Making the Maurice Knight Home More Efficient Part 2 of 3 – The Project
Last time, I delved into the history of a very unique home we were lucky enough to work on recently.
This time, we’ll look at diagnosing the home for energy efficiency upgrades and then the beginning of the upgrades. Next time we’ll finish the project!
The Diagnosis
The MA Knight Home was recently purchased by the first non-Knight family member in its 100 year existince. The new homeowners recognized that the home needed some efficiency upgrades. The new homeowner is in the financial industry, so he ran some numbers and figured he would get his money back in 7-10 years from smart upgrades, offering an attractive return on investment in addition to being comfortable. I agree with his analysis and was happy that he has realistic expectations.
The homeowner found out about Dominion East Ohio Gas’ low-cost energy audit program that offered up to $1250 in rebates and scheduled an audit. He found us on Angie’s List and read much of this blog before giving me a call. (He repeated back to me my love of turbo all wheel drive cars, so I know he spent some time there!)
A note on the Dominion program: It is a Home Performance with Energy Star program governed by BPI standards. The energy audits are contracted to Good Cents, who performs test in energy audits followed by a test out after improvements are made. I am a BPI Building Analyst, but I don’t actually perform energy audits because the program takes care of that. I primarily pursued the certification so that I could understand energy auditors, I am primarily a Home Performance contractor, meaning my job is to actually fix problems, not just diagnose it.
This Home Shows the Limitations of Blower Door Testing
There was one part of the energy audit I didn’t trust: the blower door number. The number on this home was 9930 cfm50. This is an unusual circumstance, normally they are very reliable, so let me explain.
Older homes, from experience, typically have blower door numbers 2-3 times their square footage. This home is between 8000 and 10,000 square feet, depending on how you count finished parts of the basement and the servants quarters. So I expected a number between 16,000 and 30,000 cfm50. For an explanation of the cfm50 unit, click here.
The reason for this is that blower doors are only capable of measuring 5000-6000 cfm50 before they have to start extrapolating. The more they extrapolate, the less accurate they become. This problem can be solved by hooking 2 or 3 together, but most auditors don’t carry more than one door (they are about $3000 a piece). My friend Allison Bailes recently explored the limits of blower door measurement in a blog post.
Because of this, we did not pull a final blower door number and I cautioned the homeowner to measure our success by comfort and reduced gas usage rather than a change in the BD reading.
Jargon Demystified: A blower door is a large fan surrounded by a shroud that is installed in your front door. It draws some of the air out of the house and measures the air leakage of the home.
Sizing Things Up and Picking a Scope
The homeowner was eager to make the most cost effective upgrades first, then gradually tackle more later if it seemed prudent. Attic insulation, not very shockingly, was the upgrade with the highest ROI according to the audit with $4779 annual savings. (Yep, there’s room for improvement here…) This is according to a software program that I strongly dislike, but at least I agreed with it this time.
The home is heated by the largest residential boiler I have seen, a 1.3 million BTU one (a large furnace is around 100,000 BTU, for reference). The audit said it was running at 75% efficiency.
From everything I have heard, there aren’t many options for more efficient steam boilers of this size (there are for water boilers, a different animal). So this was not first on the list.
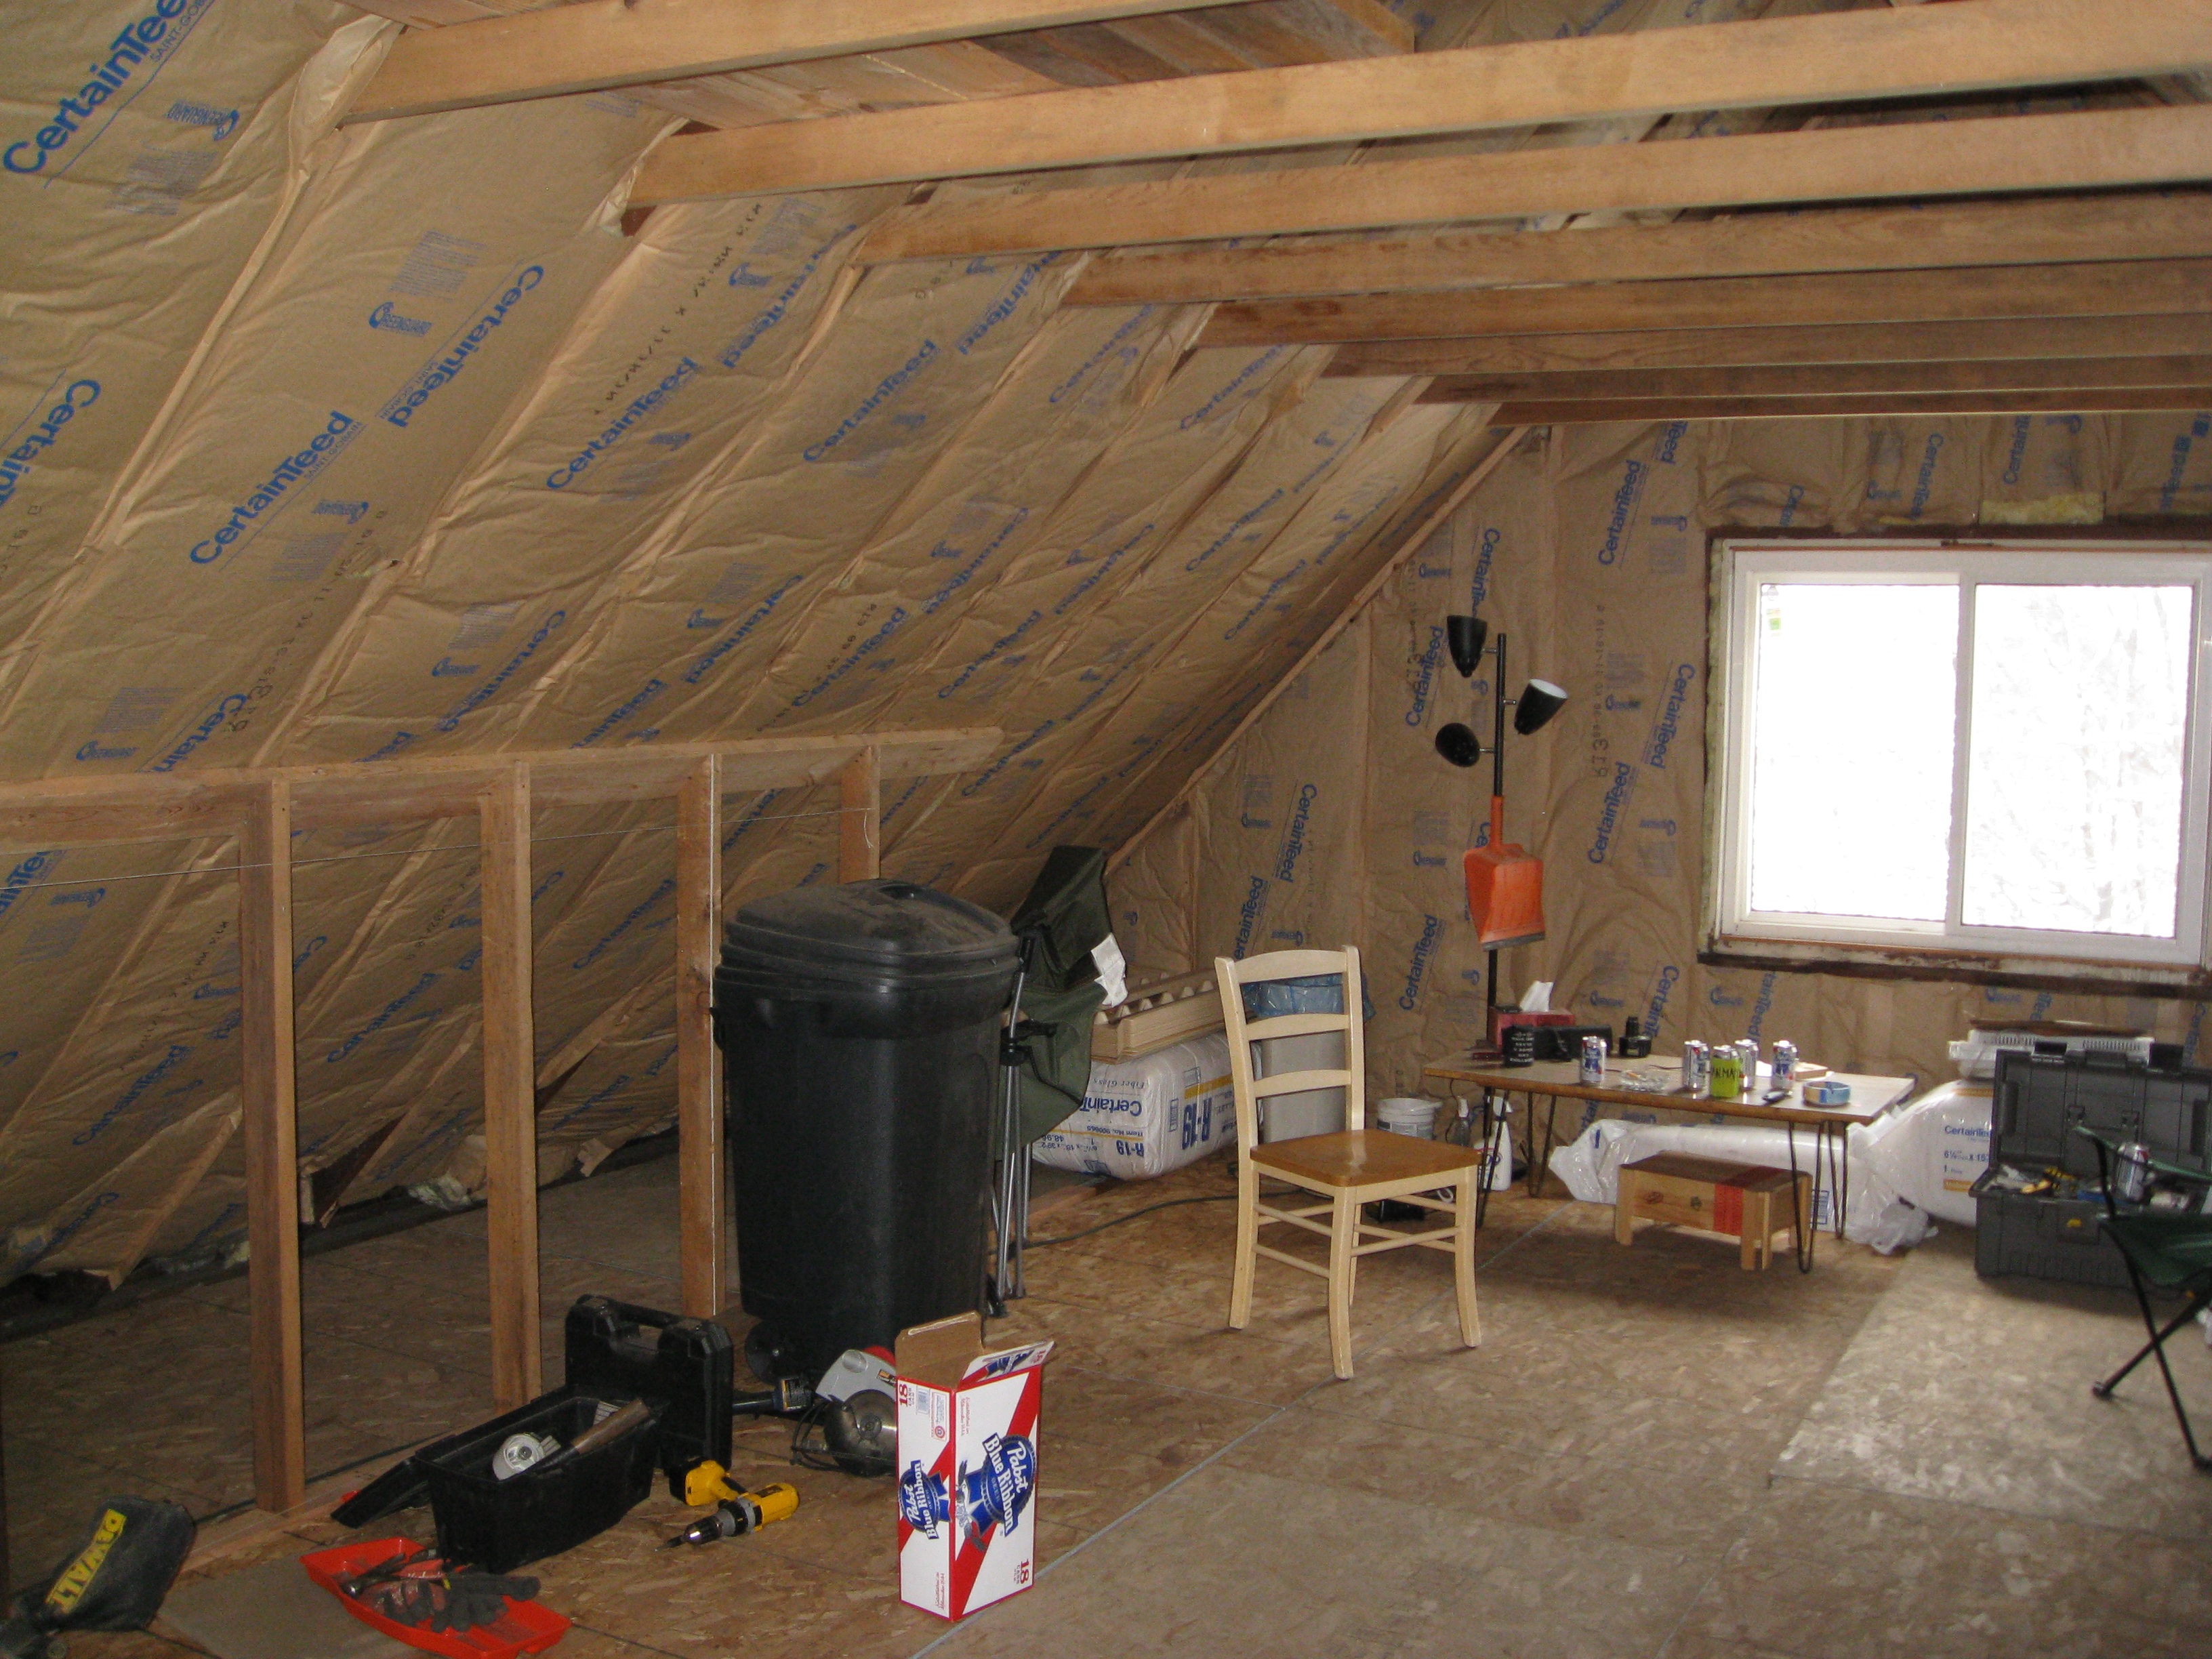
The home is built with knee walls on the third floor like most homes of this era, often known as a finished attic. You may want to check out my post on how to insulate and ventilate knee walls. Here is what that type of construction looks like before insulation.

The house is very complex and required a whopping 11 hatches to be installed in order to access all of the knee walls and attic spaces. Here is the floorplan map of the 3rd floor, sorry for the mediocre quality of the scan:
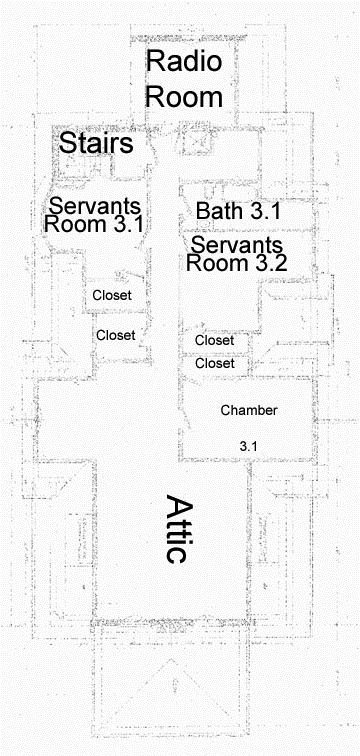
The radio room is a small area that used to house a lot of short-wave radio equipment. The part marked attic is thought to be the nursery for the Knight’s 5 children.
Here is the dormer in Servants Room 3.1 from the inside, you may note the stenciling on the ceiling from the Akron Junior League:
The hope, as always, is to provide ventilation to the knee wall attics. The roof has a ridge vent, so attic exhaust ventilation was covered. My preference for intake ventilation is for soffit vents, followed by gable vents. Here is the soffit of the house just outside the right window in the picture above:
My hope was to cut 4″ x 16″ brown soffit vents into the soffit area just over the window. There were 2 problems with this. First, the area was not tall enough to accept the vents, and second that area does not open into the attic area hardly at all:
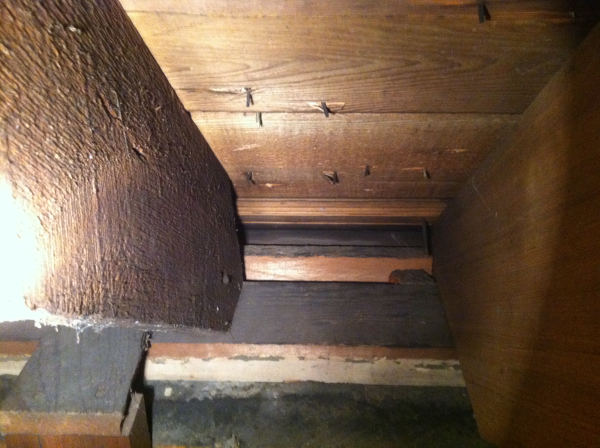
Because of this, I recommended that the homeowner have gable vents installed by a mason, since cutting through stone walls in 1913 mansions is a little beyond our usual scope.
Aside from that, I recommended my standard procedure for insulating and air sealing knee walls:
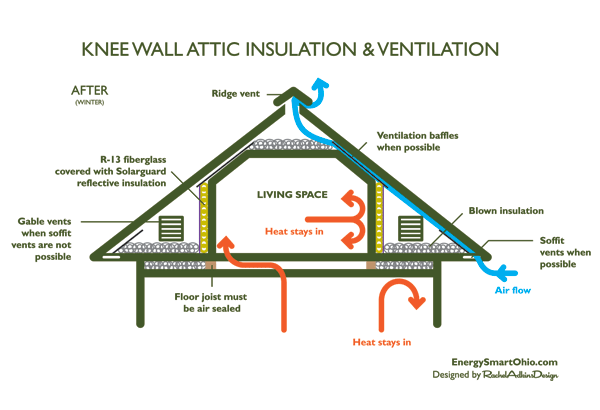
There was one twist, rather than insulating the knee walls with R-13 fiberglass rolled insulation covered with Solar Guard reflective insulation to prevent convection losses, we installed R-13 batts covered with R-30 rolls, a trick I learned at a trade show. The R-30 will just fall over if it isn’t held up, and is also prone to convection, so we cover it with house wrap to both hold it up and keep the attic air from robbing the fiberglass of R-value (a subject for another post).
The Work
Strangely enough, the actual project wasn’t that tricky, it was just big. I told the homeowner when quoting him that the house is 3-4 times the size of a typical knee wall house job, so expect the price to be 3-4 times of a typical knee wall job ($3500-$5000). My crew really enjoyed the job because it was a cool house and they knew what they were in for the next day, since it took 6 days.
My guys got a work out on this one, we had to carry a ton of insulation up the stairs. Here is the large nursery area on the third floor before we got there:
And while we were there:
You can see the fiberglass precut for knee walls.
While the knee wall insulation is important, the truly critical part of insulating knee walls is air sealing. These homes are notoriously leaky, the worst blower door numbers I’ve seen have all been on 1.5 and 2.5 story homes with knee walls. Let’s take a look at this process:
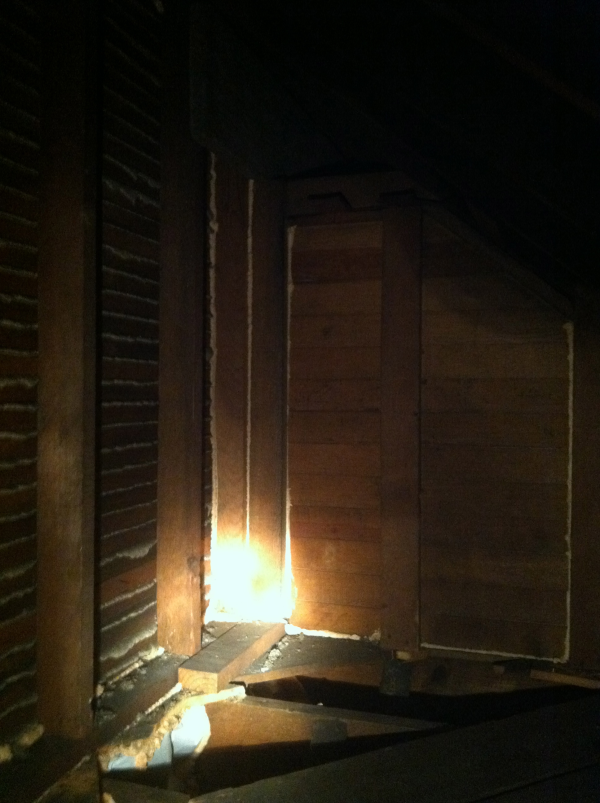
This is a corner inside a knee wall. On the left is the plaster sticking through the lath. On the right is the back of a built in storage cabinet, more on that later. The vertical orange lines are potential air leaks that have been sealed with fireblock foam. Note the white at the lower left of the picture. That is vinyl-faced fiberglass with foam around it to seal the floor joist below the knee wall. Here is a close up of a tricky floor joist after it was sealed:
Scot, who is my crew member responsible for air sealing, and who is ridiculously passionate about kicking air leagage’s butt, was responsible for this one floor joist with a gas line running through it.
If you’re thinking these are some of the least sexy pictures you’ve ever seen, you’re probably right. Well, I guess People of Walmart can give us a serious run for our money… What we do isn’t sexy, but it works.
One last picture to show the throroughness of the air sealing of the knee walls. Note the floor boards that had to be cut to be able to access below the floor joists. Also look at the bottom of the wall where Scot suspected some air leakage and foamed it.
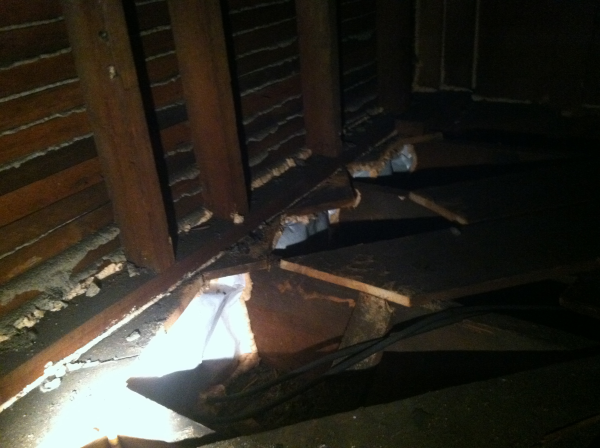
I’d just like to take a moment to say thanks to my guys, Clayton, Scot, and Craig here for making me look good, it is their hard work in these crummy, dirty, tiny, uncomfortable little spaces that makes all the difference. They didn’t let some floorboards stop them, they just got the circular saw. And they didn’t let those wires stop them either, they made sure that cavity was sealed too. That’s the mark of people who care about what they do, and it let’s me sell with great confidence that the job will be done right.
Well done air sealing in a home like this is absolutely essential to good Home Performance. Which brings us to the surprise we found, and a good place to break. Click here to read part 3!
Would you like to have your own home looked at with this level of care? If you live in the Cleveland or Akron areas, just call 330-524-6495 to set it up!
Related Articles:
Making the Maurice Knight Home More Efficient Part 1 of 3 – The History
Making the Maurice Knight Home More Efficient Part 3 of 3 – The End
How to Insulate and Ventilate Knee Wall Attics
How Much Does Attic Insulation Cost? A Helpful Guide.
Insulation and Air Sealing: Extreme Coffee and Tea Edition
Fix Your House for Free! The Magic of Energy Efficiency Financing
Get the HVAC Guide

It's free! Make buying a new furnace, air conditioner, or heat pump less stressful.


