The master bedroom dipped into the 50s on cold nights. To combat it, Ryan and Kim cranked the heat, only to wake the kids up sweating.
Some ice melt came through the ceiling as well. There was some work to do.
Some ice melt came through the ceiling as well. There was some work to do.
Summary
Ryan and Kim recently bought this home as a place to dig in and raise their two young children. It has a lovely spot at the end of a cul-de-sac, well off the road on a big lot, which suits their private natures. The home has plenty of space for their kids as they grow up. Being in Geauga county, the schools are excellent, the taxes are a bit lower, and no one will look at them askance if they want to ride a four wheeler or four. Since they are both mechanical engineers, they love the thought of outdoor toys. In short, it was perfect.
Well, almost. Their bedroom runs 10 degrees cooler than the rest of the house on cold winter days, enough that it can be hard to sleep. To make up for it, they turn up the heat which overheats the kids’ rooms, waking them up sweating. (At 4 and 2, this is a bad scene…) Being in the snow belt, they get a ton of snow. Which leads to a bunch of icicles anywhere there is a gutter. Last year, a little water leaked into the living room, freaking them out. There was some work to do.
Post project, temperatures in the house are far more even, the master bedroom is no longer frigid, and icicles are almost eliminated. Following is the story of how we did it.
Photo Album
See a bunch of project photos here:

Problems
- Summer comfort 7/10, winter comfort 6/10 (10 being amazing).
- Master bedroom 10 degrees cooler than the rest of the house on cold days.
- Kids’ rooms run 5 degrees warmer than the main floor, waking them up.
- Lots of icicles everywhere, some leakage in living room, concern of a major intrusion.
- Very dry skin in winter for Kim (a sign of air leakage).
- Summer comfort is poor, AC runs a lot, but second floor is 5-10 degrees warmer.
- Basement is frigid in winter.
Results
- Summer & winter comfort up to 9.5/10 in both seasons.
- Master bedroom runs within a few degrees of the rest of the house
- Kids’ rooms run within a few degrees of the rest of the house
- No icicles so far, with the exception of minor ice below the chimney and bath fans (which are unavoidable, since heat comes out of them)
- Dry skin much better, but still a bit dry.
- Air conditioner never runs on high stage anymore, where it used to run there most of the time (loudly.) Humidity levels stay impressively low, near 40% relative humidity. Anything under 50% is doing awesome, especially with a muggy summer.
- Basement was beyond budget. It is still cold.
Client Feedback
Ryan, 1/5/16: “Some notes for the three zones and the house in general. Below 45-50 degrees the Ecobee in zone 1 set at 74 feels good.
As the outside temp goes up I have turn it to 70 or it feels hot in the house. It was 5 degrees outside this morning, Ecobee is set at 74. The other thermometer I have in zone 1 (with the Ecobee) is near the windows reads 71 like usual over there. The master in zone 2 was at 71 measured. The upstairs was at 74 measured. Feels good so far. I need to run my humidifiers though, it is dry.”
Ryan, 1/6/16: “The house feels good mostly all over 10. No crazy temp swings, (except the basement 5 and little front room 8).
The big fireplace living room and the master bedroom are considerably warmer than last year, much much better. The upstairs is not collecting all the heat, so it is cooler and controlled which is good and better.”
Ryan 1/20/16: “It was 1 degree outside at my house today. My bedroom was 70, much better than 58 last year. No icicles yet.” (Later, minor icicles formed below the chimney, which is a heat source because of the boiler and water heater.)
Ryan 5/30/16 – A Hot Day: “We have the house set for 74 reading from the upstairs sensor. The ecobee usually reads 74-72 down stairs. Across the room reads 71 on the ac remote room unit. House feels good.
Comfort is better this year. The kitchen does not have the warm spot it did last year. Also the a/c has a triple stage fan, I don’t think it has gotten up to the full power to push air lately. It used to be at full power a lot, very loud and noticeable.
Last year average summer comfort, 7. This year 9.5.
Last year average winter comfort, 6. This year 9.5.”
11/15/16 Kim: “I do believe that my skin has been less dry since the changes we made. It can still be an issue but doesn’t seem to bug me as much as it used to.”
Upgrades
-
Air Sealing and Insulation
- Upper Attic – Removed insulation, removed whole house fan, new air sealed hatch, air sealed, installed R-49 blown cellulose.
- Knee Wall Attics – Removed insulation, closed cell foam on roof deck.
- Basement – Closed cell foam in rim joists.
-
HVAC
- Backdraft sensor on water heater
- Ecobee EMS-02 thermostat for first floor boiler zone for datalogging
- New duct to Ryan’s office
-
Other
- New (and quieter) bath fan on second floor, with hard, insulated lines vented through the roof.
Full Story
This is the full monty with pictures, explanations, and all. It’s not short. If you’re getting bored, download the Home Performance 101 Guide to your right, check out other case studies, read the blog, or if you’re ready to start click “Get Started” at the top right. Still with me? Let’s dive in.
As seems to be almost standard for our jobs, Ryan and Kim have an amazing yard with a house whose comfort leaves a lot to be desired. Here’s the story of diagnosing the home, coming up with a plan, executing it, then following up after the project.
Diagnosis
This house is a Cape Cod, which means it basically has a finished attic. If you had X-ray vision, it would look like this from the side:
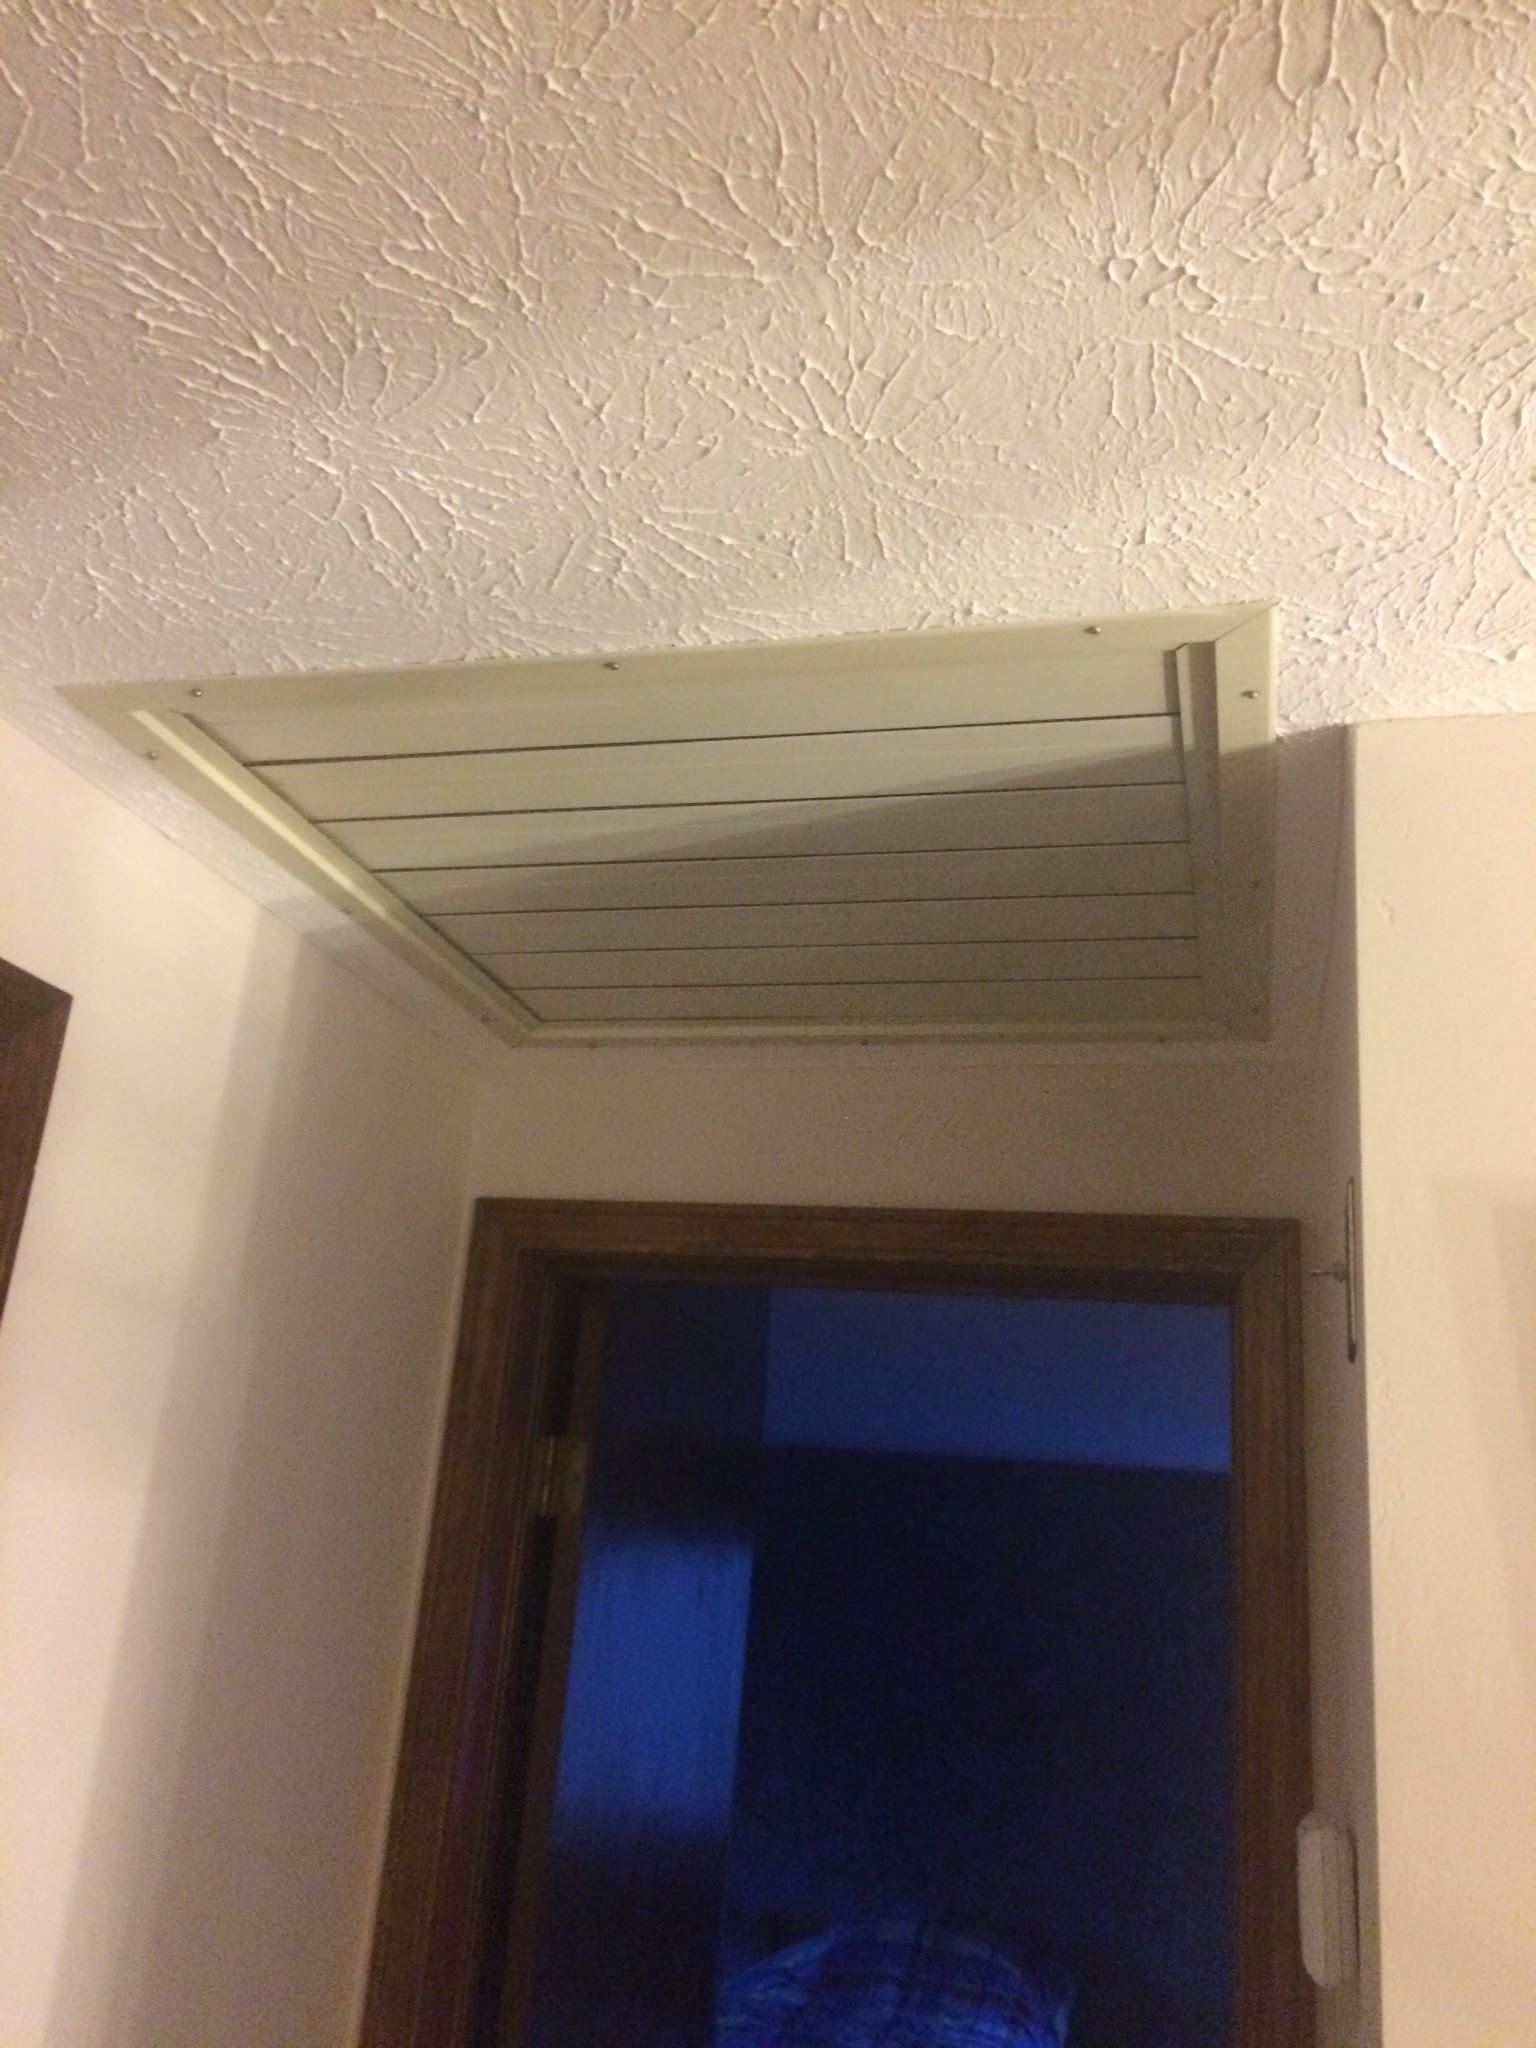
Most Cape Cods are confused. The attic spaces don’t know if they are inside or outside. The attics can either be inside or outside, but they have to pick one. The hatches usually are very leaky. Typically when I turn my blower door on (a big fan that blows air out of the house), when we pop the attic hatch open, we are slammed in the face with a ton of air because that area is so leaky. Here’s one of the hatches:
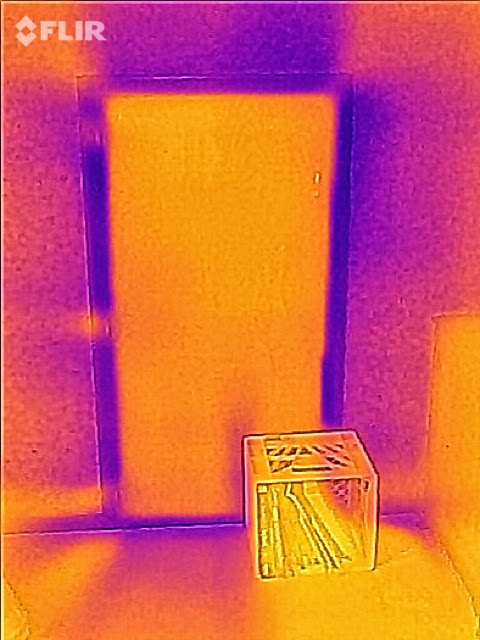
This is a hatch in infrared. It looks like a scene from Poltergeist. It was cold outside, so blue is bad. Blue air is blowing out everywhere. The hatch had so much pressure on it that we had to put a crate of books against it to hold it closed!
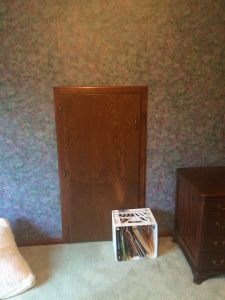
This is the same hatch with a normal picture, looks fine, right? Behind it lies the root cause to many of the comfort problems in this house.
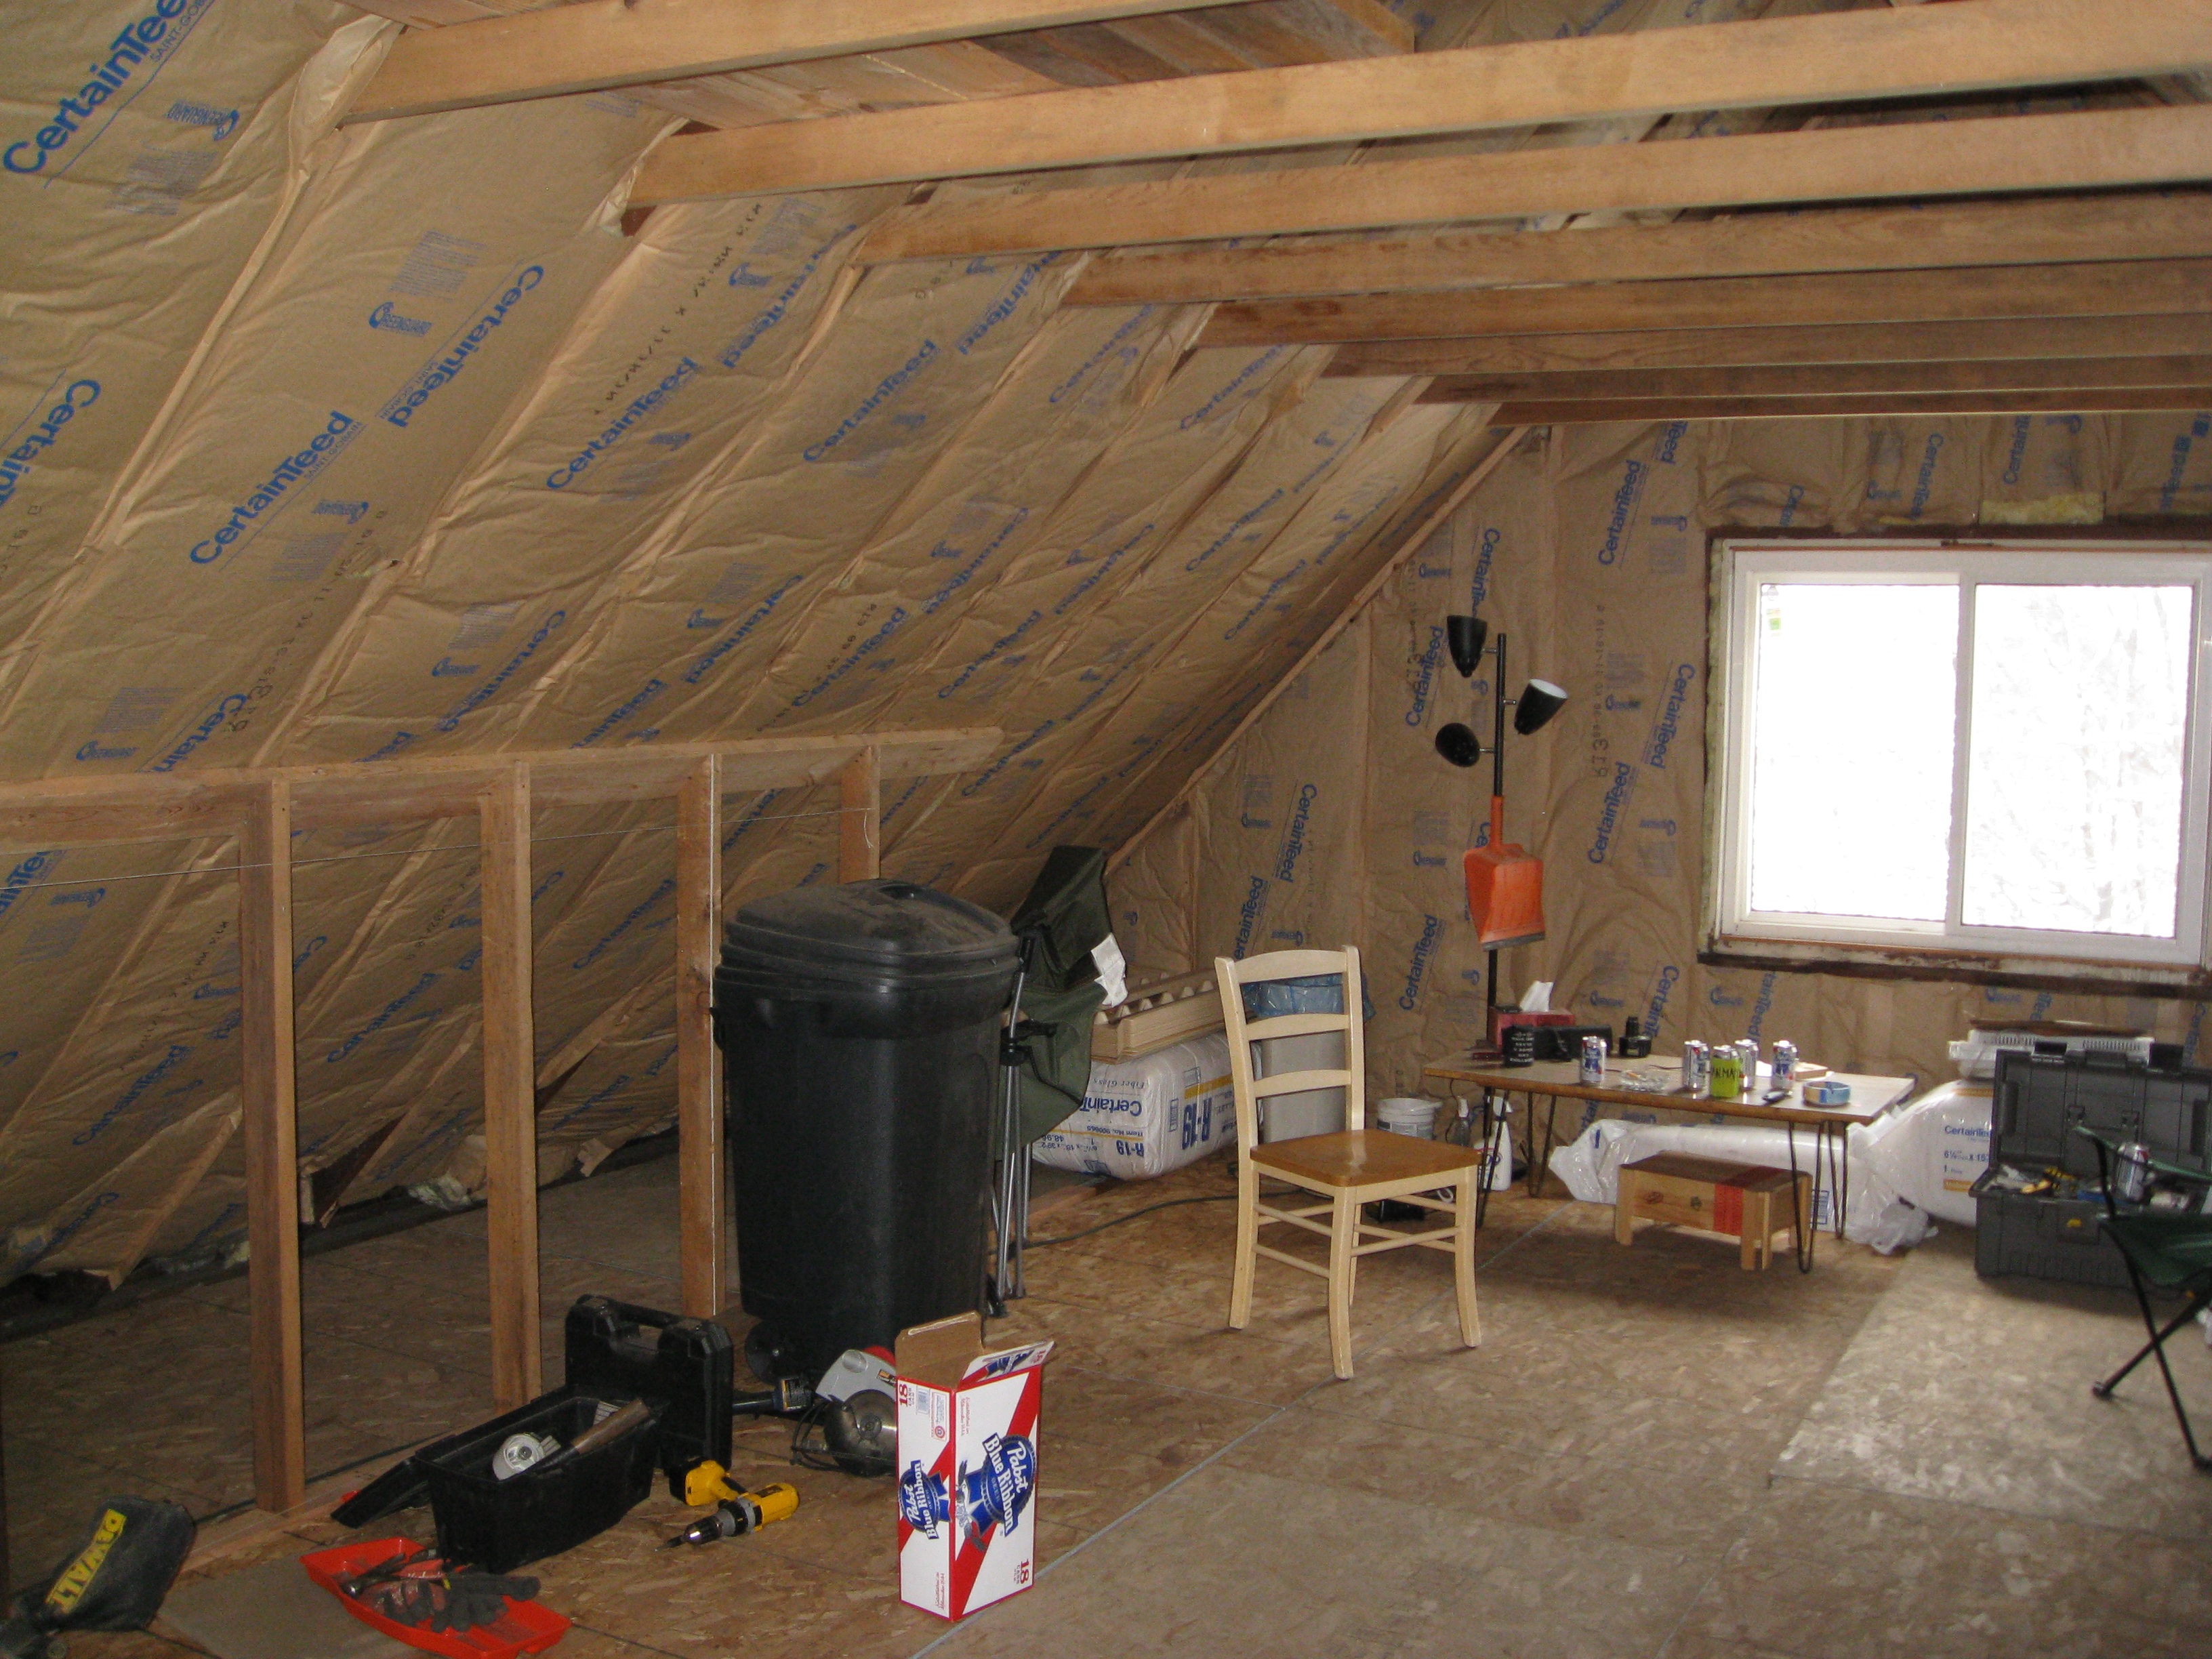
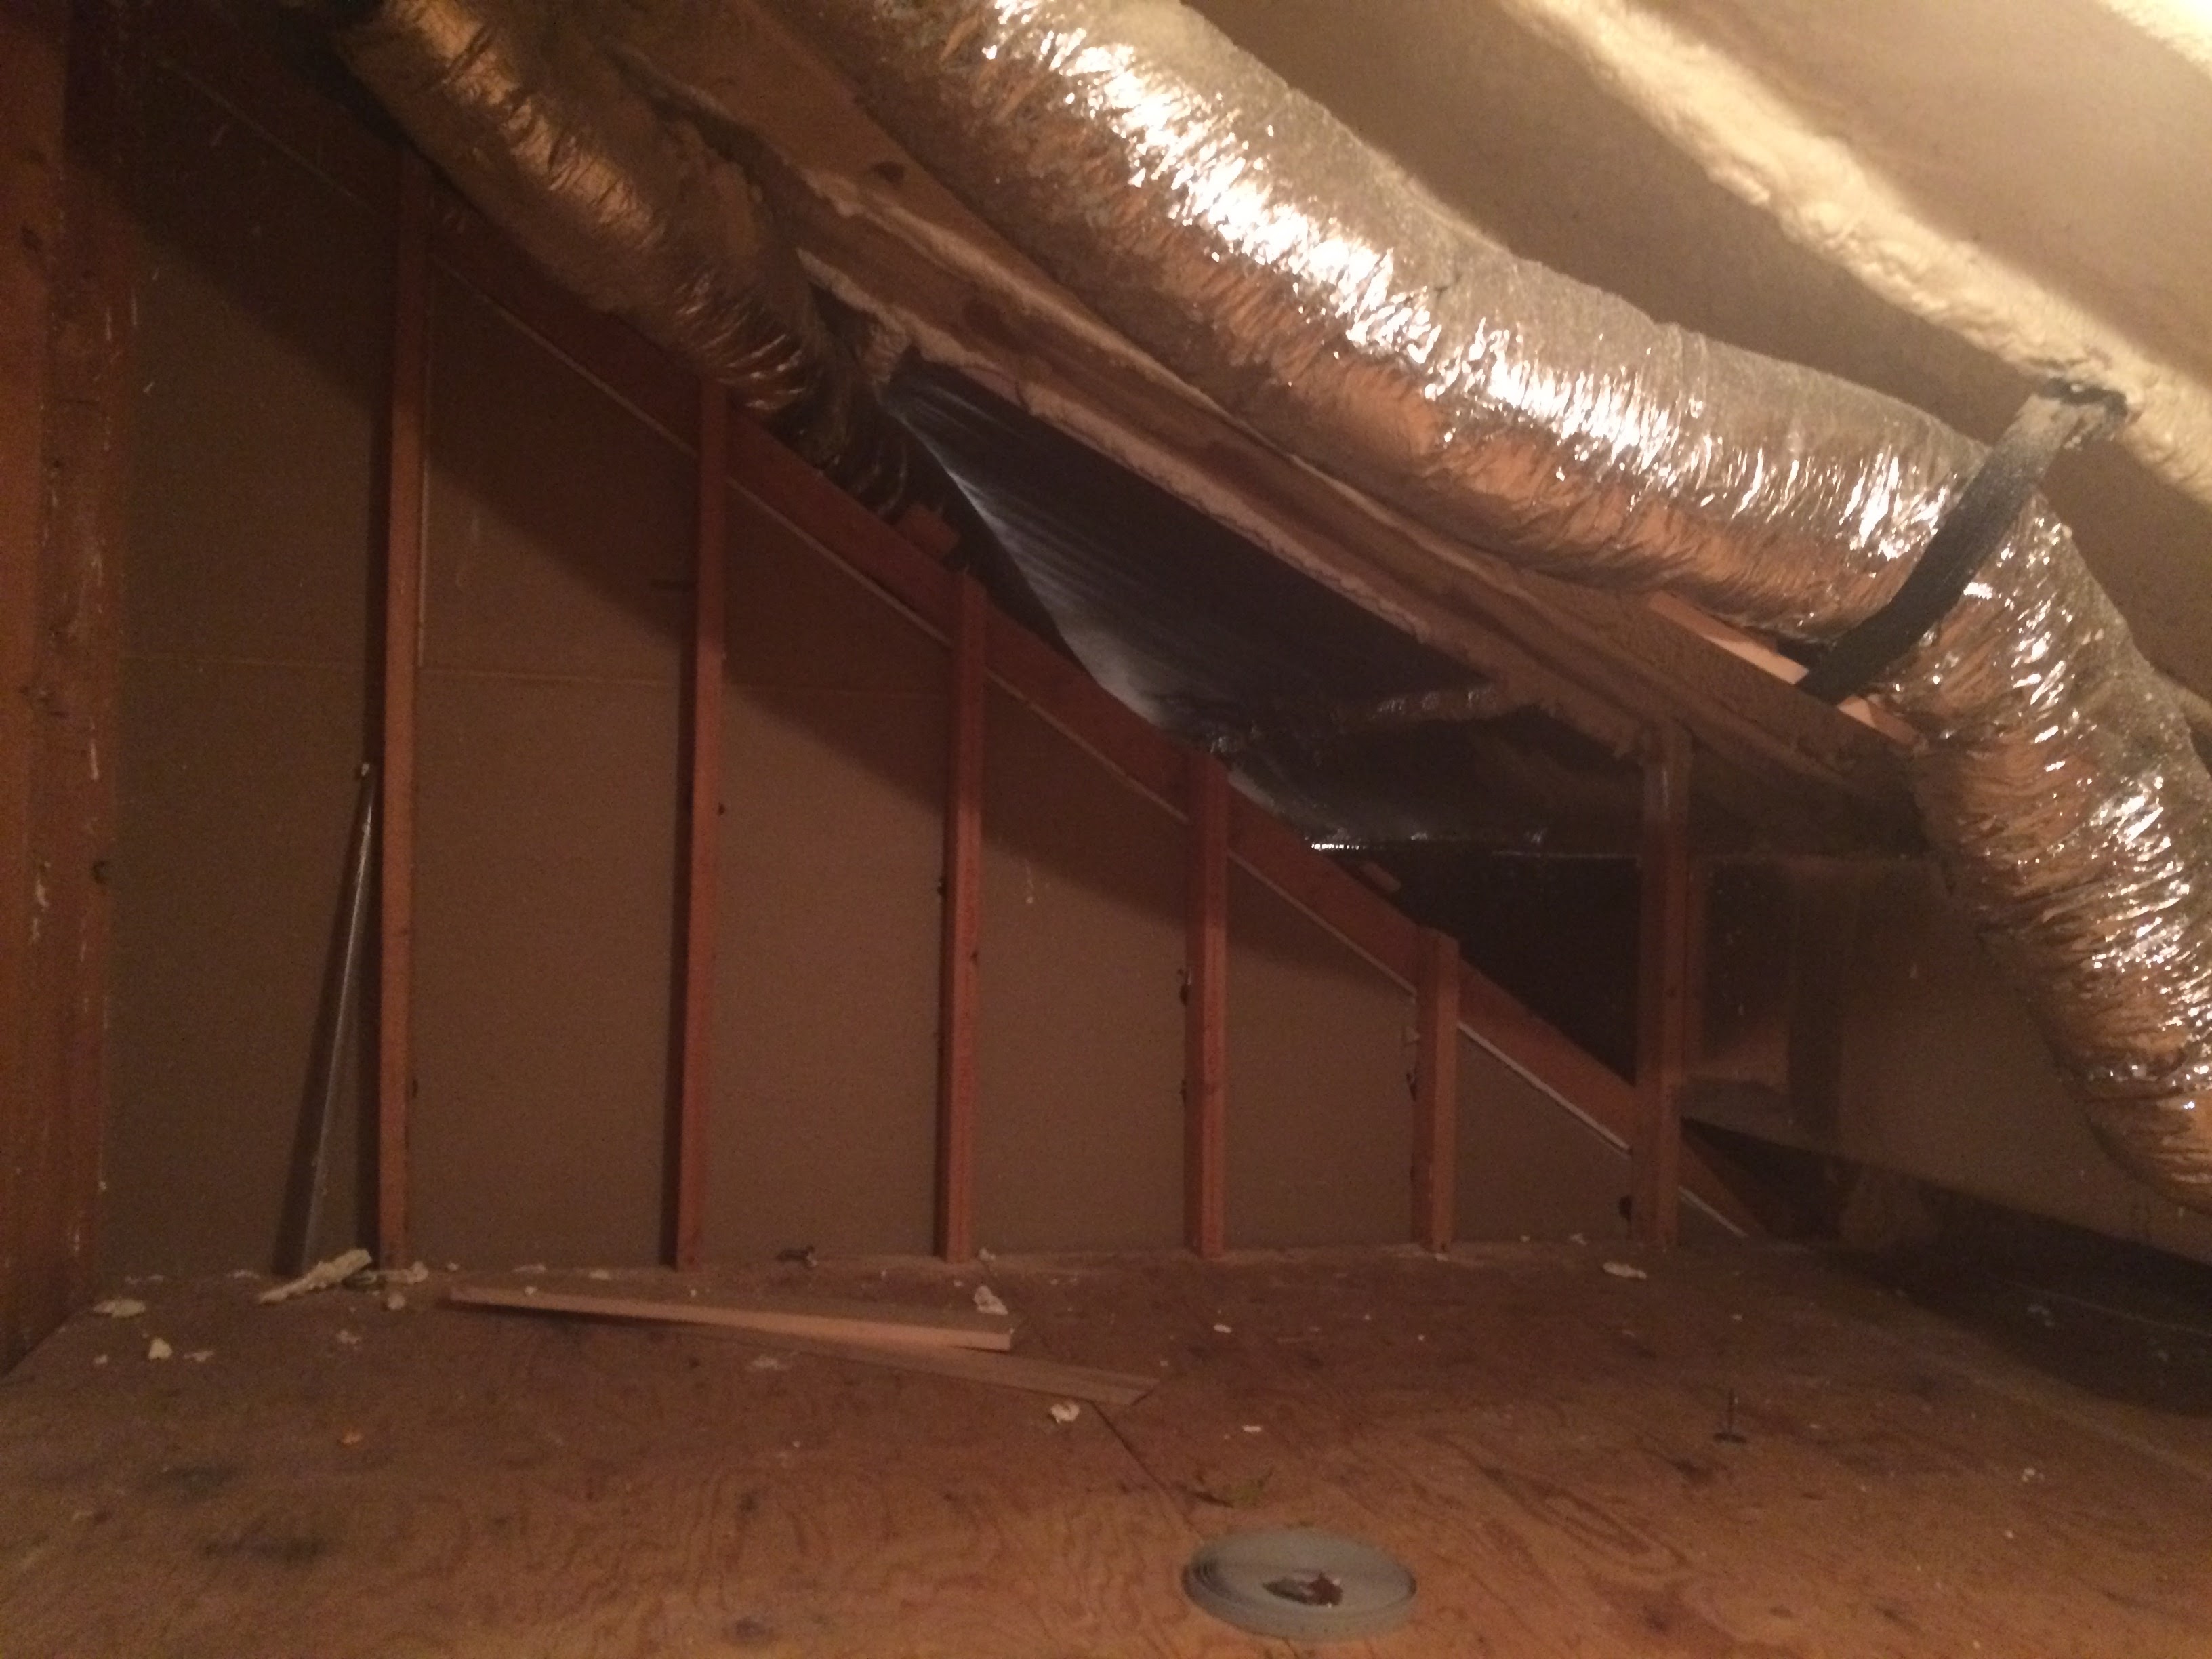
Inside the hatch is the air conditioner for the house and a bunch of ductwork, which caused a lot of the problem. Here’s what it looks like inside the attic behind that hatch:
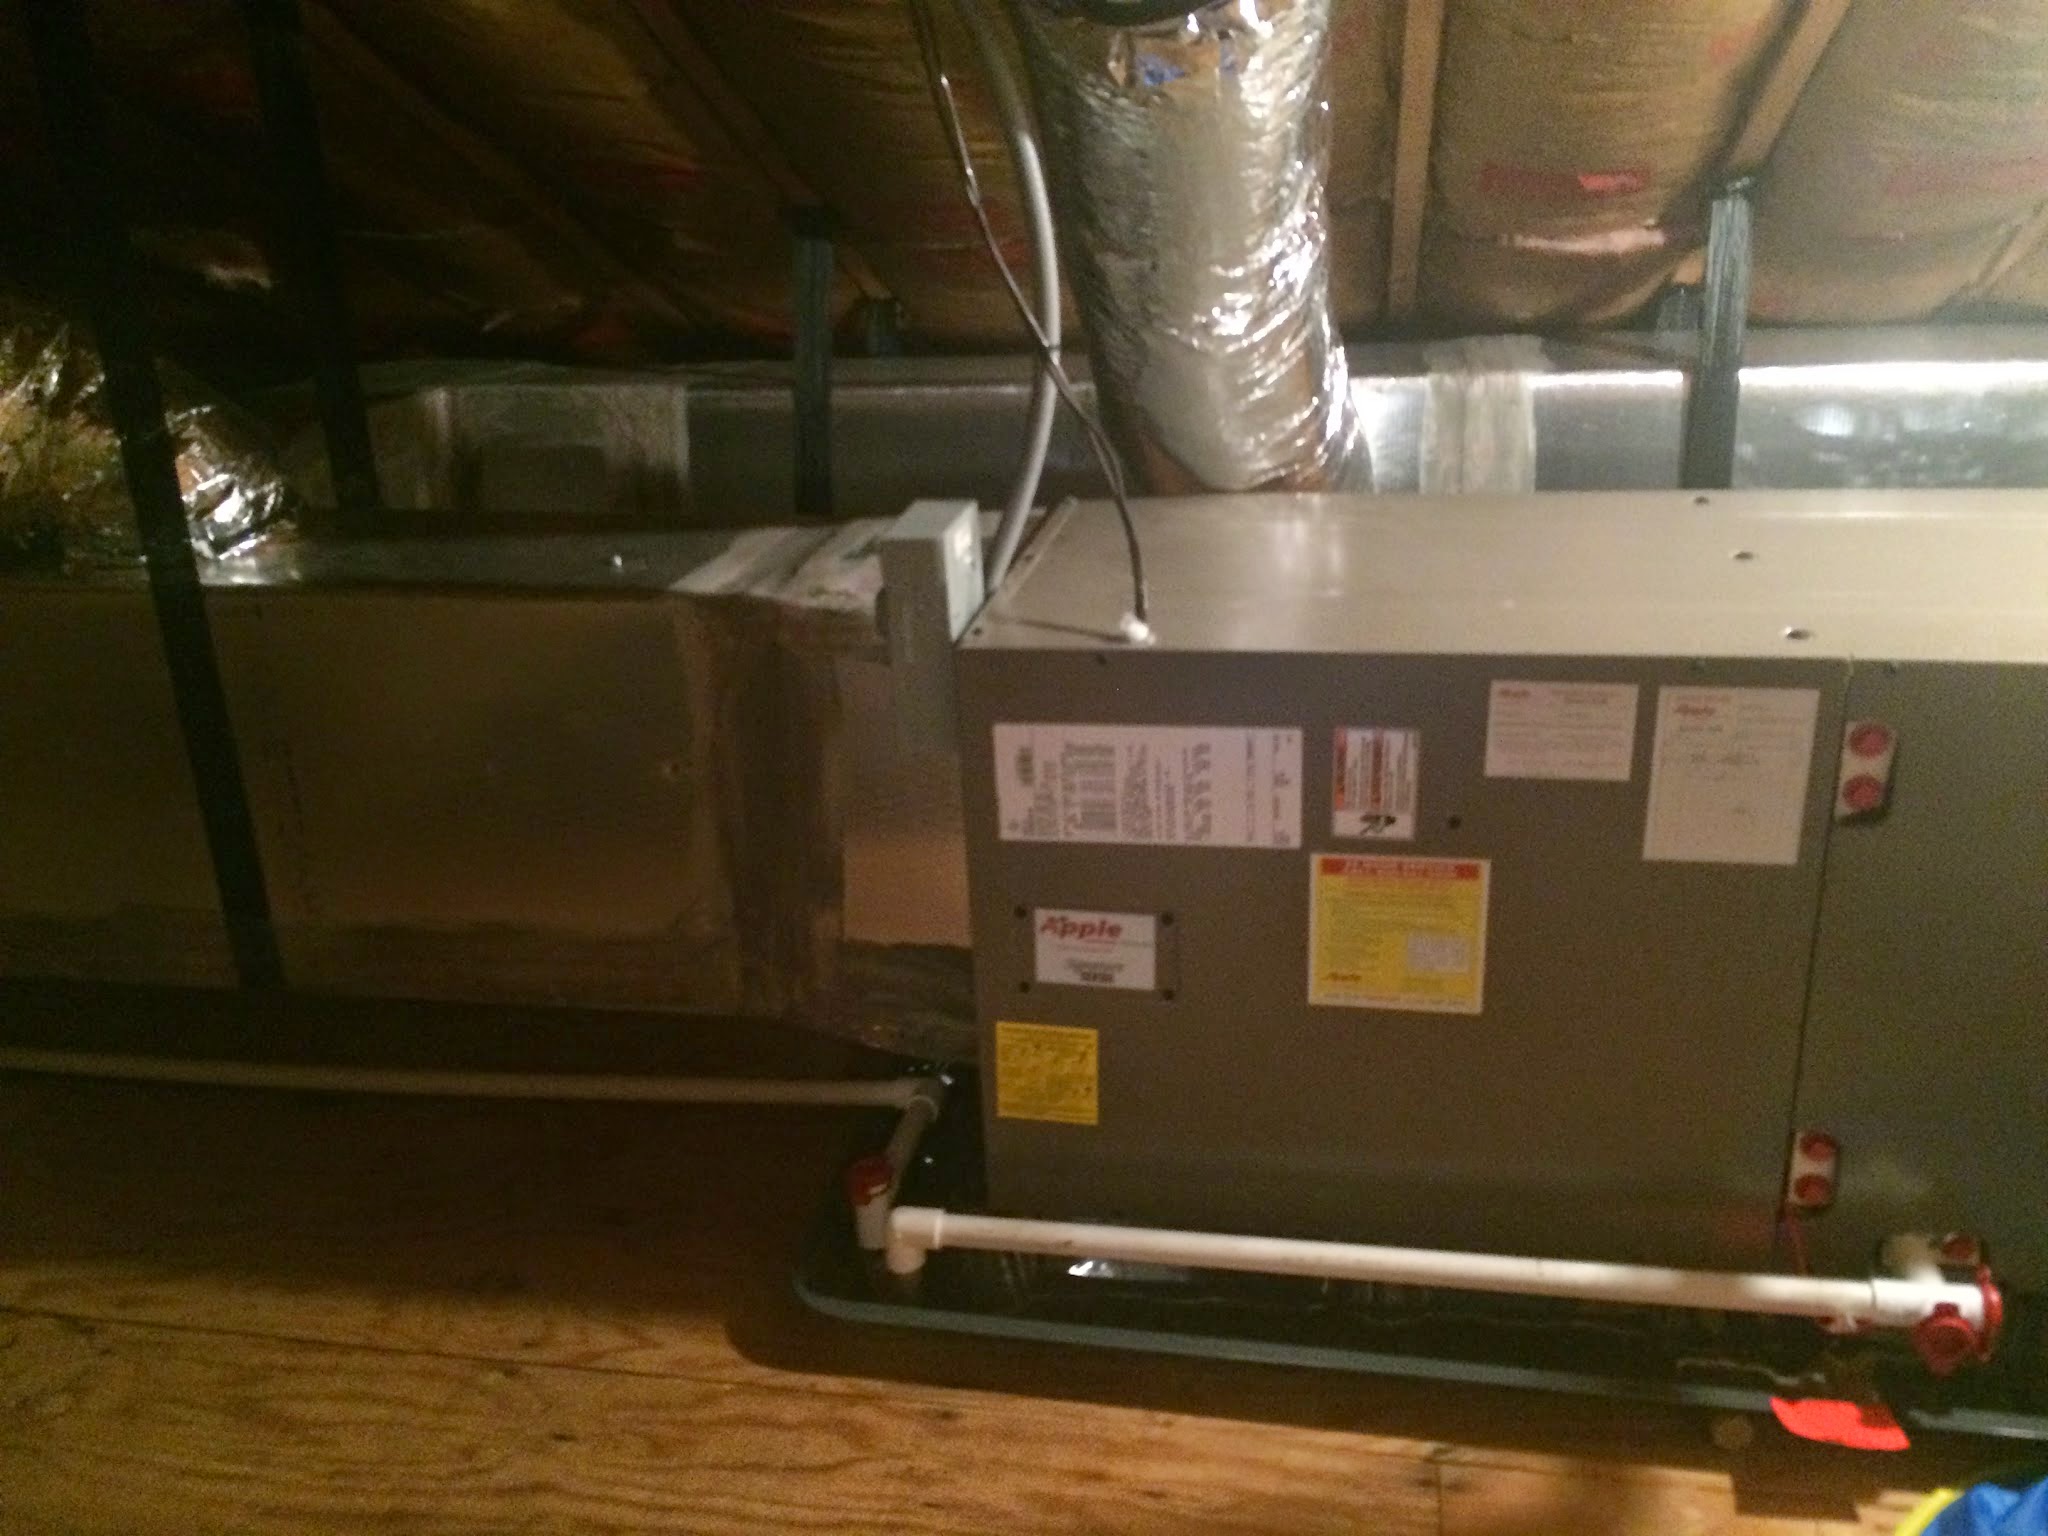
Note the fiberglass insulation on the ceiling. This attic was supposed to be inside the house. The problem is, fiberglass does not stop airflow. Check out the duct in the middle of the picture going up. Here is what it looks like going into the main attic, which is above this one over the second floor ceiling:
Look at the hole to the left of the duct. When the HVAC crew installed this duct, they didn’t seal the hole they punched through the already porous fiberglass. (Fiberglass can work just fine, by the way, but it needs to be in a sealed box to work best.) With the blower door sucking cold (blue) outdoor air into the house, it looked like this:
That hole is leaking like crazy! There were a number of ducts going up through this same spot, all of them leaky. They needed to be addressed.
The foyer of the house was also very leaky, it’s part of the same attic shown above:
Here it is in infrared:

Note the blue near the bottom left. The front porch is just beyond that, but it doesn’t know if it’s inside or outside. So it leaks. That spot is very small to get to, it was a real challenge to address. This house was a claustrophobic nightmare on a lot of fronts, that was one of them.
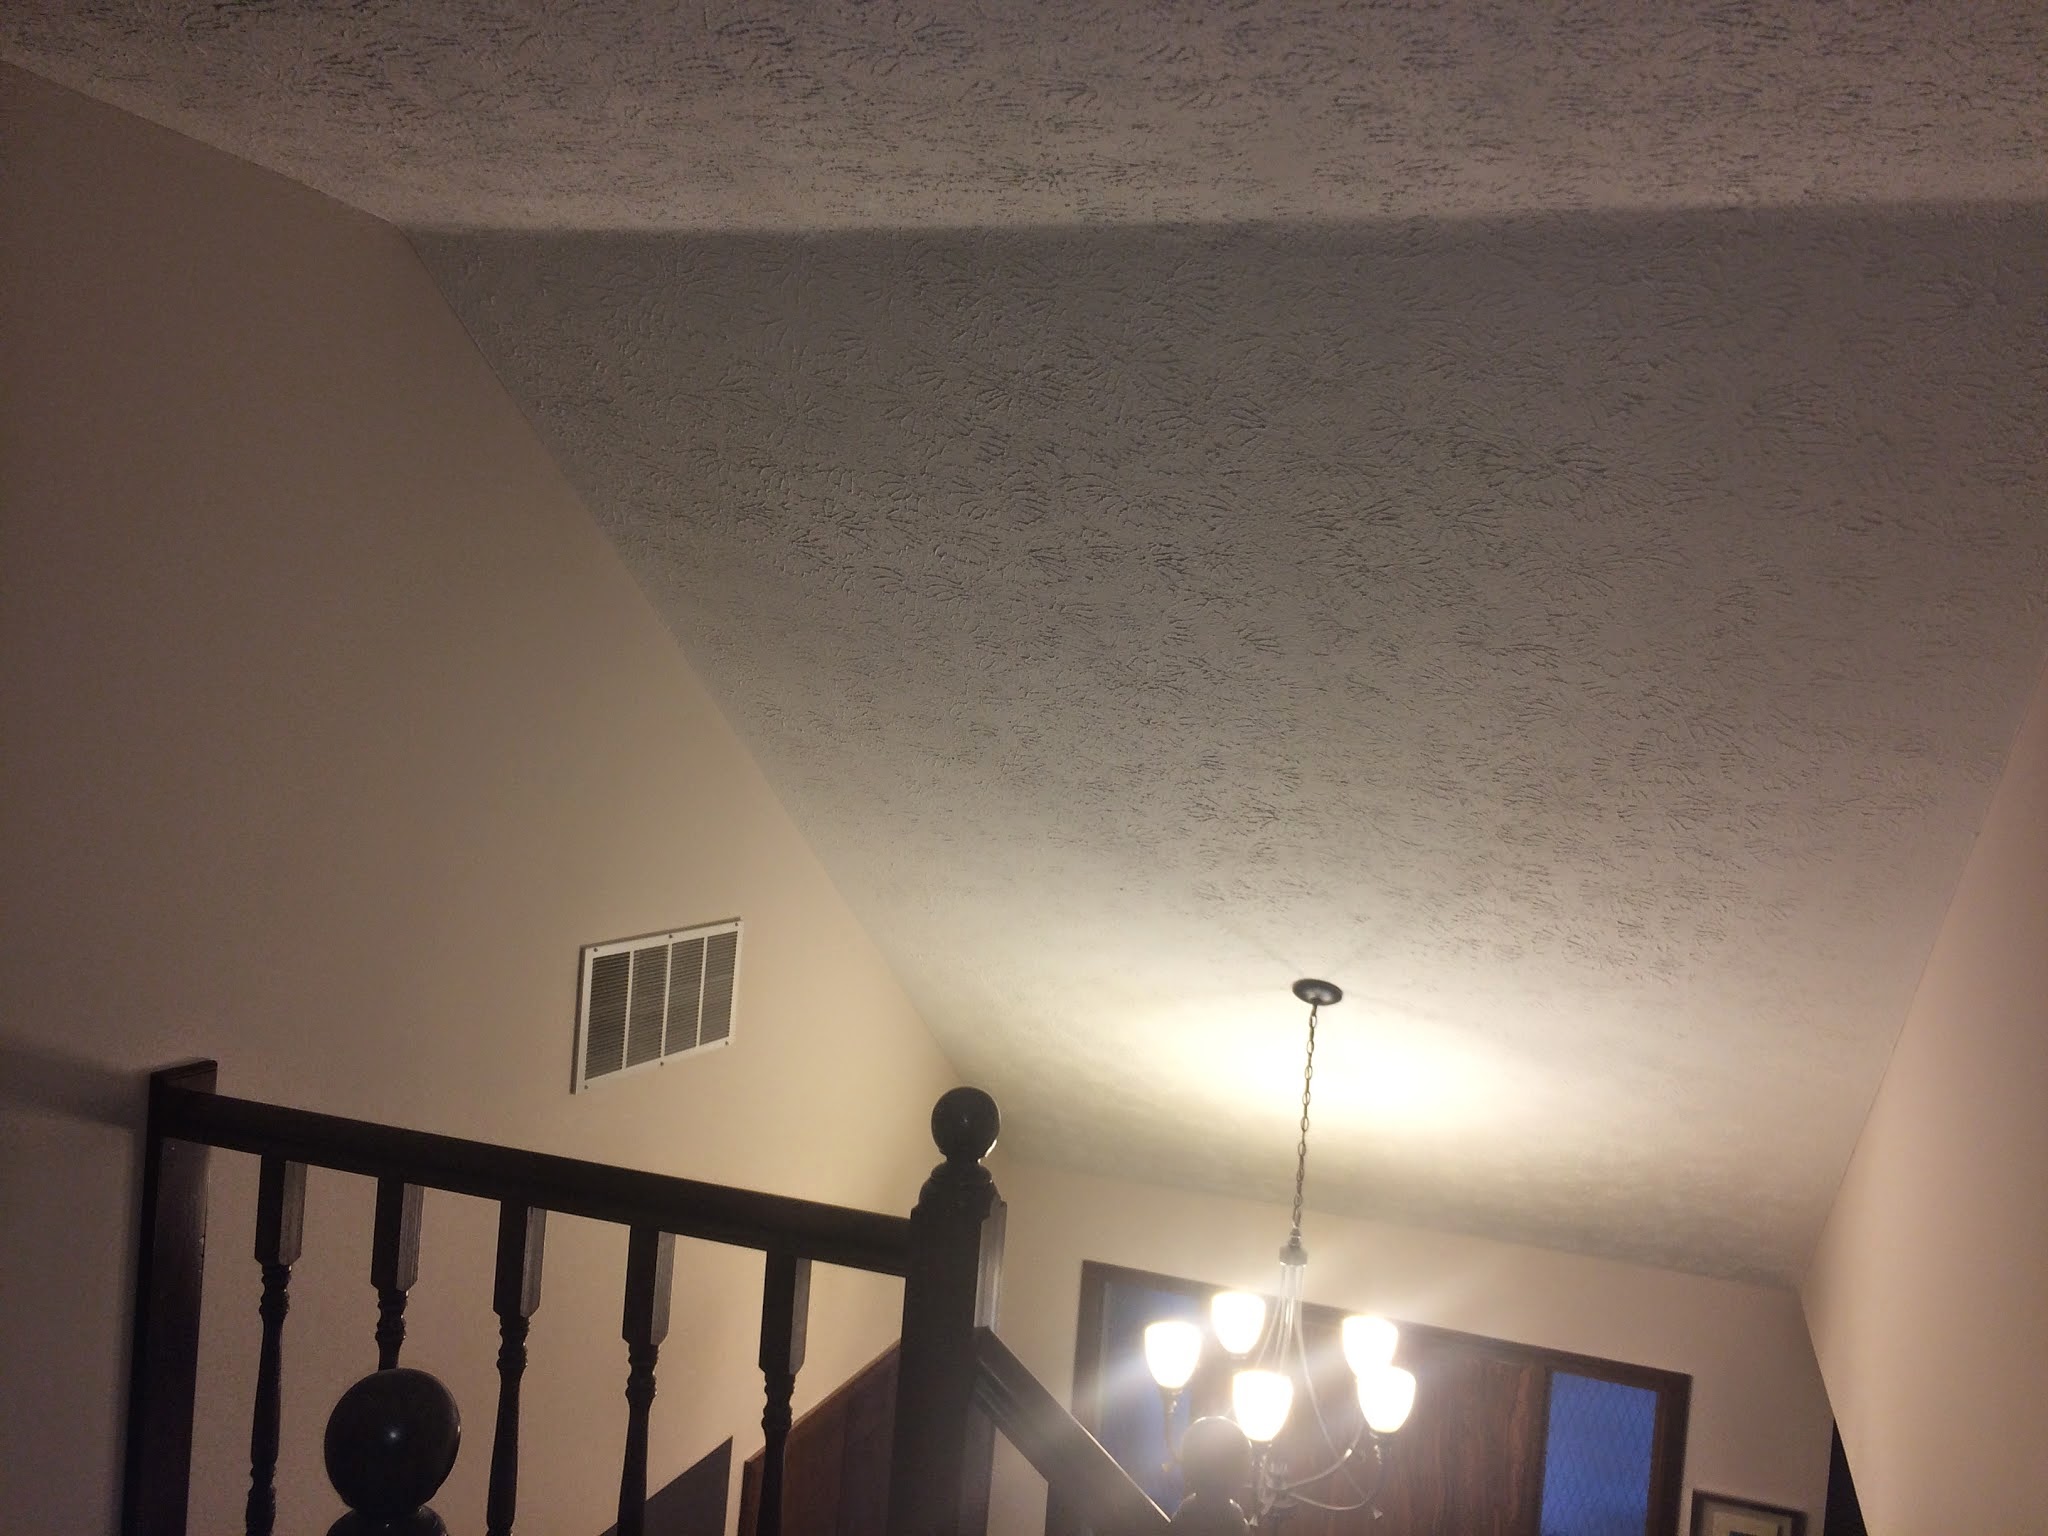
I’m not a fan of whole house fans, they tend to be very leaky and don’t work all that well anymore because nighttime temperatures here in Cleveland are staying a good bit higher than they used to. So you just end up with a leak, like this:
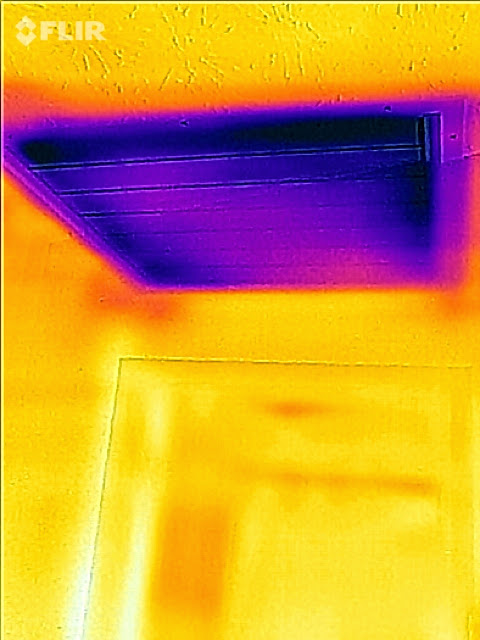
Yikes! That is seriously ugly. Tons of leakage. Here’s the visible picture of it:
The top of the stairs is uncomfortable because of this. The thermostat for the air conditioner is on the wall in the bottom right of the picture. Because this leaky spot is right above the thermostat, hot attic air can leak onto it in during the summer and run the AC more than it would otherwise. Everything is interconnected.
The Project
The fun part of working with mechanical engineers is that they are spreadsheet wizards. Gandalf level. They took my fairly rudimentary spreadsheets and tweaked them to include budgets and staging of the work. Some of what they did is now part of our standard process.
Since both Ryan and Kim are used to managing projects, they understood that things shift and move around a lot during a project, but if you keep budget in the back of your mind, it’s remarkable how often you can come close to it.
This house was particularly leaky, a nearly 7000 point blower door number. That is borderline obscene for a house of this era. I would expect that in an old suburb like Shaker Heights where the homes double as sieves, but not in a home built during the oil embargoes.
That means that the primary focus on this home was sealing it up. The R-values on the home barely budged. We took out R-20 fiberglass in the knee wall attic and installed R-20 closed cell spray foam. The attic was R-30 fiberglass, we bumped it to R-49 cellulose.
But, and this is a big but, we sealed the heck out of the house. We achieved a 54% leakage reduction, but I do have to say this one was a nail biter.
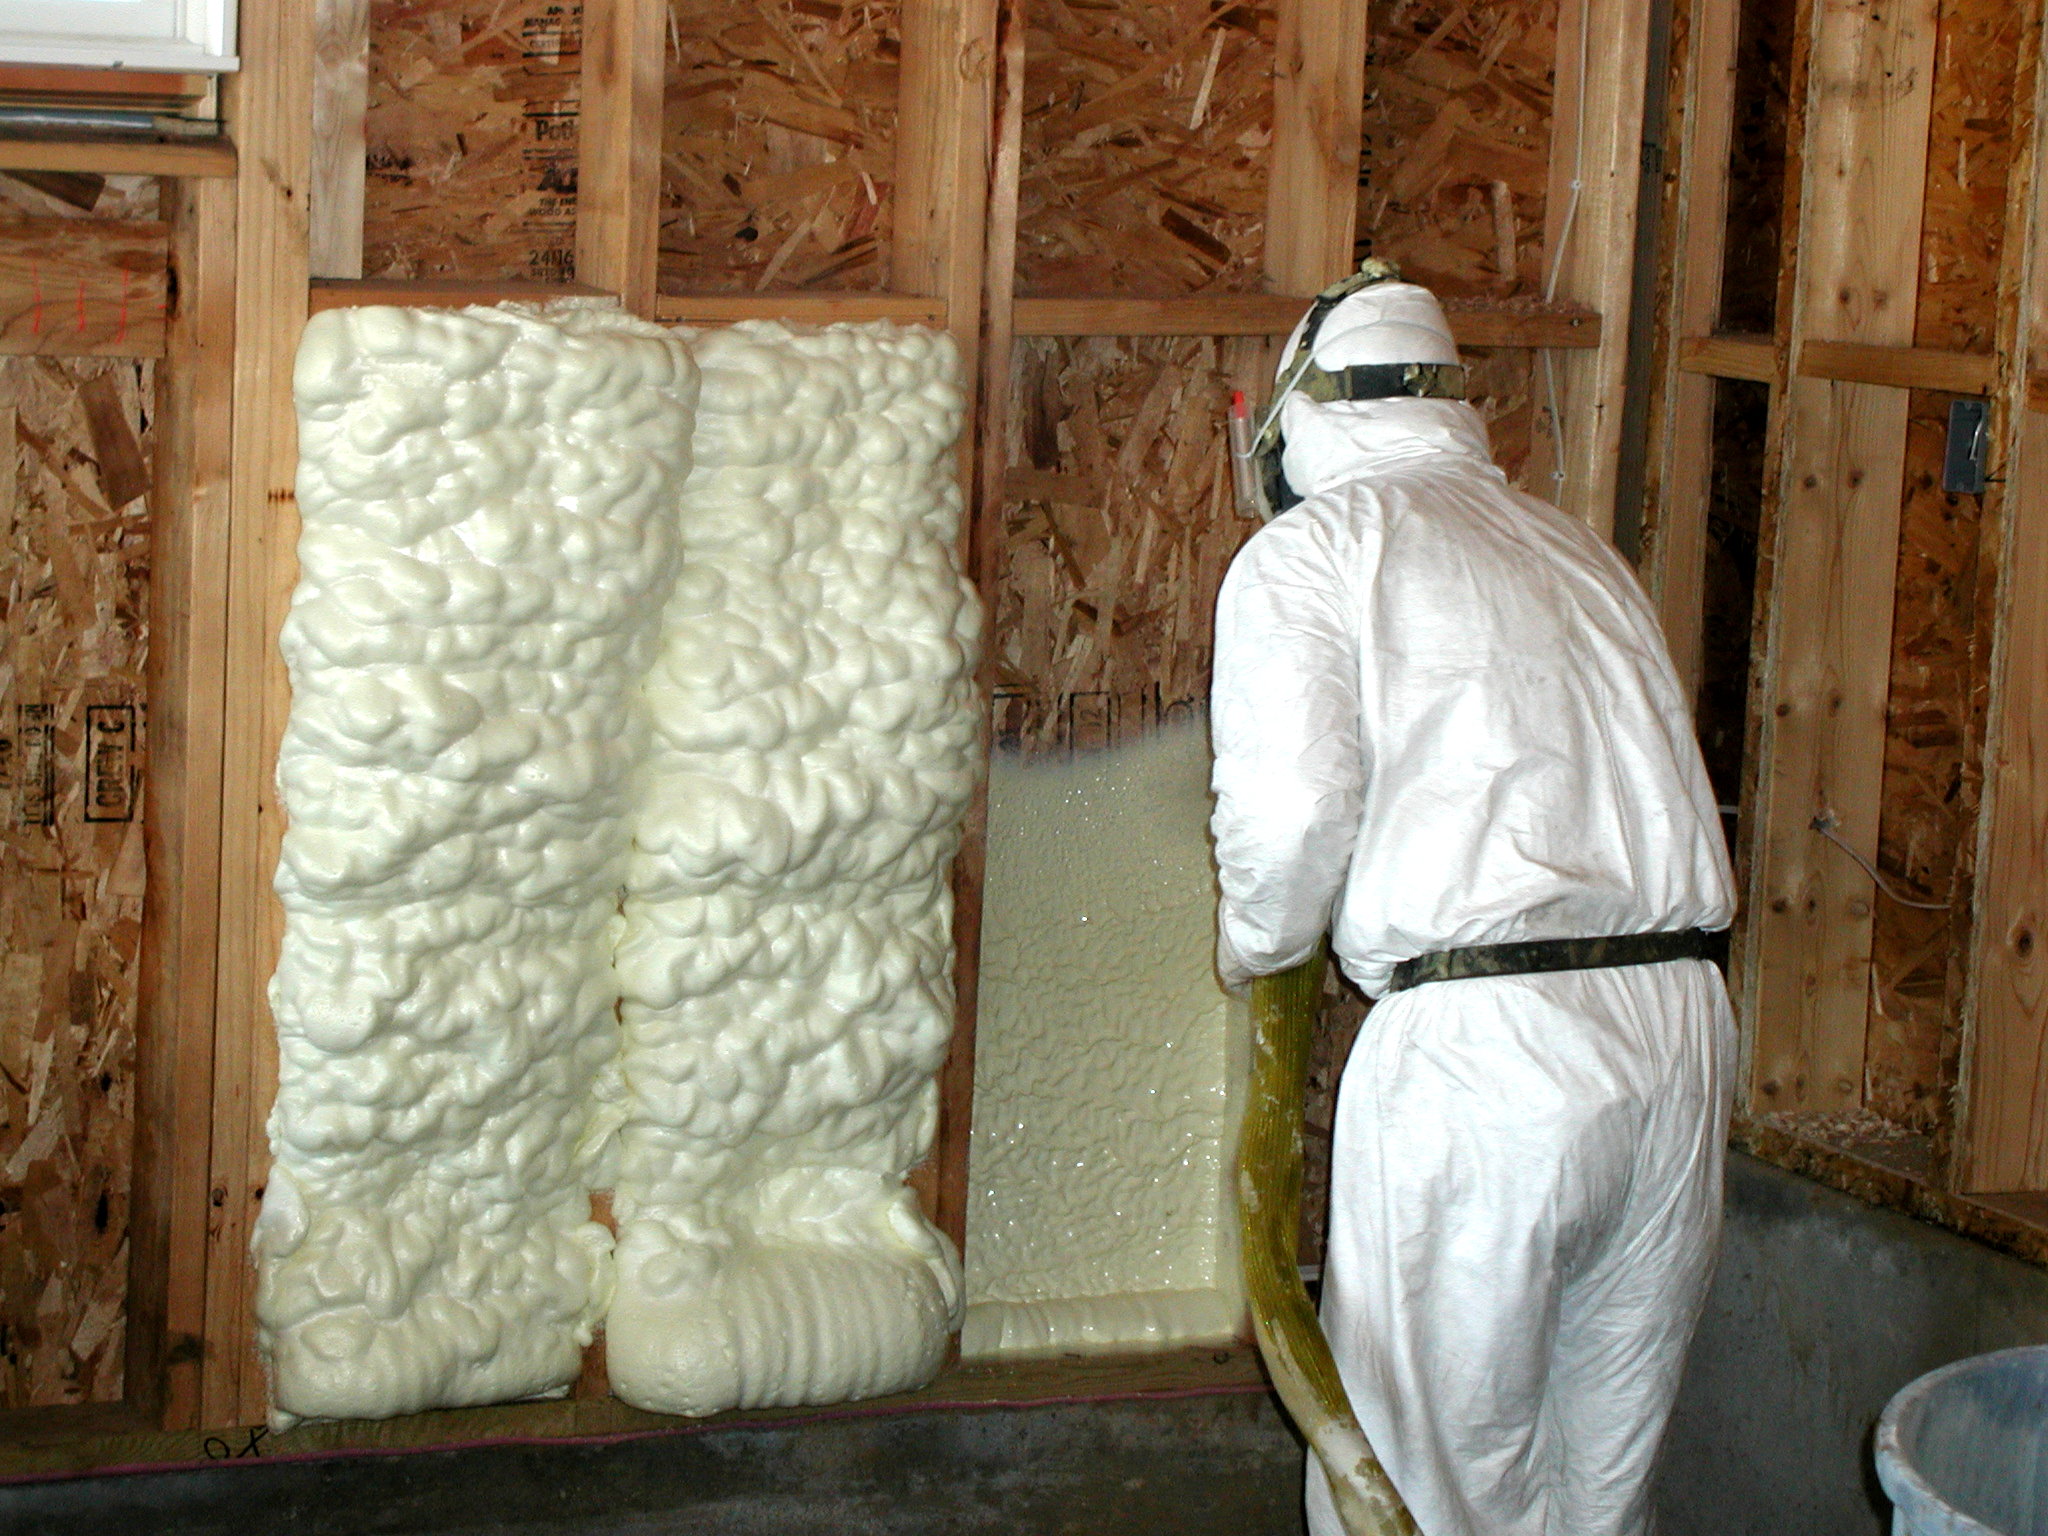
Attic Spray Foam
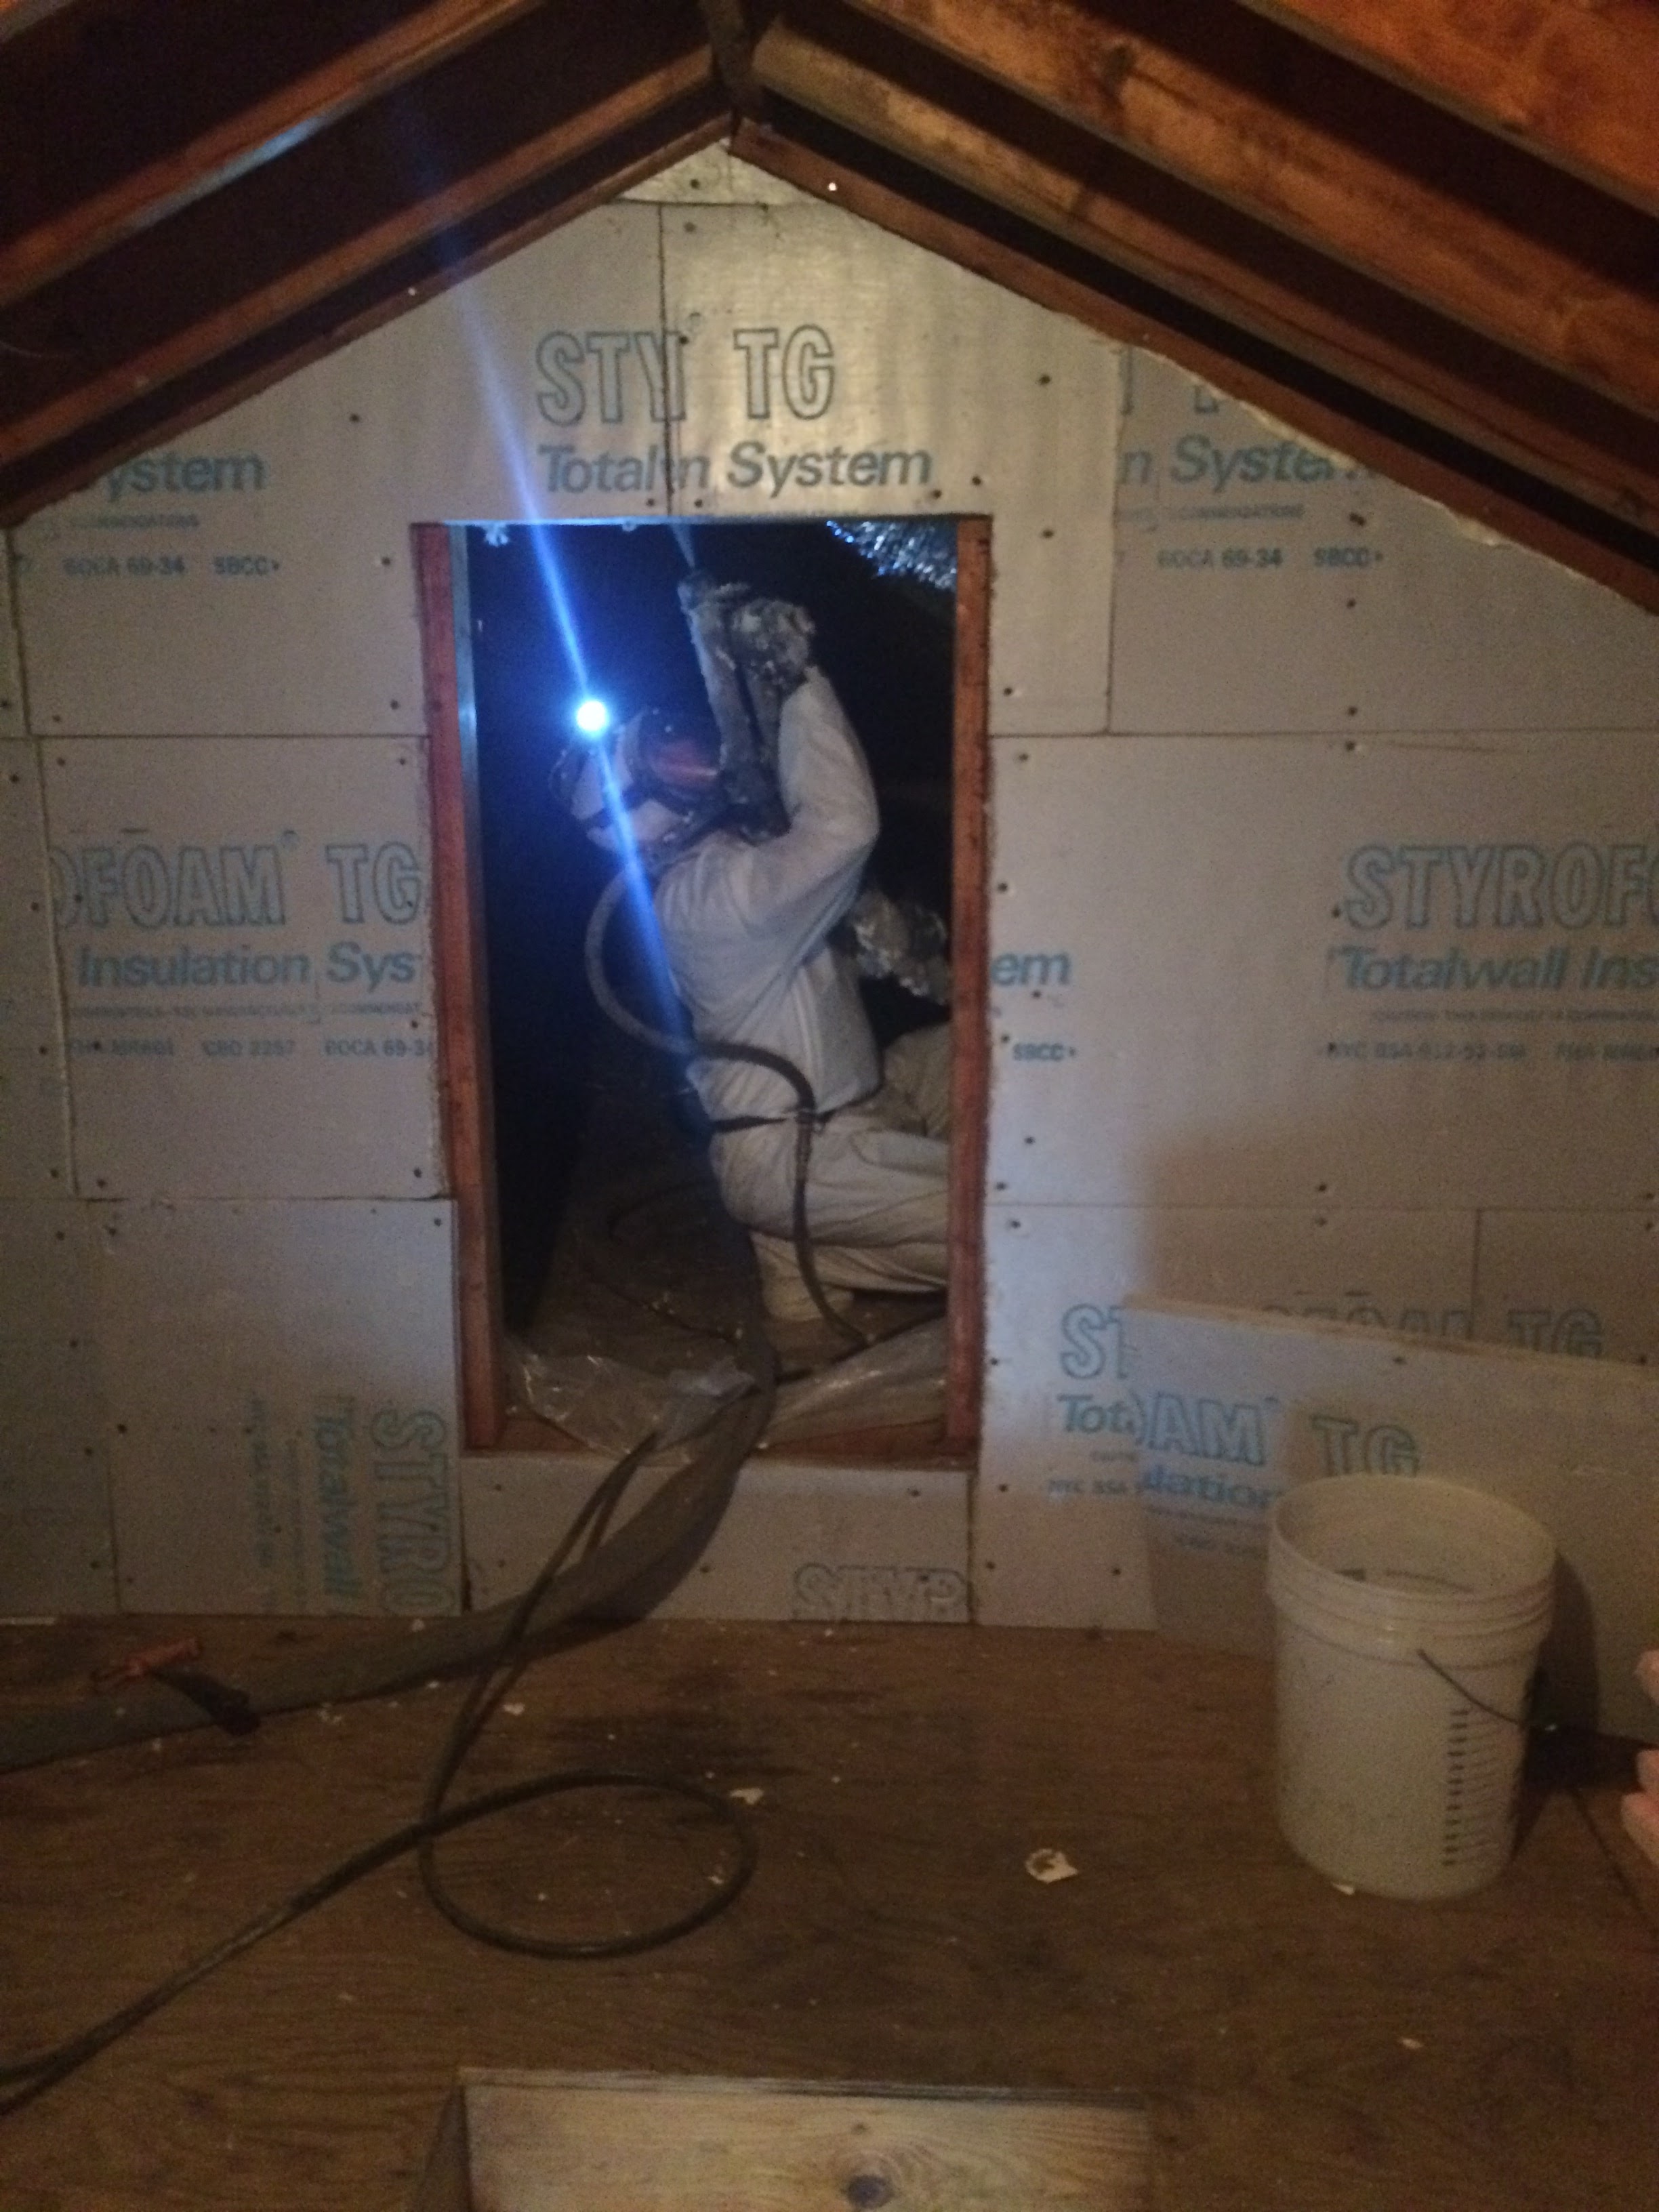
This is a view of Donny Oney of Affordable Foam spraying the roof deck of the front knee wall attic, the one I showed pictures of. This shot is taken from the garage attic. This work drastically reduced the massive leakage from this attic and led to the lack of icicles Ryan reported later.
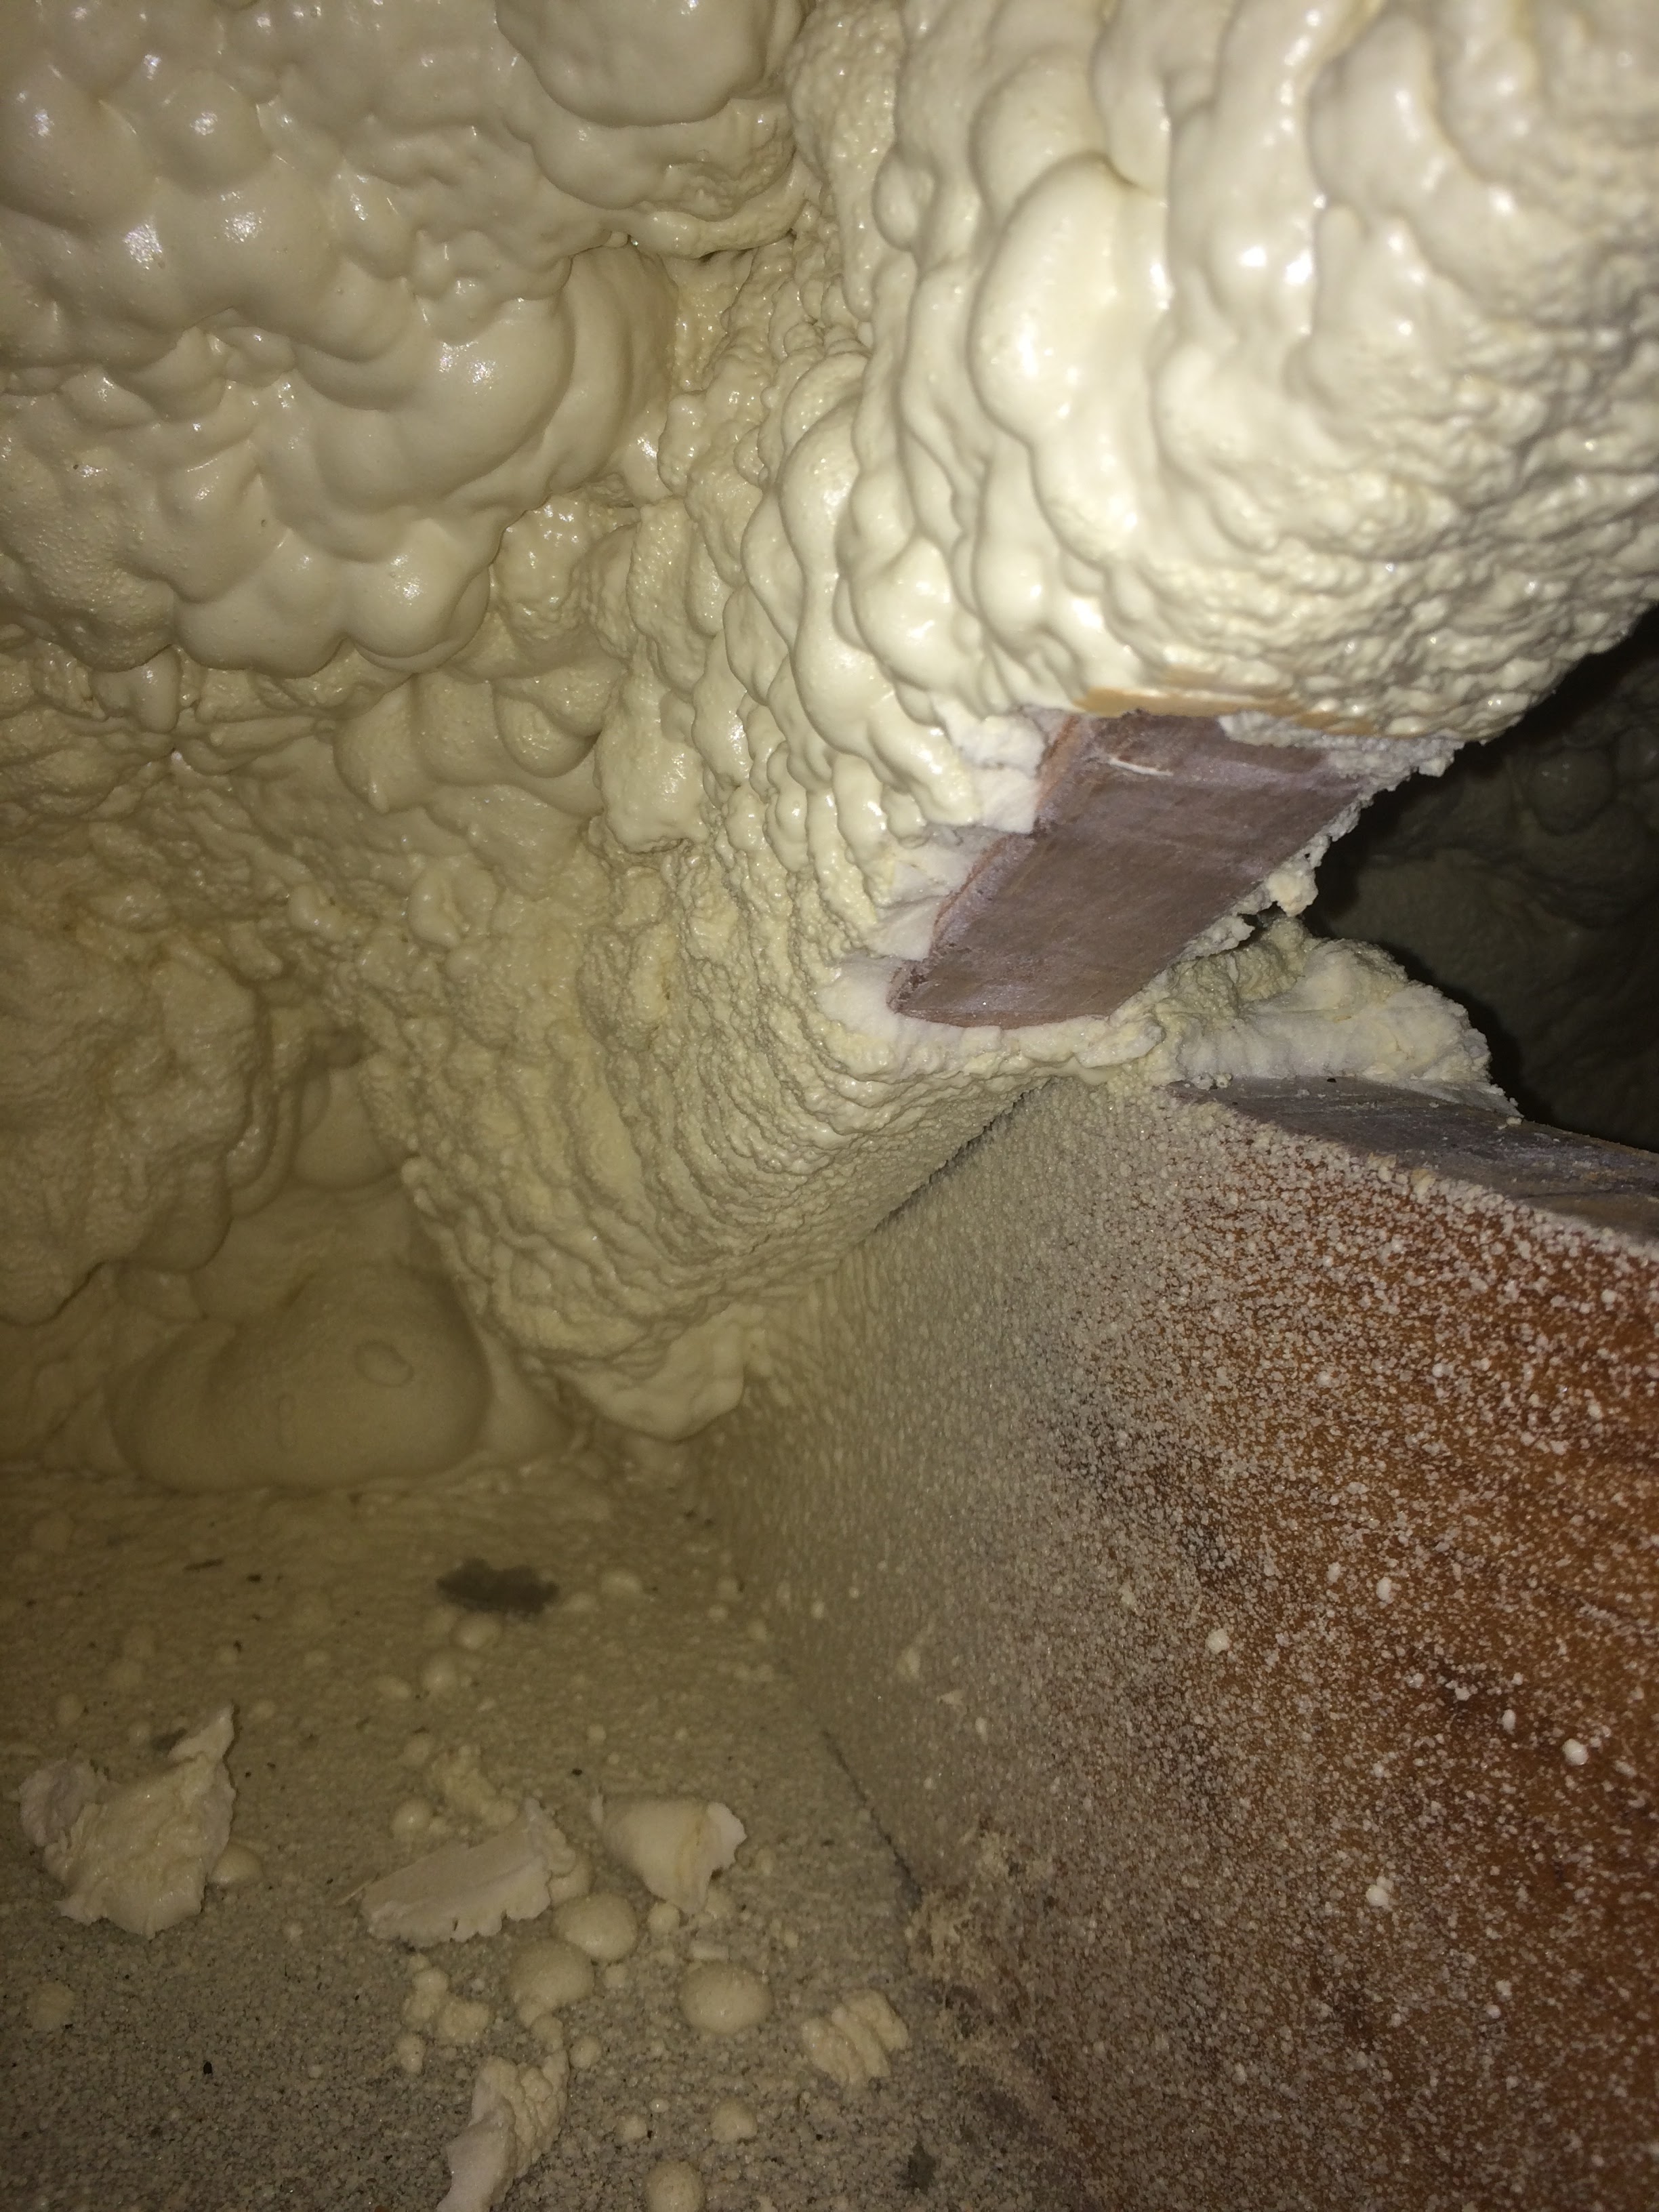
That attic was tricky, though. Remember this picture?
The space behind it is very small. Here is Cameron McCune in the tiny space (he and his brother Clayton did the prep work on this project including attic insulation removal, a new bath fan, and so forth.)
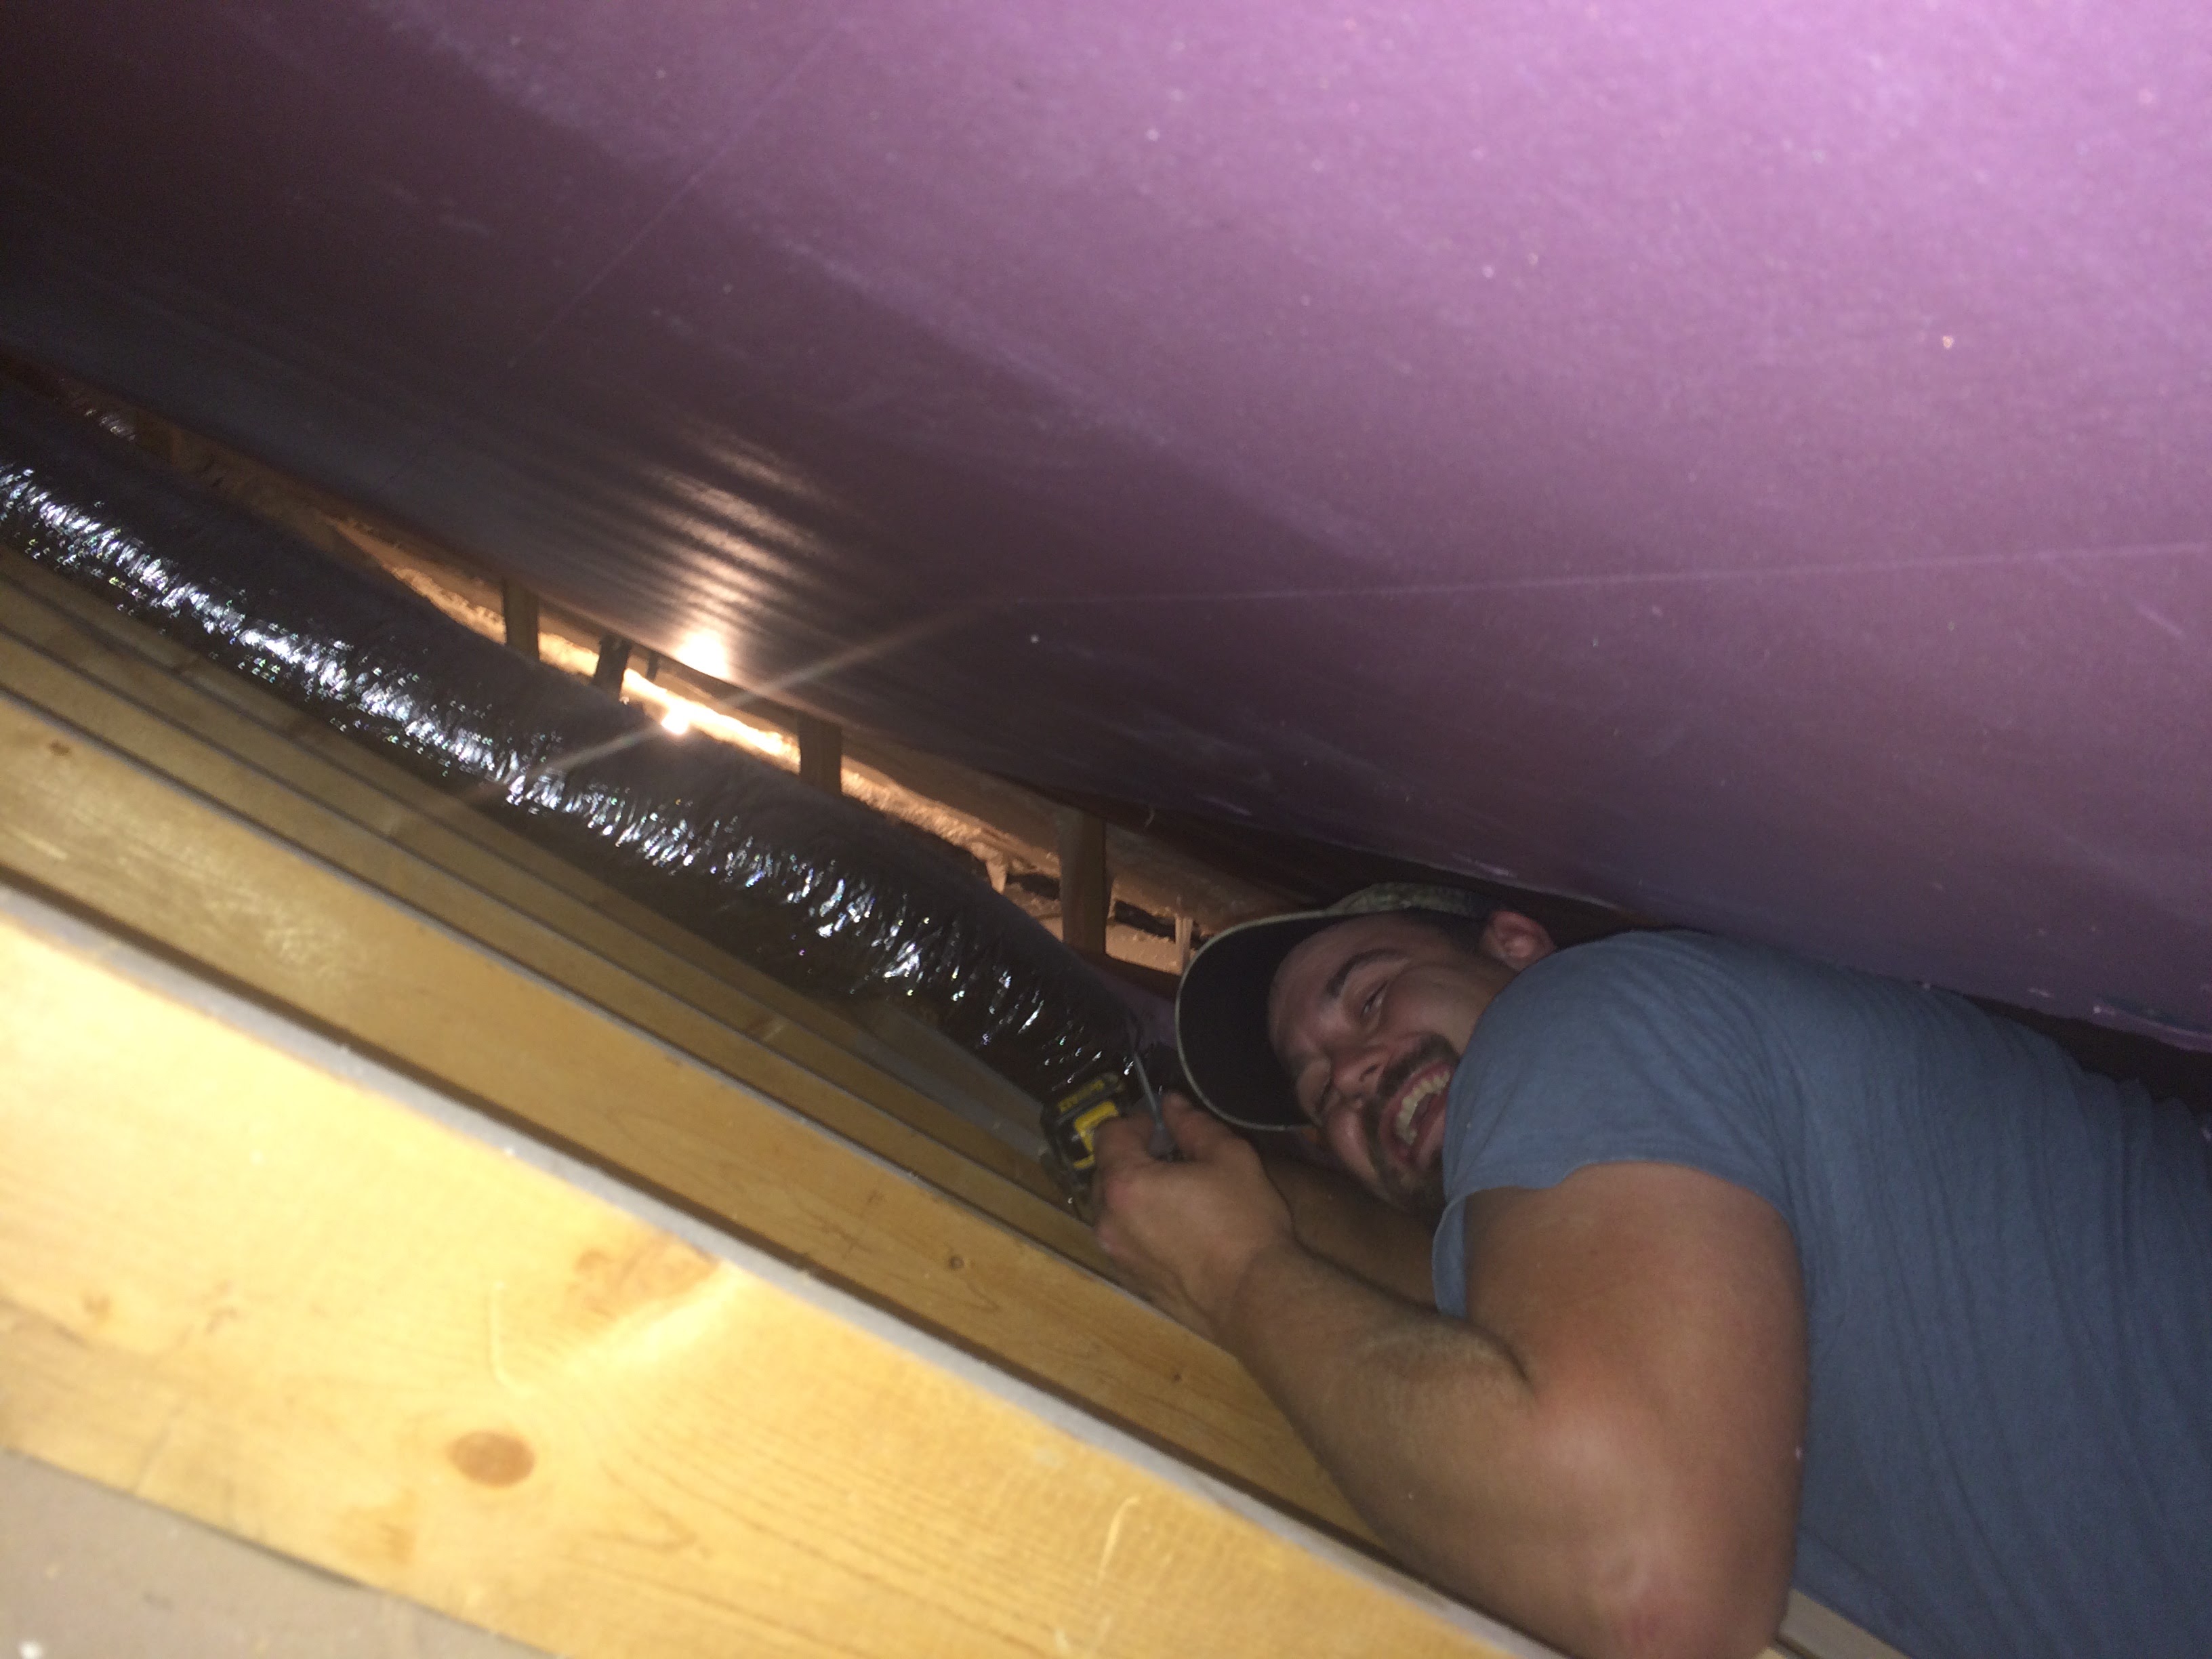
Cameron doesn’t fit in there. Neither do I. Neither did Affordable Foam. We opted to use foam board over that spot, which is a whopping R-10. (We did leave the fiberglass above it, so it’s actually R-30 total, but I think the foam board alone would have worked fine.)
We used up about 2 years worth of luck with that foam board, though, it just happened to need exactly 1.5 sheets of it, no cutting necessary. Here’s what it looked like before sealing:
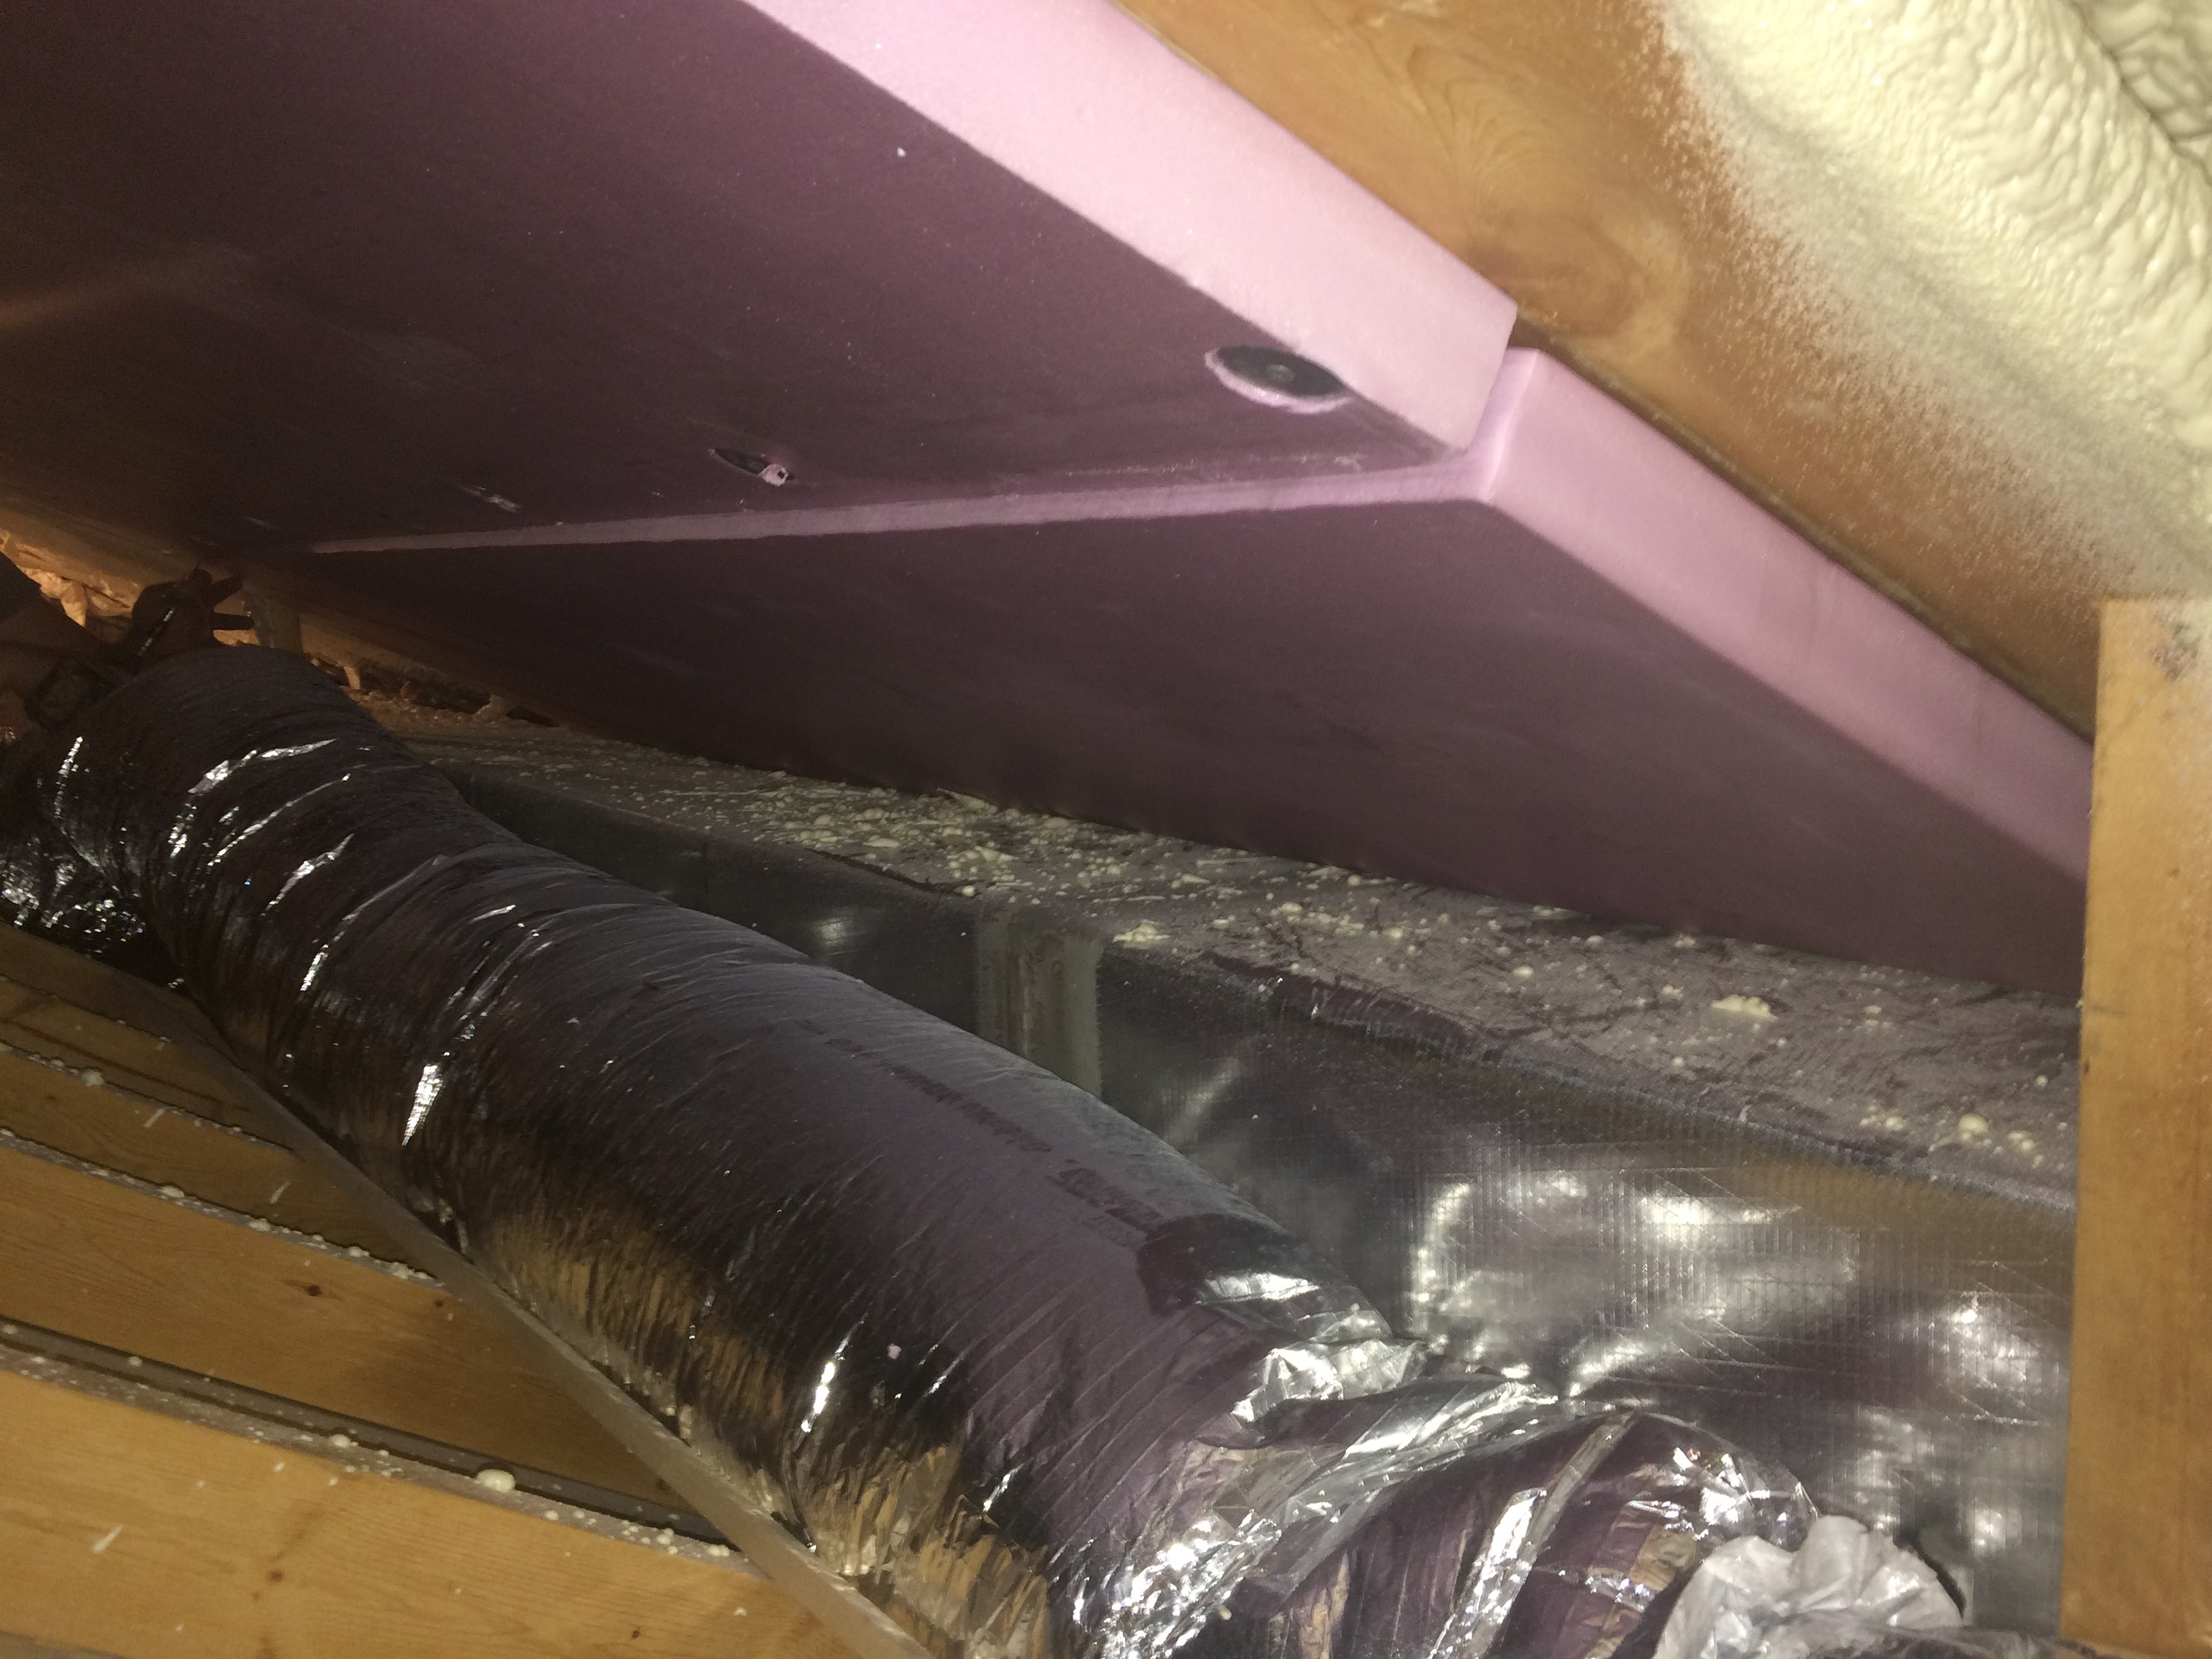
The seam between those pieces of foam board needed to be sealed, otherwise it would be a big air leak. The way this job flowed, the foam guys had come and gone, but I knew we would need a little more foam. Ryan was game for grabbing a “kit” of spray foam, and I used it to touch stuff up. The kits look like propane grill tanks. Fair warning, don’t just use them, there are a lot of little things that you want to know, the biggest thing being keeping the chemicals above 80 degrees for 48 hours. Follow the manufacturer instructions religiously.
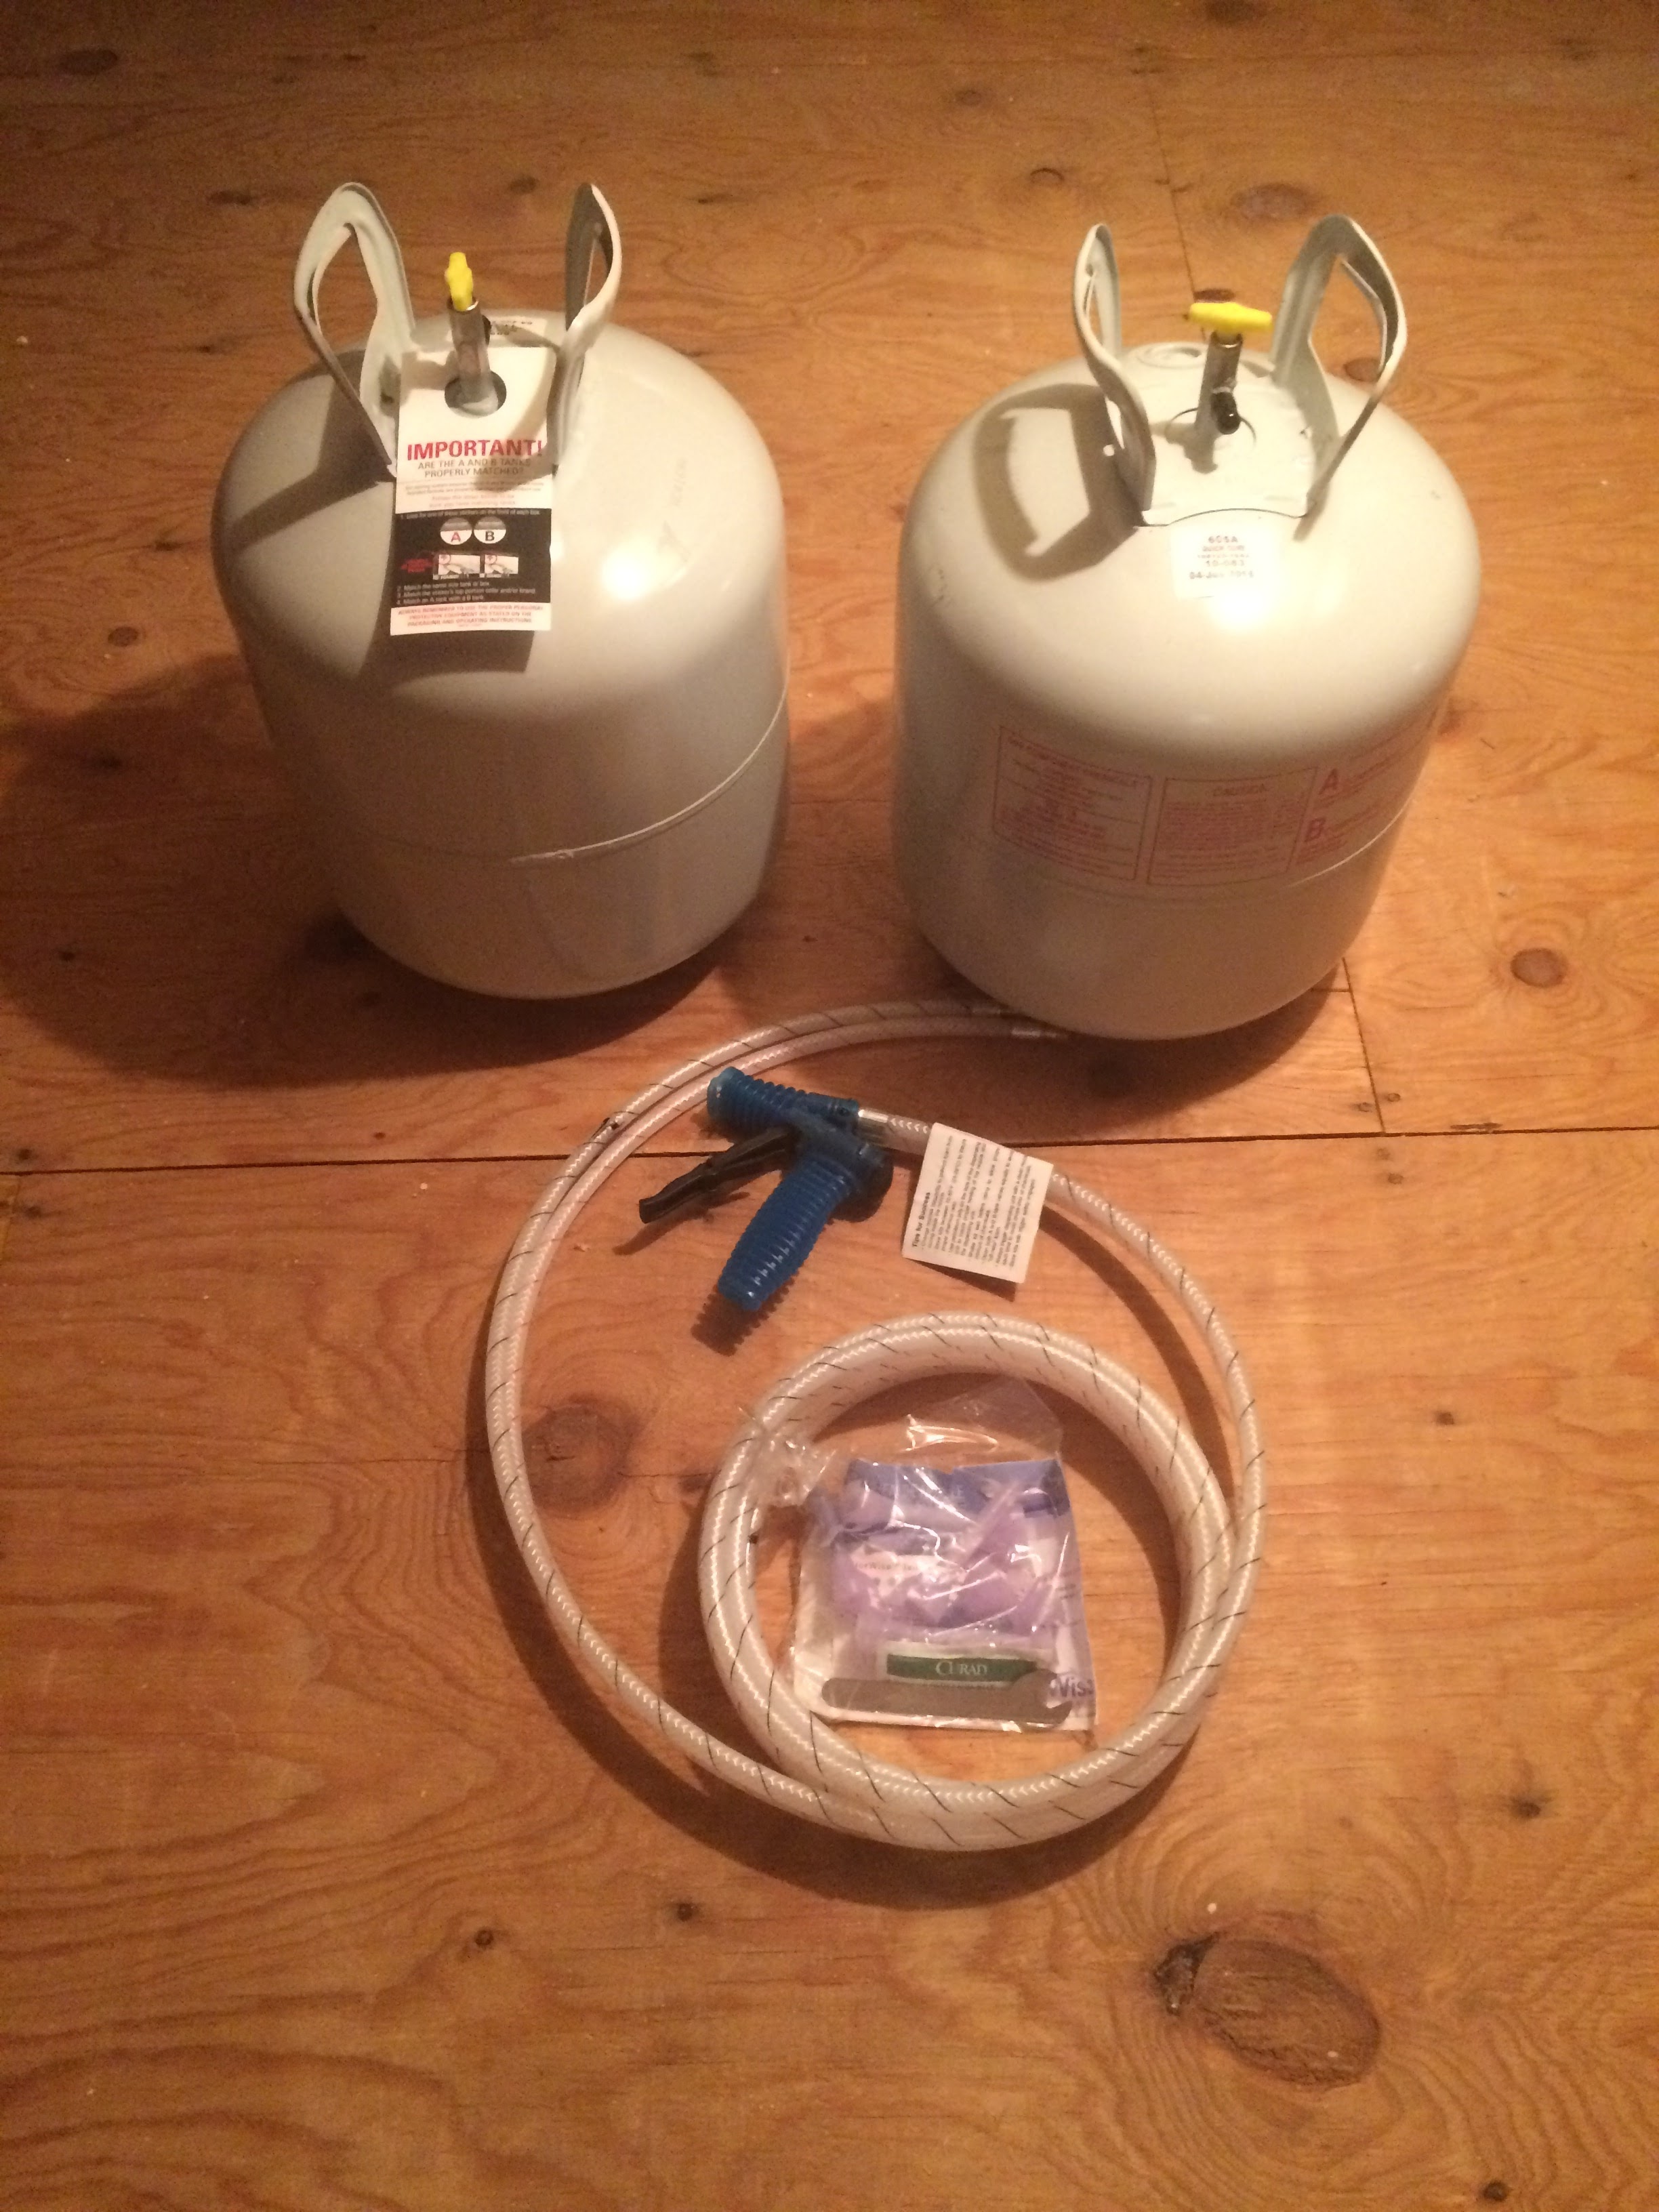
Above is a foam kit, this is the larger of the common sizes, it’s 600 board feet. A board foot is 12”x12”x1” thick. Board feet is the unit you’ll usually see for spray foam pricing. You get charged by how many inches you want with the first inch being a good bit more expensive, and the difficulty of the job also influencing pricing.
Here is that spot after touching it up with the kit:
At this point we were down from almost 7000 points to this:

3950 was below the 4200 target. All sealed up!
Or was it? My stretch target was 3000, and this space still felt cold. In running the blower door test with my infrared camera, I looked at this same little spot in the attic and saw this. Blue is bad.

Well nuts. There are still some big leaks hiding in here. Remember, the foam contractor was done and gone. Visually, it looked like a good job, testing showed there was some touch up work to do.
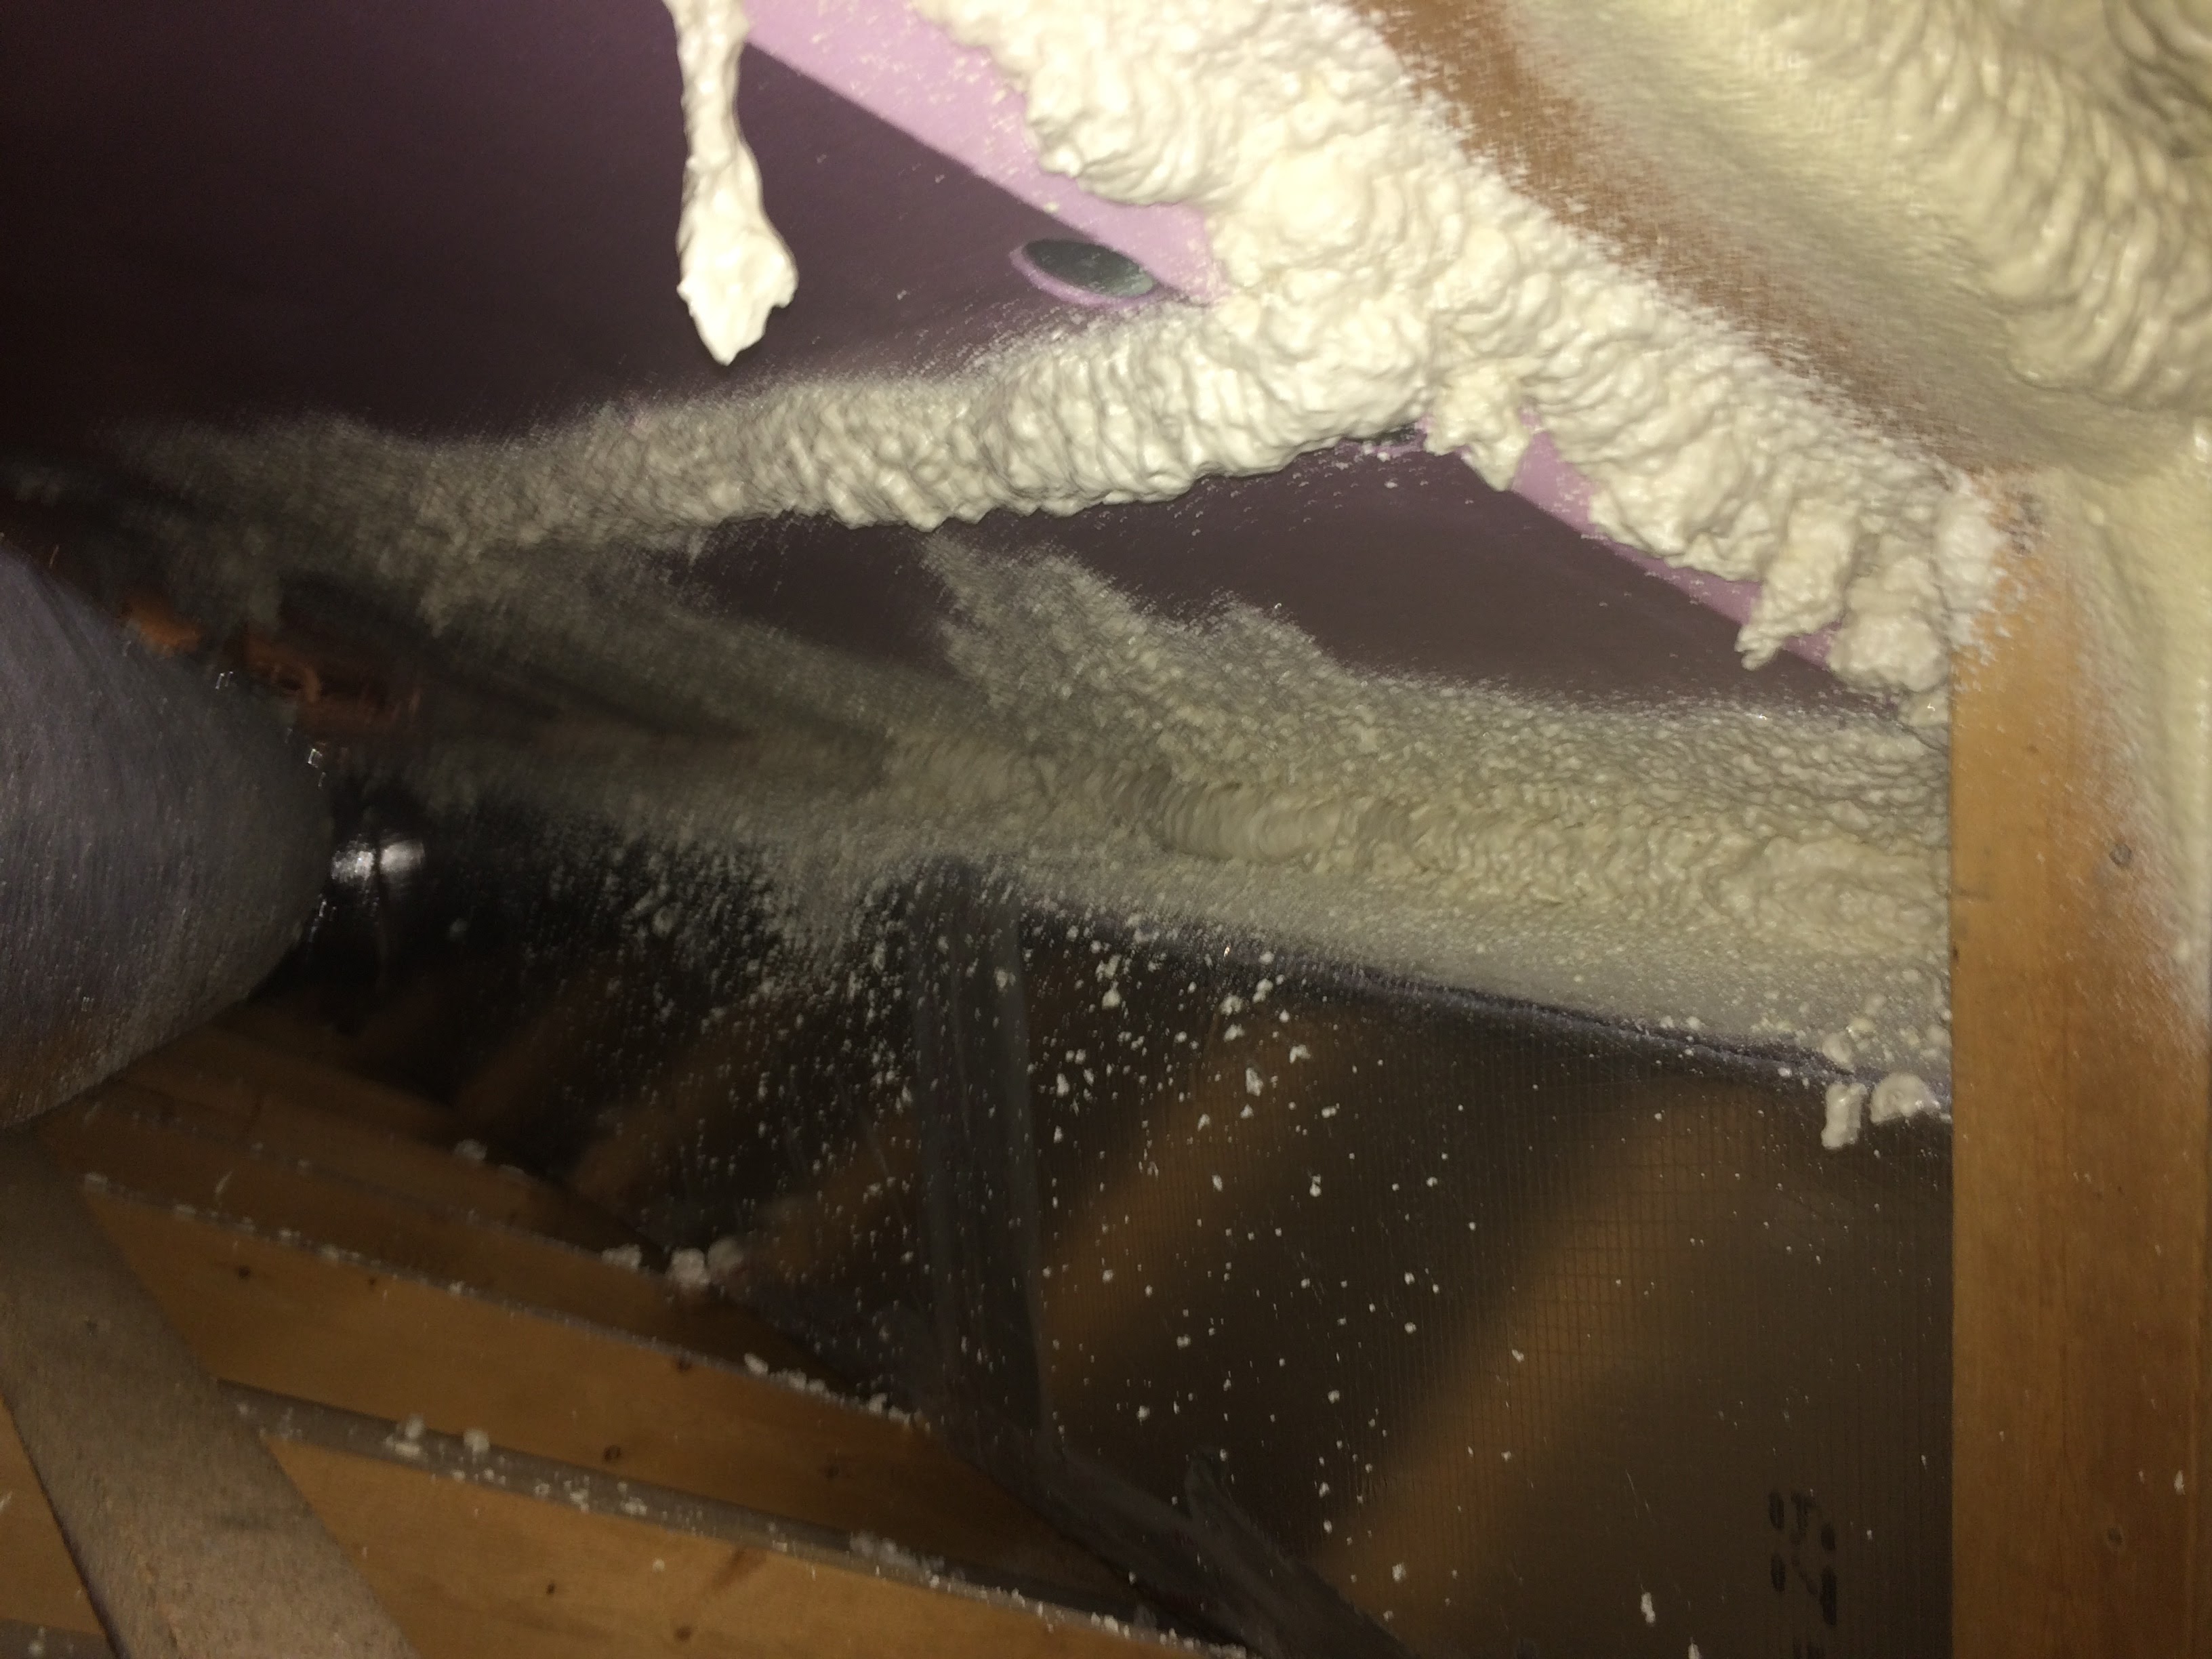
I had planned on this, hence the foam kit for touching things up. It shows you why it’s so important to have someone check work after a job is complete, usually there are misses, sometimes big ones. Here’s what that picture looks like in real life:
Note the spray foam on the roof deck. The project would have been called complete by most at this point. Also note the duct, it has a little board above the strap to straighten it out a bit. This helps improve the flow. Not a perfect solution, but far better than the huge dips it saw before when the strap was digging into the duct.
It turned out there was a huge hole in a spot you just couldn’t see. I still have no idea what it looked like. Thanks to infrared I knew where it was, and just held the trigger down on the foam kit for a while. It’s jokingly called “spray and pray”. The blower door number did this:
Almost a 1000 point difference, 16% of total leakage! To be fair, this also includes some basement work I was working on at the same time, but that one big hole was almost 800 points all on its own. For reference my in-laws’ 1800 square foot ranch home leaks 995 points. Total. That one hole was almost as much leakage as an entire house!
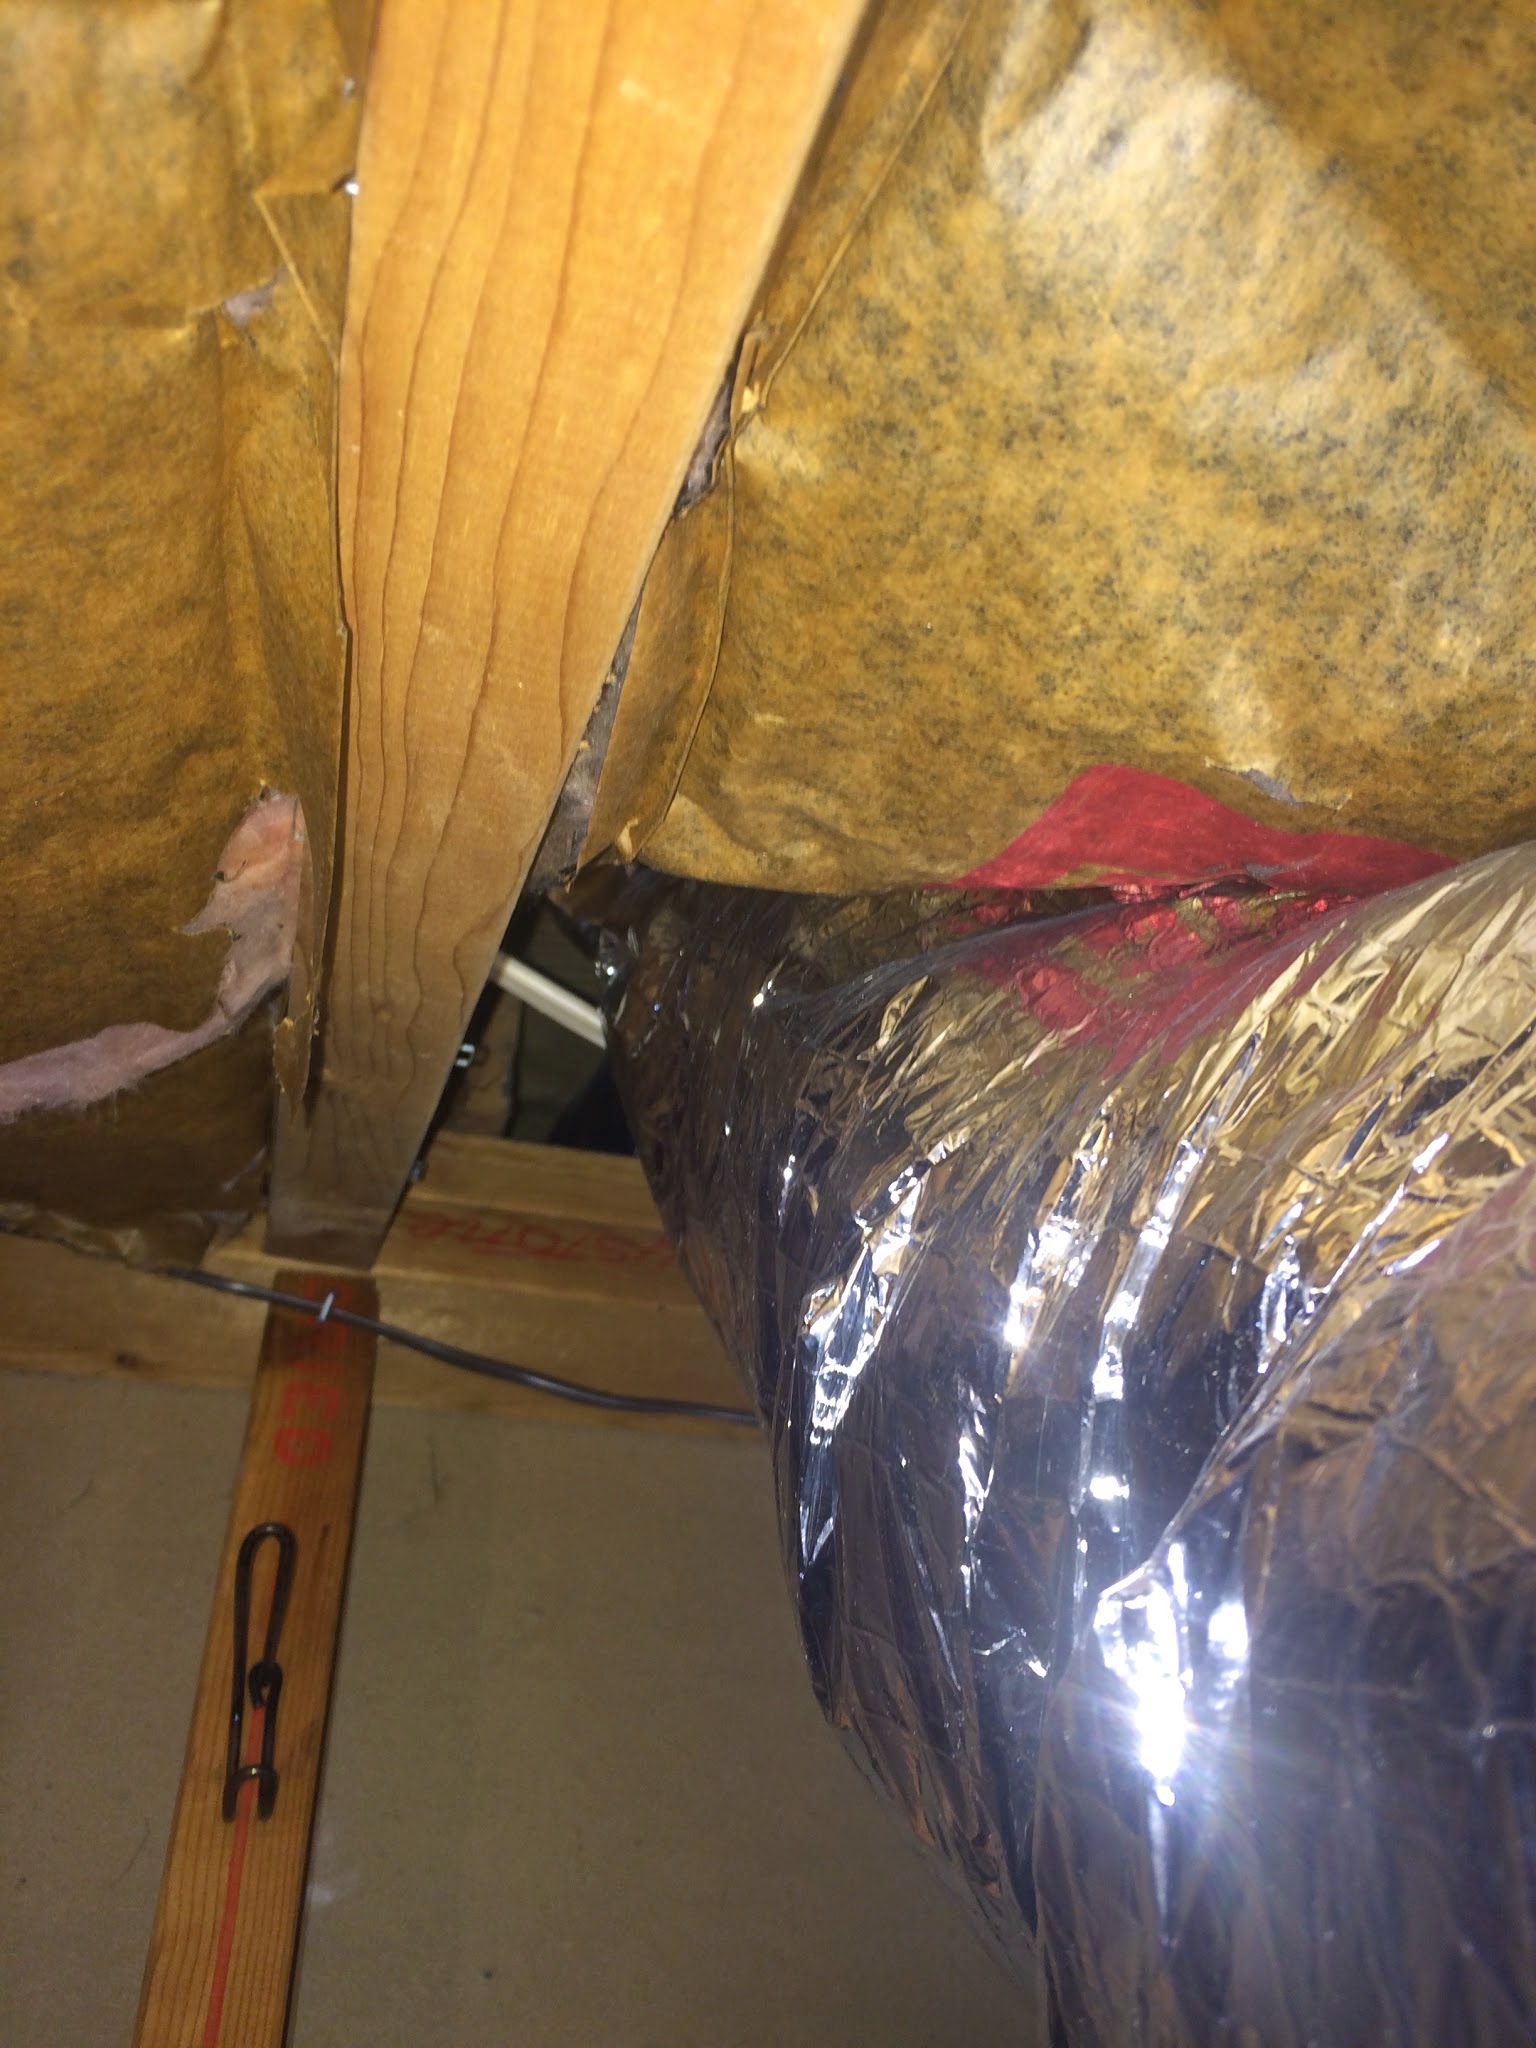
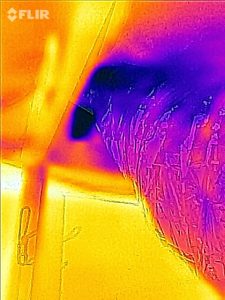
Here is another small miss we found and fixed:

It looks pretty big from the blue, but it’s not. It’s a small spot where two joists come together, maybe 3” long, here it is:
It’s not the bare spot on the wood, it’s the small crack where the two pieces of wood meet just below the bare spot. Would you have found that without a blower door and infrared? I’m not sure I would have. It underlines the importance of quality control.
The Tale of the Cold Tub
Fairly often, tubs are left open to an attic, particularly in half story homes like this Cape Cod. In the tiny rear attic (where I had a rare claustrophobia attack), you could see this:
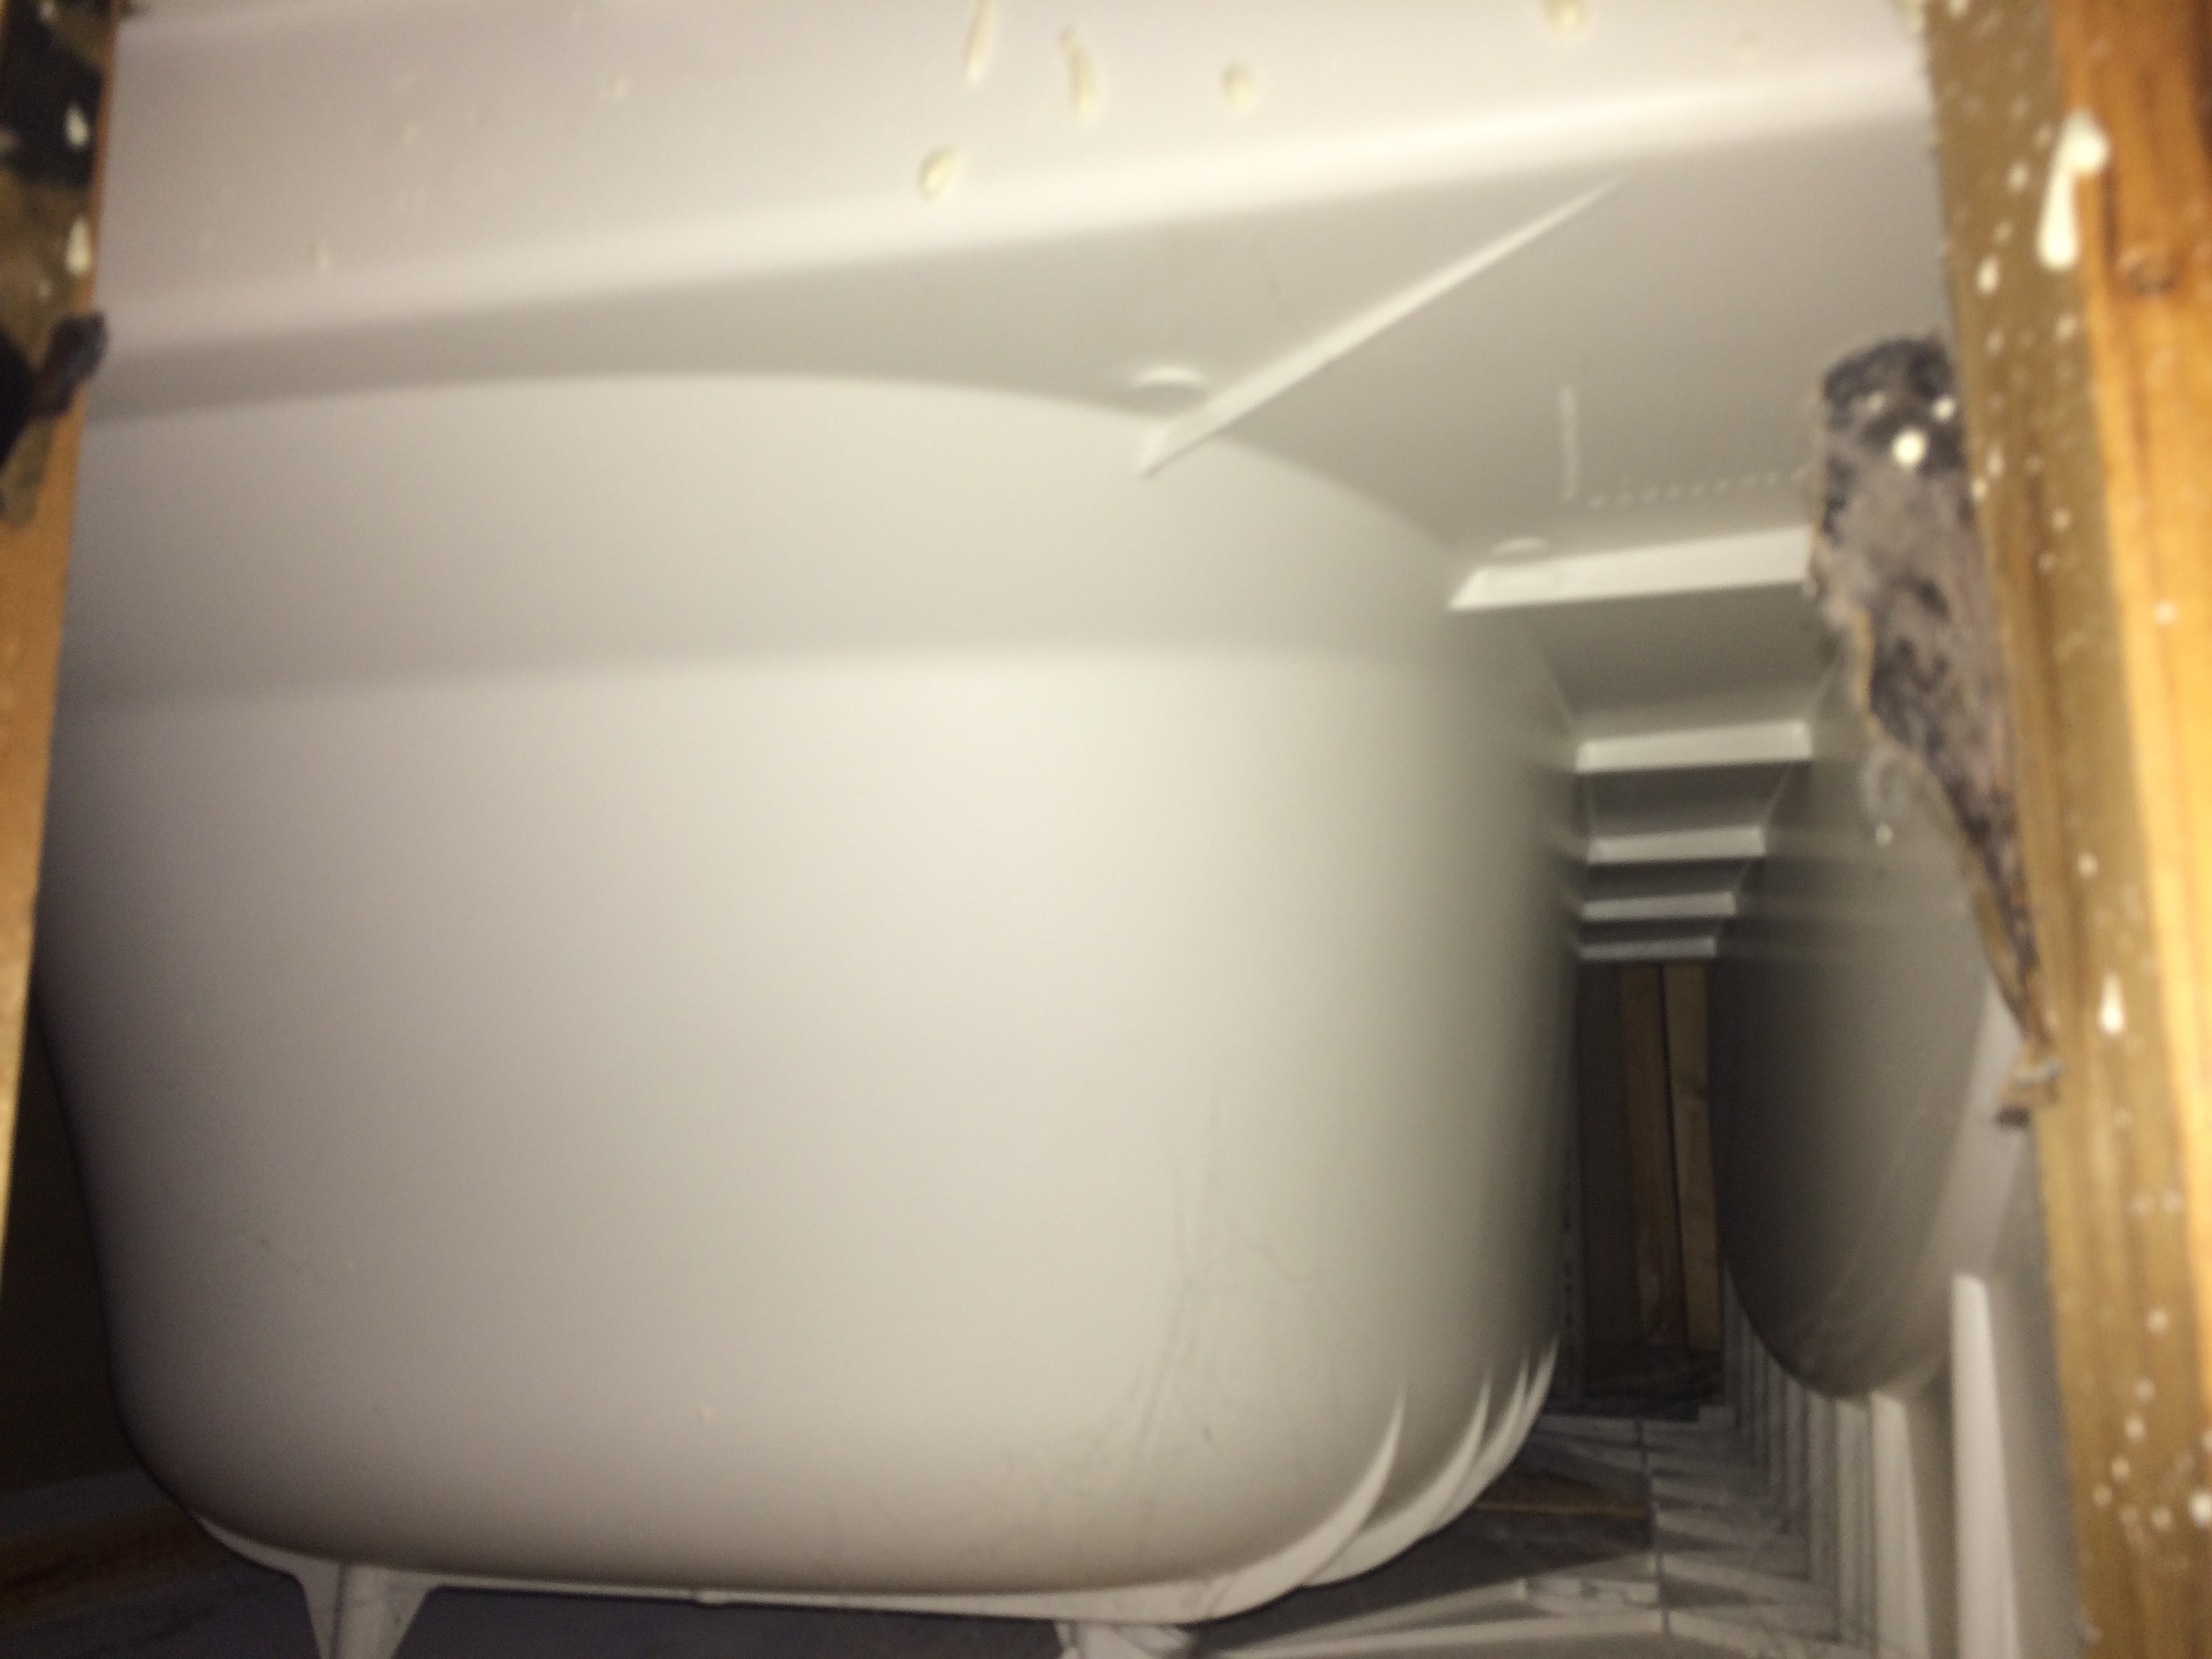
Before, this tub was open to the outdoors. It’s not anymore. Do you have a tub that cools off faster than it seems like it should? You may have the same problem.
Slight HVAC Changes
Once the quality control work was complete, there were two HVAC items that needed to be tackled.
First, I was concerned about the water heater backdrafting. Standard gas water heaters need to pull air from inside the house to burn. When you tighten a house up a lot, they often can’t get air from inside the house, so they pull air to burn right down the same chimney they are supposed to vent air out of. Yes, it’s a problem. It’s called backdrafting, which can cause carbon monoxide to build up in a home. In serious cases the side effects are death. I take this seriously.
Since the water heater was new, we decided to install a switch that would turn off the gas if it sensed backdrafting, Ryan, Kim, and I can all sleep better. Carbon monoxide alarms on each floor are critical as well.
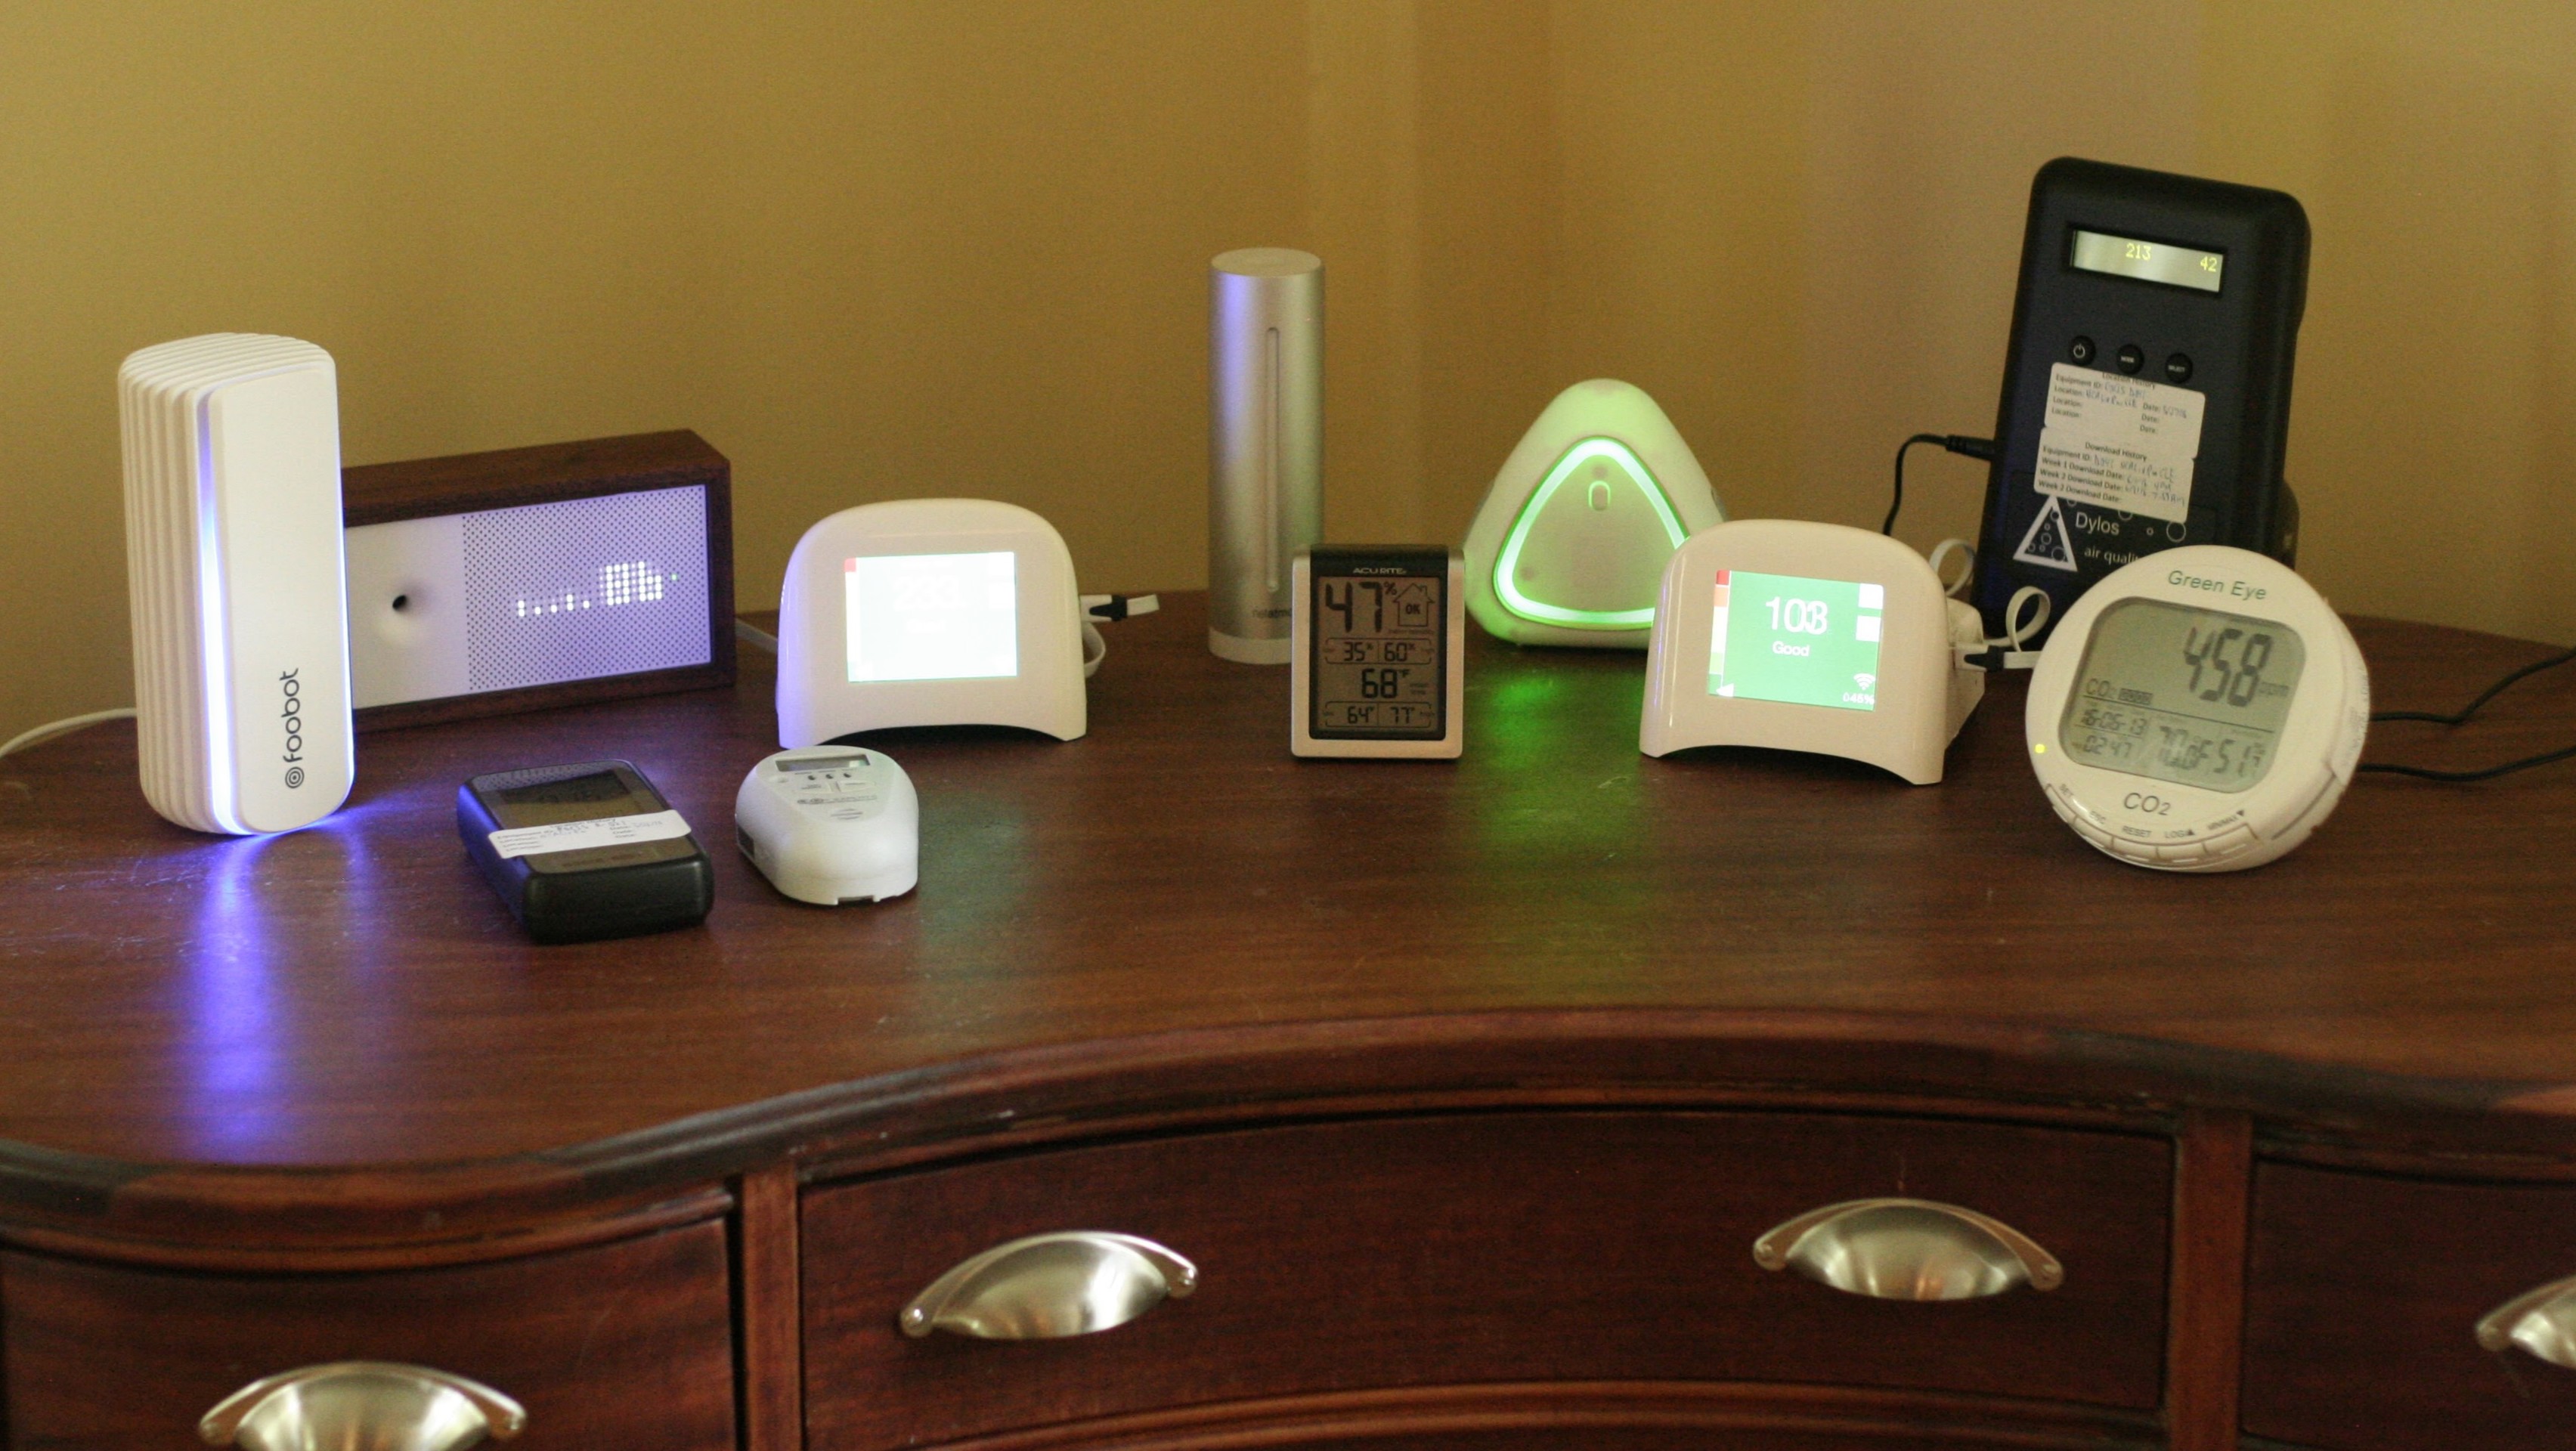
Second, I really like to have a view into how client homes are operating so when I get a phone call trying to figure out why an area doesn’t heat or cool well, both of us are not just guessing. We like a thermostat called an Ecobee, it does “datalogging”, which means it records data over time: indoor and outdoor temperature, indoor humidity, thermostat set point, and equipment run time. We like the commercial model for a number of reasons, here’s what it looks like:
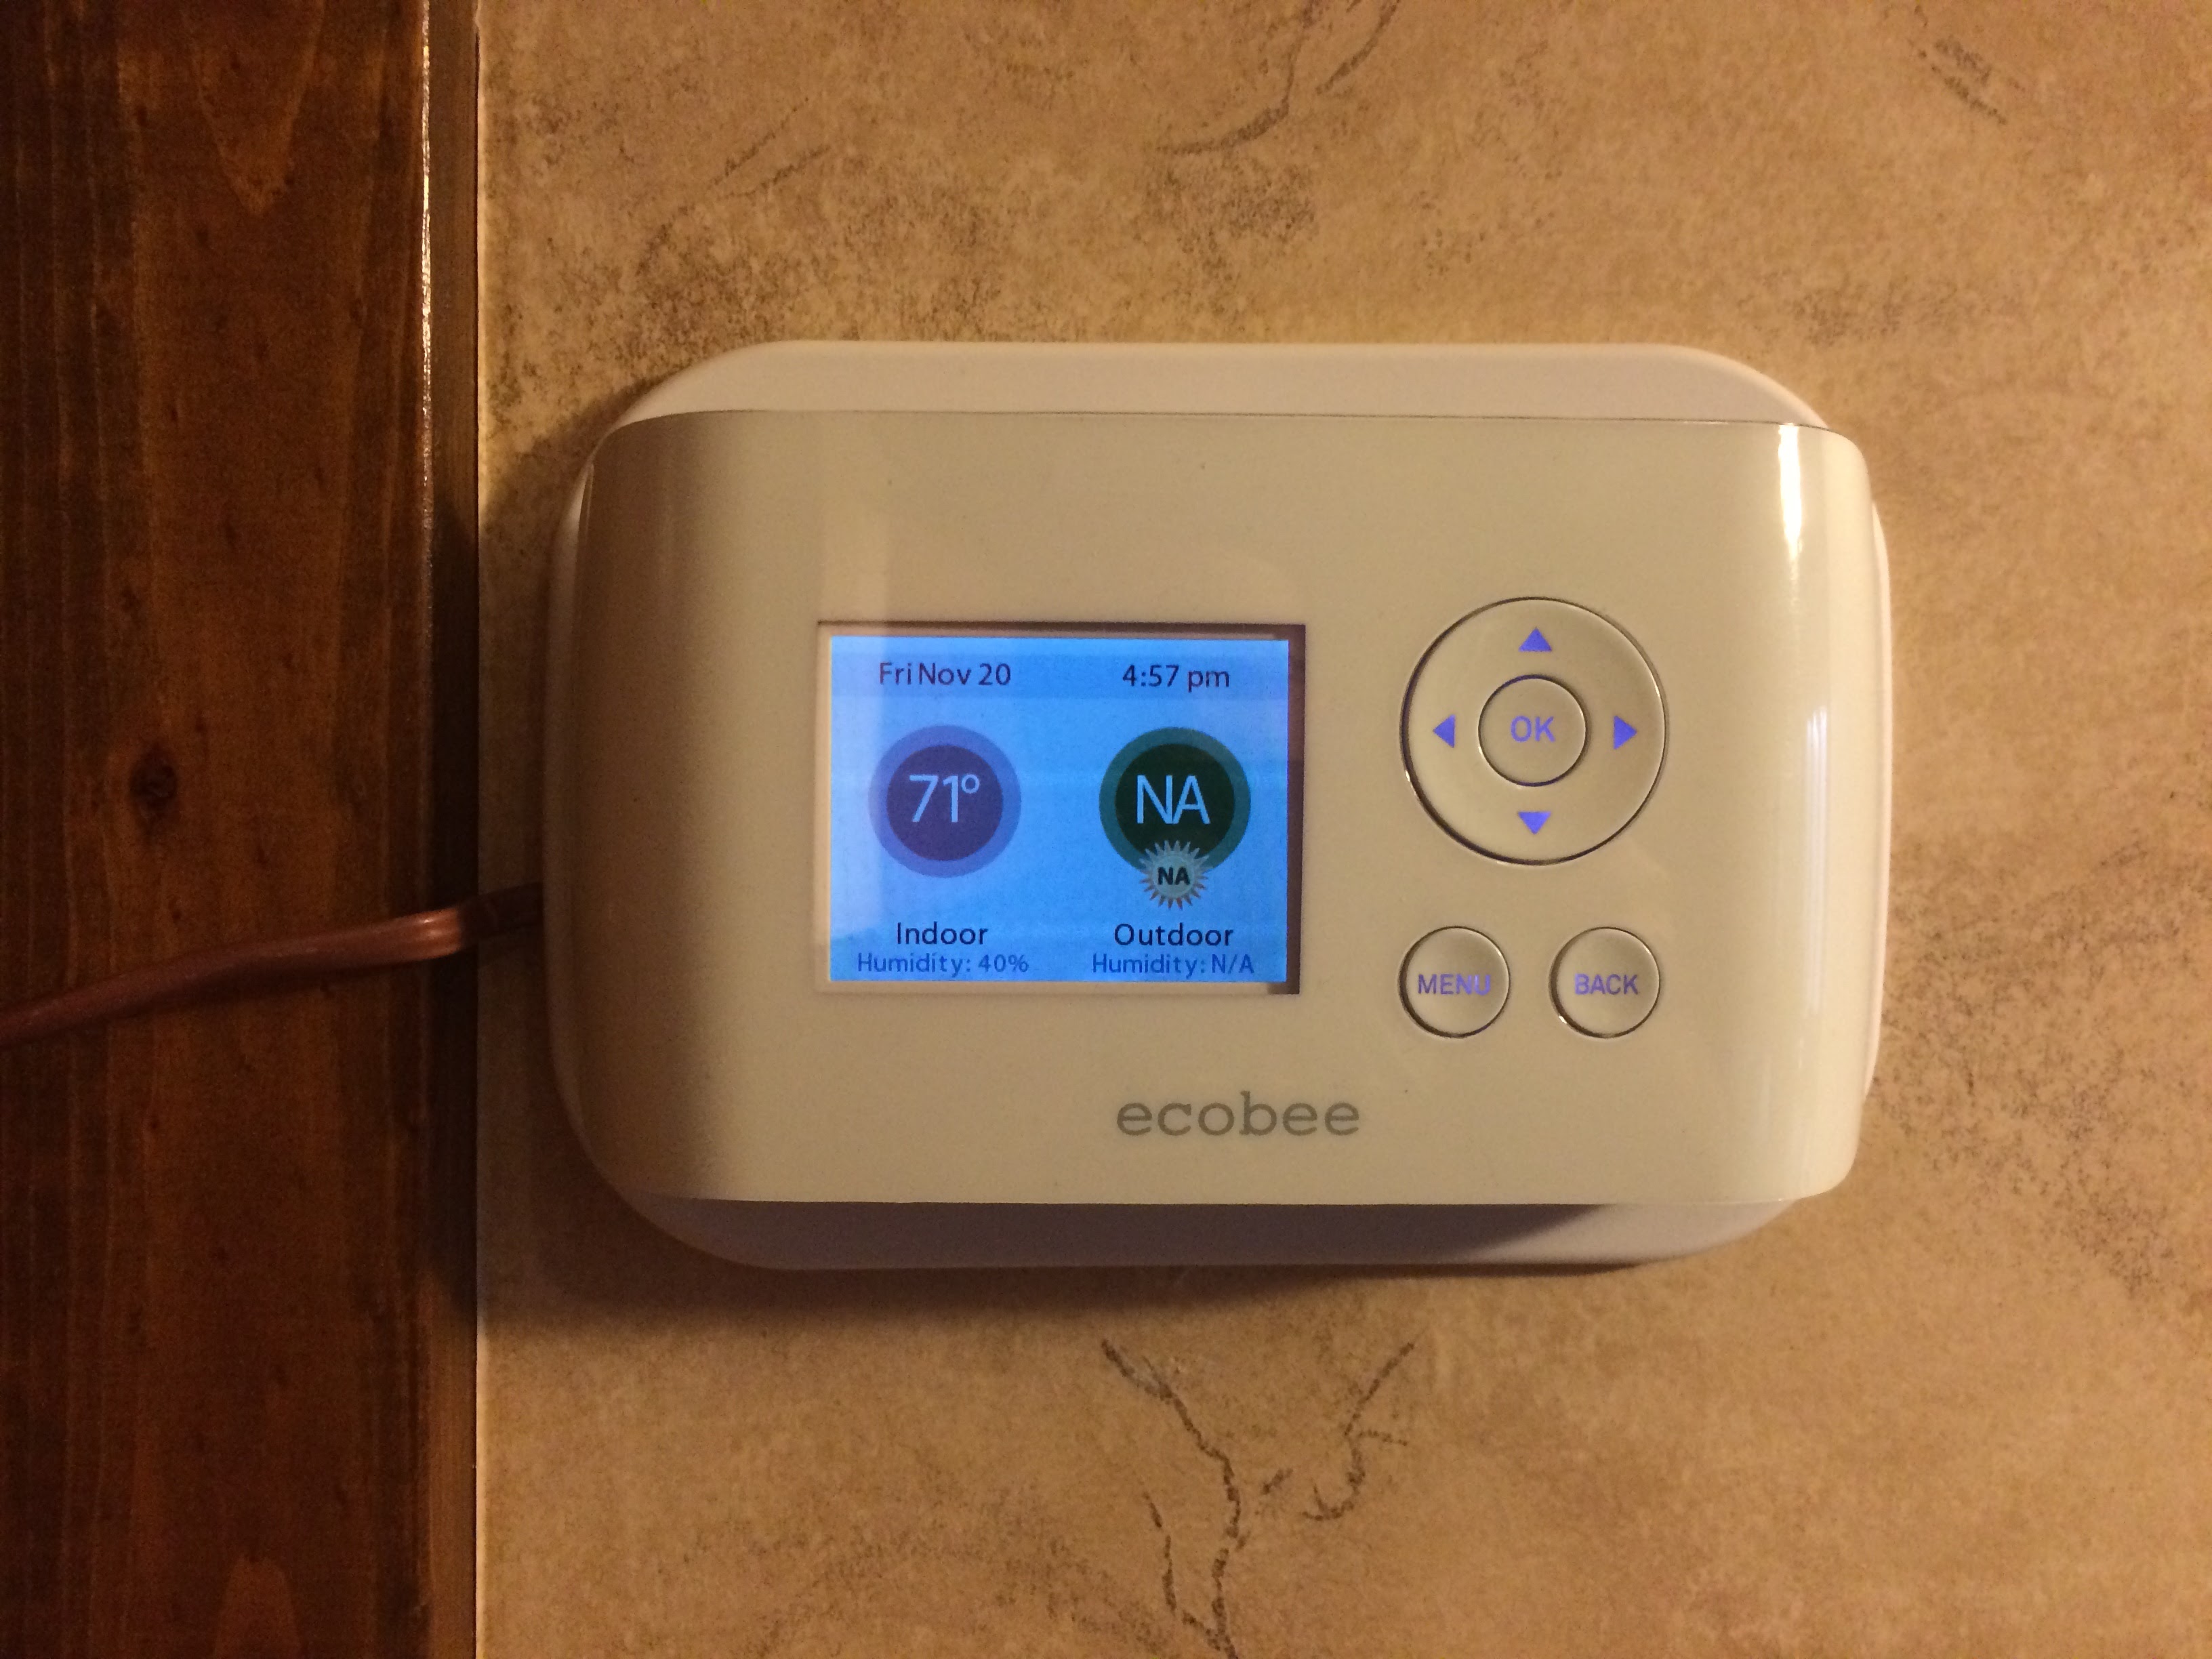
This install was a bit tricky because the boiler system doesn’t provide power. I had to buy an inverter to provide it with juice, hence the slightly unsightly wire.
Continuous Optimization
The last stage of Energy Smart’s process is called Continuous Optimization. We just made massive changes to a house, so just like a race car after major upgrades, we need to take it to the track, put it through its paces, and figure out how we need to operate it differently in the future. In the case of this house, it was quite simple. (If you read the other case studies, it’s often more involved than this.)
The Ecobee thermostat returns helpful charts that help us diagnose the house and understand how it is operating. Rather than guessing, we can then make educated suggestions of how to operate the house:

Here’s how to read this chart. The green line (that’s a little bouncy) is the indoor temperature. The red dashed line is the thermostat set point. The light gray line is indoor humidity (a bit low at 25-30%, but not crazy low, winter target is 30-40%.) The black line is outdoor temp, it was pretty cold. Lastly, the red bars at the bottom are run time when the thermostat is calling for heat.
Even in some of the coldest weather we see here in Cleveland, the heat is only on 50-60% of the time. We knew the boiler was too big, but after the project we found out the radiators were too big, too!
Note the drop in the green line. Ryan and Kim went out of town for a few days and turned the heat down. It’s pretty cold outside, below 10 degrees. It took 7 hours to drop 9 degrees. That’s not a super-slow move, but it’s pretty slow. Particularly with weather that cold.
Let’s switch to summer, this had some data that dropped my jaw:
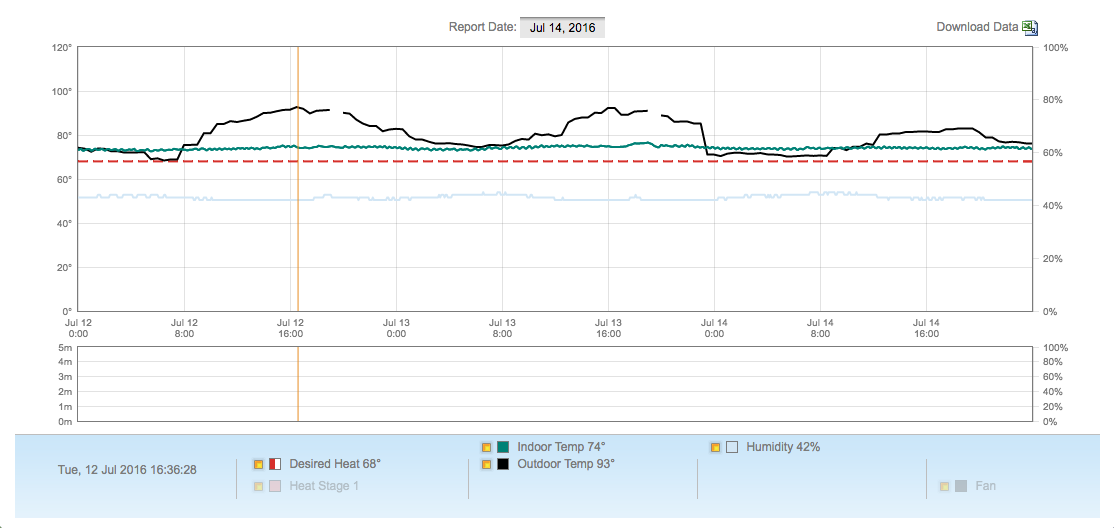
The Ecobee thermostat is only running one zone of the boiler system, it isn’t hooked up to the air conditioner. If it were, there would be blue bars at the bottom showing air conditioner run time.
Note the gray humidity line. In the summer we want to be below 60% relative humidity all the time. If you want to be truly comfortable, humidity needs to be in the 40-50% range. This is remarkably tough in many homes. Except in this house, where it’s running in the low 40s! I have only seen this in one other client home, and they have a massive dehumidifier running to accomplish this. (An important note, we have found some of the humidity sensors in Ecobees to be off by as much as 5%, so this could be 47% which is good, but not jaw dropping.)
A big part of the low humidity is the fancy 3 stage air conditioner that came with the house. It used to run on high a lot, now it runs a fair amount, but on low or medium stage. Low stages are much quieter according to Ryan. Air conditioners only dehumidify when they are running. Particularly in humid climates it’s best to size them smaller and run them like crazy to dehumidify. If they have multiple stages, run them on lower stages. That is exactly what looks to be happening here.
Before I arrive, most clients set their thermostats to 68-72 in the summer so the AC runs enough to do some dehumidification (although they don’t know why they do it, they just do.) Post project, we see setpoints in the 74-80 range, and clients still find it comfy because humidity is low. Our sweat evaporates and keeps us cool like it’s supposed to. Ryan and Kim are now 74 degree clients up from 72. That can lead to less energy usage along with better comfort – our ideal outcome!
A Note on Feedback and Case Studies
I tend to hound clients a bit for feedback, as you could see in the client feedback section. Those comments were almost all at my prompting. It’s very important that we understand what worked and what didn’t, so we can figure out why and either a) fix it on this house or b) not do that next time. The goal is always to deliver remarkable results within your budget while continuously improving.
Ryan reports summer and winter comfort at 9.5 out of 10 now, that’s a win!
Your Next Steps
We want every project to be a case study. If you truly want to solve a problem in your home, we can help. Be committed, though, because as you can see these projects are fairly involved. We gradually walk you through the process so it’s only slightly overwhelming at worst. This project took about 8 months start to finish. We purposely take it slow, we’re more likely to catch mistakes that way, we’re all less likely to get overwhelmed, and it usually costs less.
Once you’re ready to start the process, it all begins with an Initial Consultation where we’ll create a prioritized list of problems to solve and pretend like we’re on an episode of Bill Nye the Science Guy with some blower door testing. (It’s a lot of fun!) You can get an Initial by clicking on the “Get Started” button at the top right of the website.
Be sure to spend some time reading up before you do, though, we have a ton of (hopefully) useful information on this website, along with Free Guides on everything from HVAC to ice dams. Thanks for reading! If you still want more, be sure to check out the photo album which has about 60 of the 800 pictures I took on this project (that’s totally normal, by the way.)
Detailed Numbers
Gas Use Before 2052 therms
Predicted Use After 1326 therms
Actual Use After 1300 therms
Normalized Use N/A
Electric Use Before 17,000 kWh
Predicted Use After 15,375 kWh
Actual Use After
Normalized Use
$600 Energy Savings Predicted
$Not calculated Energy Savings Actual
Energy Use
Electric
- 1 year before 17,000 kWh
- 2 years before N/A
- 3 years before N/A
- 1 year after 11,671 kWh
- 2 years after N/A
Natural gas
- 1 year before 2052 therms
- 2 years before N/A
- 3 years before N/A
- 1 year after 1300 therms
- 2 years after N/A
Duct Leakage
- Before N/A
- Predicted N/A
- After N/A
IAQ Measurements
- Before N/A
- Predicted N/A
- After N/A
Load Calc Heating/Cooling
- Before Heating 59,355 BTU/hr
- Before Cooling 23,705 BTU/hr
- Predicted Heating 44,666 BTU/hr
- Predicted Cooling 21,829 BTU/hr
- After Heating
- After Cooling
Zonal Testing
With a blower door you can check how leaky a room or space is to the outdoors. It’s a useful way to figure out how close you have come to perfection. If a room reads 0.0 it is completely indoors. If it reads 50, it is completely outdoors. (50 Pascals, a pressure unit, is the standard pressure Building Scientists run the blower door at.) When I did the audit, I wasn’t yet doing zonal, so I don’t have before numbers.
Halfway Point/Three Quarters/Post Project
Year Built 1976
Square Footage 2568
Energy Use Index*
Before 102.6
Target 73.5
After 67.5**
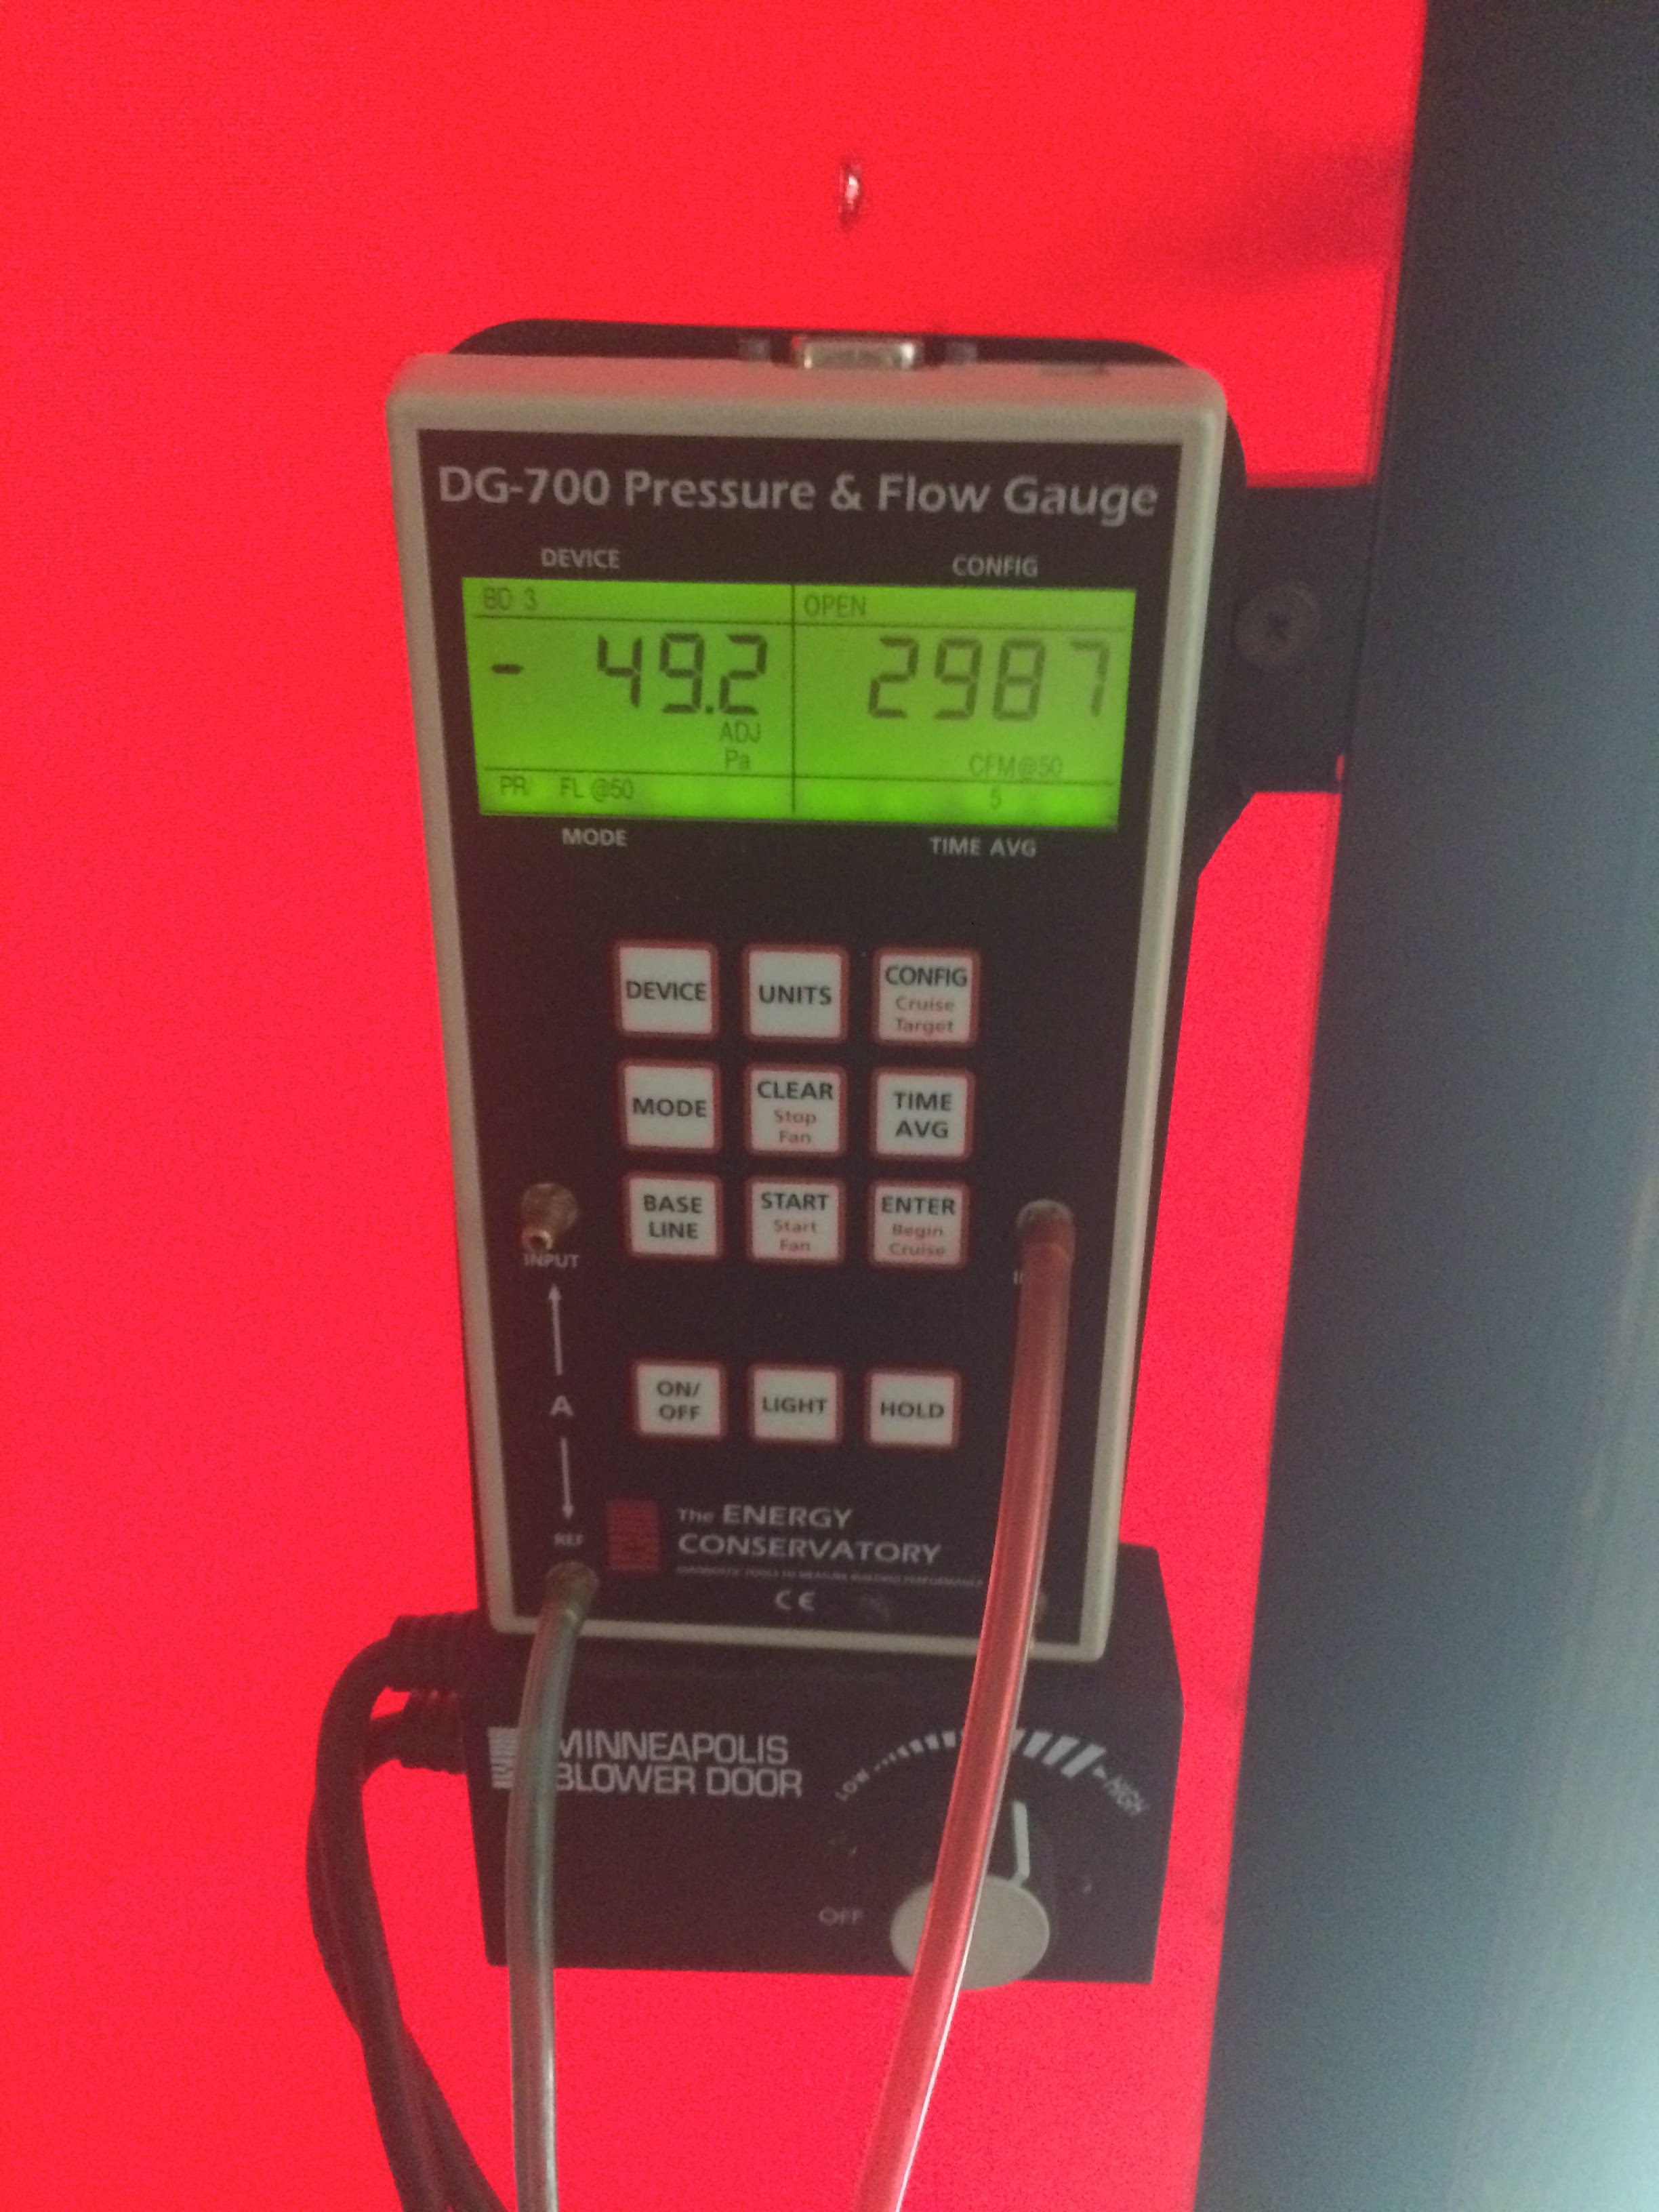
Air Leakage (cfm50)
Start 6589
Target 4200
End 2987
*EUI is a measure of a home’s energy use per square foot. A 0 means it makes all the power it uses, such as with solar. Below 50 is very good. 100 is a bit piggish.
**The measured winter was unusually mild, I expect this number to be 5-8 points higher this winter.