Jim's office was air conditioned in winter and heated in summer.
So was their bedroom.
He wanted to reverse that.
Background
Jim and Jan bought this house over 20 years ago and have been good to it, upgrading it carefully through the years. They raised their daughters here. Now that their kids are out of the house and Jim is retired, they’re making more upgrades to make the house just the way they want it.
A few things kept bothering them. The icicles by the garage were too big for comfort. Water leaked from an ice dam in the back of the house. It stained the ceiling in the family room, which Jim had to repair. Jim’s office is always a bit too hot or too cold, seeing as much as a 5-7 degree swing from the rest of the upstairs. The master bedroom is partly over the garage and roasts in summer and freezes in winter. The second floor is at least 5 degrees warmer than the first in summer. The basement can be a touch damp, although waterproofing improved it greatly. Small annoyances that added up made this home well suited to Home Performance upgrades using our Comprehensive Planning Process.
Jim was a project manager for an IT company, so he likes to plan things ahead. He has a very clear appreciation for having a thorough logical plan mapped out before starting work. Better still, he is an avid DIYer. He’s just a step or two down from Bob Vila. On this job Jim taught me just how much weight a homeowner can carry. Homeowners can do as good or better work than a contractor, and now DIY work scopes are often part of the project paths we deliver.
Summary of results: The office is cozy (just in time for retirement), the master bedroom experienced a huge improvement, and the house is a nicer place to live.
Photo Album
See a bunch of project photos here.

Problems
- Ice damming on garage
- Ice damming behind master, including water damage which Jim had to repair
- Jim’s office too hot/cold
- Master bedroom way too hot/cold
- Second floor 5+ degrees warmer in summer and several degrees colder in the winter
- Basement a little musty.
- Mild allergies and dry skin.
Results
- No noticeable ice dams
- Jim’s office up to 9/10 for comfort
- Master bedroom much closer to the rest of the house
- Second floor no more than 2-3 degrees different from first
- Basement still a little musty
- Carbon dioxide and humidity levels elevated (fix planned)
Testimonial
“I was looking for help on how to solve a severe ice dam problem. While doing internet research on how I might solve this problem I ran across the Energy Smart Home Performance website. Their approach to solving home performance problems made a lot of sense to me. Instead of just looking to fix the symptom (ice dam) their approach is figure out the likely cause(s) and address those. In other words, look at the entire house as an interconnected system. Luckily this company is located in NE Ohio so I contacted Nate Adams and he came out for an initial consultation with my wife and me in March 2015. We talked about the ice dams but he also kept asking additional questions to see if there were other areas of the house that we would improve if we could. I mentioned that my 2nd floor office and the master bedroom were either too warm or too cold and in general the 2nd floor temperature was significantly different from the first floor.
Long story short we hired Nate to do a complete analysis of our home’s performance. It started with a blower door test allowing him to identify the amount of air leakage and where those leaks were. The infrared camera images showed some huge air leaks in the top plates on the 2nd floor, the soffits in the two 2nd floor bathrooms and the knee wall in the master bedroom. He then developed a complete plan to address our issues and concerns. The plan included specific steps to take, along with estimated costs for a contractor to do each one. Nate’s service included a three tier model (Budget, Sweet Spot, Complete) and we then met to develop a comprehensive plan of which steps we would do and who would do them. I’m a DIYer so I ended up doing a lot of the work myself (saving myself a significant amount of money) and allowing us to do almost everything in the Complete model. Nate was heavily involved in the entire process from helping me find contractors to perform some of the work to answering all of the questions I had along the way. Nate is not a general contractor, he is a home performance consultant and is generally paid by the hour so he can do as much or as little as you want. He generally doesn’t do most of the actual work himself, that is done by contractors or yourself, but he can act as your agent with the contractors if you wish and he has contacts with a number of excellent contractors depending what work you need done.
Upon completion of the project we had reduced the blower door number by an outstanding 44% from the initial measurement. This was done through a combination of air-leak sealing (rim & band joists, knee walls, top plates in attic) using spray foam, spray foam insulation in the master bedroom cathedral ceiling (done in conjunction with a roof replacement), removal of fiberglass attic insulation and replacing with 18” of blown in cellulose, and a number of smaller items.
It was a fun project that took about 6 months elapsed time from my initial meeting with Nate until it was all done. I learned a lot during the project and Nate was great to work with. Although we’ve only had a limited “test period”, our home already feels much more comfortable with no big temperature differences between the 1st and 2nd floors and my office and the master bedroom are much more comfortable overall. We’re looking forward to the energy savings these changes will bring but that was not really the major reason for doing the project; for us it was really more about having a comfortable home where we can enjoy being in any part of the house.”
Post Project Client Feedback
“I can give you one piece of feedback right now. I’ve been sitting in my office for several hours today. Last winter I would have had a sweatshirt on and had my little space heater going on a day like today. Today, it is very comfortable in just my standard winter wear of jeans and a flannel shirt. So a huge improvement in this room!” 1-4-16
“As promised some further follow-up after a really cold night; 5 degrees on our thermometer this morning. I have nothing to report as in pretty much everything is good. No significant difference in temperature from downstairs to upstairs or from room to room. I also checked all of the cold walls and ceilings that we found last winter and they all felt perfectly fine now. The master bedroom is still slightly cooler than the rest of the upstairs but not anything like it was before and certainly acceptable given how difficult a room it is.” 1-5-16
“Thought you might like to see these pictures of my house and my neighbors house (3rd picture) that I took today now that we have both snow and cold. Notice any difference between them? (These pictures are in the full story.) No icicles on mine!!!! Yeah! I also noticed driving down our street today how many other houses also had icicles hanging off the gutters. I also included one shot of the back of the house, again no icicles except some very tiny ones below where the bathroom fan vent is so no surprise there.” 2-13-16
Upgrades
-
Air Sealing and Insulation
- Upper Attic – Removed insulation, air sealed, installed R-49 blown cellulose. (Cellulose was DIY.)
- Master Bedroom Cathedral Ceiling – Removed roof deck (as part of planned roof replacement) and existing insulation, 3.5” closed cell spray foam applied to drywall. Roof reinstalled.
- Master/Garage Knee Wall Attic – Removed insulation, closed cell foam, new sealed hatch. (DIY)
- Front Porch Knee Wall – Dropped porch ceiling, foamed knee wall, tested for leaks, replaced ceiling. (DIY)
- Band Joists (Vertical board between first and second floor) – Sealed with caulk/foam on 3 accessible sides of house. (DIY)
- Basement – Closed cell foam in rim joists. (DIY)
-
HVAC
- Heat pump water heater
- NetAtMo IAQ monitor to keep an eye on carbon dioxide and humidity levels
- Ventilating dehumidifier
-
Other
- Two new (and quieter) bath fans on second floor, with hard, insulated lines vented through the roof. (DIY)
Full Story
First off, I absolutely love this project. The homeowners were so fantastically pleasant to work with, and Jim blew my socks off with the quality of his DIY work. He got a very high level package for substantially less because he was willing to do a lot of work himself including new bath fans and a bunch of air sealing with a foam kit. It was a great test of the business model I’ve purposely set up to work well with DIYers. His work quality bordered on the spectacular, I didn’t find a leak in the work he did in the basement. That’s tough to do! Jim also shared some project management techniques with me, which were helpful, as I’m new to that.
This house is also a good example of how just because a house is reasonably airtight and well insulated with low energy use, doesn’t mean there aren’t a lot of problems to solve. This was a pretty long list.
The result borders on the spectacular, I am super pleased about it. If you read our other case studies, I’m not often easy on myself like this.
The Diagnosis
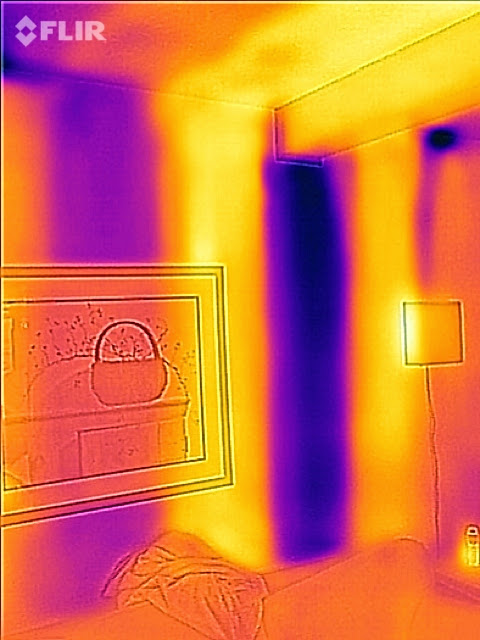
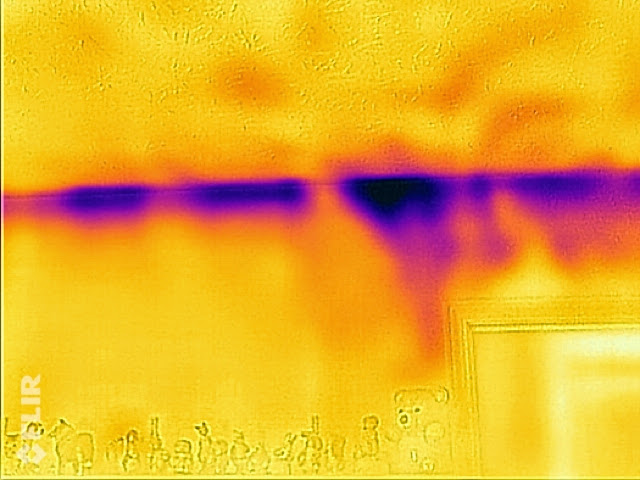
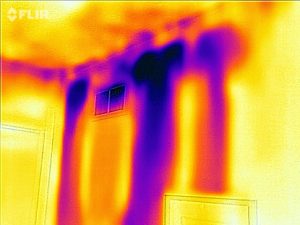
All right, all right, get on with it! This was a really fun house for infrared work, it had a whole pile of train wrecks to fix. Let’s start with Jim’s office, the stairway is right behind his chair:

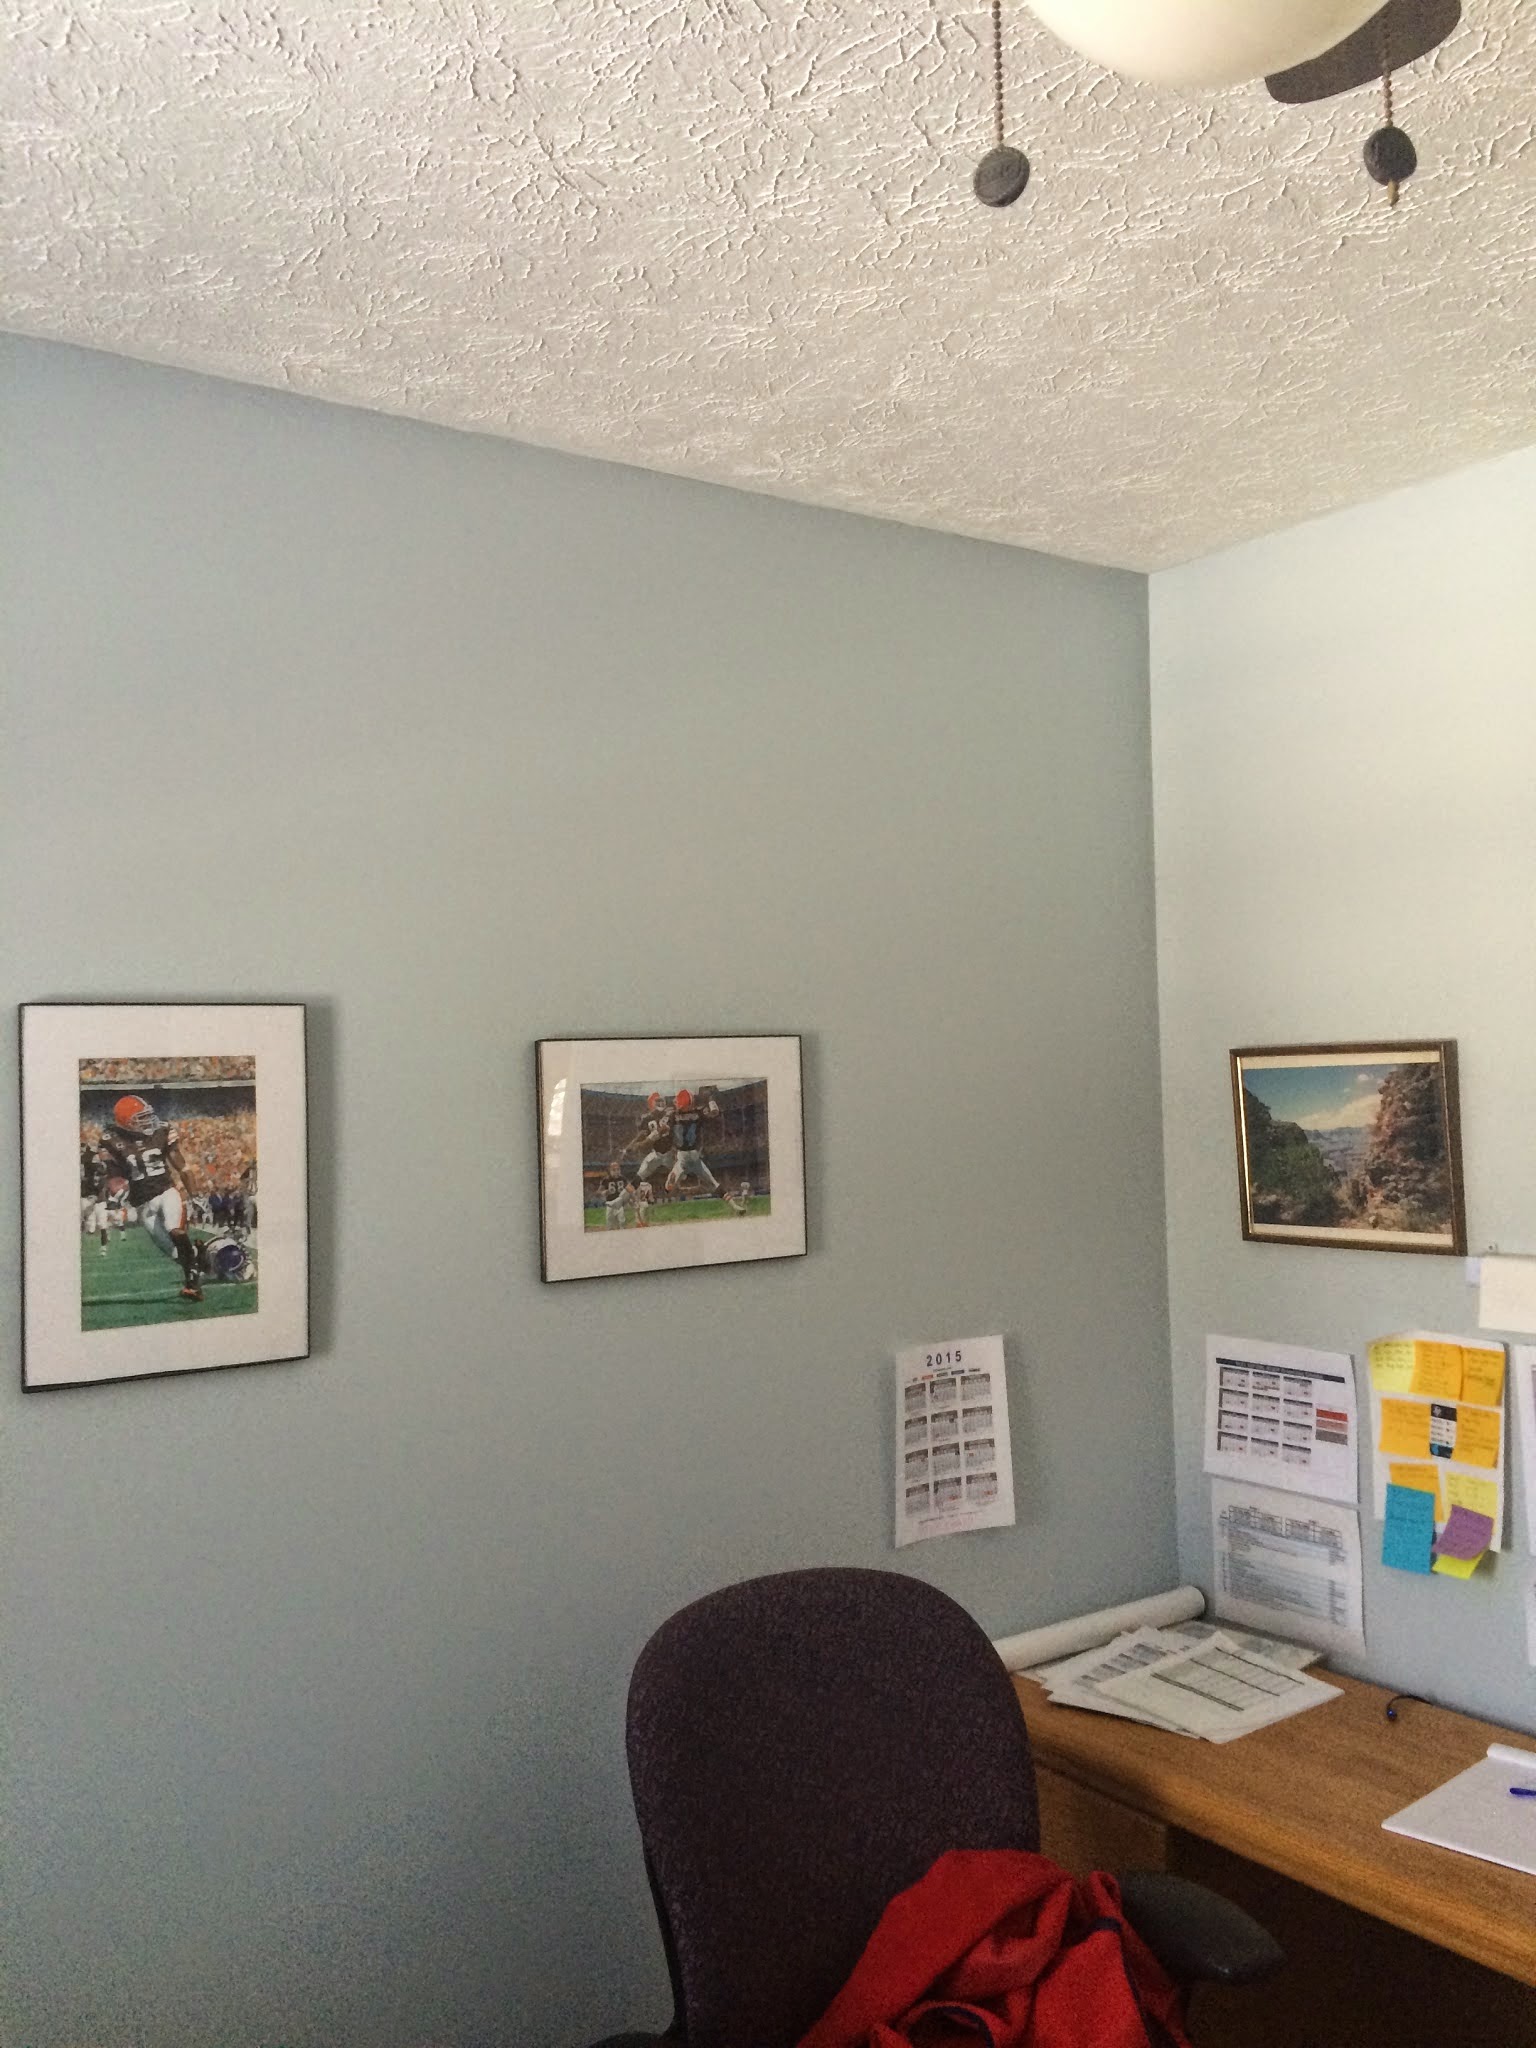
I really love doing infrared work on cold days! You can see everything! The blue on the wall is right above the stairway. That spot is completely uninsulated. Our bodies have about 165,000 temperature/comfort sensors, and we can sense cold surfaces near us, and they drive us nuts. Meanwhile the house has 1 temperature sensor – the thermostat.
I also noted two classic indicators of thermal discomfort: the space heater and the sweatshirt on the chair.

Right where I would expect it, next to the desk against the cold wall. This can throw heat and bring the surface temperature of the cold wall up, which makes those 165,000 sensors happier. The temperature of surfaces around us is possibly the most important factor in human comfort. It’s called Mean Radiant Temperature (MRT). I gave a little talk to a room of HVAC contractors in April 2016, guess how many people knew this concept? None. If you know the concept, you know what to look for, and you can get good results with an adequate budget.
Moving on, the master bedroom was also noted to be particularly cold. This is actually in the family room, I’ll explain shortly:
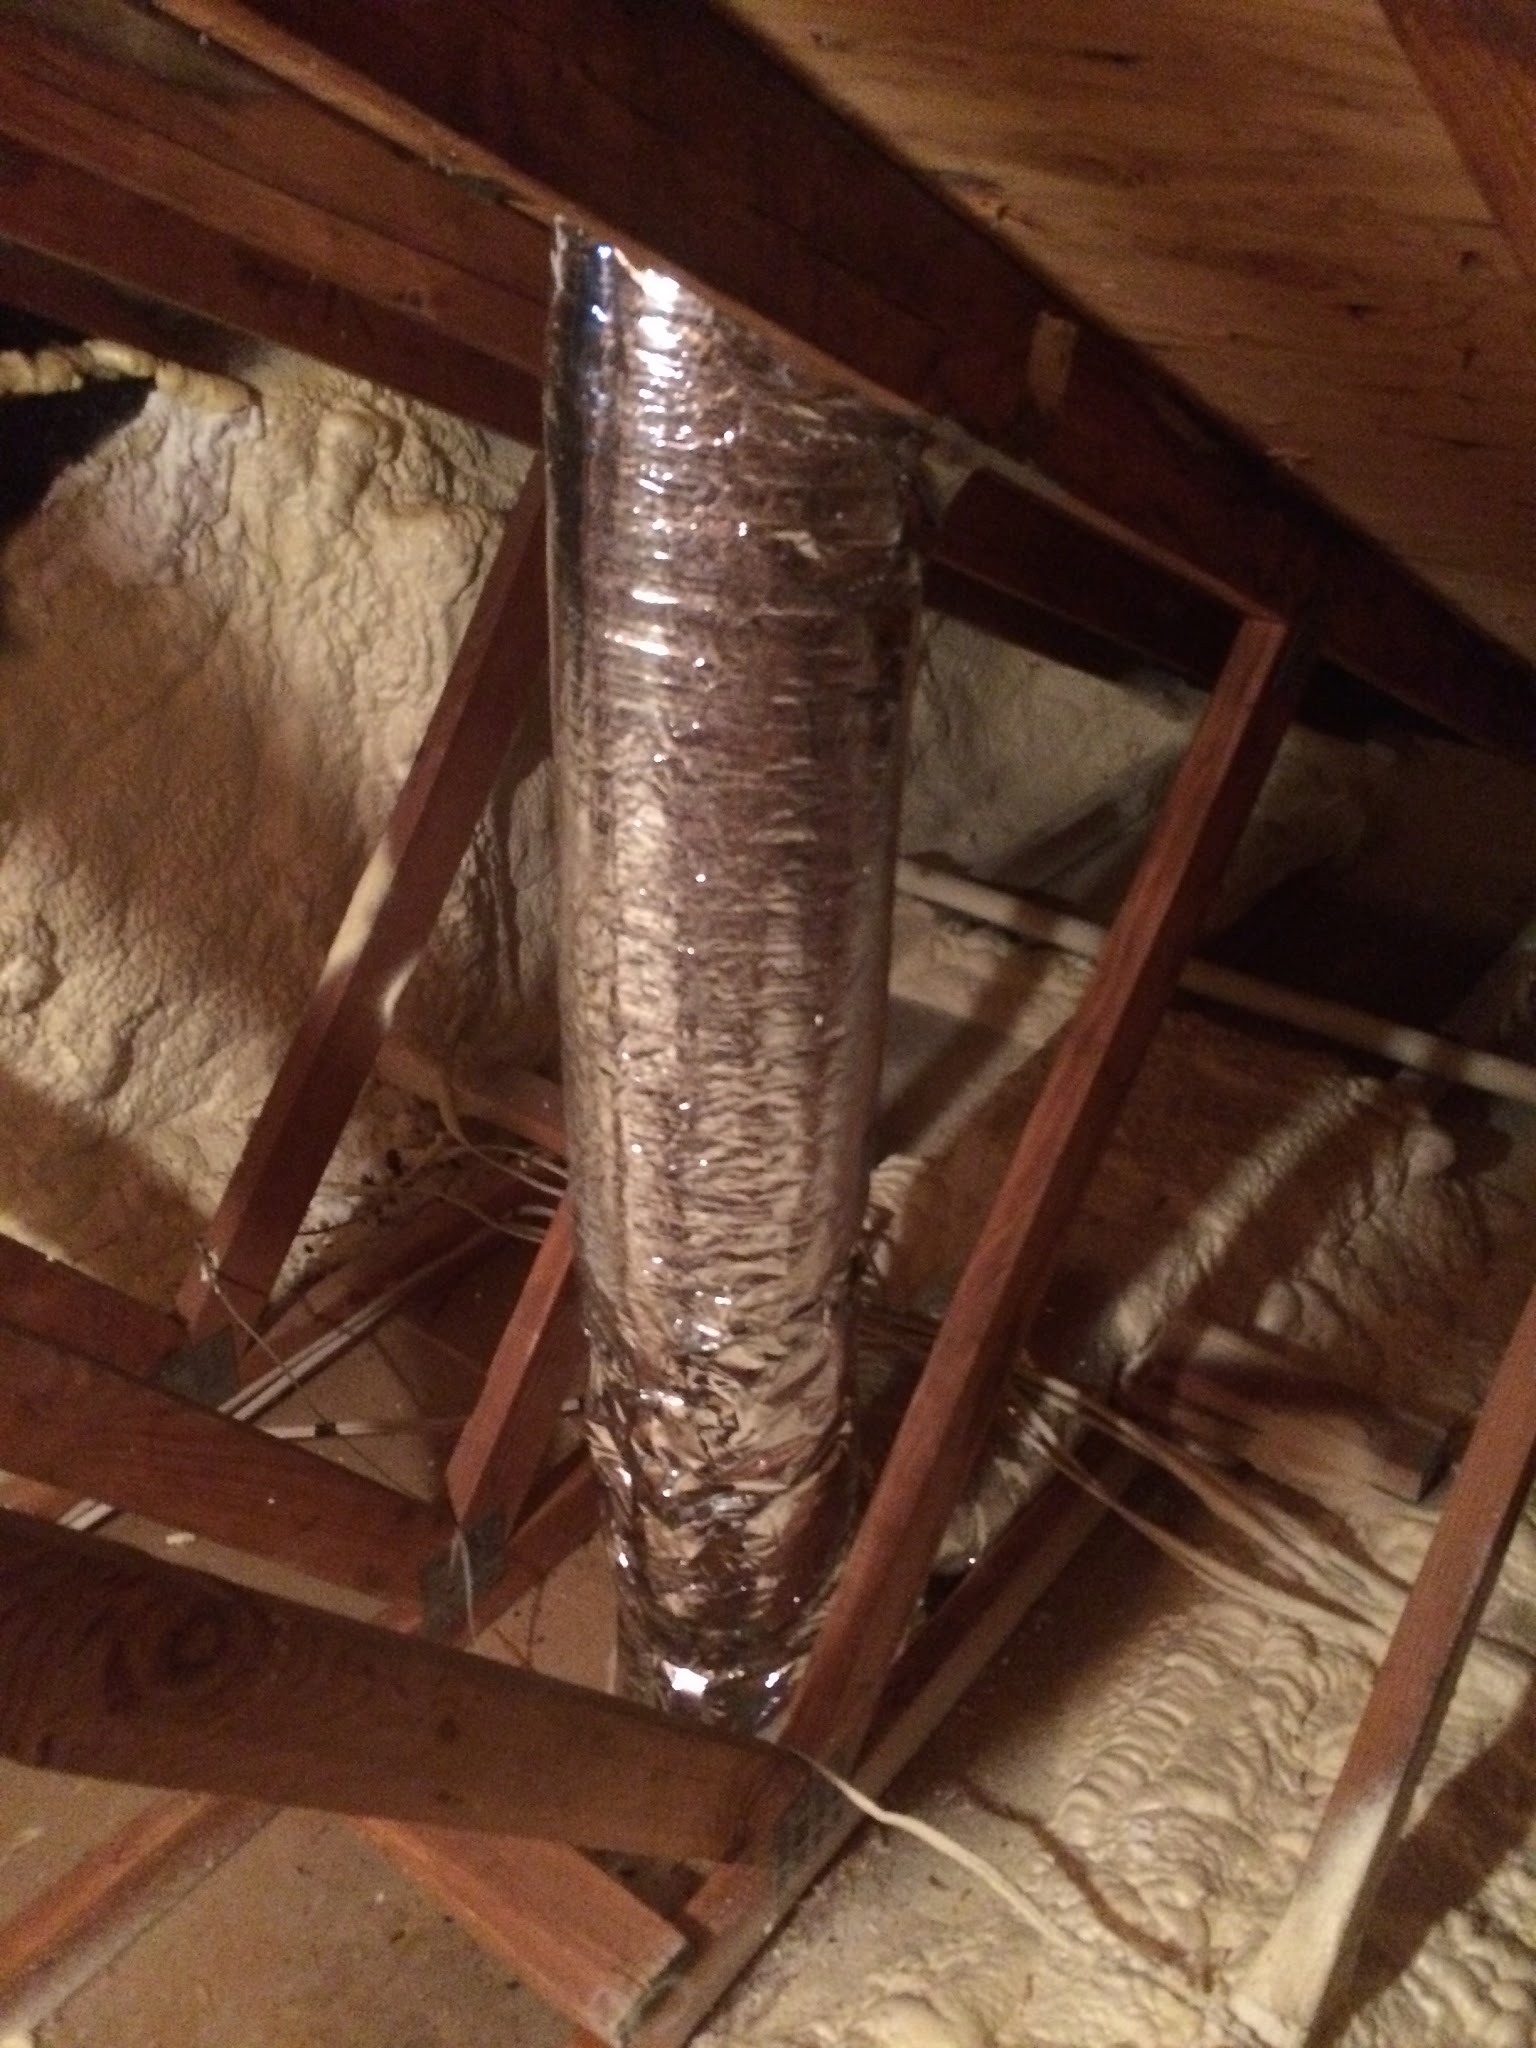
The dark blue spot is cold, that is the cold air return from the master bedroom to the basement. It runs through the attic of the garage, here’s what it looks like:
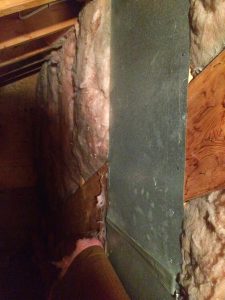
This is the back of the wall in the master closet, I’m above the garage here. The metal panning is called a “panned joist”. It’s when a wall or floor cavity gets used as a duct, rather than putting an actual piece of ductwork in the cavity. These tend to leak like sieves, particularly when they are in the outdoors like this one.
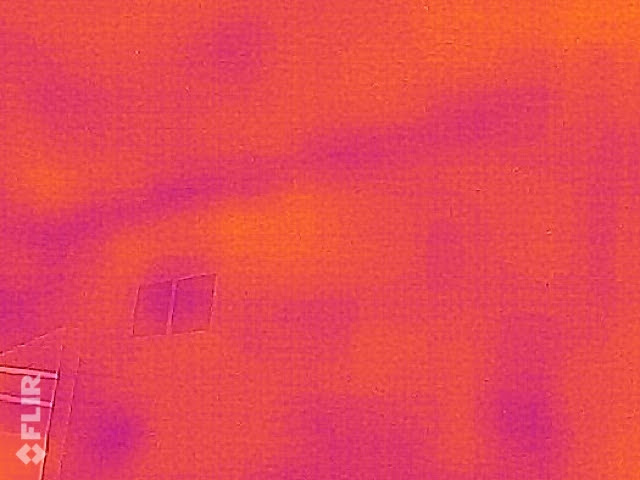
As a teaser of the results we achieved, here is the family room wall downstairs post project:
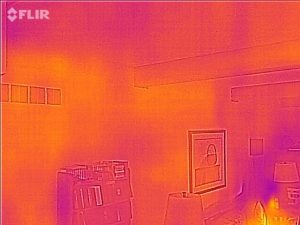
This was taken in the summer, so in this case yellow (warm) would be bad. Instead it is a very boring infrared picture where everything is the same color. This is what you want: boring.
Back in the master bedroom, this is the knee wall of the cathedral ceiling, it backs up to the main attic on the other side of it. It’s really leaky, which you can see from the blue blobs. In general, a big blob shows lack of insulation. A streak like you see coming down the wall indicates an air leak. This wall has it all!
The beam on the master ceiling is also quite leaky, which is typical.
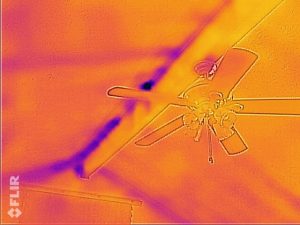
The bathrooms weren’t boring, either. This is the master bath:

The bath fan is the square, it’s pretty leaky. The circle is a recessed light, which tend to be somewhere between awful and hideous for air leakage. Most importantly, the blue line in the corner is a leaky top plate. The top plate is the board(s) at the top of your wall on top of the studs. They tend to leak like crazy, and the ones in this house were extra bad.
But wait there’s more!

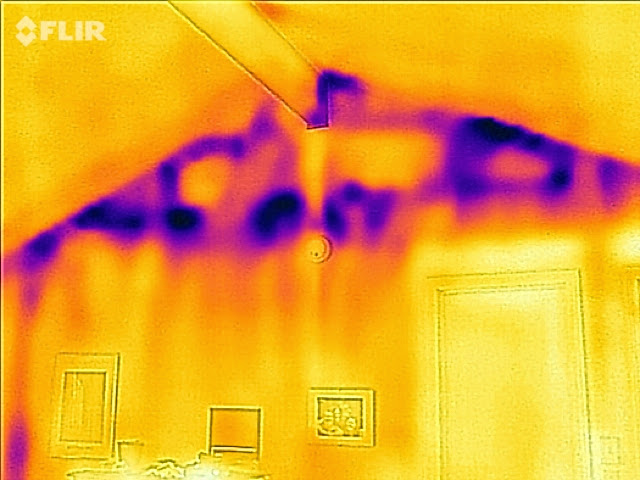
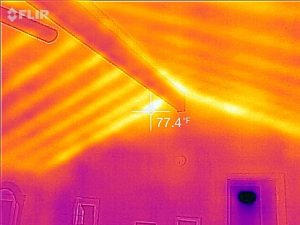
This is one of my favorite infrared pictures. This is the wall of a bedroom, on the other side is the bathroom. This is inside the house, not outside. The huge blue spot is cold air being pulled into the house. In the winter, warm air from inside the house leaks up through the wall into the attic and is part of the ice damming problem. In the summer hot air from the attic pushes down into the house, leading to the hot second floor. I often say everything is interconnected, this is one example.
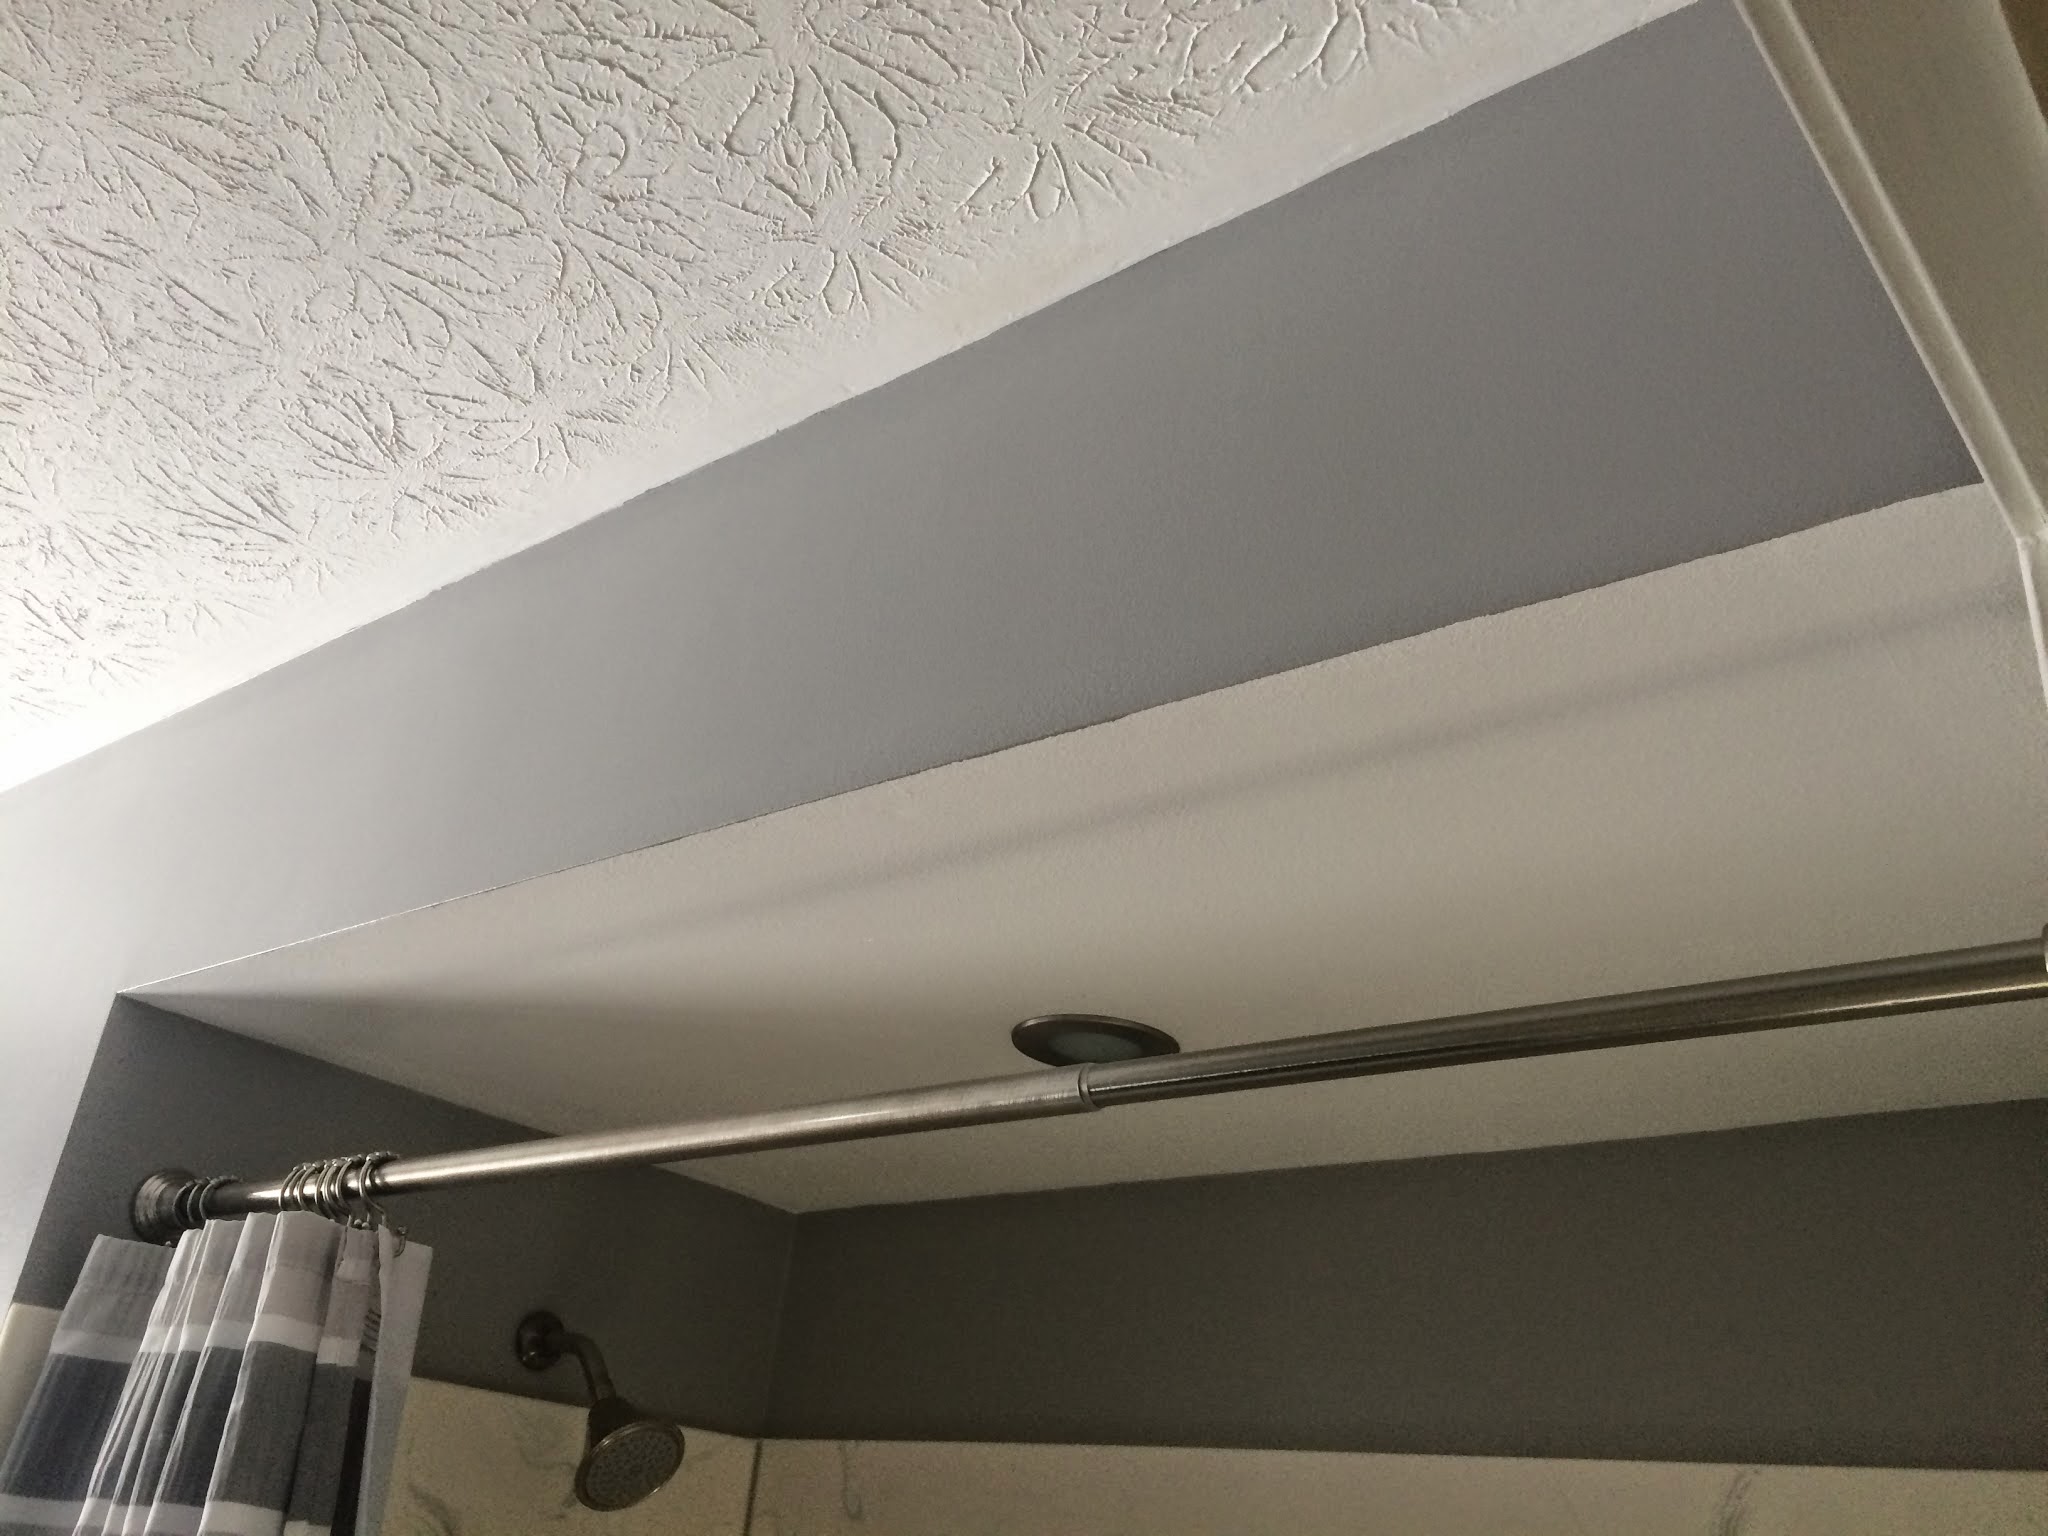
This is called a dropped soffit, it’s where the ceiling drops down about a foot. They were very common in the 70s and 80s, but they show up in many homes. They are also awful for air and heat leakage. This is what was on the other side of the wall in the last photo. Here’s what the dropped soffit looks like in infrared:
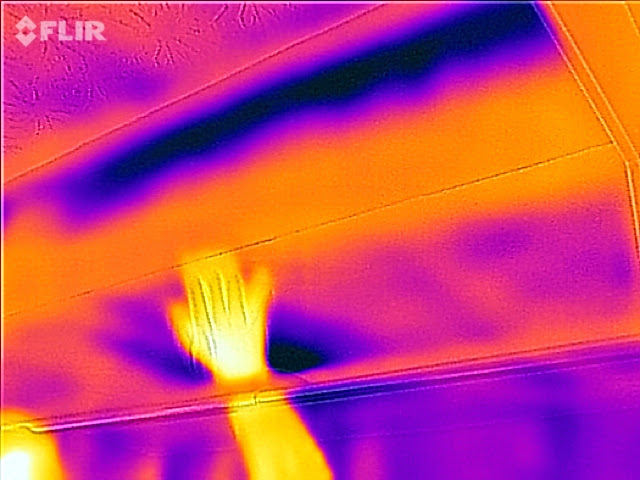
That’s Jim’s hand in the photo, he saw the infrared camera and wanted to feel the cold for himself. Dropped soffits are a major problem that needs to be dealt with. There is another one in the master bath as well. These are also common in kitchens.
Remember, this house has a relatively low blower door, or air leakage number. We find there is a tipping point around 1:1 blower door leakage to square footage. This house started off at 3349:2569, about 1.3:1. That is where the Cape Cod homes I’ve worked on typically end up after job completion. We got this home down to 0.7:1. Here was a house with a fairly good leakage number, but it had a ton of problems. Everything is relative. Don’t prejudge, every time I do it, I mess something up.
I returned to offer plans to Jim and Jan about how to handle the various problems in the home within the budget they gave me to work with. We typically offer 3 packages. We actually start with soup to nuts, what we call package 3, then work backwards to chop off items until we get to the budget number. The 3 packages are just a trial effort. Once my clients have a few weeks to absorb the firehose treatment I gave them, we sit back down and decide exactly what we will do together.
In this case, Jim ended up doing just shy of Package 3 (Complete) and pulled it off by doing a ton of DIY. Let’s dig into the project itself.
The Project – Preparation
As always, it’s the preparation work that makes or breaks you.
It’s time to give Jim some props, the first of a few. As you saw earlier, the bath fan was leaky. It also terminated in the attic, which frequently leads to mold problems. Jim did an amazing job installing two new bath fans and venting them through the roof. Here’s one partway through install:
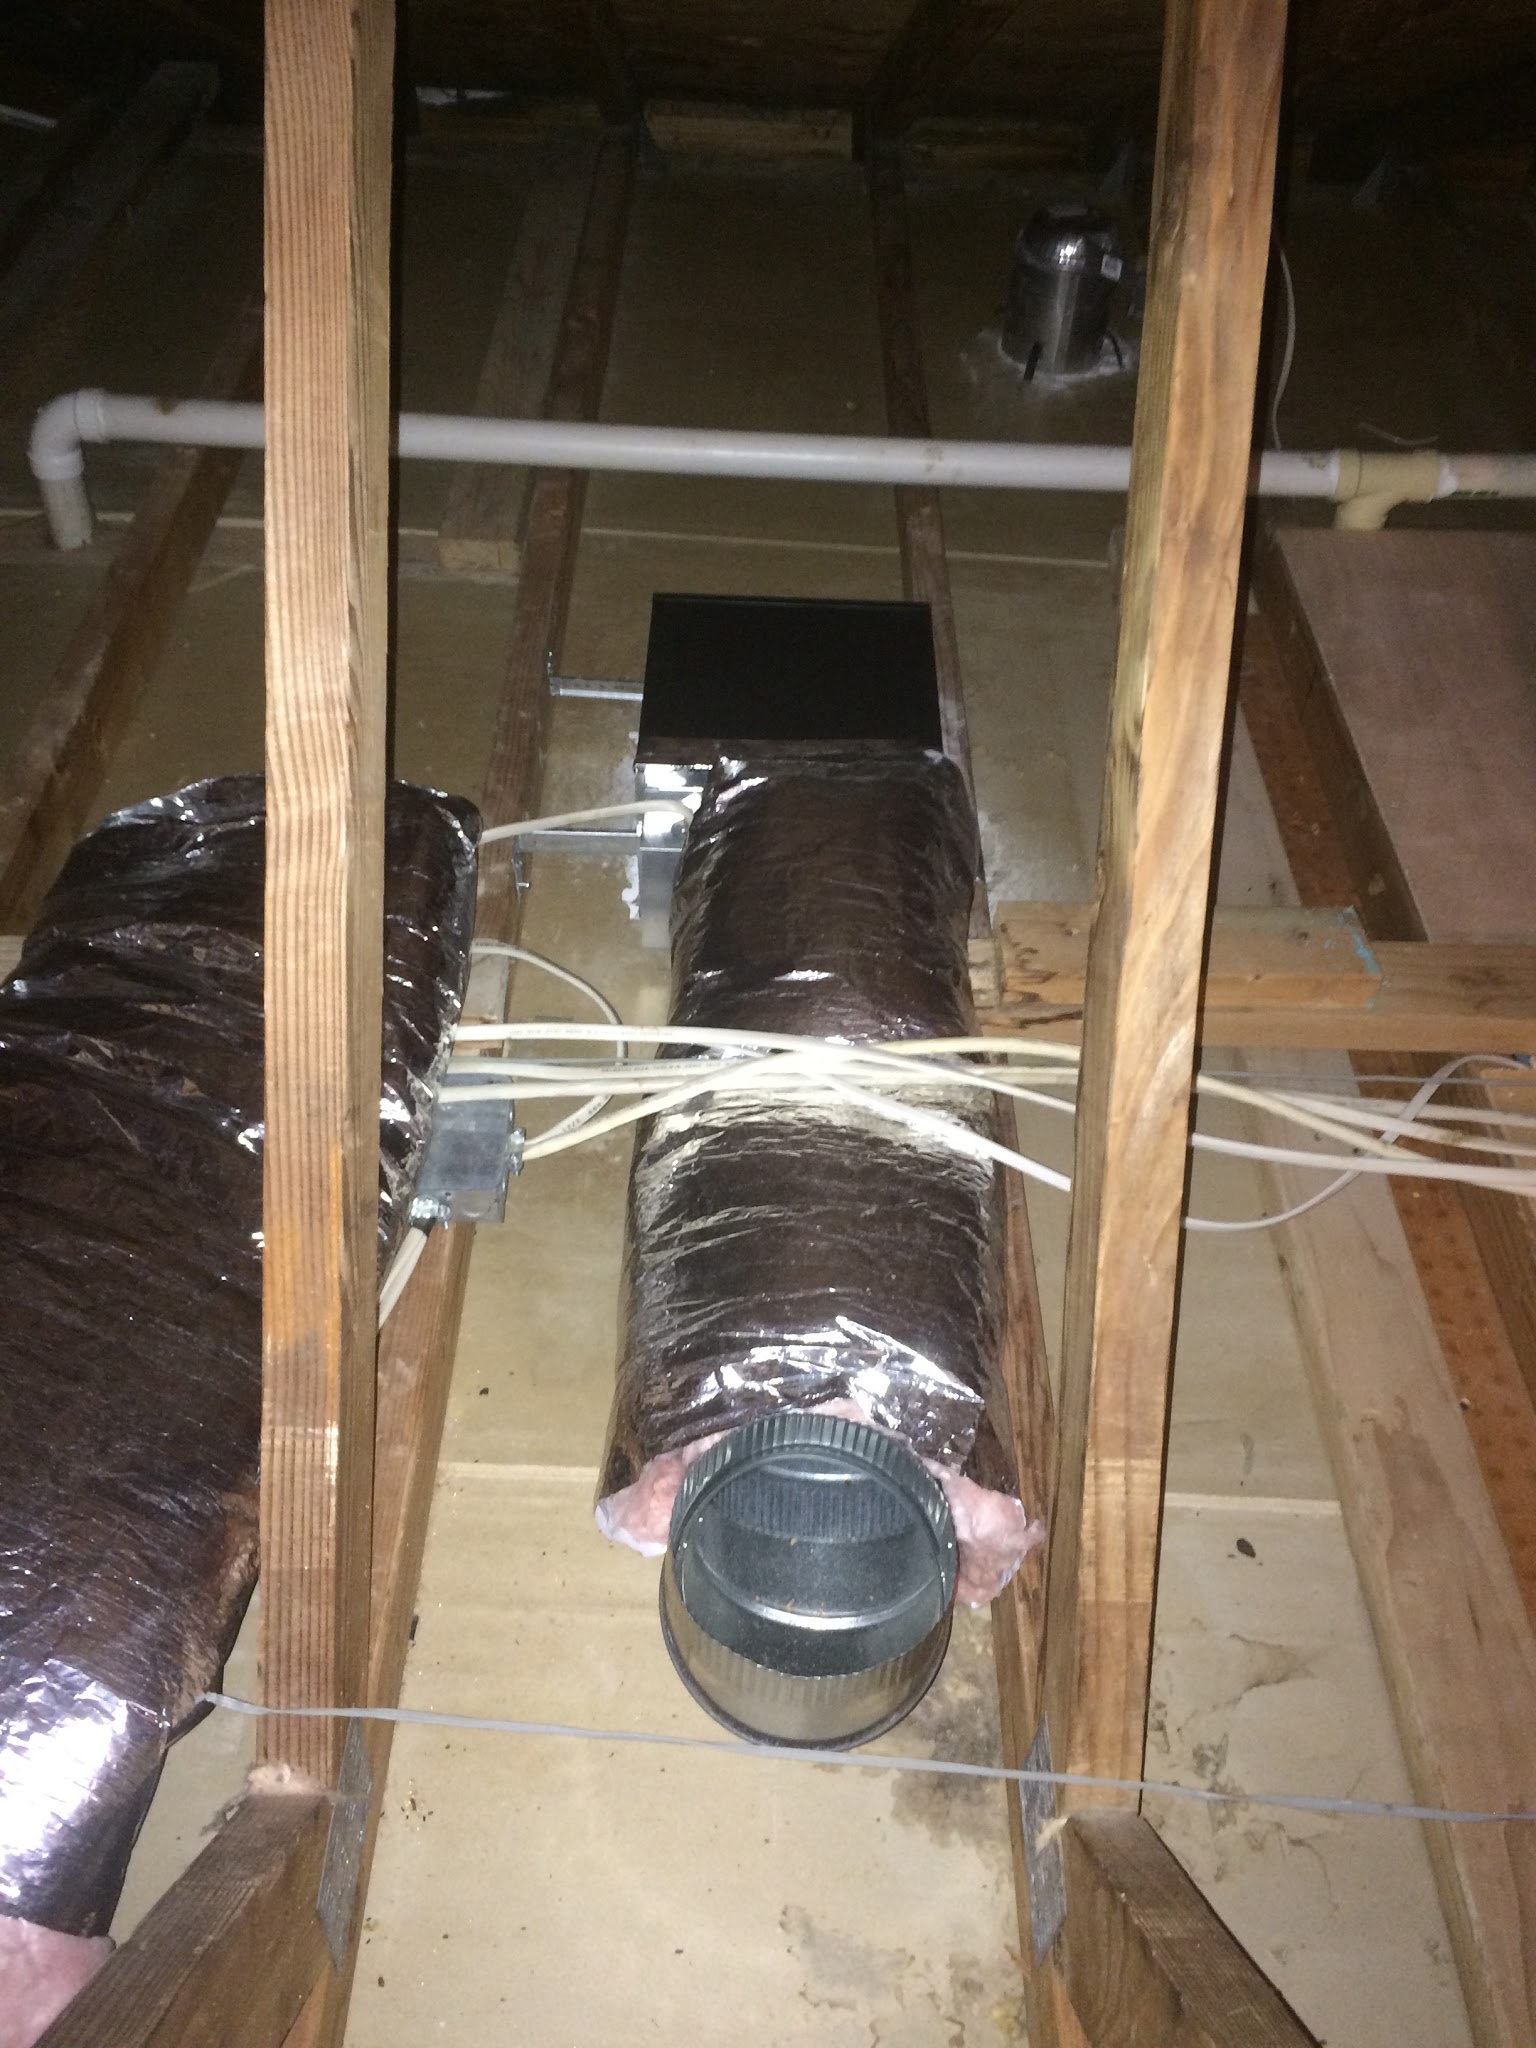
Note that he used 6” hard duct (not 4”, which flows a lot less) and insulated the line. Just as my chapter on Bath Fans prescribes, and what his work scope said.
Here it is vented out the roof. Note he did it with only one 90 degree turn and a short run, 8-10 feet of pipe. Very nicely done! You may note the spray foam, this picture is post air sealing.
I say there are Five Priorities of Home Performance: air sealing, air sealing, air sealing, insulation, and the right HVAC. Air sealing absolutely makes or breaks projects – miss a few key leaks and the results stink. It’s a game of inches. Don’t miss any easy ones.
One of the biggest parts of preparation is removing existing attic insulation. Yes, it’s hard. Yes, it’s a bit expensive. I used to view it as optional. I don’t now. Do you have to do it? Of course not, it’s your house, not mine. If you expect a reasonable chance of good results, though, it’s necessary. I don’t like that fact much either.
My former foreman from my contracting days, Clayton McCune, got the insulation out of the attic along with his brother Cameron. It exposed all those top plates and dropped soffits that were leaky. We always note that attics smell better after a removal. We get most of the poop and pee out from years of critters holding rave parties.
The dropped soffits in the bathrooms only had cardboard stapled on top, Jim cut wood to fit over the holes and installed it himself so we could seal it with foam.
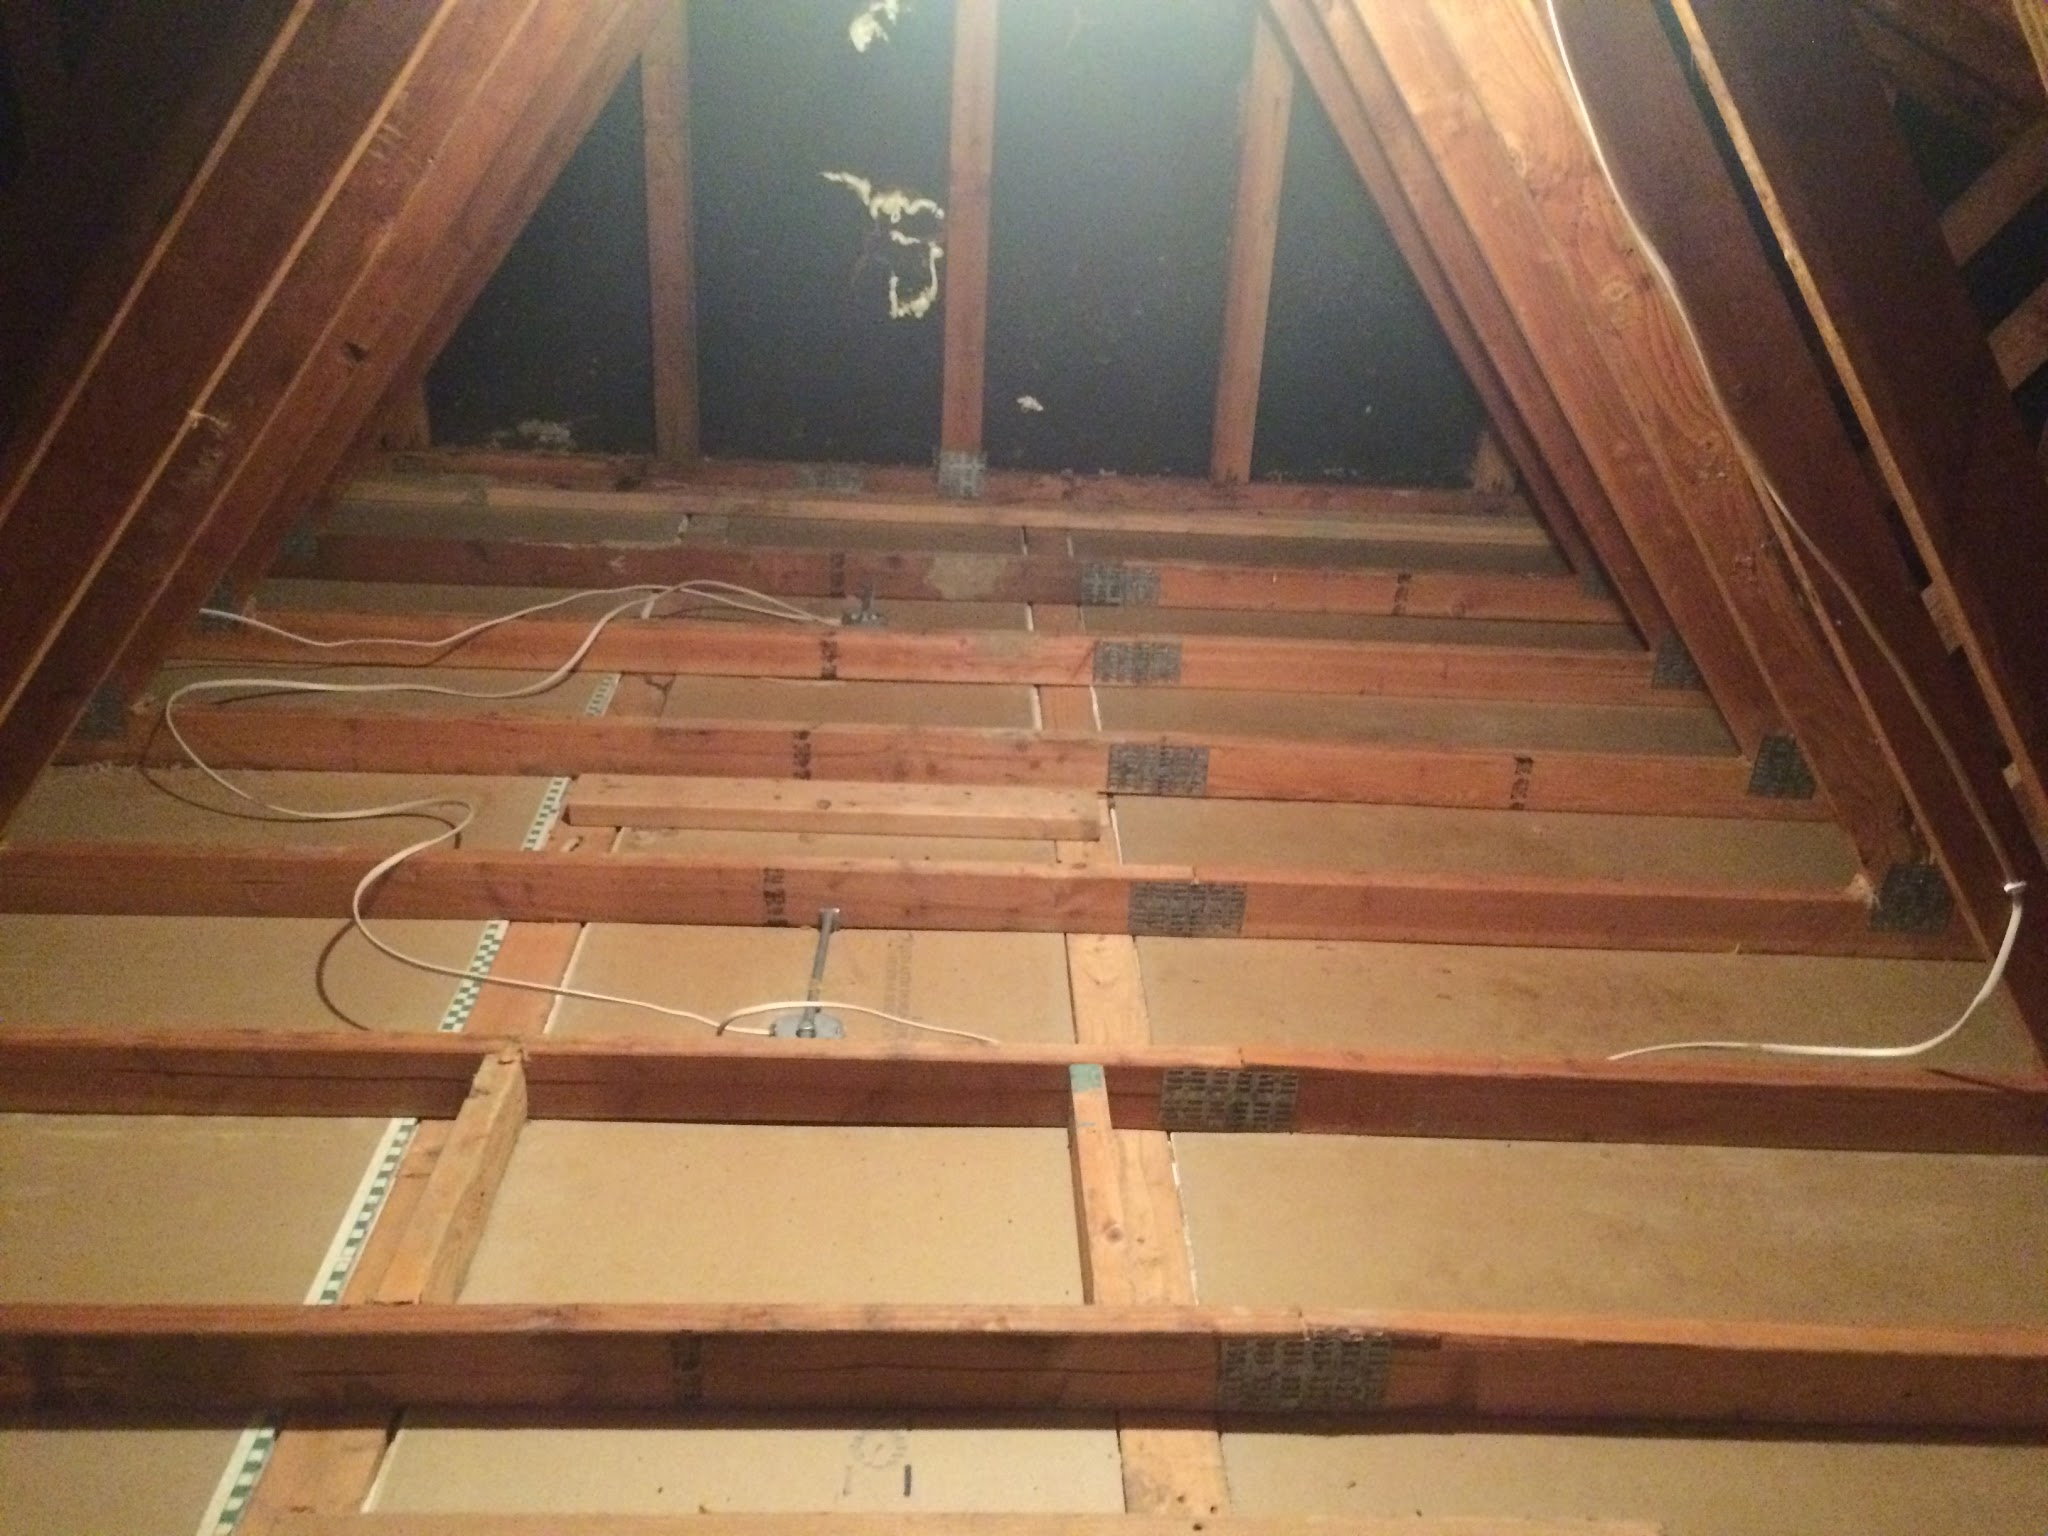
Above is what the attic over the second floor looks like cleaned out. Note the boards you can see going from front to back under the ceiling joists in the picture. Those are the top plates in the hallway, which are leaky like this:
That’s actually in Jim’s office, another reason he was cold in there.
Once those top plates were uncovered, we could seal them, which looks like this:
This work drastically changed the comfort on the second floor. Remember this ugly picture?
It now looks like this:
. 
Boring. Just like we want.
Thanks to air sealing, that wall is no longer cold in the winter. Or hot in the summer. Our bodies don’t like cold surfaces. Or hot ones. What you want is a really boring infrared picture like this with no highs and lows.
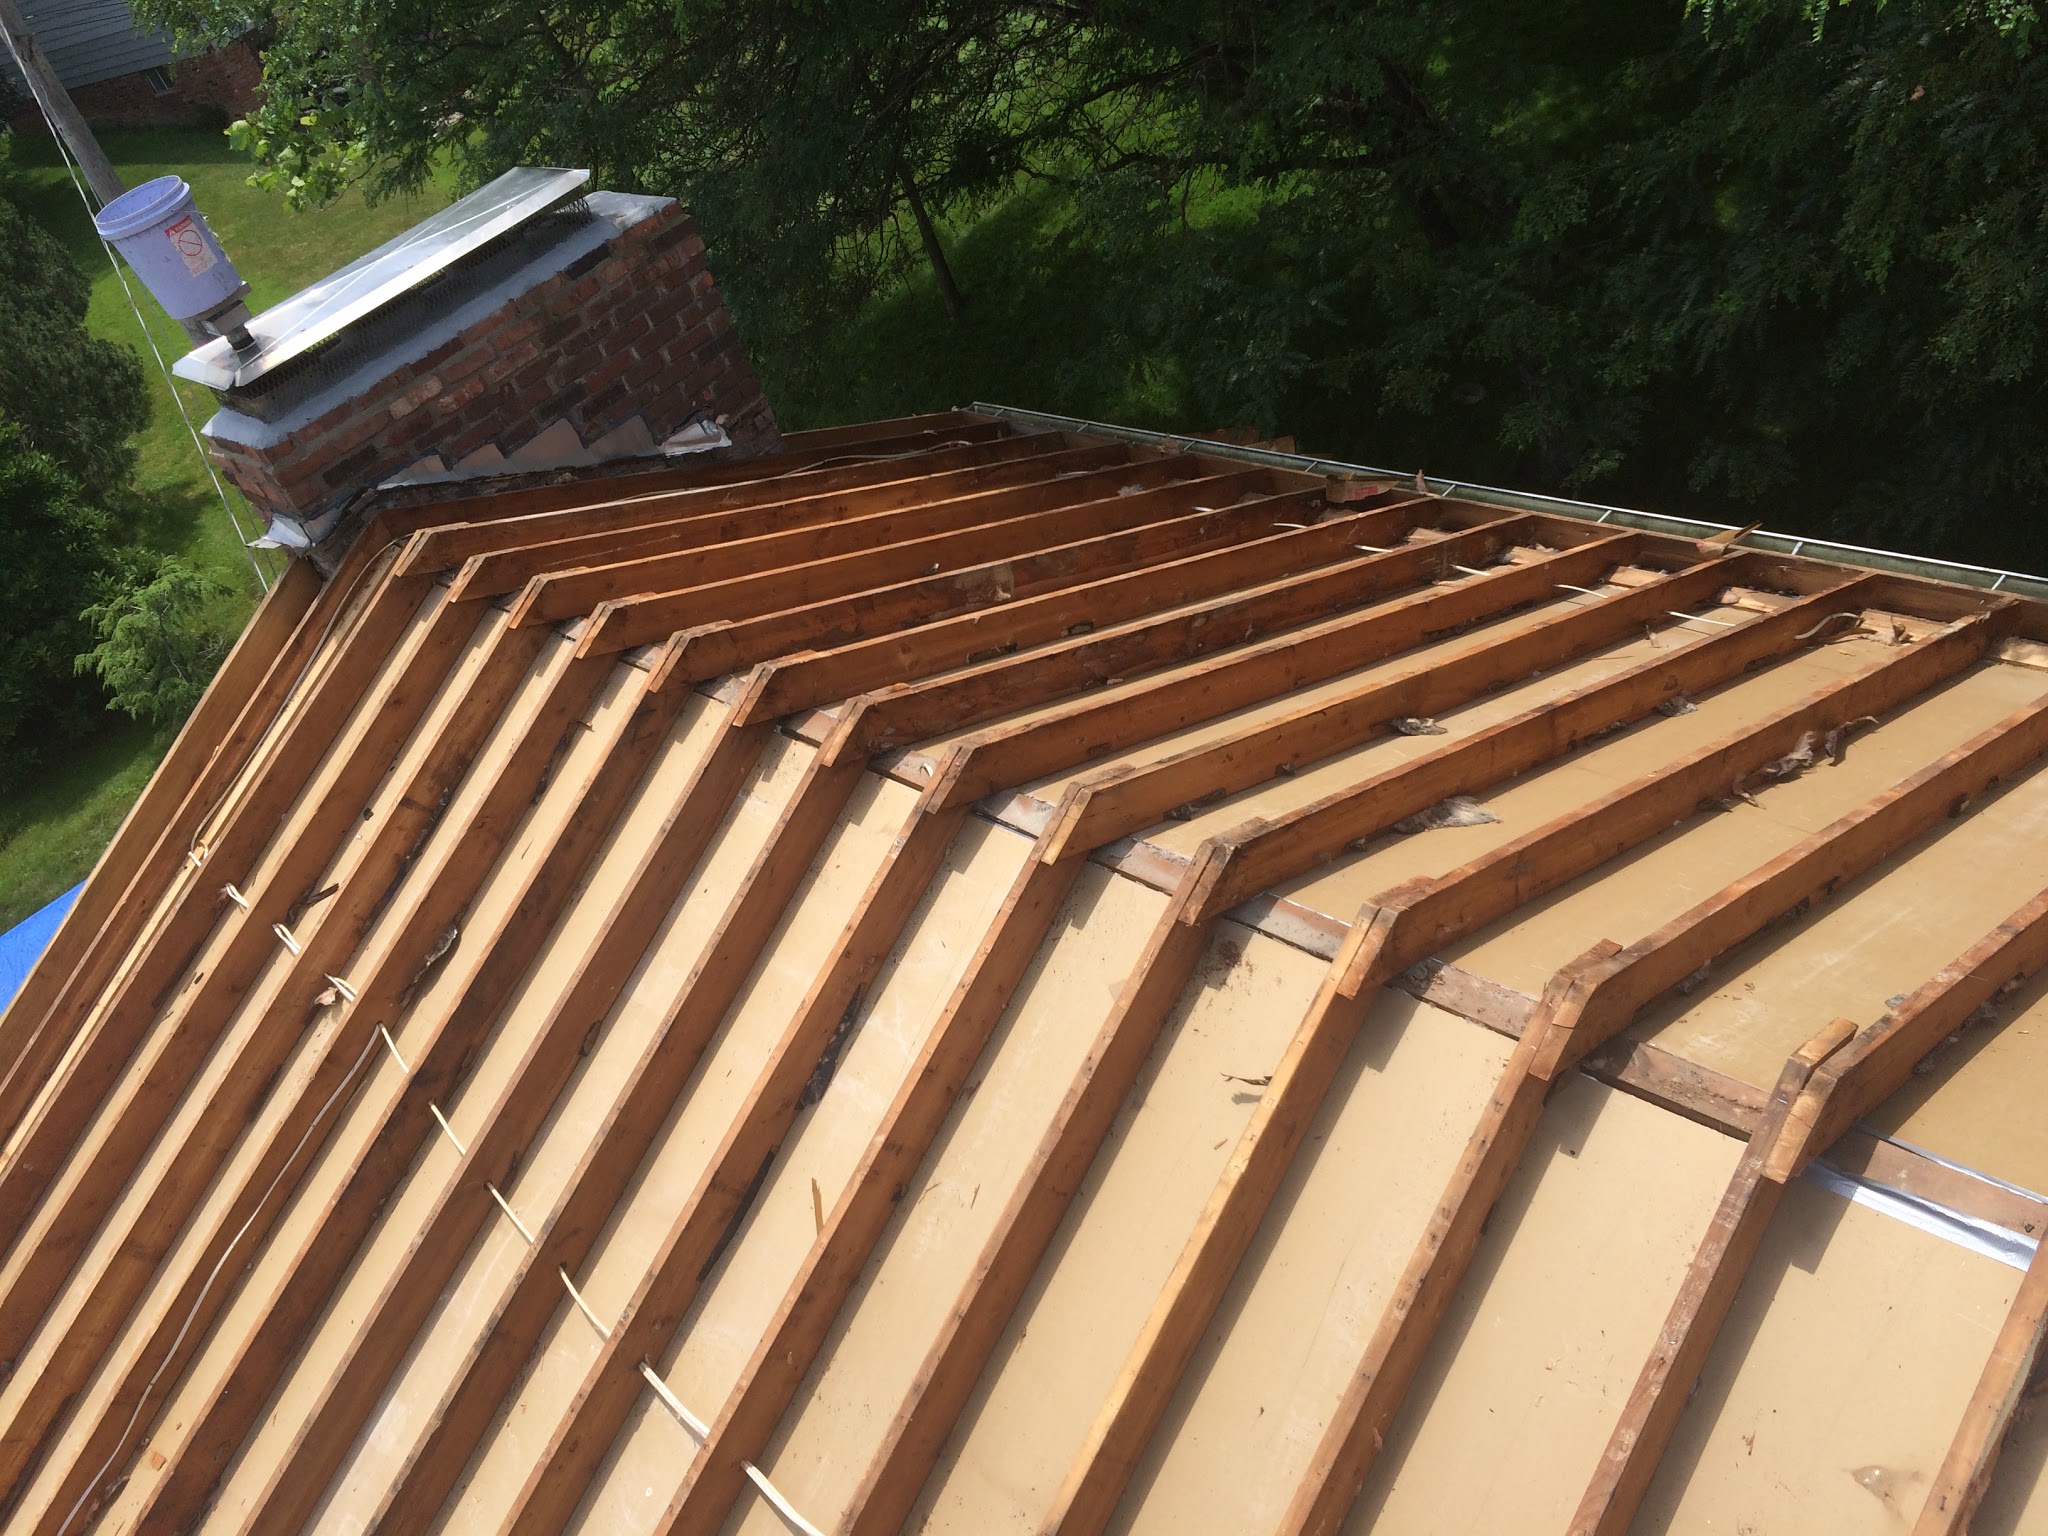
The master bedroom was a very tricky one. With a cathedral ceiling your effective retrofit options are to remove drywall on the inside or the roof on the outside. Jim was getting a new roof, so we had them remove the sheathing. Here’s what we found.
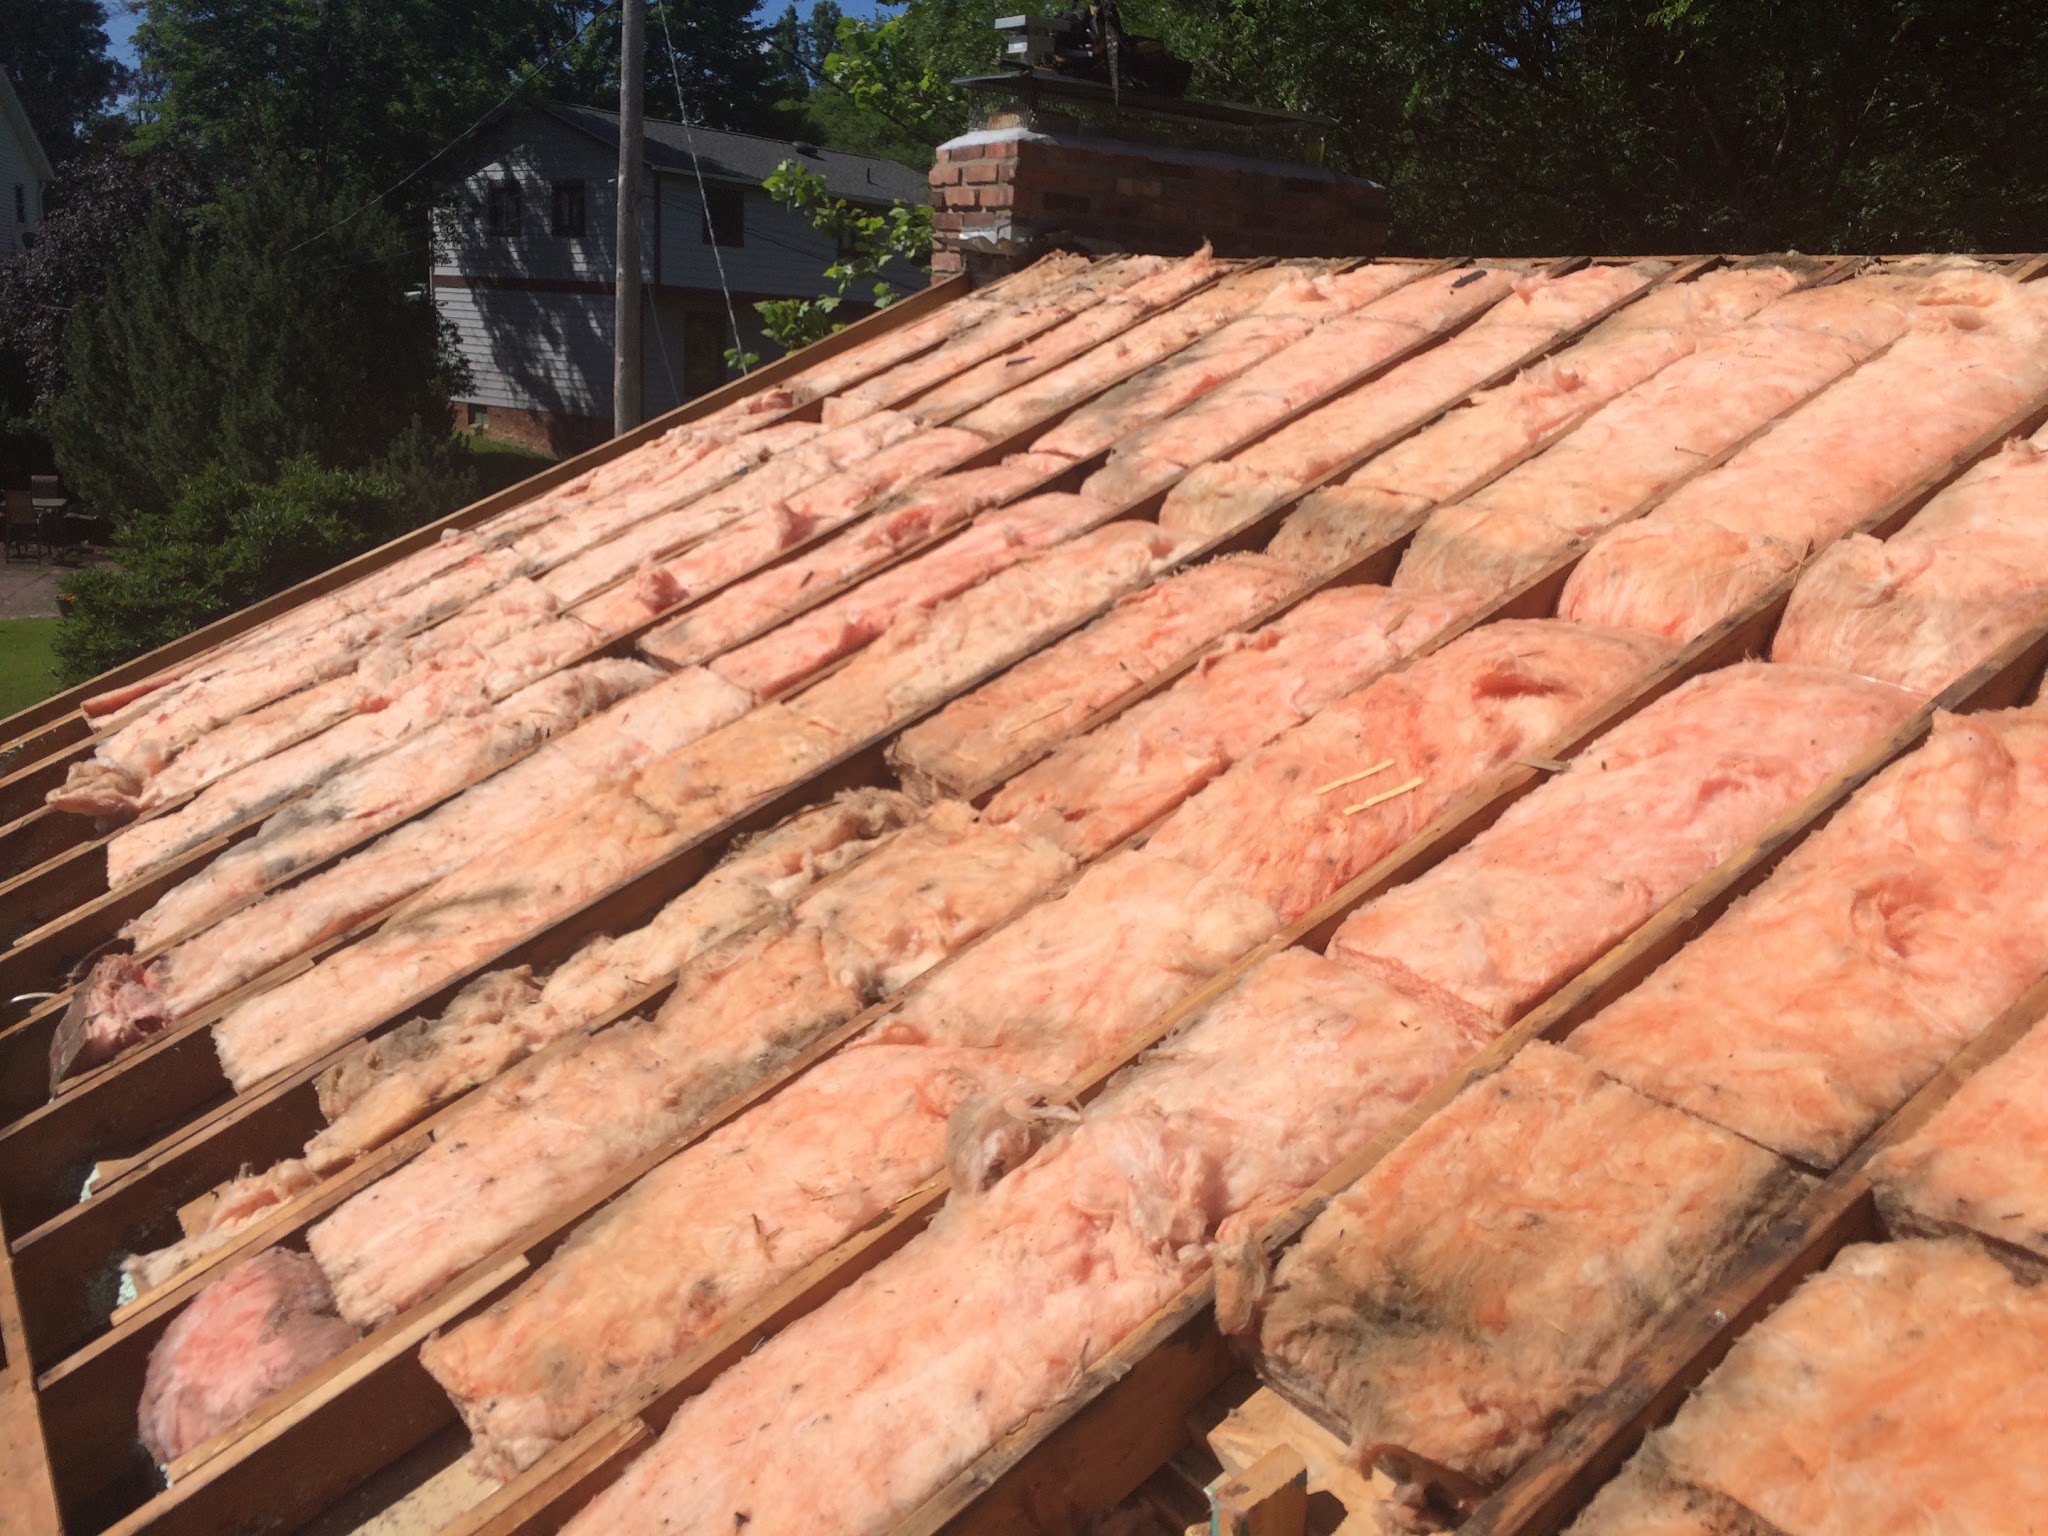
Note the dark spots, particularly in the lower right of the picture. Those are signs of air leakage. When air leaks through fiberglass it doesn’t stop the air, but it does filter the dirt out of it. If you see dirty fiberglass anywhere, the odds are quite high it’s due to air leakage.
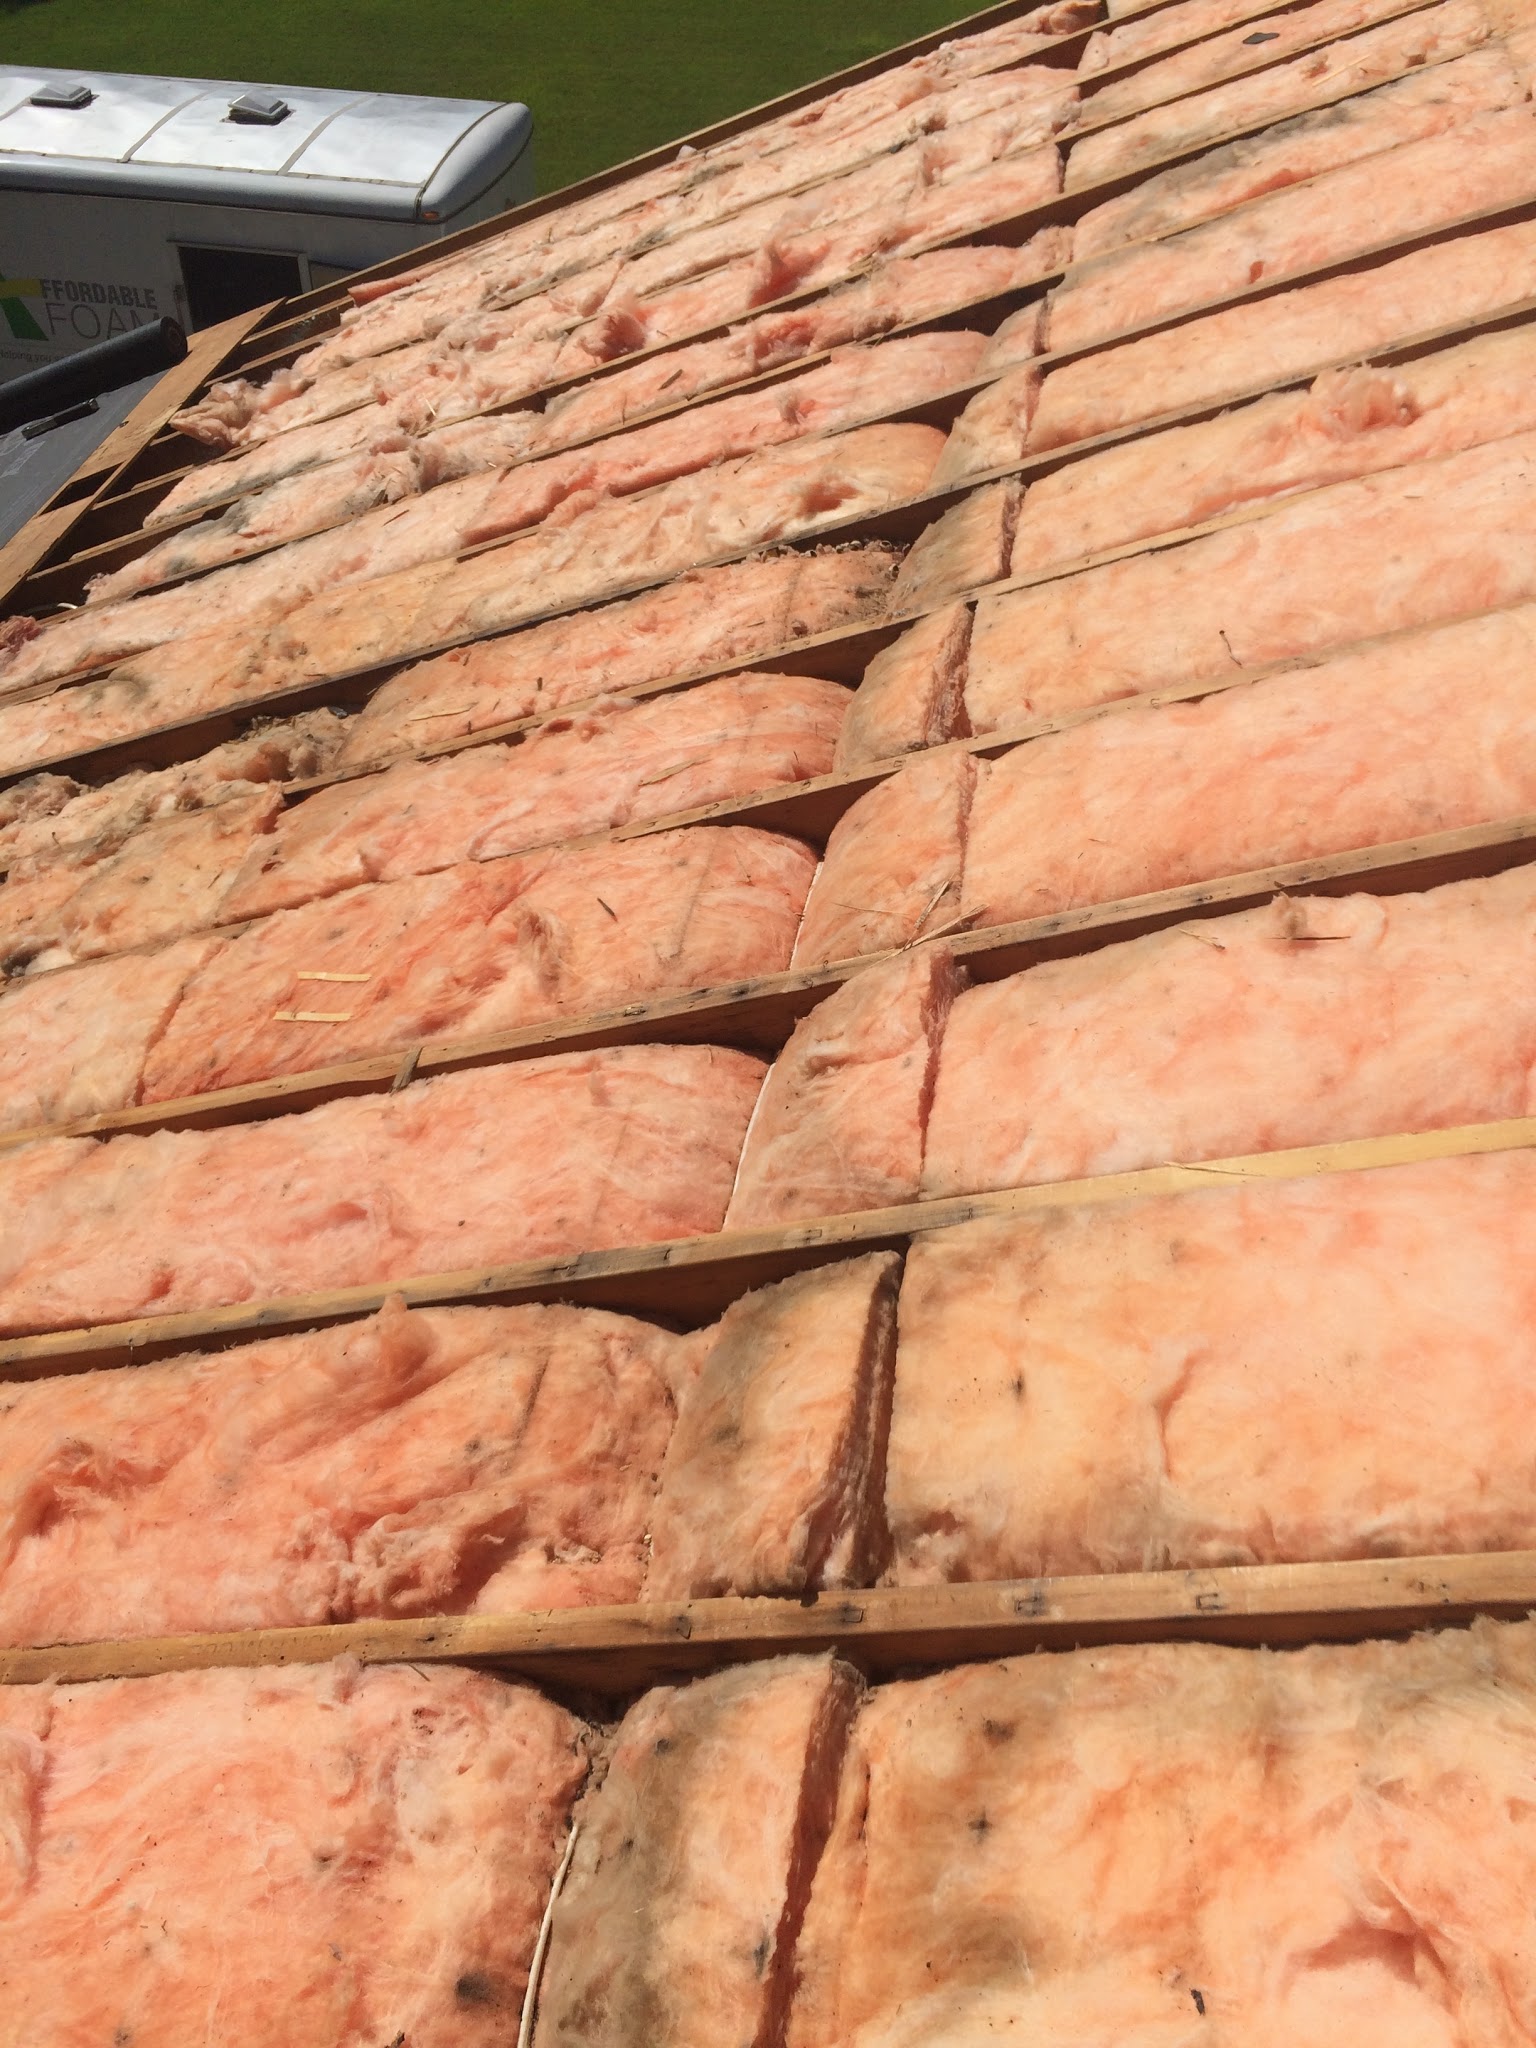
This is a different angle of the same thing: the roof over the master. Note how the electric wires are crushing the fiberglass a bit. This is an improper install. The insulation should have been split and some insulation run on top, some insulation run underneath. Or a slit could have been cut to accomplish the same thing. Instead, the squashed insulation was likely performing at about half its rated insulation value.
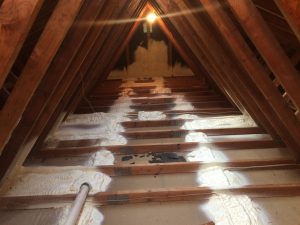
Once the roofing crew got the insulation out and in the dumpster, we had this:
I couldn’t resist and headed into the house to see what it looked like in infrared. I was rewarded with this:
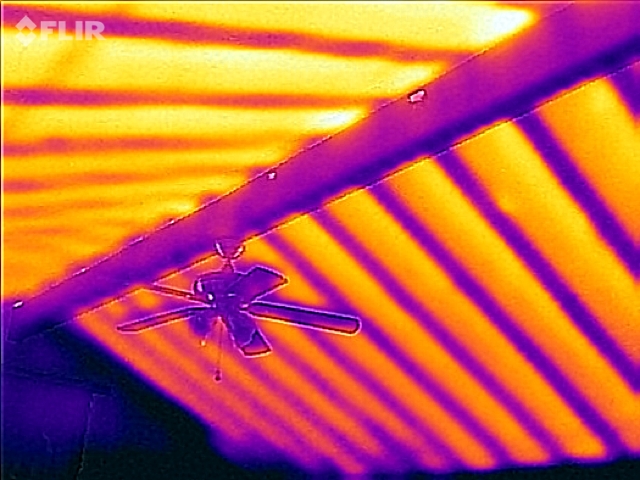
This is one of my favorite infrared pictures. It was a warm day, about 80 degrees, and the sun was shining on the drywall, which is yellow (warm). It has essentially no insulation value. The cooler blues/purples are the ceiling rafters and beam. Wood does not have a high R-value, about 1 per inch. So the 2×6 rafters are about R-5.5 or so. Still, it is far higher than the bare drywall, so it shows up cooler. After insulating with spray foam, it looked like this:

This is also on a warm day. Note how the warm spots are now the joists, not the drywall. I’m taking the temp of the one hot spot, which I think is not enough foam over the electric box for the fan. There is always a miss. Always. This one was no longer accessible because it is under roof now. With testing, you can find or fix a bunch, check the album for pictures of me testing and sealing the remaining leaks.
Another comparison is in order, here is before and after of the knee wall in the master:
Before & After

The before was taken on a cold day, so blue is bad. The after was taken on a hot day, so yellow is bad. Note how the knee wall is pretty much all the same temp. The blue spot in the after is a damp towel.
There are some yellow/white spots where the wall touches the ceiling. This is a connection point. Connection points are really tough to get to, and if you put too much caulk/foam in them, you can’t get the building materials back on (sheathing, siding, etc.) This is why simpler shapes in houses are better – the more connection points, the more places they have to leak. This is part of why Cape Cods are so stinking leaky.
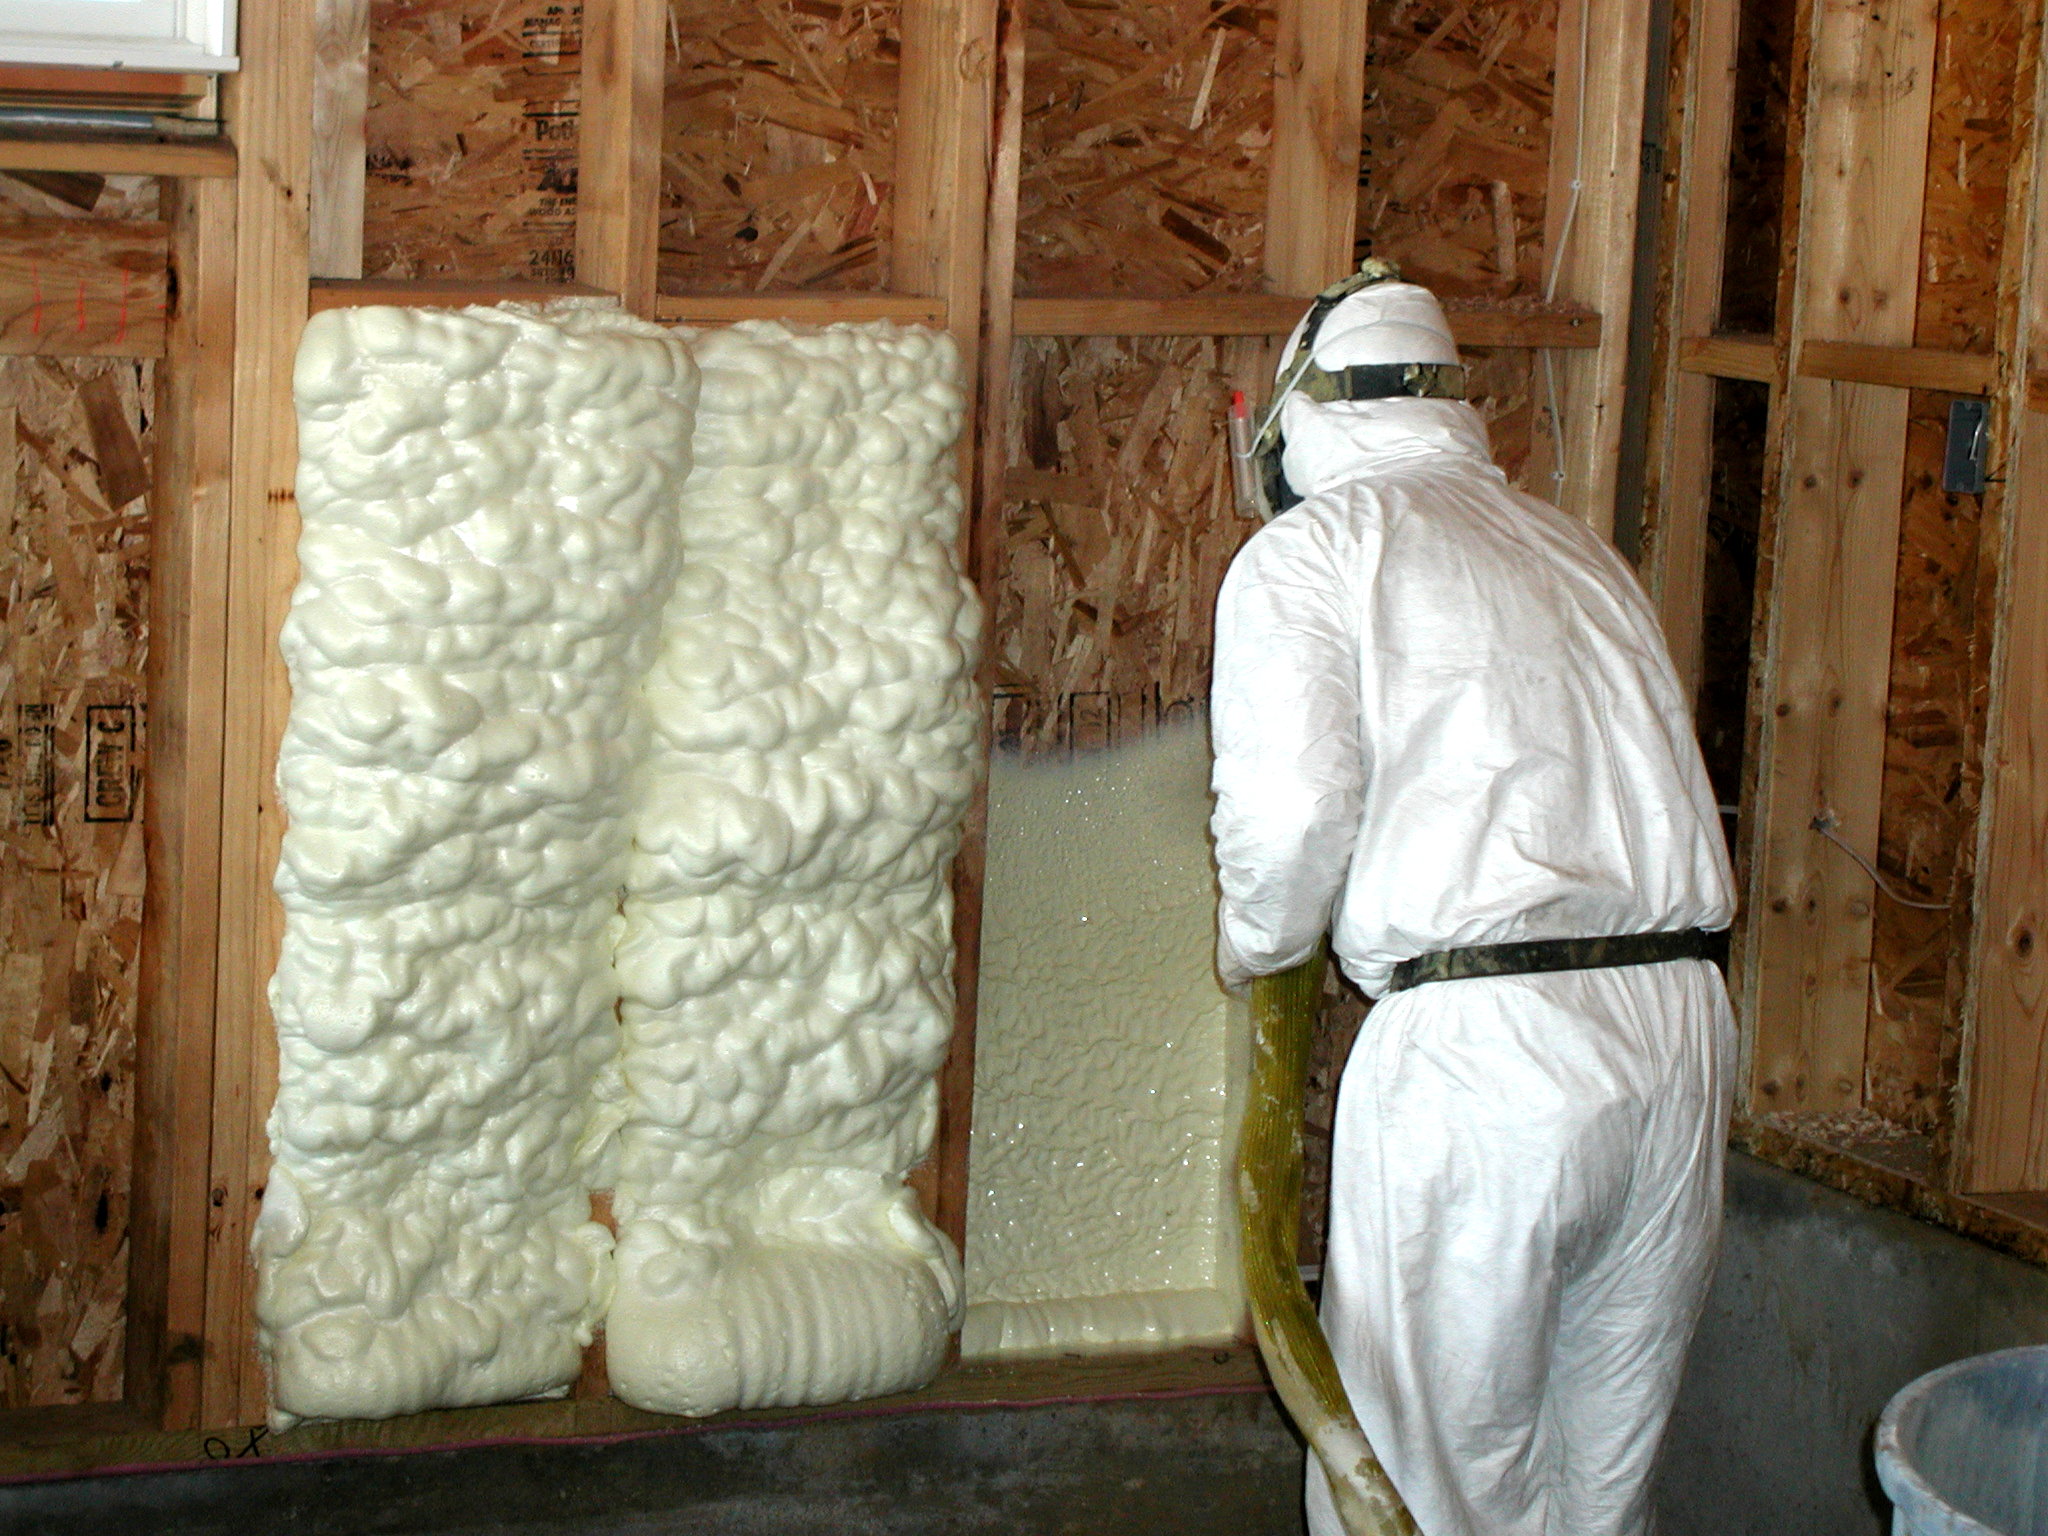
Here’s the foam just after completion as Gary and Donny scrape the excess foam off:
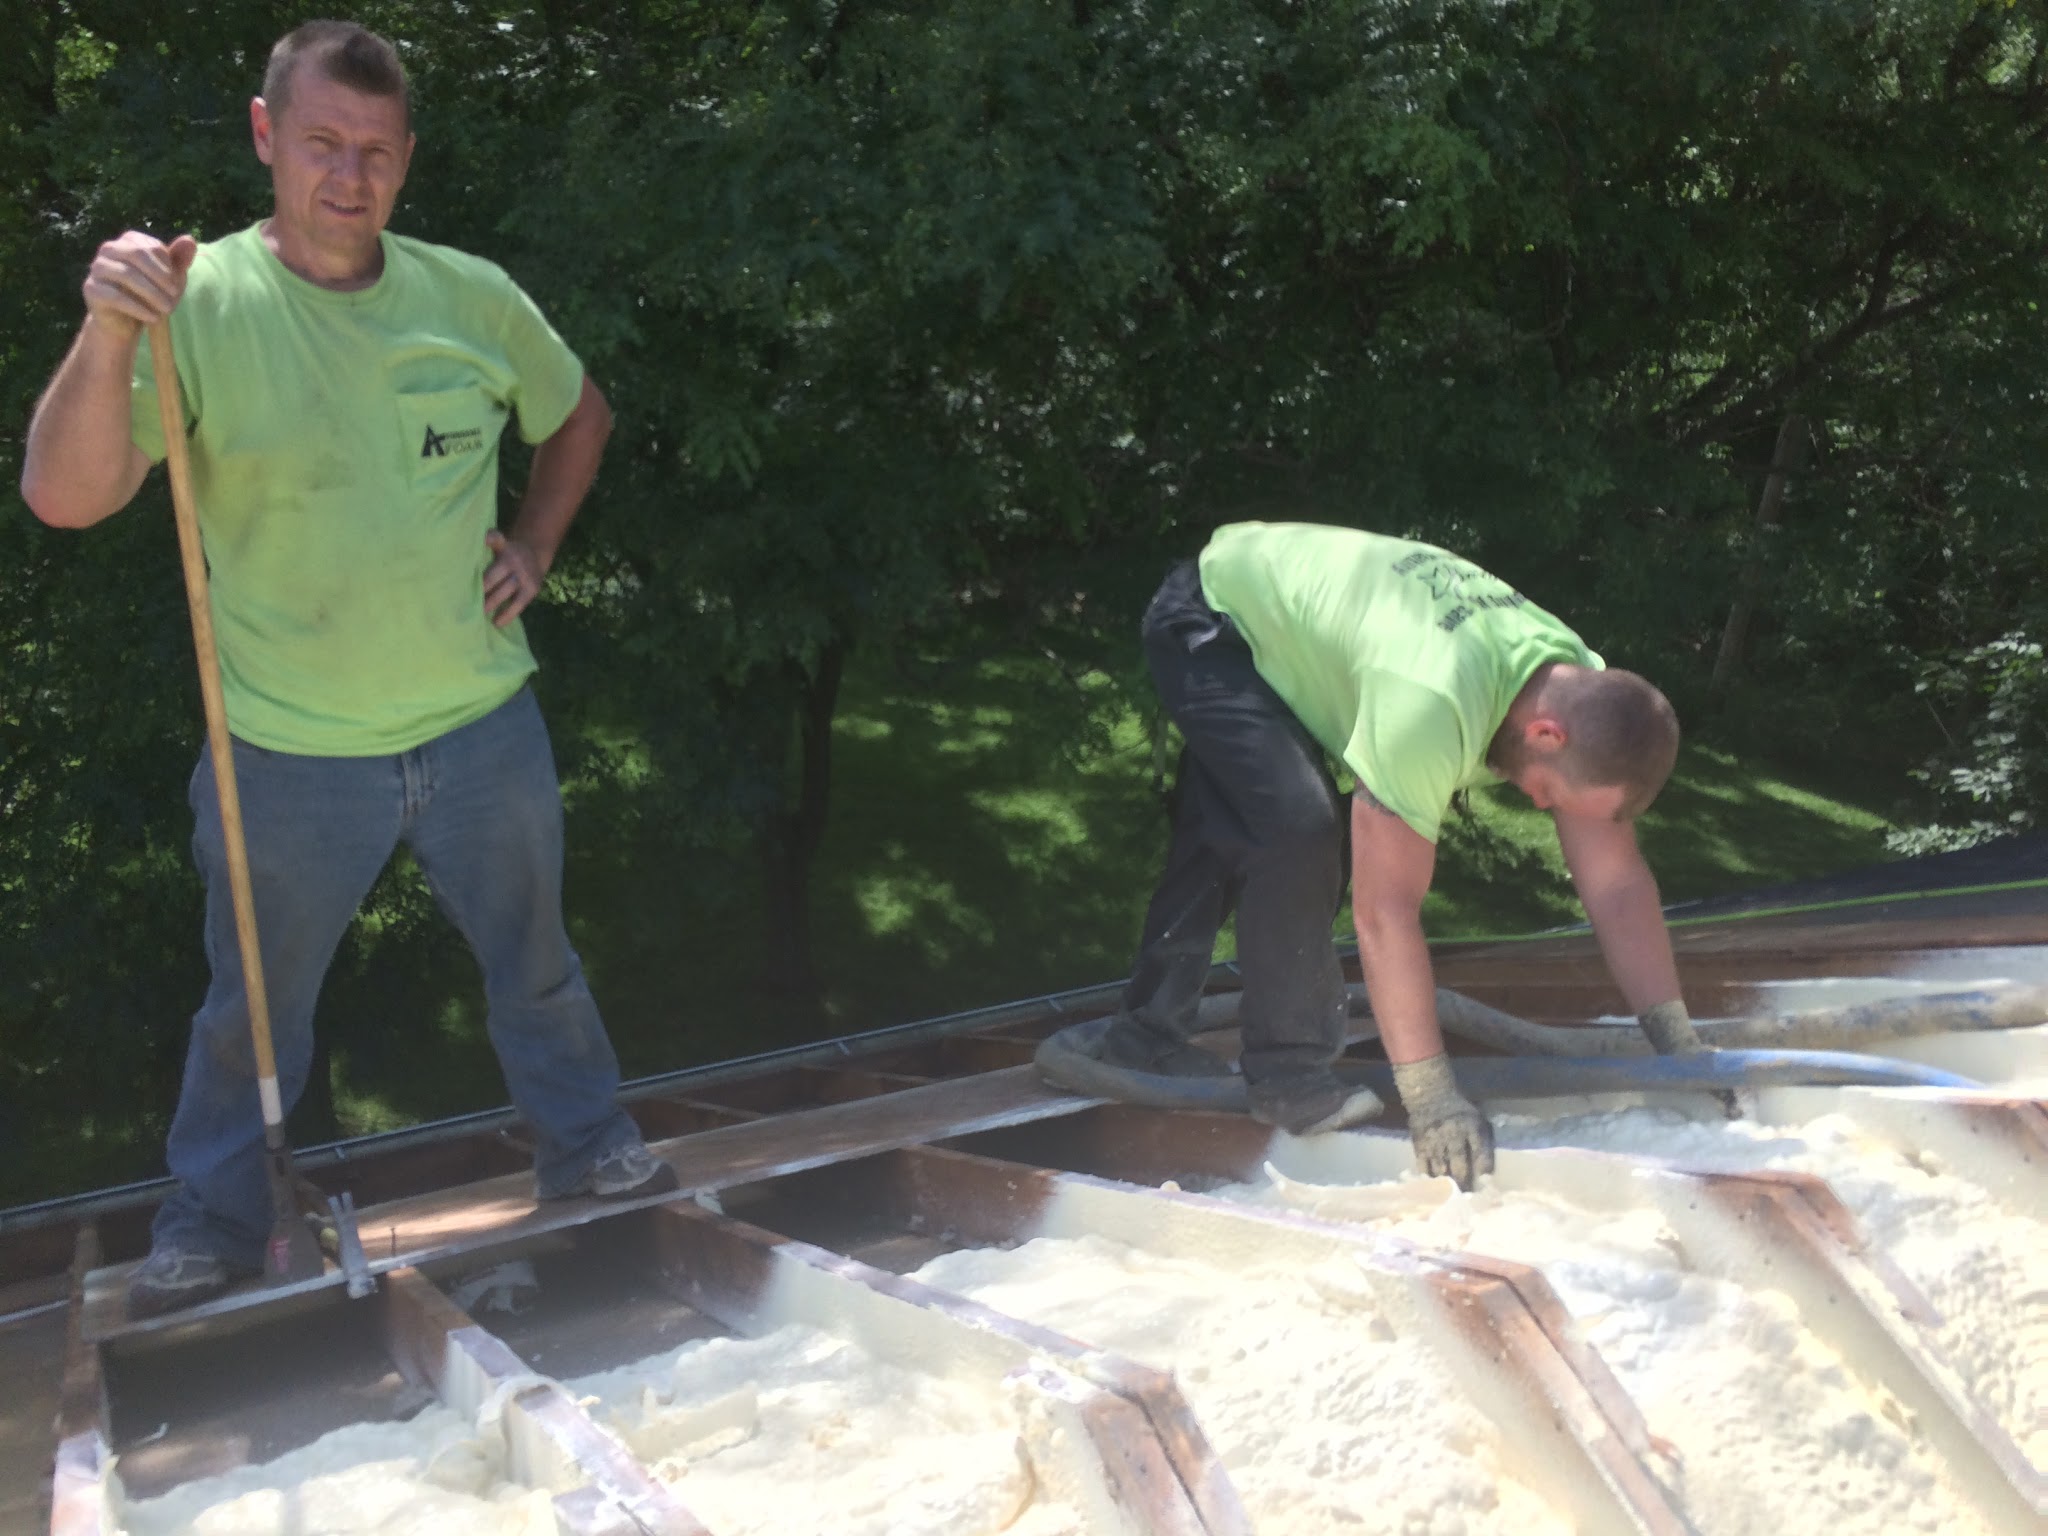
We got this house to similar tightness levels as a new build. (For my energy geek readers, it’s right around 4 ACH50 down from 7.5.) A pretty kick butt result.
The air leakage on the second floor was down to very low levels. I sadly didn’t take before numbers for this house, but the bedrooms were only 2% connected to outdoors, a remarkable number. They probably started around 10-15% connected. In older houses I consider under 10% to be good. In post WWII houses, I want under 6% if possible.
OK, time for more props for Jim. If you are an avid DIYer, you may be able to save yourself some serious coin. Jim’s DIY work saved him 40% on this phase of the project. And he did a fabulous job, I haven’t worked with many crews that did as well.

The blower door is in the front door. Look above the brick, see the light green? That’s yet another knee wall in this house, which is a wall that backs up to an attic. In this case the attic is over the front porch. Here’s a closer shot:
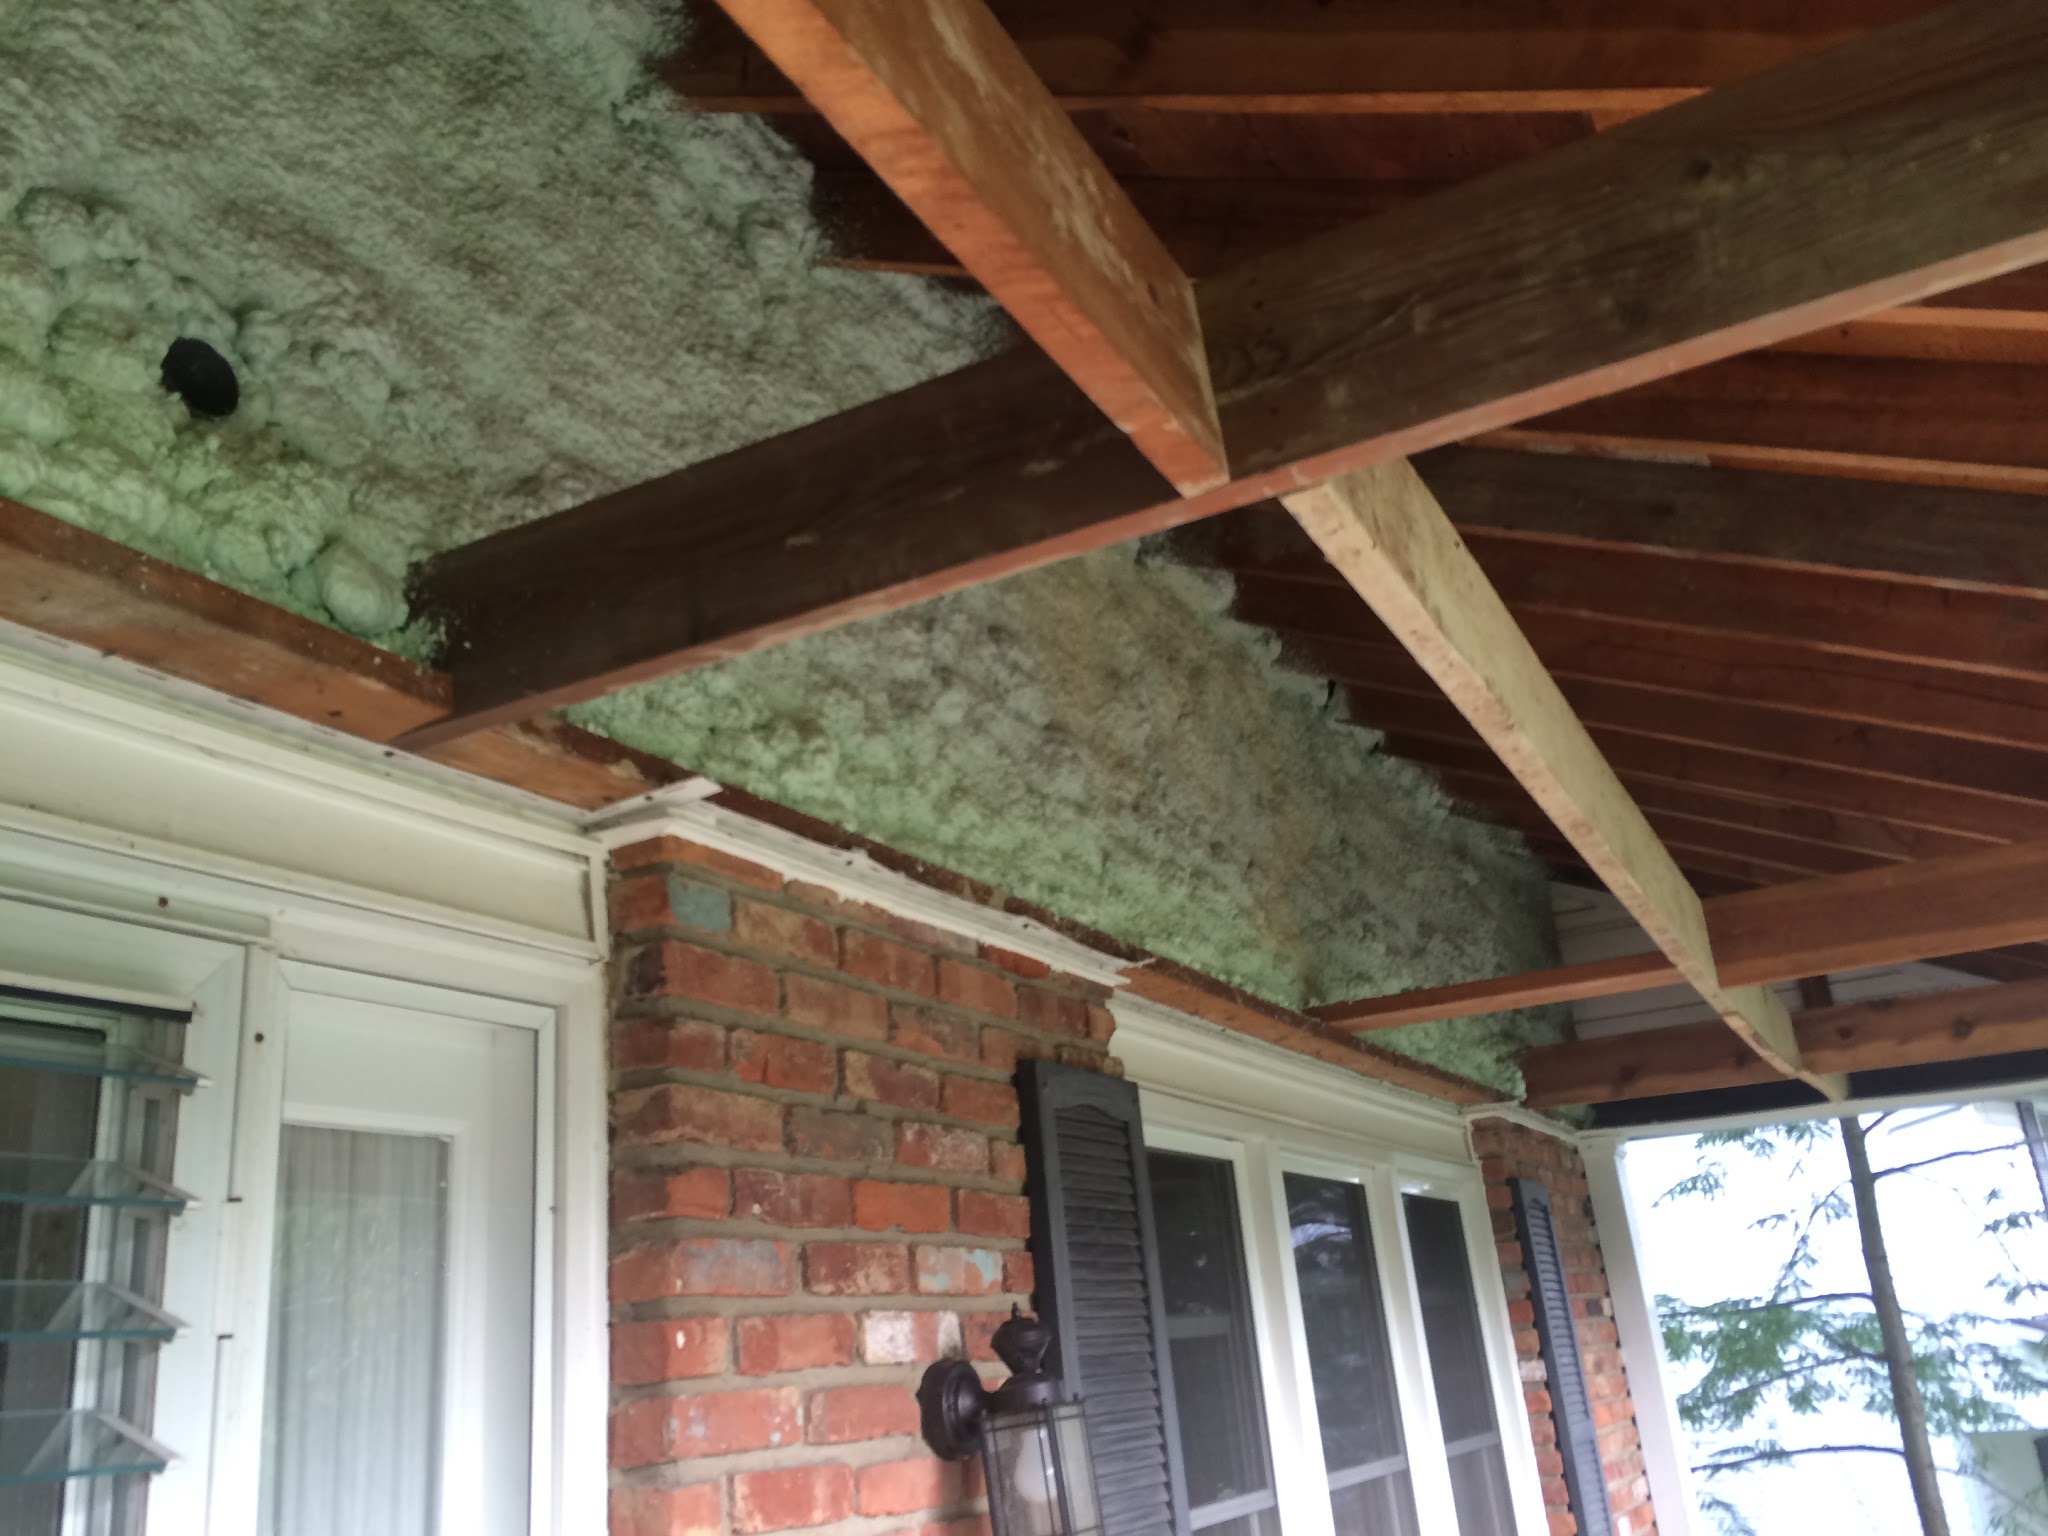
Jim sprayed this himself. Note that he didn’t fill the hole near the top left, that’s the vent for the first floor half bath. In testing this, I found almost no leaks. He also tackled the rim joists in the basement (the vertical board on top of the foundation). I couldn’t find any leaks there. Really remarkable.
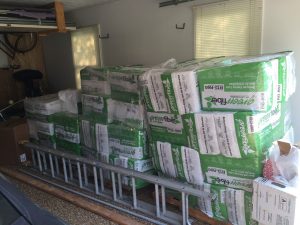
The last step of the first phase was blowing cellulose insulation (mostly recycled newspaper) into the upper attic. Jim and Jan opted to do that themselves, saving a nice chunk of change. We have designed our process so it works well with DIYers.
After one last round of air sealing, we finished up. The house started at 3349 points, here’s where we got to:
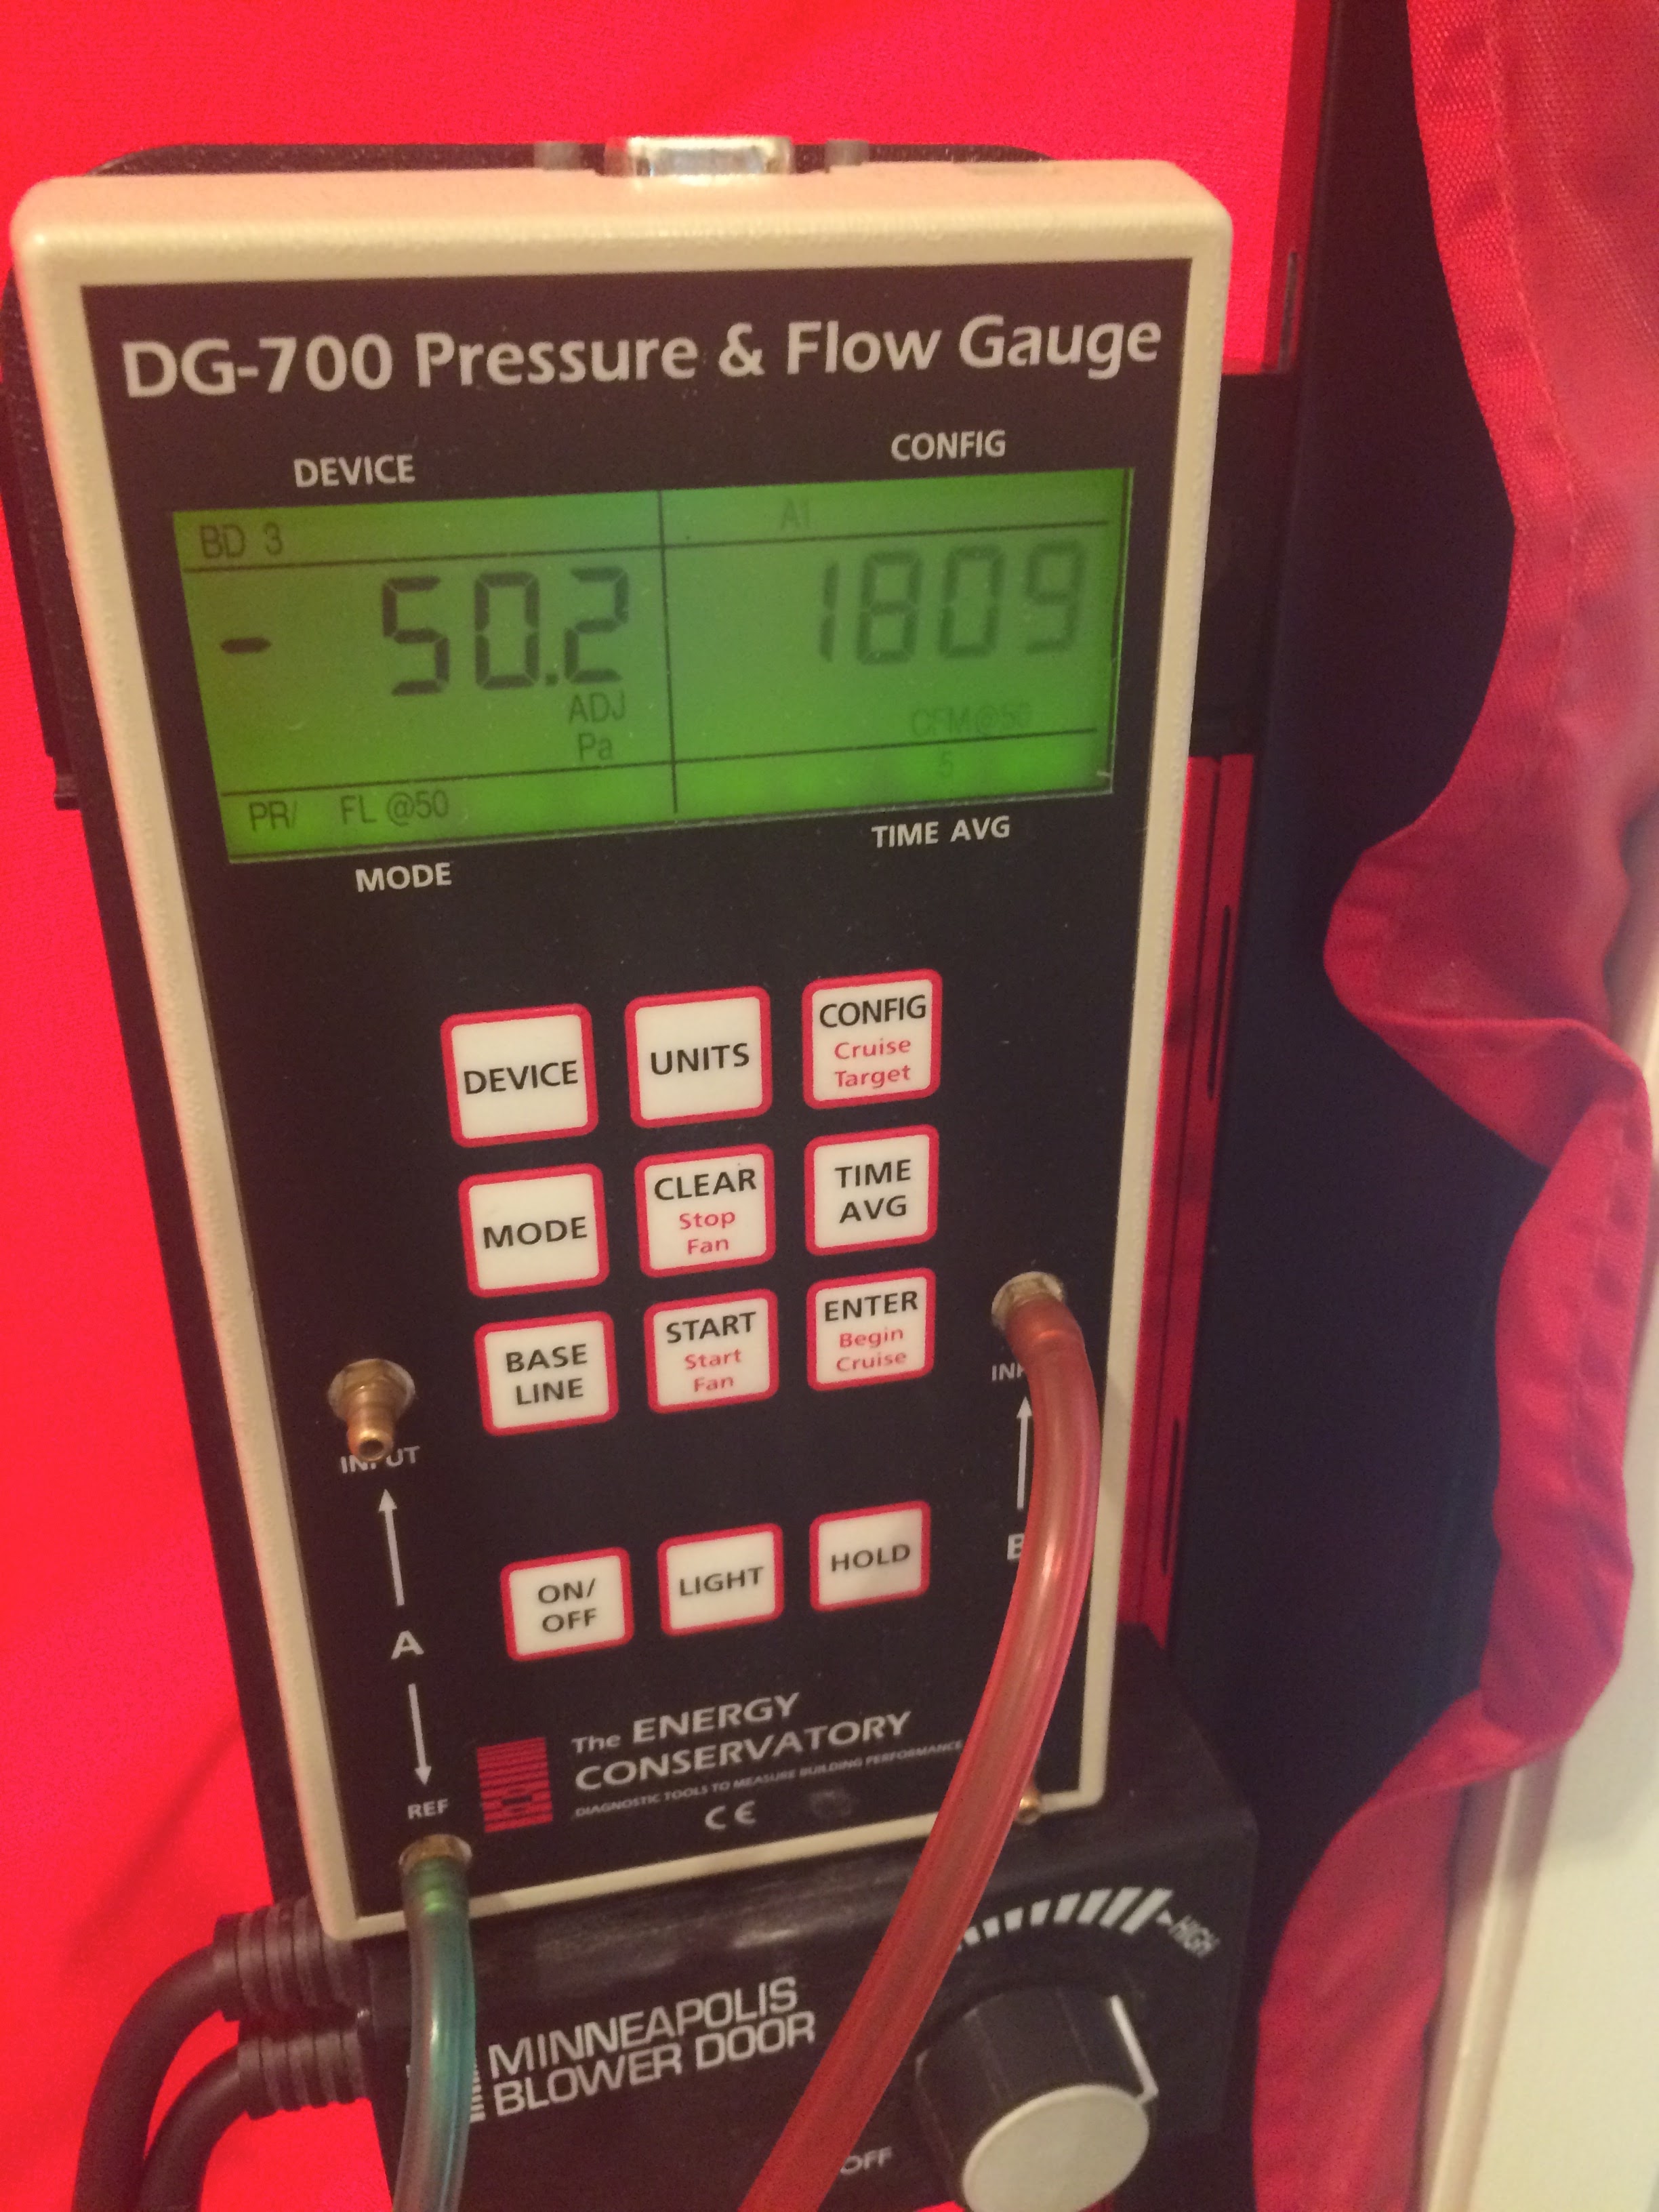
A 46% reduction! We barely touched the walls, this is almost all attic and basement. Pretty cool!
Uh Oh…
This house had what’s called a “natural draft” gas water heater. It’s the standard one in my region and relies on heat rising to pull combustion gases out of the house. The problem is, it needs supply air from inside the house to burn. With an air sealing job, you stop a big part of the air supply. Sometimes, the water heater can’t get enough air to burn from inside the house, so it uses the next easiest supply: right down the same chimney it’s supposed to use to vent the air it’s burning. This is called backdrafting. It’s bad news, it could lead to carbon monoxide poisoning and death. We take this risk seriously and test. Jim’s house failed this test:
The water heater would draft, kinda-sorta, if no fans were on. If the dryer was on, it backdrafted badly. There are some solutions to this, but they are not very palatable, they mostly involve punching a hole in the tightly sealed house we just created. This water tank was 11 years old, which is “end of useful life”. It was on borrowed time, so we decided to replace it:

This is a heat pump water heater. They are all electric and have similar installed costs and operating costs as “induced draft” (water heaters with a fan sucking on the exhaust) or “sealed combustion” (which have two pipes to them, an in pipe and an out pipe) gas water heaters. For more on this check out this blog entry.
Heat pump water heaters use heat from the air around them to heat the water. They also have a backup resistance coil for when more water heat is needed fast. I have 4 of these installed, all with good reviews. When I get around to installing it, there is one in my basement as well. If you’re interested, check if you have room in your electric box, you need two slots for one.
Ice Damming Results
What started the whole process was a lot of ice damming, or icicles hanging out of the gutter. Jim sent me some pictures after the job:
Look ma! No icicles! The right side is the master, it used to be lousy with icicles. No more. Note there are some things we can’t fix like the bath fan vent in the middle. It’s job is to remove warm, moist air. So it will melt some snow.
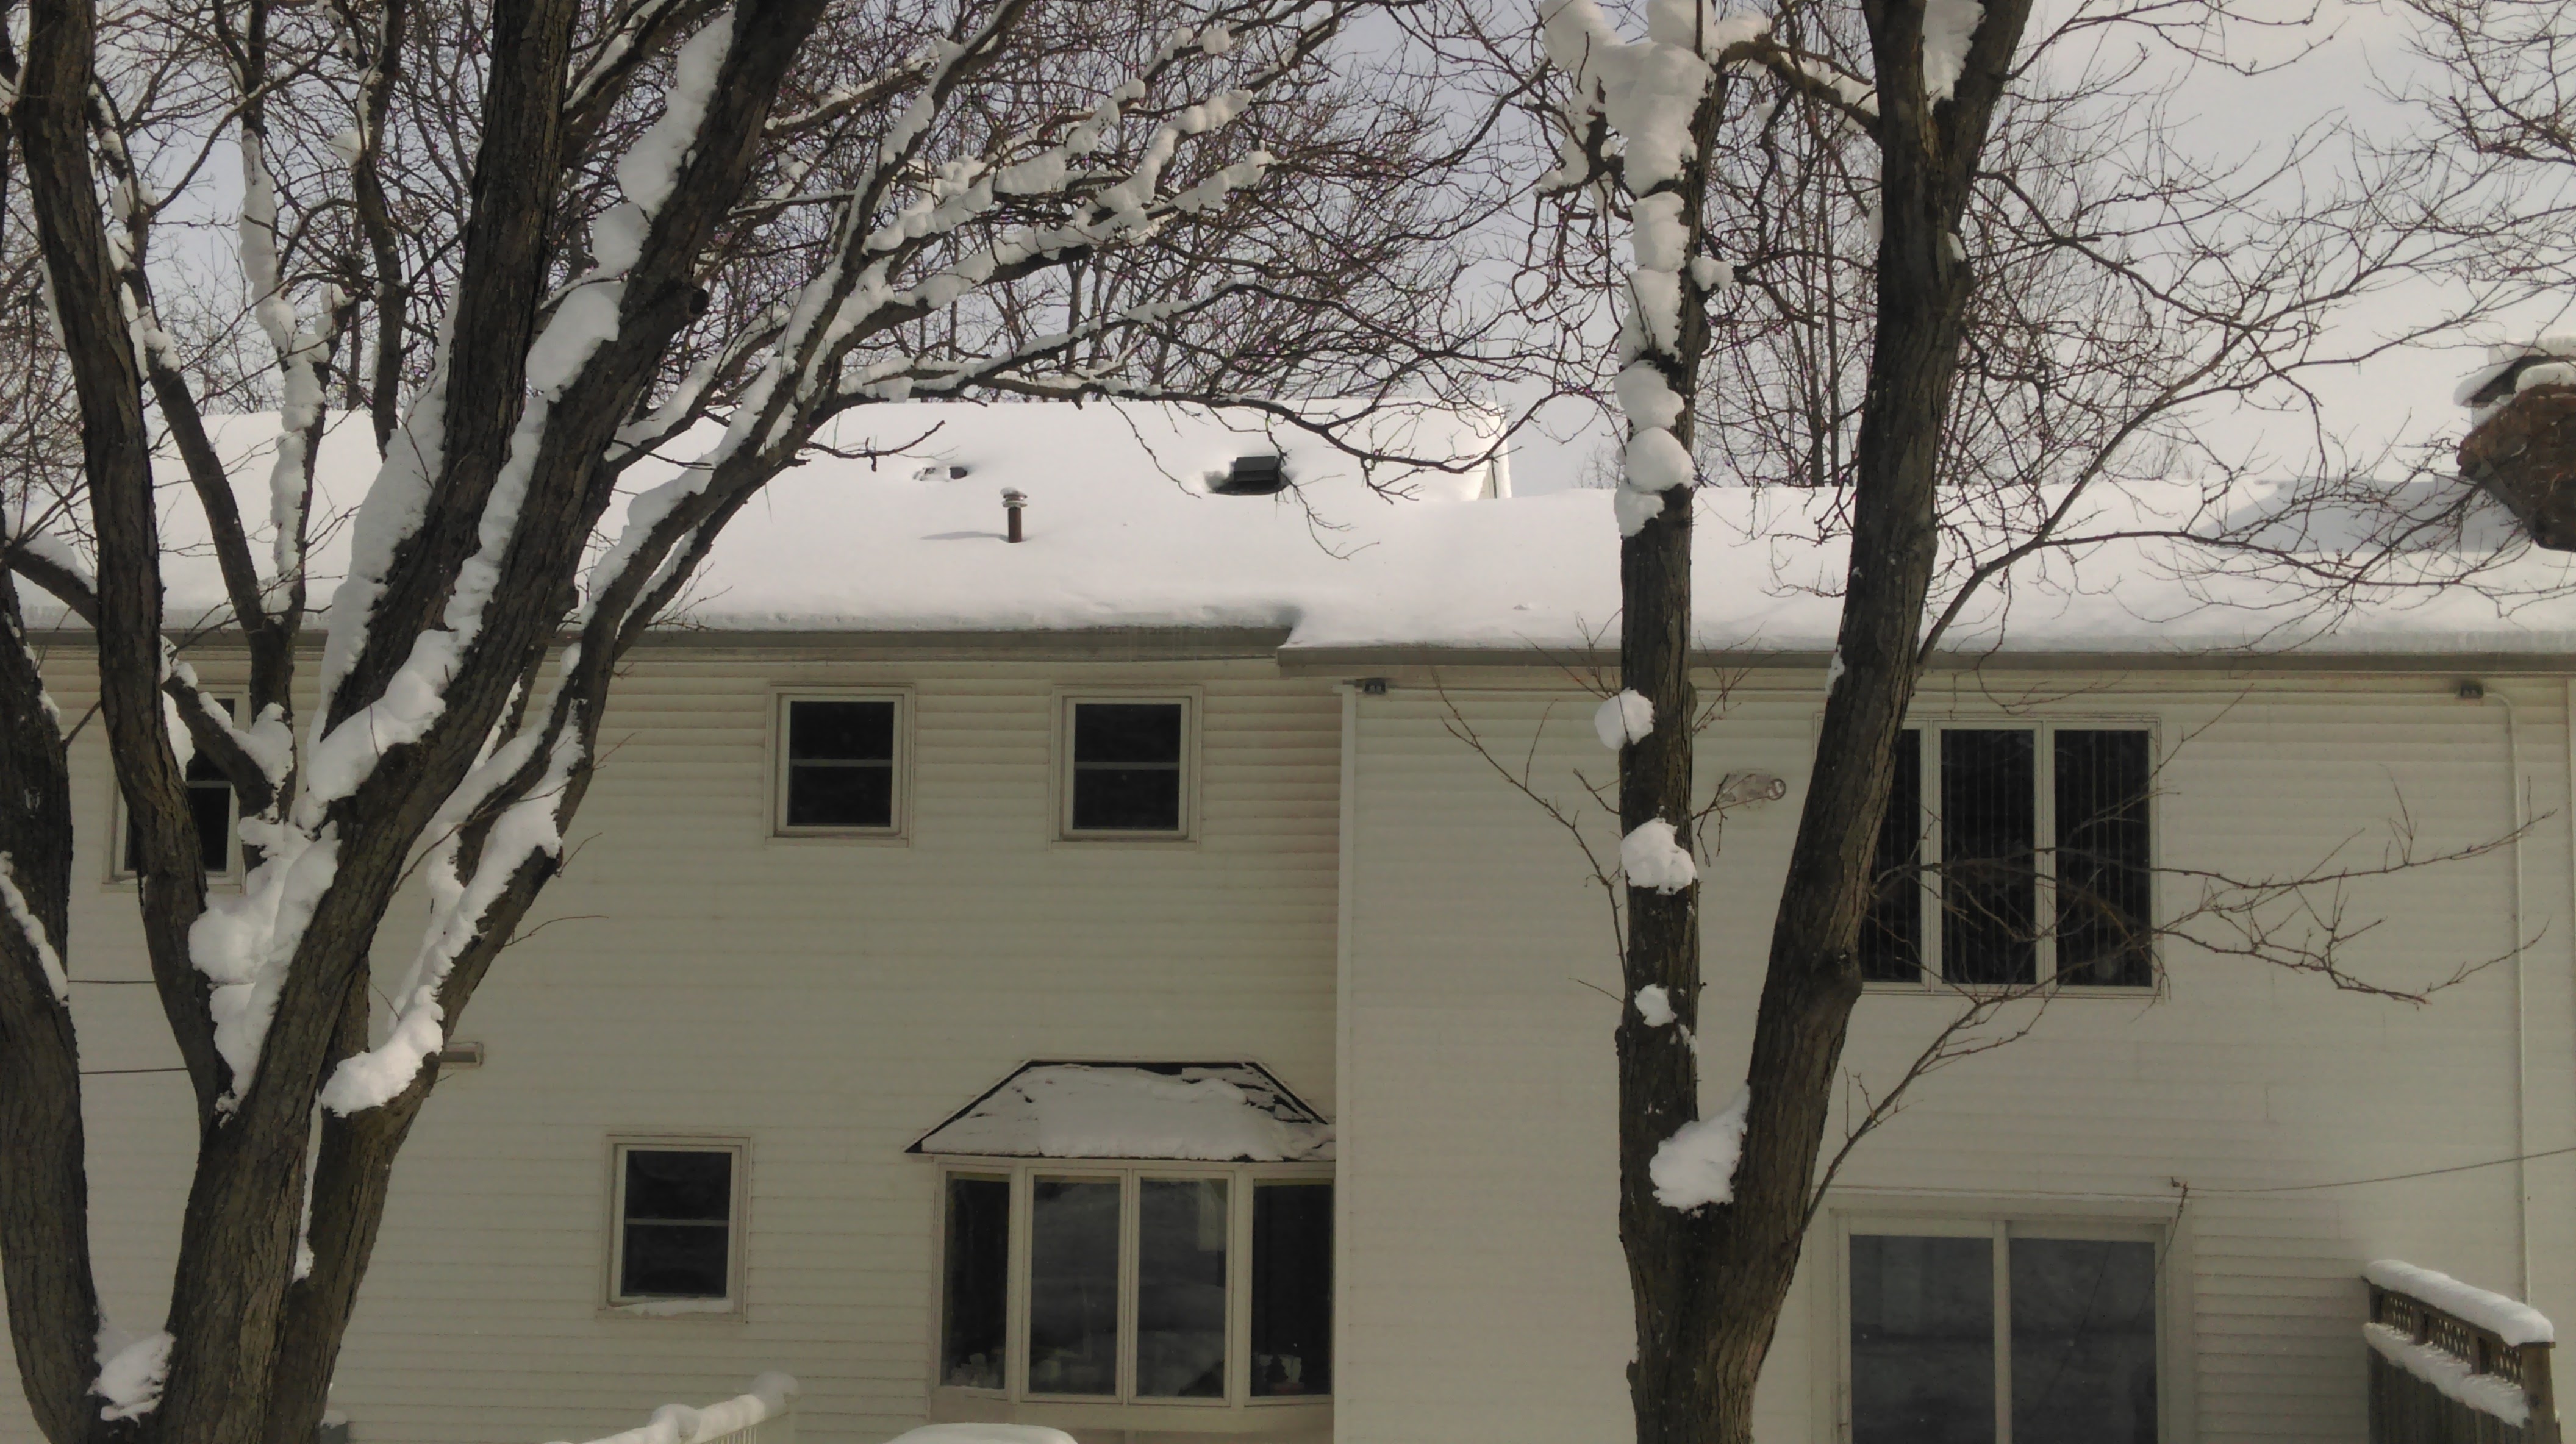
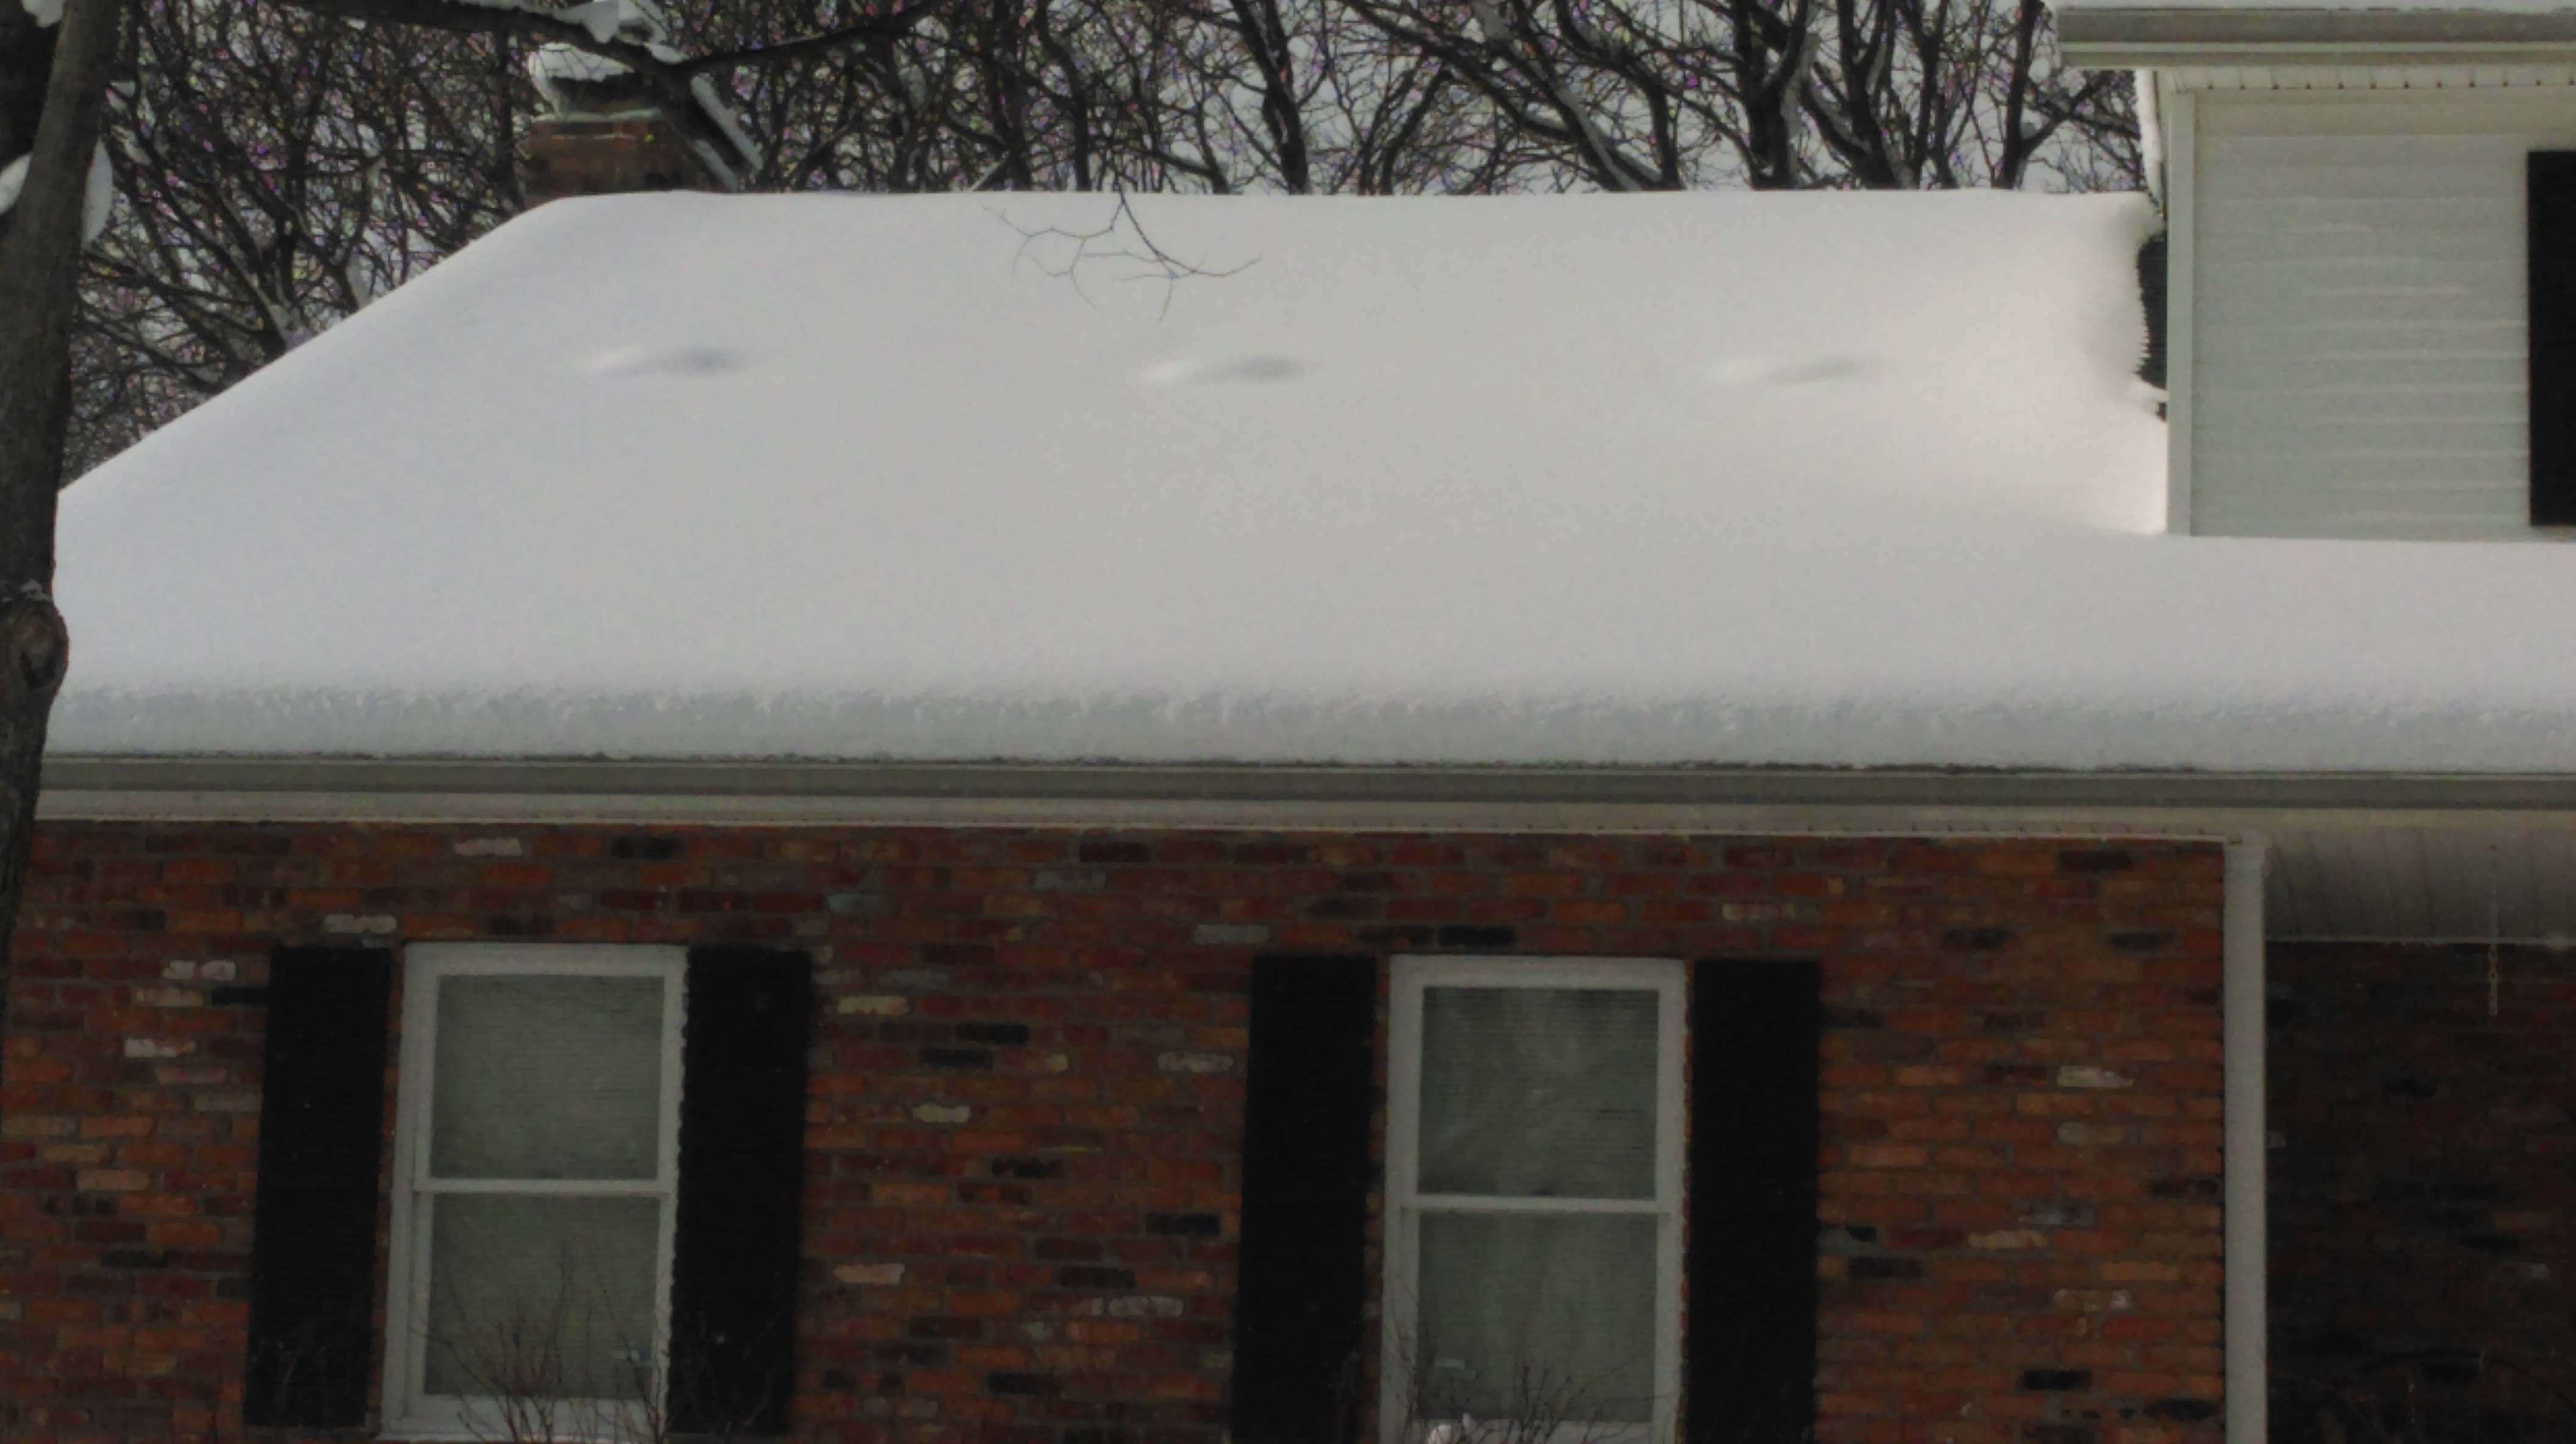
Meanwhile, at the neighbor’s house the same day:
Jim’s house used to look like this. Leaky top plates are likely a factor here as well.
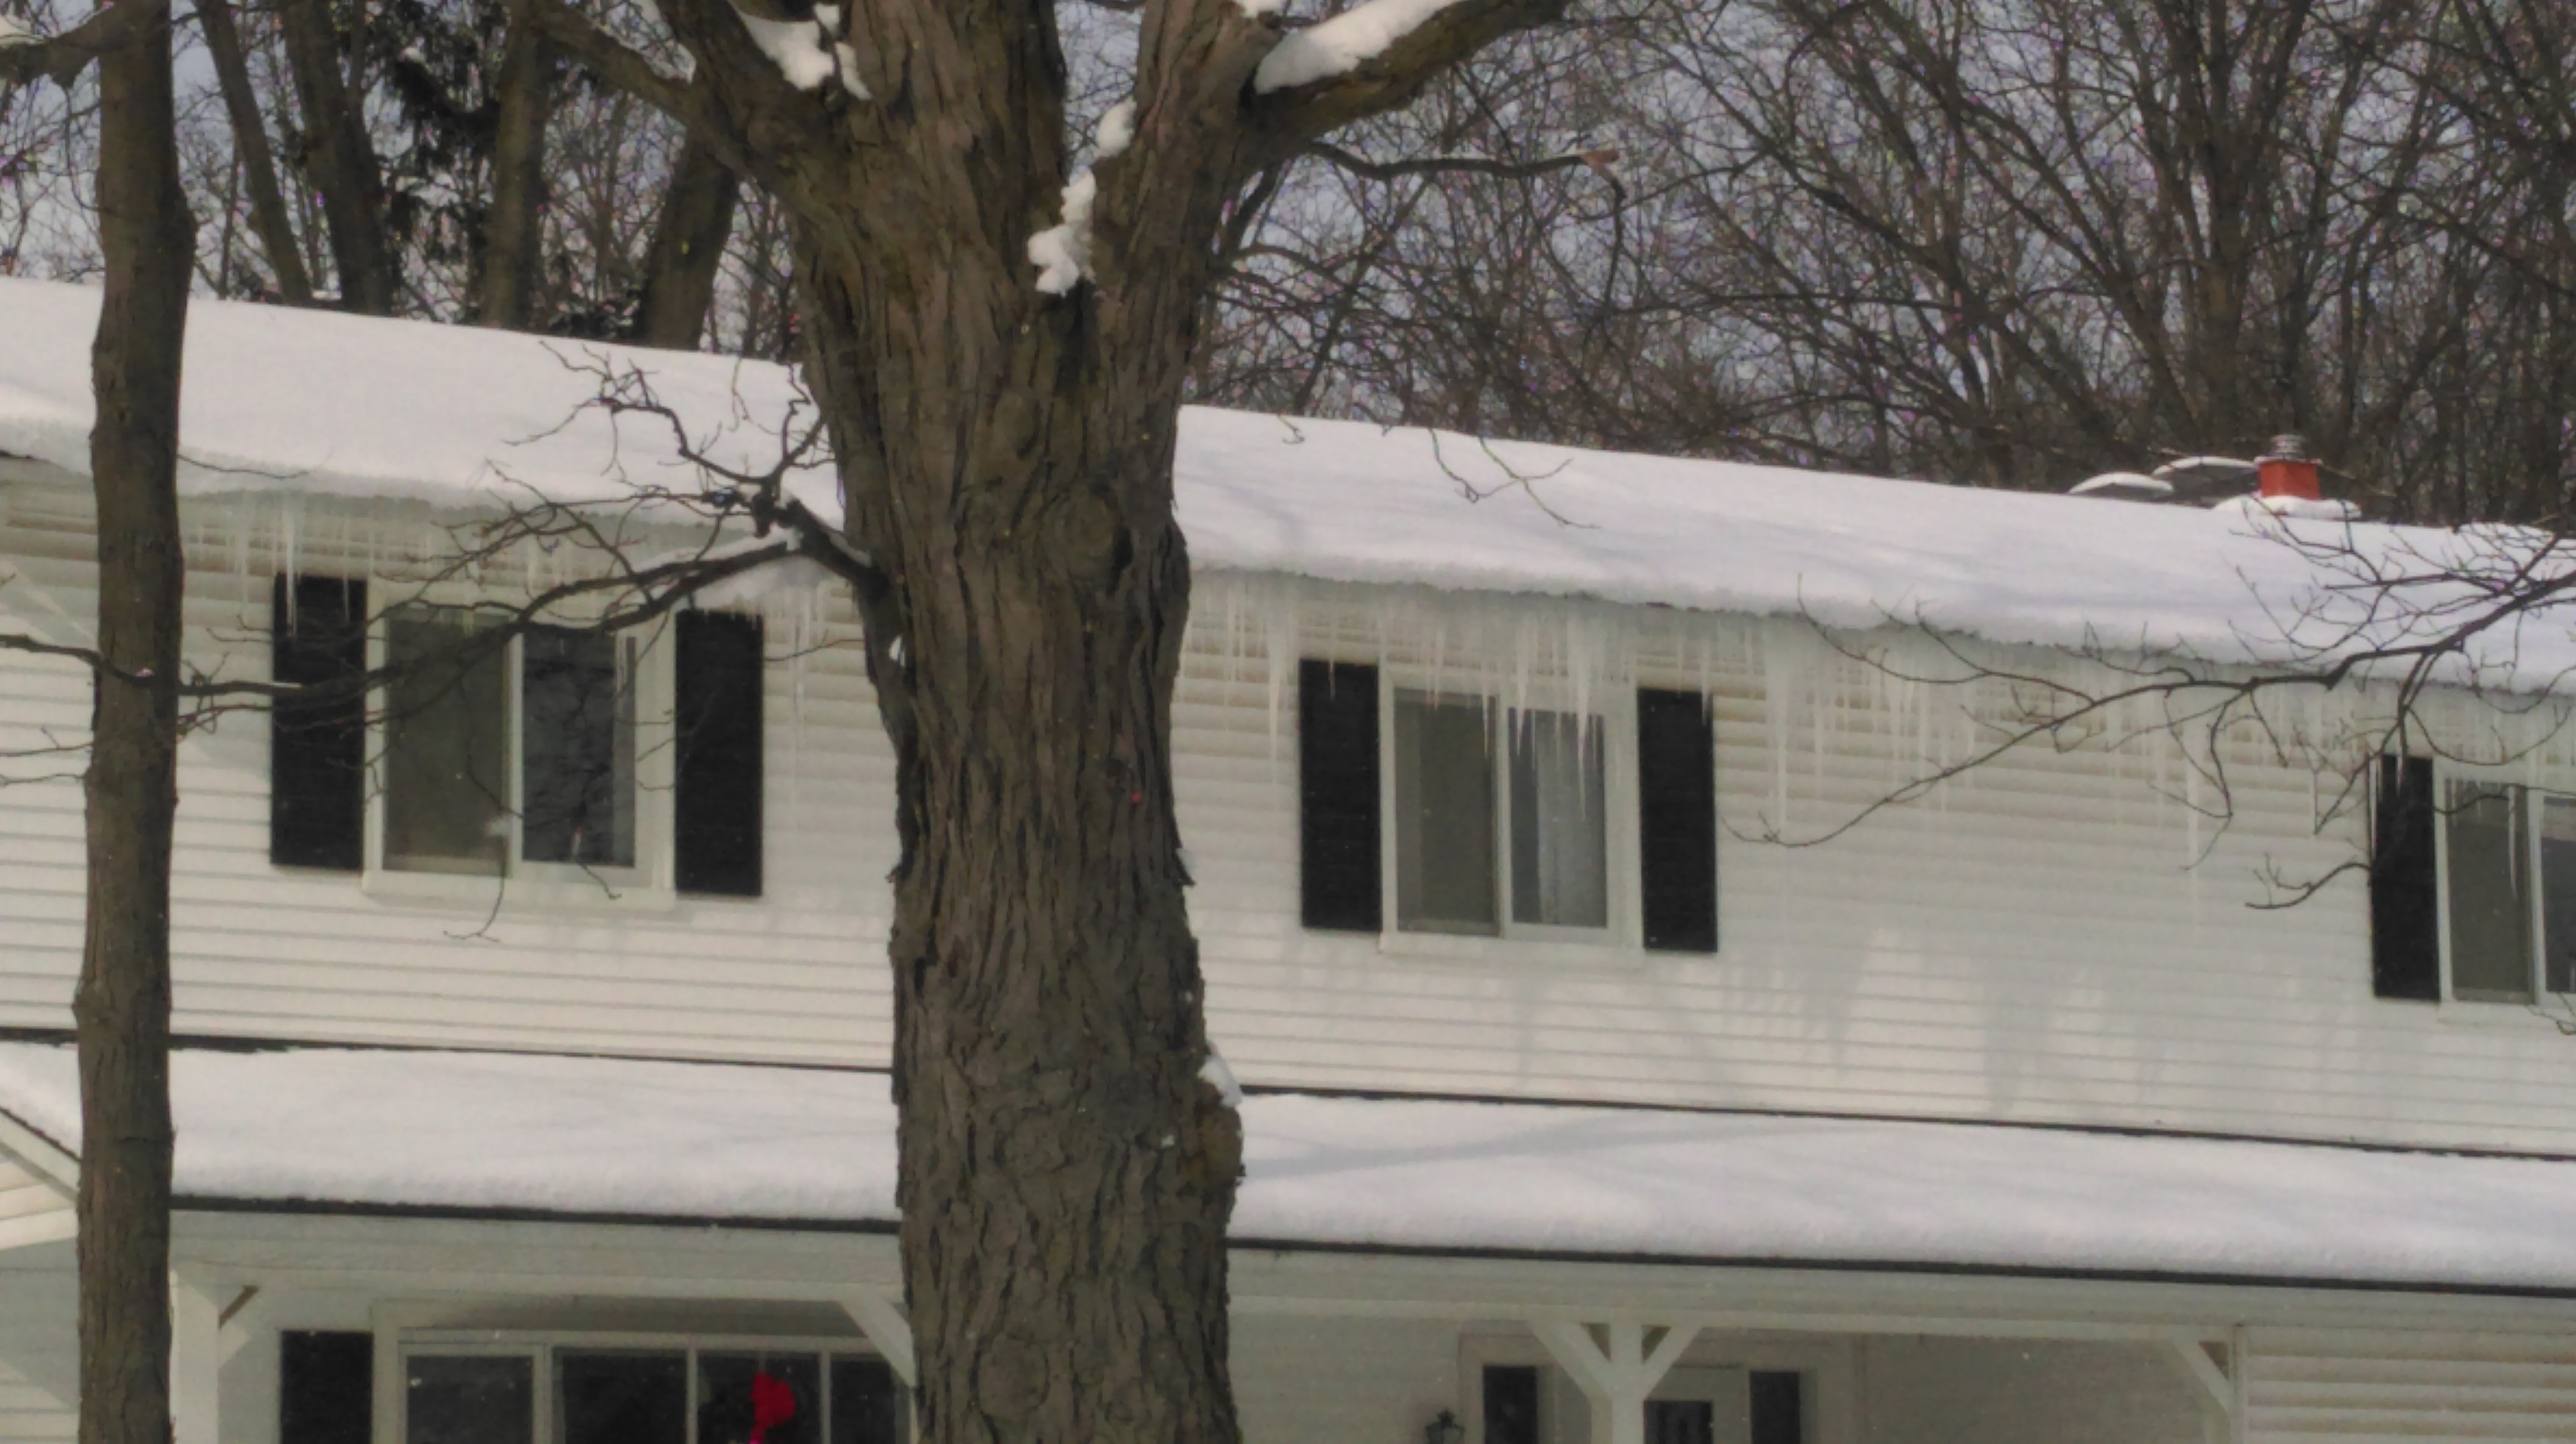
Here’s a front view of Jim’s house, this spot used to grow impressive icicles:
This is the front of the master bedroom. The only thing to note are the 3 divots in the middle of the roof. Those are roof vents that weren’t strictly necessary, but were installed by the roofers. No major harm done, and they help vent some excess heat and moisture if it gets into the attic over the garage.
I should note here, these results are pretty good. If you have an older house that is far leakier, total elimination of icicles like you see here is not a good expectation. Reductions in the 60-90% range are more realistic, typically enough that any concerns of water coming into the house are eliminated.
Continuous Optimization – Healthy Home Work
Now that the project was complete, it’s time for the final tweaks. Basically, once a job is done, it’s not quite done. There are a lot of “knobs” on the house like thermostat settings and damper settings that can be adjusted to improve comfort if a room or two isn’t quite comfy yet. When the job is complete, I’m still there to help and make final adjustments.
There were two concerns I had at Jim’s house: high carbon dioxide levels (not monoxide, the deadly stuff, but dioxide) and humidity. The house was tight enough that I suspected these would be a problem. I asked Jim to buy a NetAtMo weather station which does datalogging. (Since then we’ve come to like Foobot more.) Datalogging is collecting information and charting it, automatically. Here are their CO2 levels for a week in October 2015:
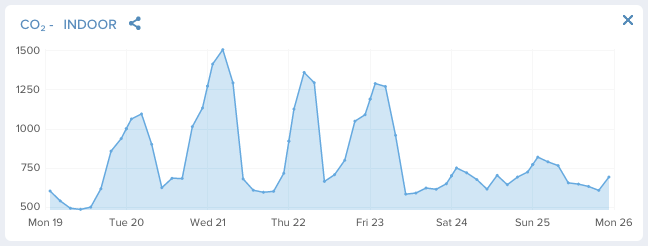
For carbon dioxide (CO2), atmospheric levels are about 400-450 parts per million. The higher the levels get, the poorer our decision making skills get according to a Berkeley Lab study. It’s best to keep levels in the 500-700 ppm range. Note how at night the levels are spiking in the 1000-1500 range. That’s because Jim and Jan are sleeping in the same room, and we release a lot of CO2 in one space at night. We first tried turning the furnace fan on low 24/7. It helped:

Still, while levels generally stayed under 1000, it’s still higher than the 500-700 target almost all the time. More adjustment was needed.
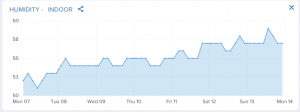
Humidity was also a concern. Tighter homes don’t release things as quickly, so when you cook, or shower, or even breathe, the moisture released can get stuck in the house. Damp basements are often a heavy contributor as well. Moisture tends to rise through the house, so it’s best to mix the house up and dehumidify centrally, if possible.
There’s a phenomenon called Sick Building Syndrome that dates back to the mid-70s when buildings started being built tighter. While the exact cause is not fully agreed upon, too little fresh air (which leads to high CO2 levels) and too high of humidity seem to be the causes.
Sick Building Syndrome typically involves headaches and respiratory problems. It relates back to what’s now known as Indoor Air Quality (IAQ). Making client homes healthy is typically somewhere on their list of goals, and always on mine. The recommendation packages we build always include measures for making a home healthier, even if they don’t fit in the budget recommendations.
High humidity is a comfort issue, but it also can provide breeding grounds for mold. Mold needs three things to grow:
- The Right Temperature – 40-100 degrees, depending on species.
- Food Source – Wood, paper or dirt are great, all are in plentiful supply in every home.
- Moisture – When humidity levels break 60%, the party starts. Above 80% and it’s a rave!
We can’t control temperature or food, we can only control moisture. We need to be sure that homes stay dry enough that mold doesn’t have good growth conditions. Here’s what that looks like:
- Summer – Never over 60%. 40-50% is best.
- Winter – Never over 50%, 30-40% is best.
Here is a week in October 2015 when humidity levels should be at or below summer range, so 35-50% or so:
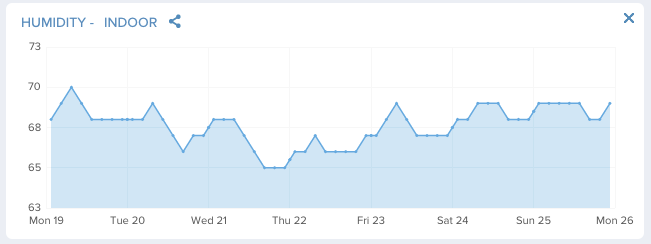
Yikes! It touches 70%!! And stays above 60% the whole week! This is way too high, and can lead to hidden problems.
Let’s check a winter chart, this is a week in December 2015:
This is winter, so humidity should be in the 30-40% range. Instead, it’s above 50% and sometimes pushing 60%. While this likely leads to less dry skin in the house, it could have some long term health implications, so we want to adjust it. The current HVAC system in the home doesn’t allow for it.
The good news is, we have a recommendation in a higher package that can reduce both CO2 and humidity levels. What is it? Well, I can’t tell all my secrets. (If you read some of the other case studies, though, you will find the answer.)
Want more? Check our reviews on Google and Angie’s List, which is now free when you sign up. (Note that most of the Angie’s List reviews are from our contracting days.) Do some more reading, and when you’re ready, get an initial consultation which can be found at the “Get Started” button at the top right of every page.
Detailed Numbers
Gas Use Before 980 therm
Predicted Use After 891 therm
Actual Use After 494 therm
Normalized Use (not calculated)
Electric Use Before 7200 kWh
Predicted Use After 7080 kWh
Actual Use After 10,370 kWh
Normalized Use (not calculated)
Energy Savings Predicted $163
Energy Savings Actual $~200
Energy Use
Electric
- 1 year before 7200
- 2 years before
- 3 years before
- 1 year after 10,370
- 2 years after
Natural gas
- 1 year before 980
- 2 years before
- 3 years before
- 1 year after 494
- 2 years after
Duct Leakage
- Before N/A
- Predicted N/A
- After N/A
IAQ measurements
- Before N/A
- Predicted N/A
- After N/A
Load Calc Heating/Cooling
- Before Heating N/A BTU/hr
- Before Cooling N/A BTU/hr
- Predicted Heating 31,822 BTU/hr
- Predicted Cooling 16,365 BTU/hr
Zonal Testing
Master Bedroom
- Before N/A
- After 5.6/50 (11% connected to outdoors)
Master Bath
- Before N/A
- After 1.7/50 (3.4%)
Basement
- Before N/A
- After 3.7/50 (7.4%)
Jim’s Office (with hatch)
- Before N/A
- After 1.0/50 (2% – Awesome!)
Front Right Bedroom
- Before N/A
- After 1.3/50 (2.6%)
Rear Right Bedroom
- Before N/A
- After 1.5/50 (3%)
Kids’ Bath
- Before N/A
- After 1.3/50 (2.6%)
Year Built 1976
Square Footage 2852
Energy Use Index*
Before 48.7
Target 45.0
After 33.5**
Air Leakage (cfm50)
Start 3349
Target 2200
End 1809
*EUI is a measure of overall usage, regardless of fuel. 0 is fabulous, that means the house makes as much energy as it uses. 50 is pretty good. 100 is piggish.
** The winter was very mild, so this number will go up.