If you read this case study, you will understand the full swath of what Home Performance is and how hard it is to execute well.
Summary
Jon and Kelly came to me wanting to take their home as close to off grid as possible. The reasons behind it were simple – Jon had gone through several major power outages including Hurricane Sandy and didn’t want to be in that situation again. That experience scarred a number of people I have worked with.
What we did is create a House of the Future. It’s all electric, so with solar panels and a generator, plus possibly energy storage, this house could be self-sustaining. Renewably produced electricity recently became the least expensive source of energy, so our economy is likely to move that direction. This house is at the point of the spear.
More importantly, it’s comfortable! Kelly always walked around inside the house in a winter coat, regardless of season. I got an email from her telling me she took her coat off. That is success to me! Read on to see how we did it.
Photo Album
See a bunch of project photos here.

Problems
- Capability to weather long power outages
- Approach Net Zero (make as much power as they use)
- Make Kelly warm
- Convert third floor to workout area
Results
- Quite air tight, slow to lose temperature
- Solar panels are planned
- Outstanding comfort, Kelly took her coat off
- Drywall is up on third floor, should increase home value
Client Testimonial
By hiring Nate Adams, we turned our 100 year old home into a “home of the future”. Our home is now incredibly comfortable, inexpensive to operate, and ready to go near Net Zero.
His insulation advice added another room to our house: the attic space equals an additional 400 sq ft. Nate was present during the spray foaming, guiding Affordable Foam and monitoring so nothing was missed. Nate triple checked areas for airflow issues. According to Nate: “missing spots generally happen because the workers that are foaming have the very difficult task of hitting all the detailed nooks and crannies.” He made sure all the spots were hit to accomplish the goal. The cost is bit higher with this accuracy but having everything foamed properly increases the comfort, efficiency, and longevity of your home system.
In addition, Nate worked with Affordable Foam on two areas in our basement; the area is now drier and warmer than before.
The HVAC choice Nate recommended us to use was the Carrier GreenSpeed heat pump. It is without question the best option to jump start the new era of renewables. After weighing various options, the GreenSpeed cost was considerably lower than installing a GeoThermal system.
We have filmed the entire house renovation process. Nate Adams’ home improvement philosophy is different than seasoned and traditional contractors and inspectors. Contractors are not on par with the knowledge Nate brings to the table. As scary as it was at times listening to all the various viewpoints, we are now in love with the comfort, energy savings, and recommend others to switch to a “properly sized” heat pump.
Nate and Co. helped make sense of the complicated interactions of this project when our hired HVAC specialists could not. An example: at first, the electric cost to heat our house use was higher than expected for the GreenSpeed. The system was using too much emergency heat. Our hired HVAC company who installed the the system had no idea how to custom design and adjust deeper settings on the equipment to our needs. After weeks of trying to get answers from them, Nate came by and fixed the settings in a snap. We are now saving 30-50% on our heating costs vs. before the adjustments! We are on par with other gas homes in the area when comparing the cost to heat their homes. Now with these new adjustments our bills are even lower! GreenSpeed! GreenSpeed! GreenSpeed! “It’s all electric!”
We can’t thank Nate Adams enough. The value of our home is greater, it is highly efficient, comfortable, and our cost of living is less monetarily. More importantly, we are reducing our carbon footprint. Nate’s advice kept us on track and helped us avoid a number of expensive and non-progressive home renovation mistakes. When a carbon tax goes in place, we’re going to be ahead of the game! You can find us on Facebook at N7 Productions.
Upgrades
-
Air Sealing and Insulation
- Attic – Removed existing insulation, replaced with spray foam.
- Basement – Spray foam in crawl space and under front bump outs.
-
HVAC
- All electric heat pump installed. 3 ton Carrier GreenSpeed with water saver humidifier.
- Electric water heater
-
Other
- Walls had previously been insulated, rim joists had previously been foamed. New windows were also installed.
- Electric stove
Full Story
This is the best case study for understanding how to create a House of the Future. Consequently, it’s not short.
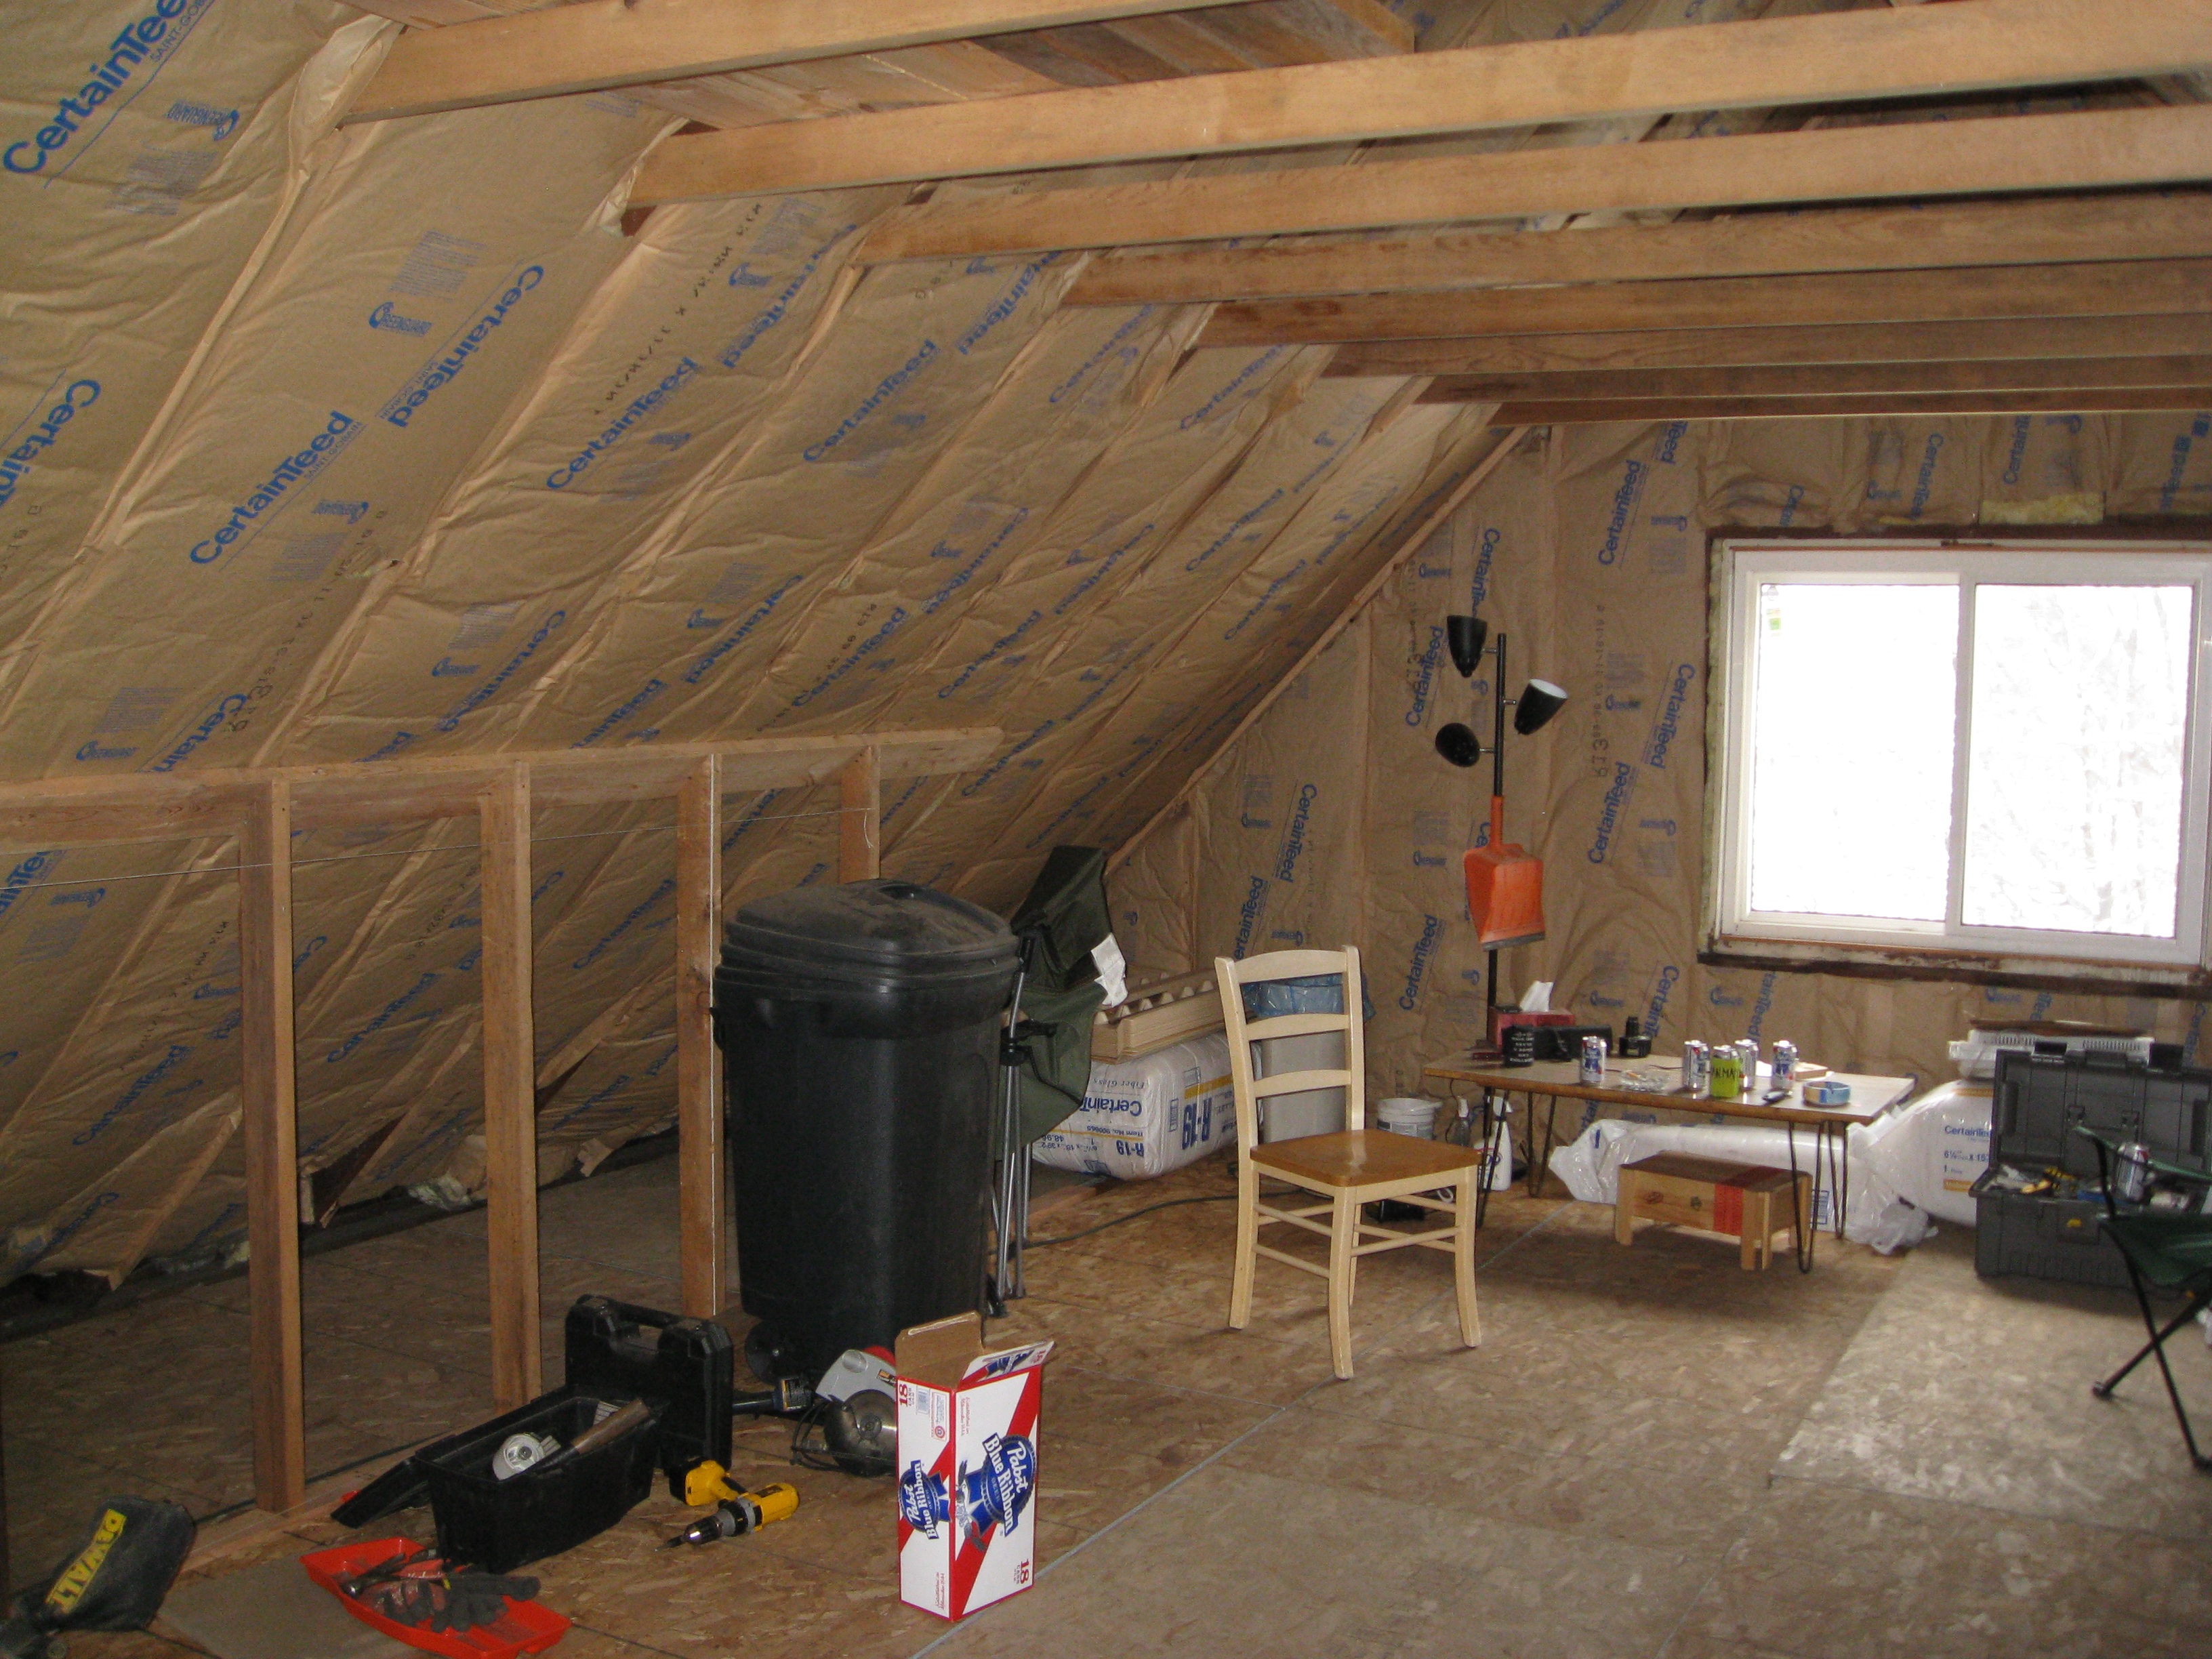
Jon and Kelly were the only ones to respond to a Facebook ad experiment I did back when Energy Smart was contracting. They have a walkup attic in their house that they wanted to convert to a workout area. I gave them a bid for a plan I’m glad we didn’t end up executing. It involved dense packed fiberglass and some new framing.
Jon was in the middle of selling his house in Brooklyn, so things were tight and he had another contractor insulate the walls and do some air sealing in the basement. Both were done pretty well, which was good to see.
When the Brooklyn house sold, Jon got serious about converting the attic into living space. His thought process had evolved to where not only did they want a comfortable home, but wanted it to be capable of running extended periods during a power outage. Or maybe even capable of going off grid entirely. The preference was to go all electric, since that can be produced renewably without burning any fuel.
All electric means a heat pump. A heat pump is an air conditioner that can heat as well as cool. In a northern climate like ours, heat pumps have a bad reputation of being very expensive to operate. Thankfully, a new generation of heat pumps is out that works well in cold climates, all the way down to below zero. A heat pump in a 1918 house in Cleveland sounds crazy, but it worked, and not only did it work but Jon and Kelly’s house is the most comfortable one I’ve ever been in. The costs to heat it may turn out to be even less expensive than natural gas, despite gas prices being at historic lows. Here’s the story of how we did it.
The Siding
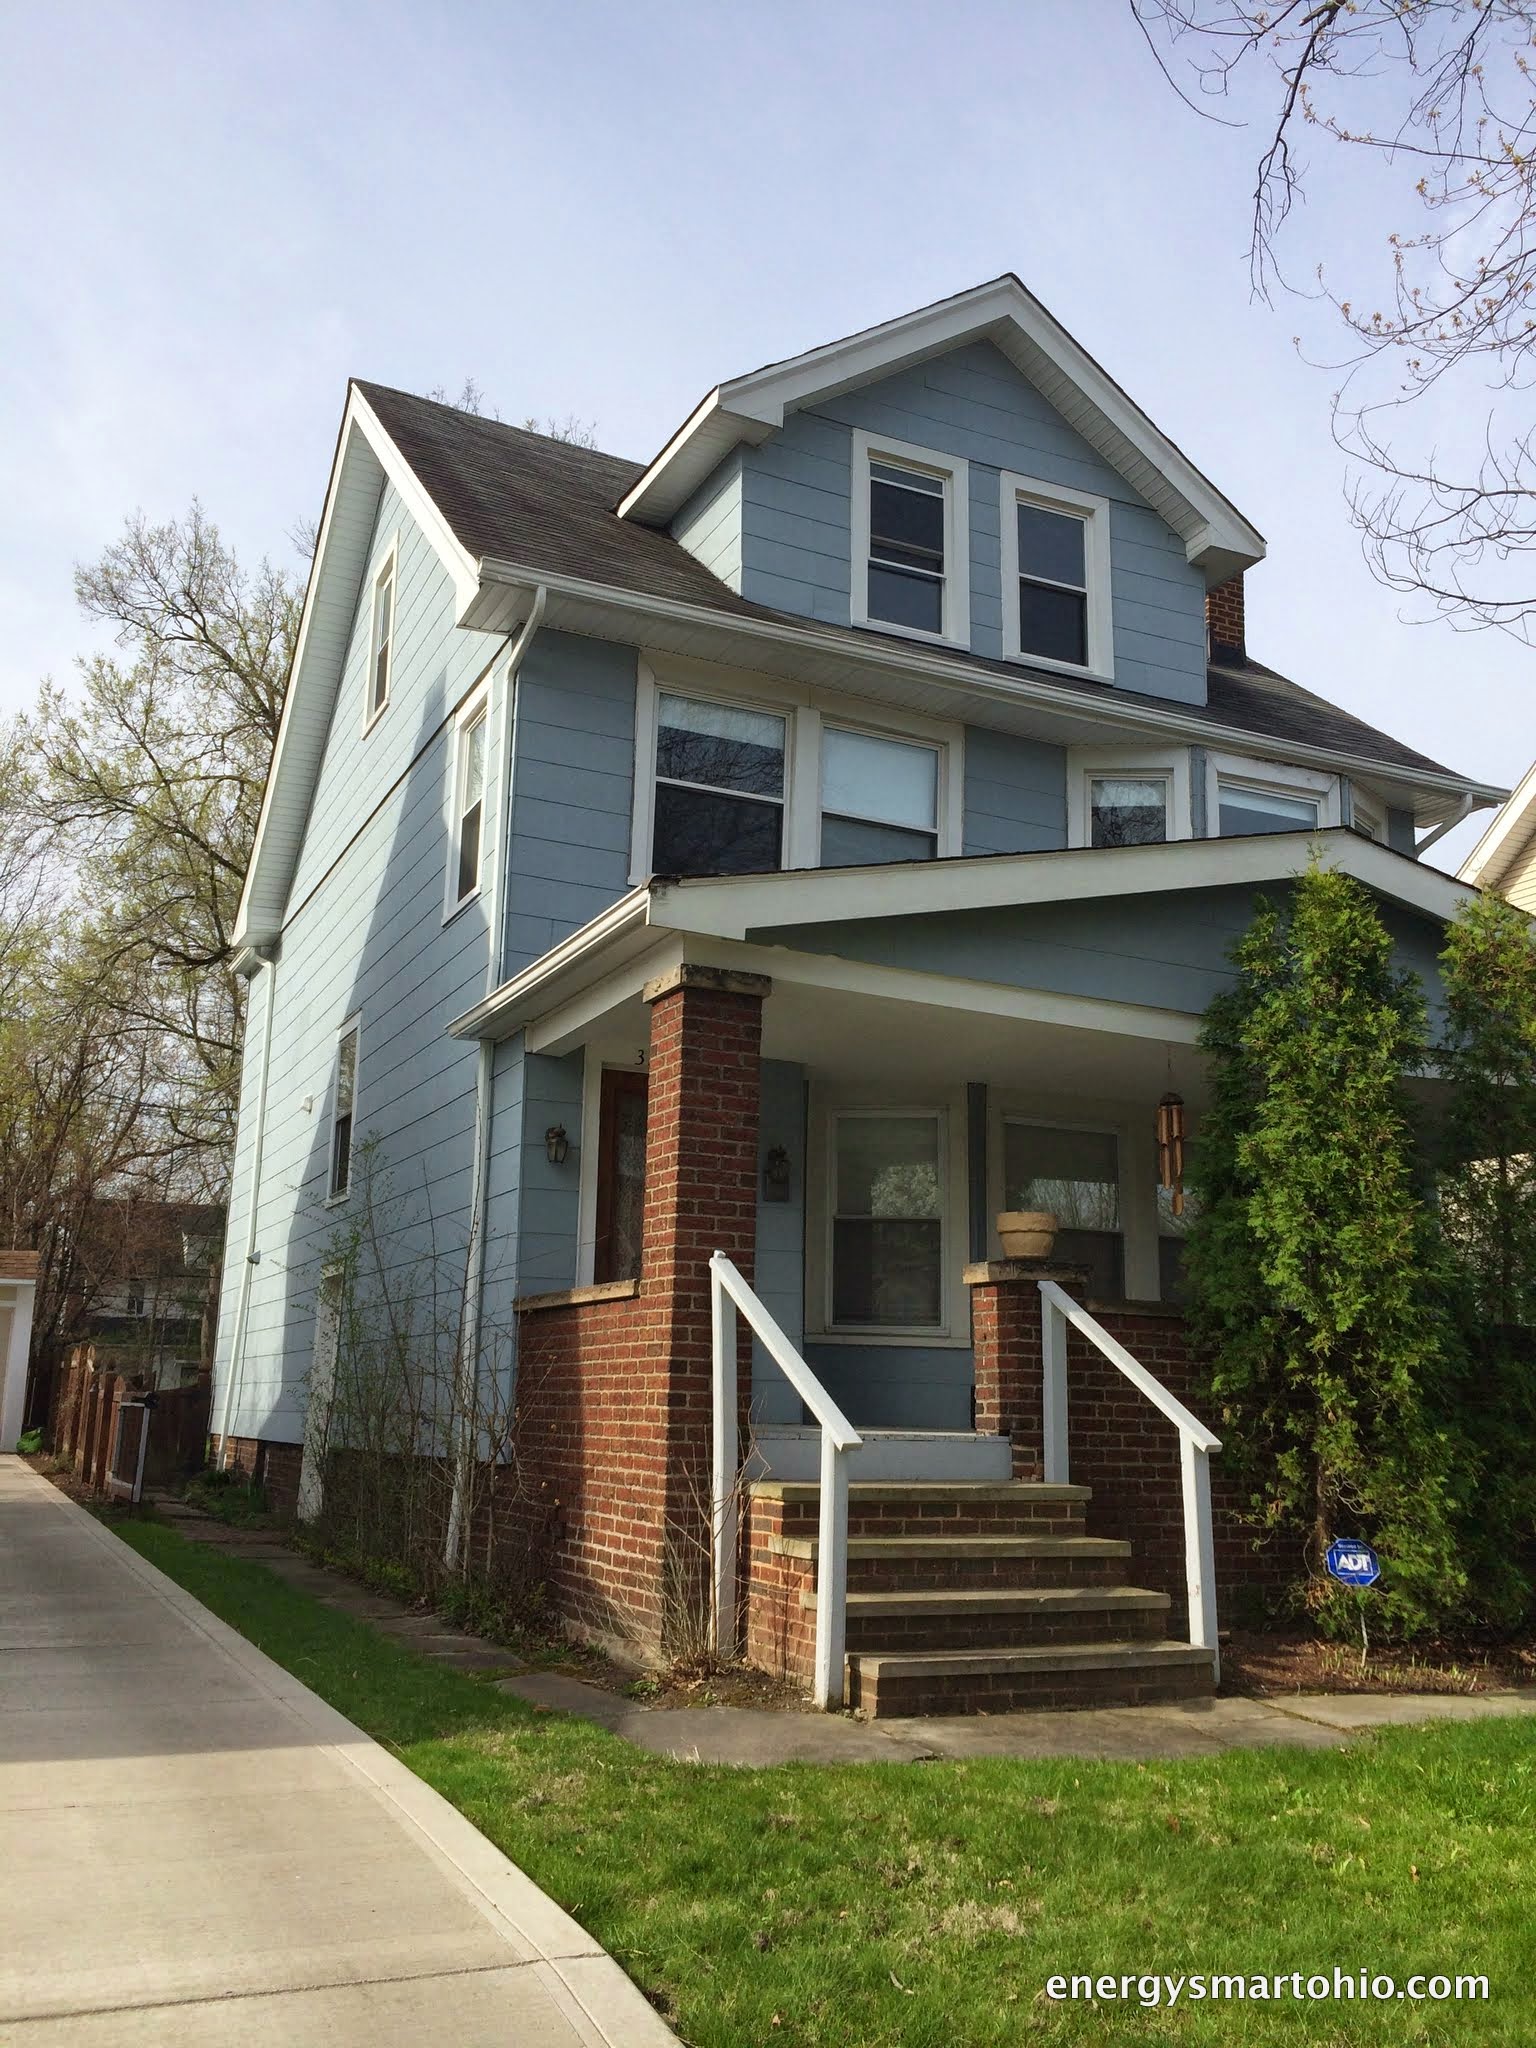
When I first saw the house, it had a nice shape but the siding made it kinda ugly. It had asbestos shingles, which are actually concrete. It looked like this:
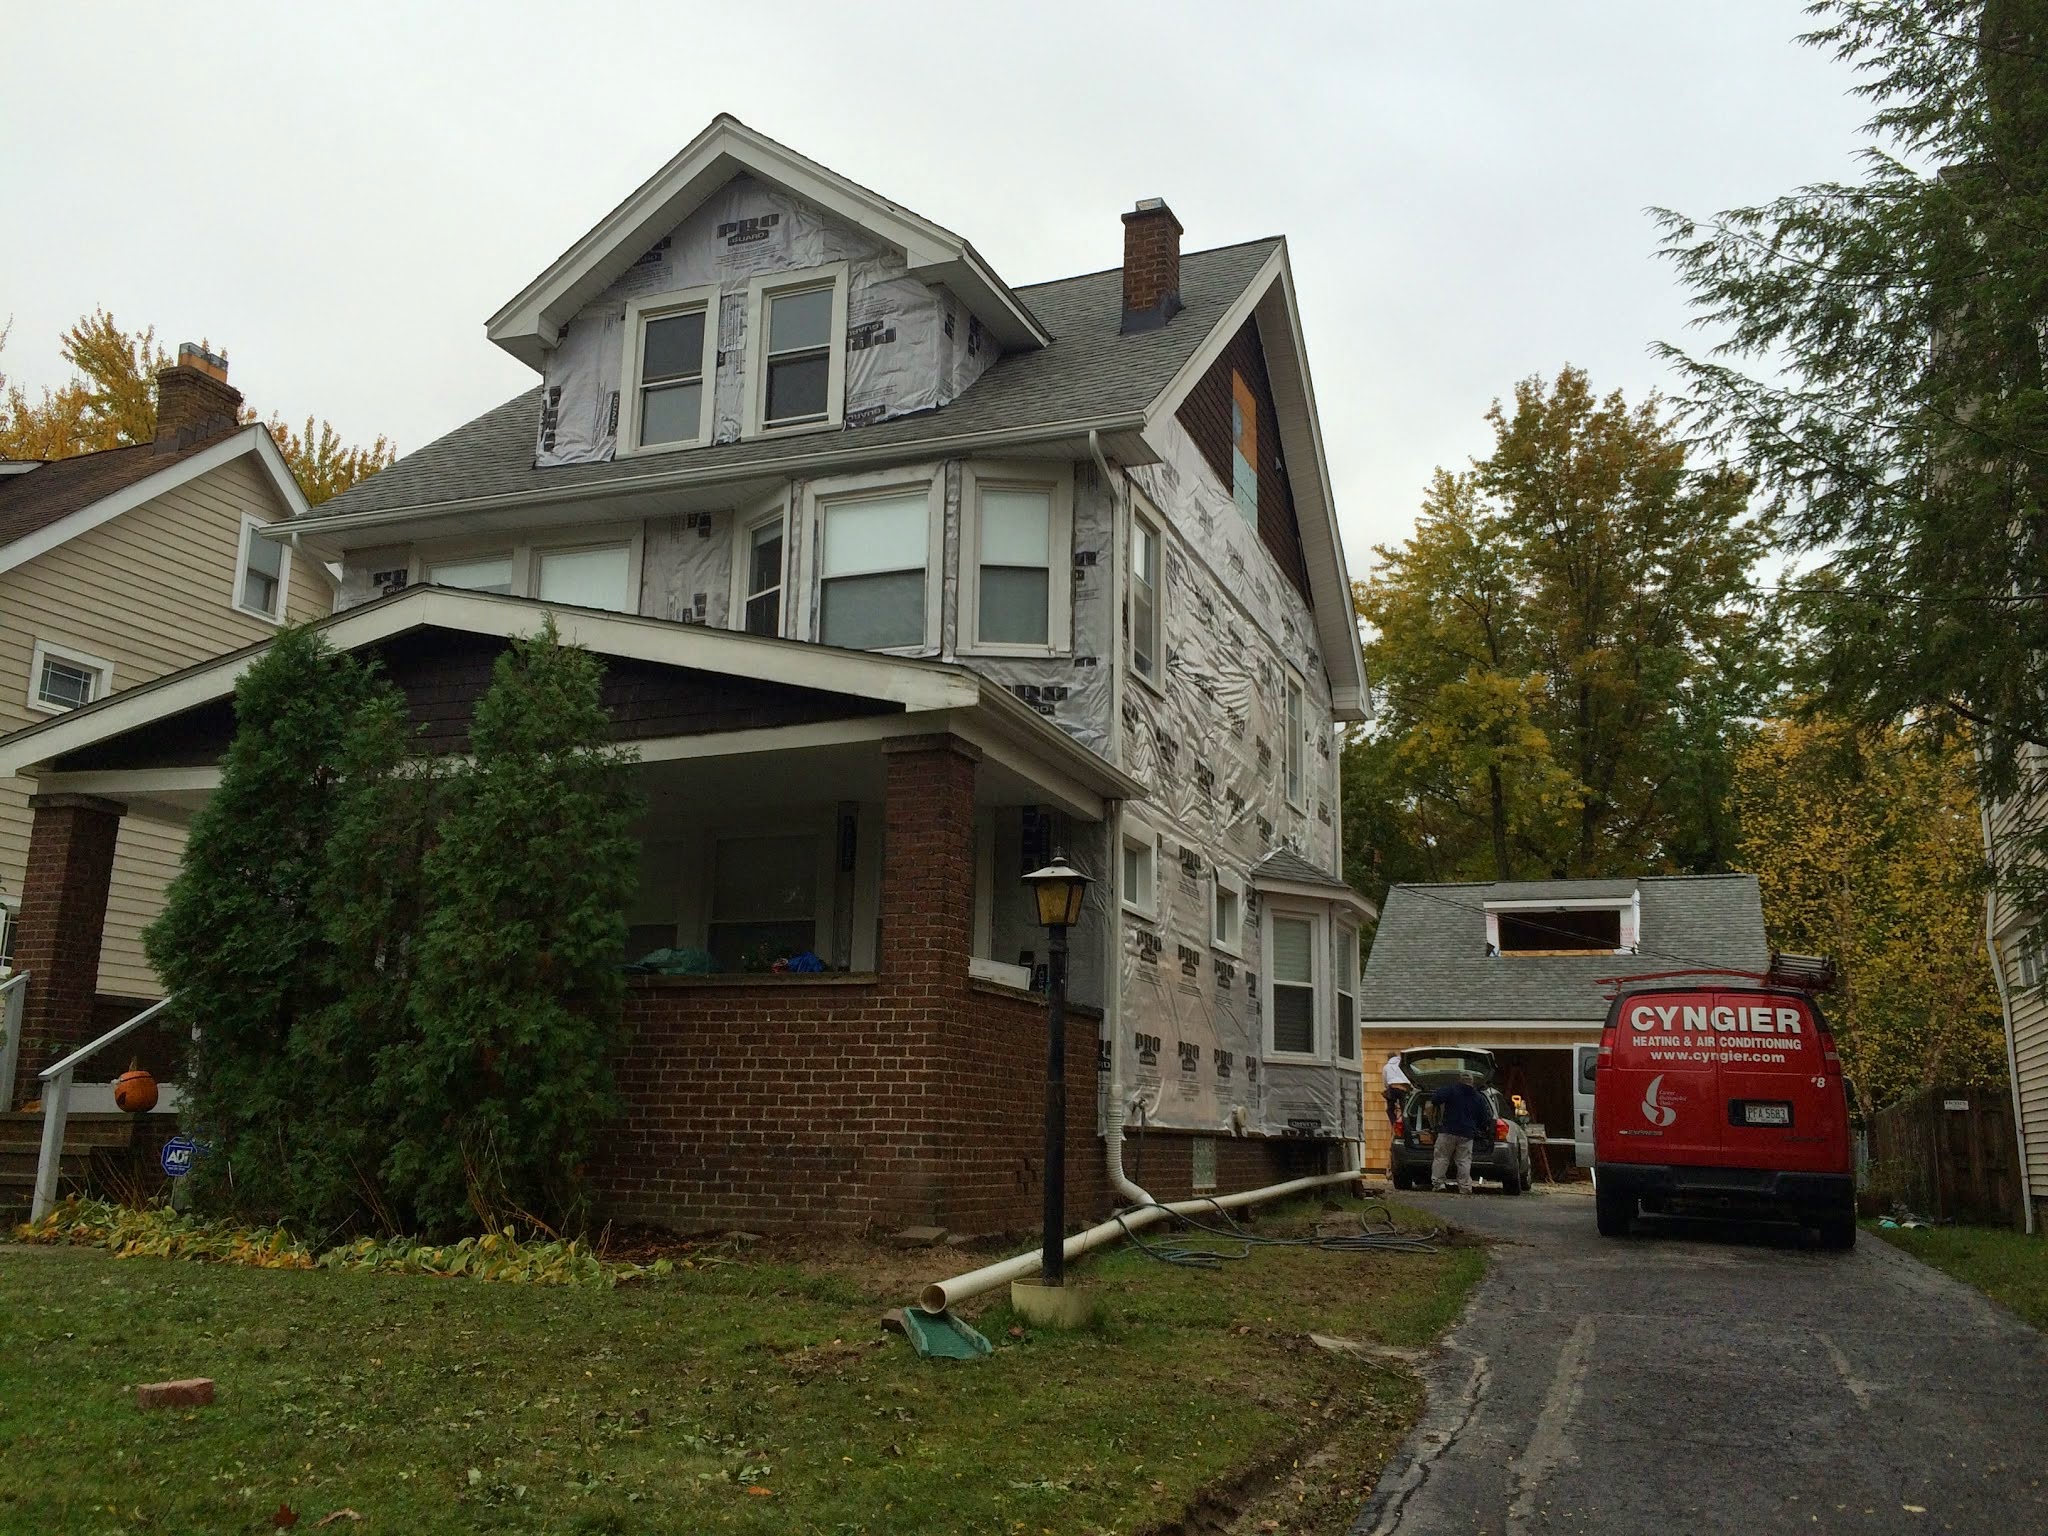
Thanks to a hail storm, the roof needed to be replaced, and since the siding was heavily tied into the roof the insurance company ended up replacing the siding too. Here it is mid project, the day of the heat pump install:
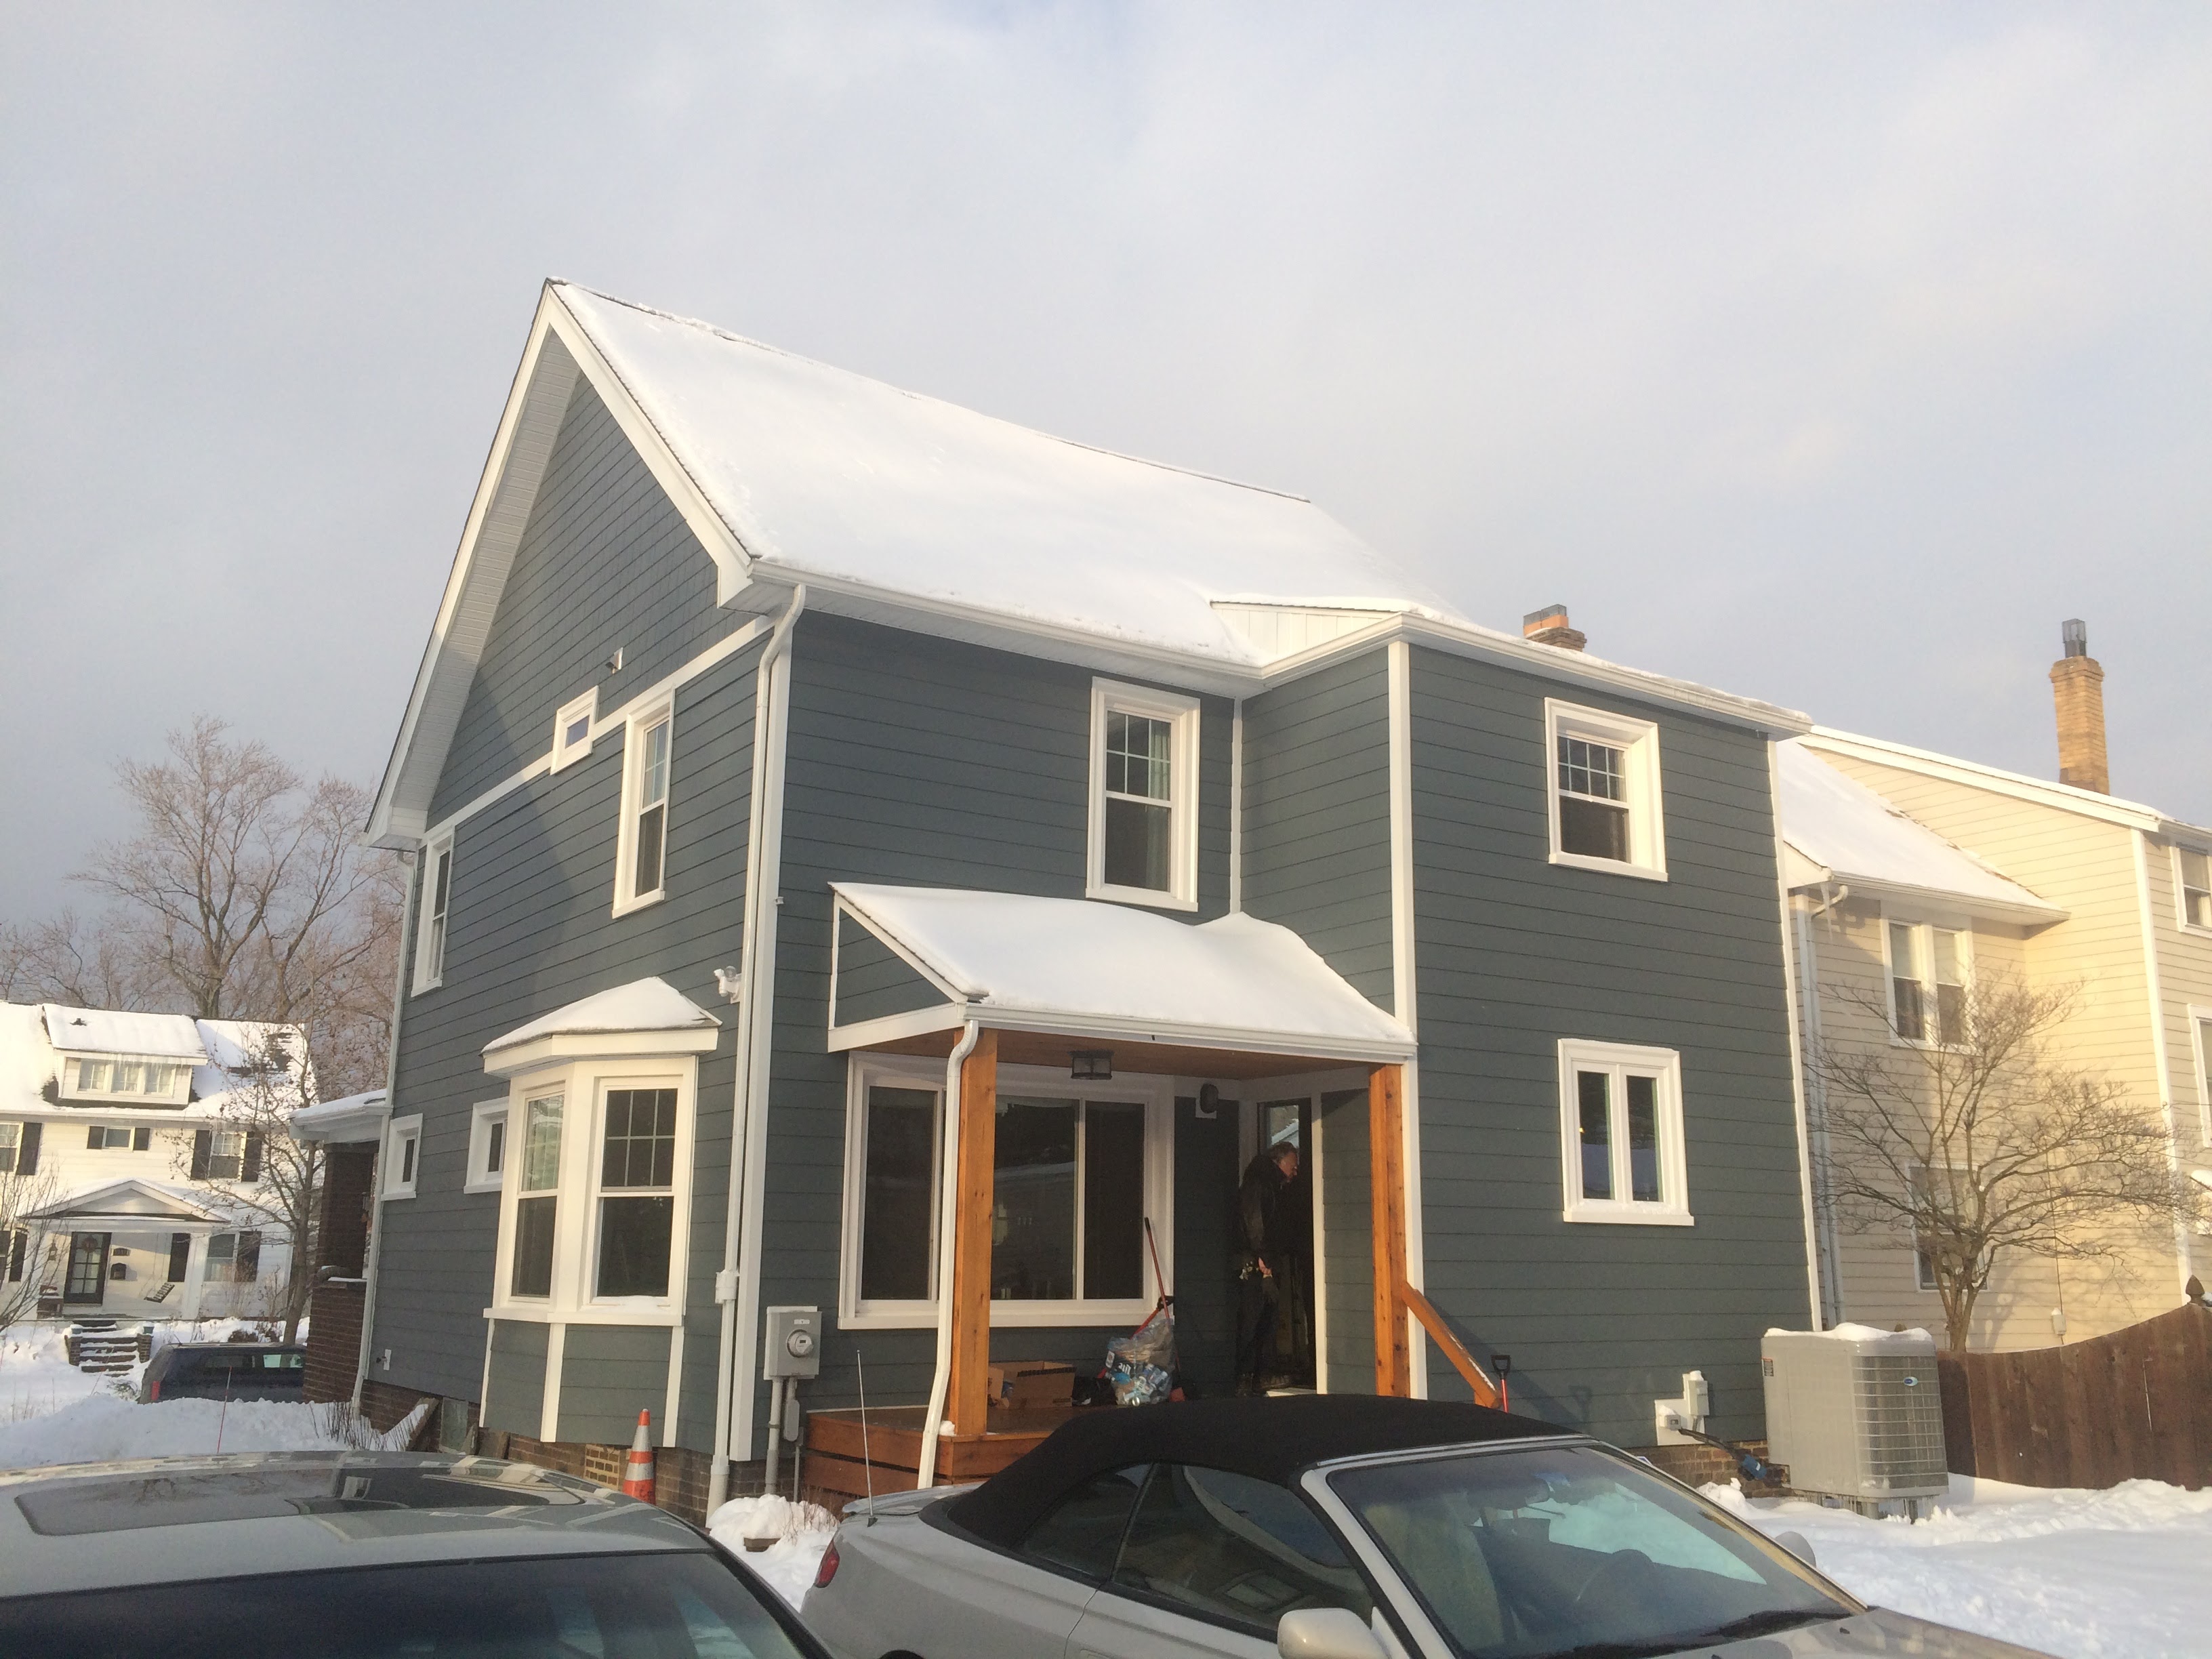
And here’s the house as it looks today:

A fresh new look for it with Jon and Kelly on the porch. It’s a lovely house!
The Diagnosis
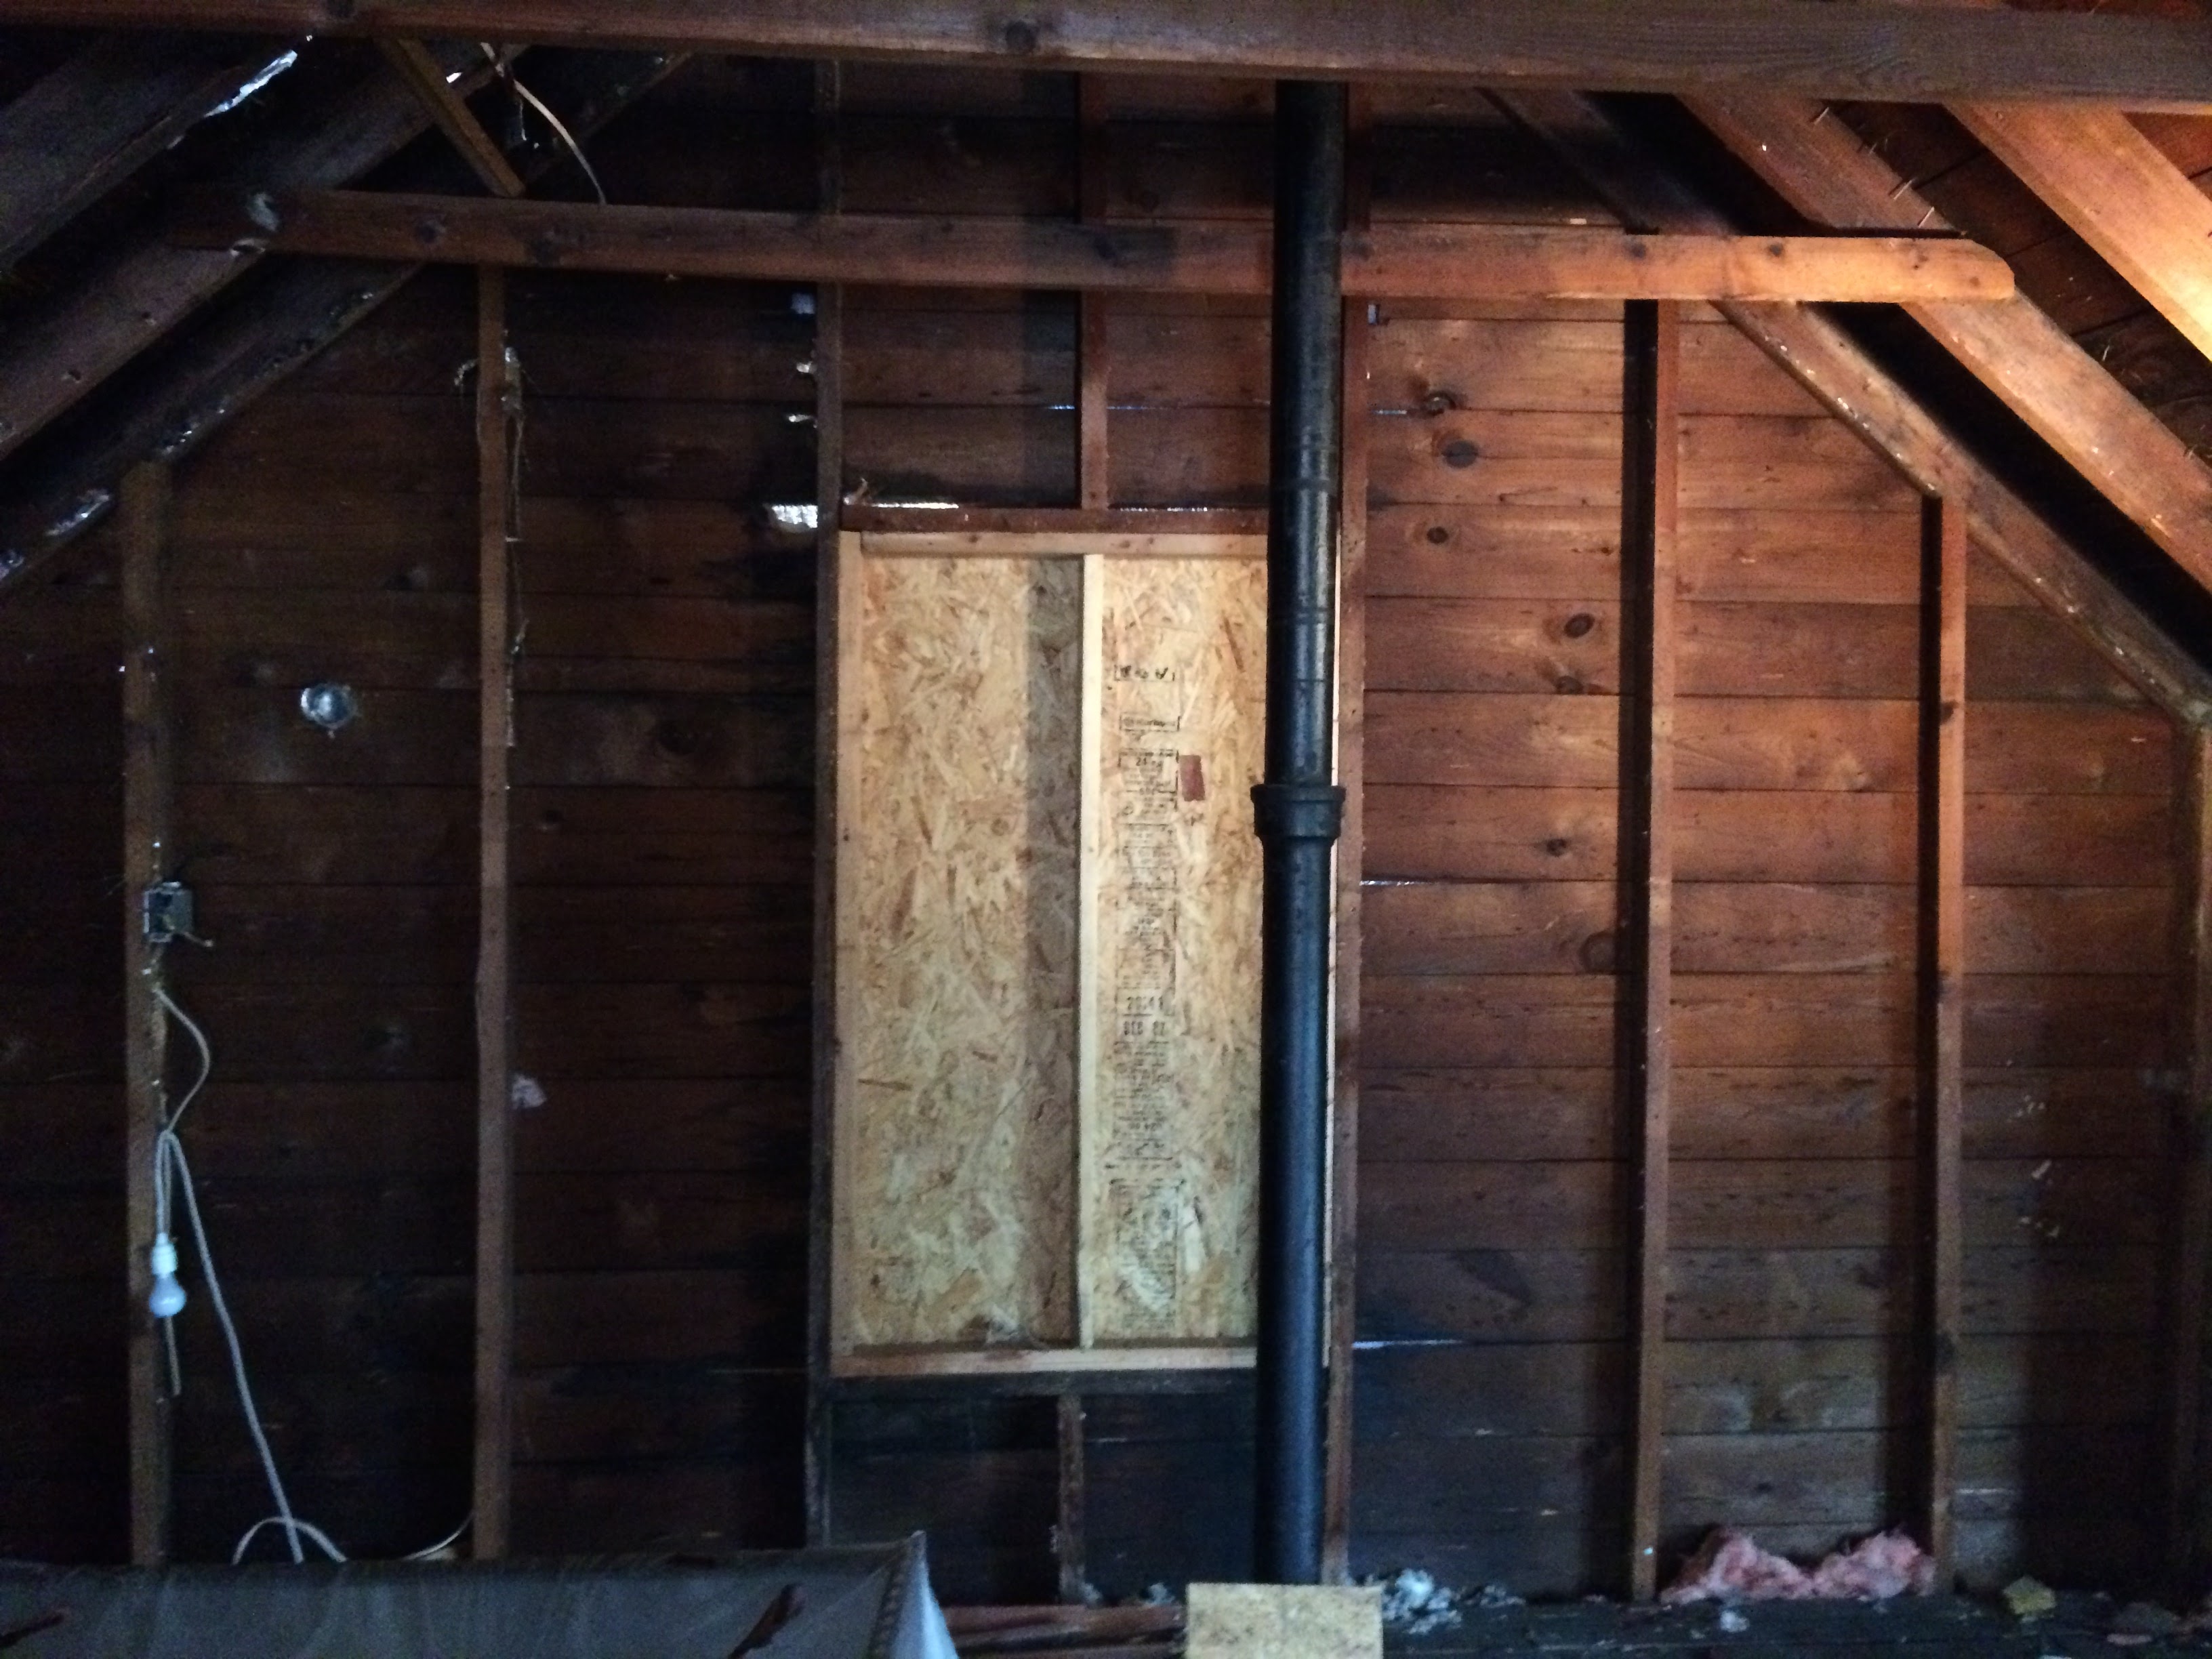
This was a pretty early diagnosis for me, before I got my Flir One infrared camera. So it’s not as interesting as many of the others. It will be shorter, though! That said, let’s dig in, here is the attic as I found it:
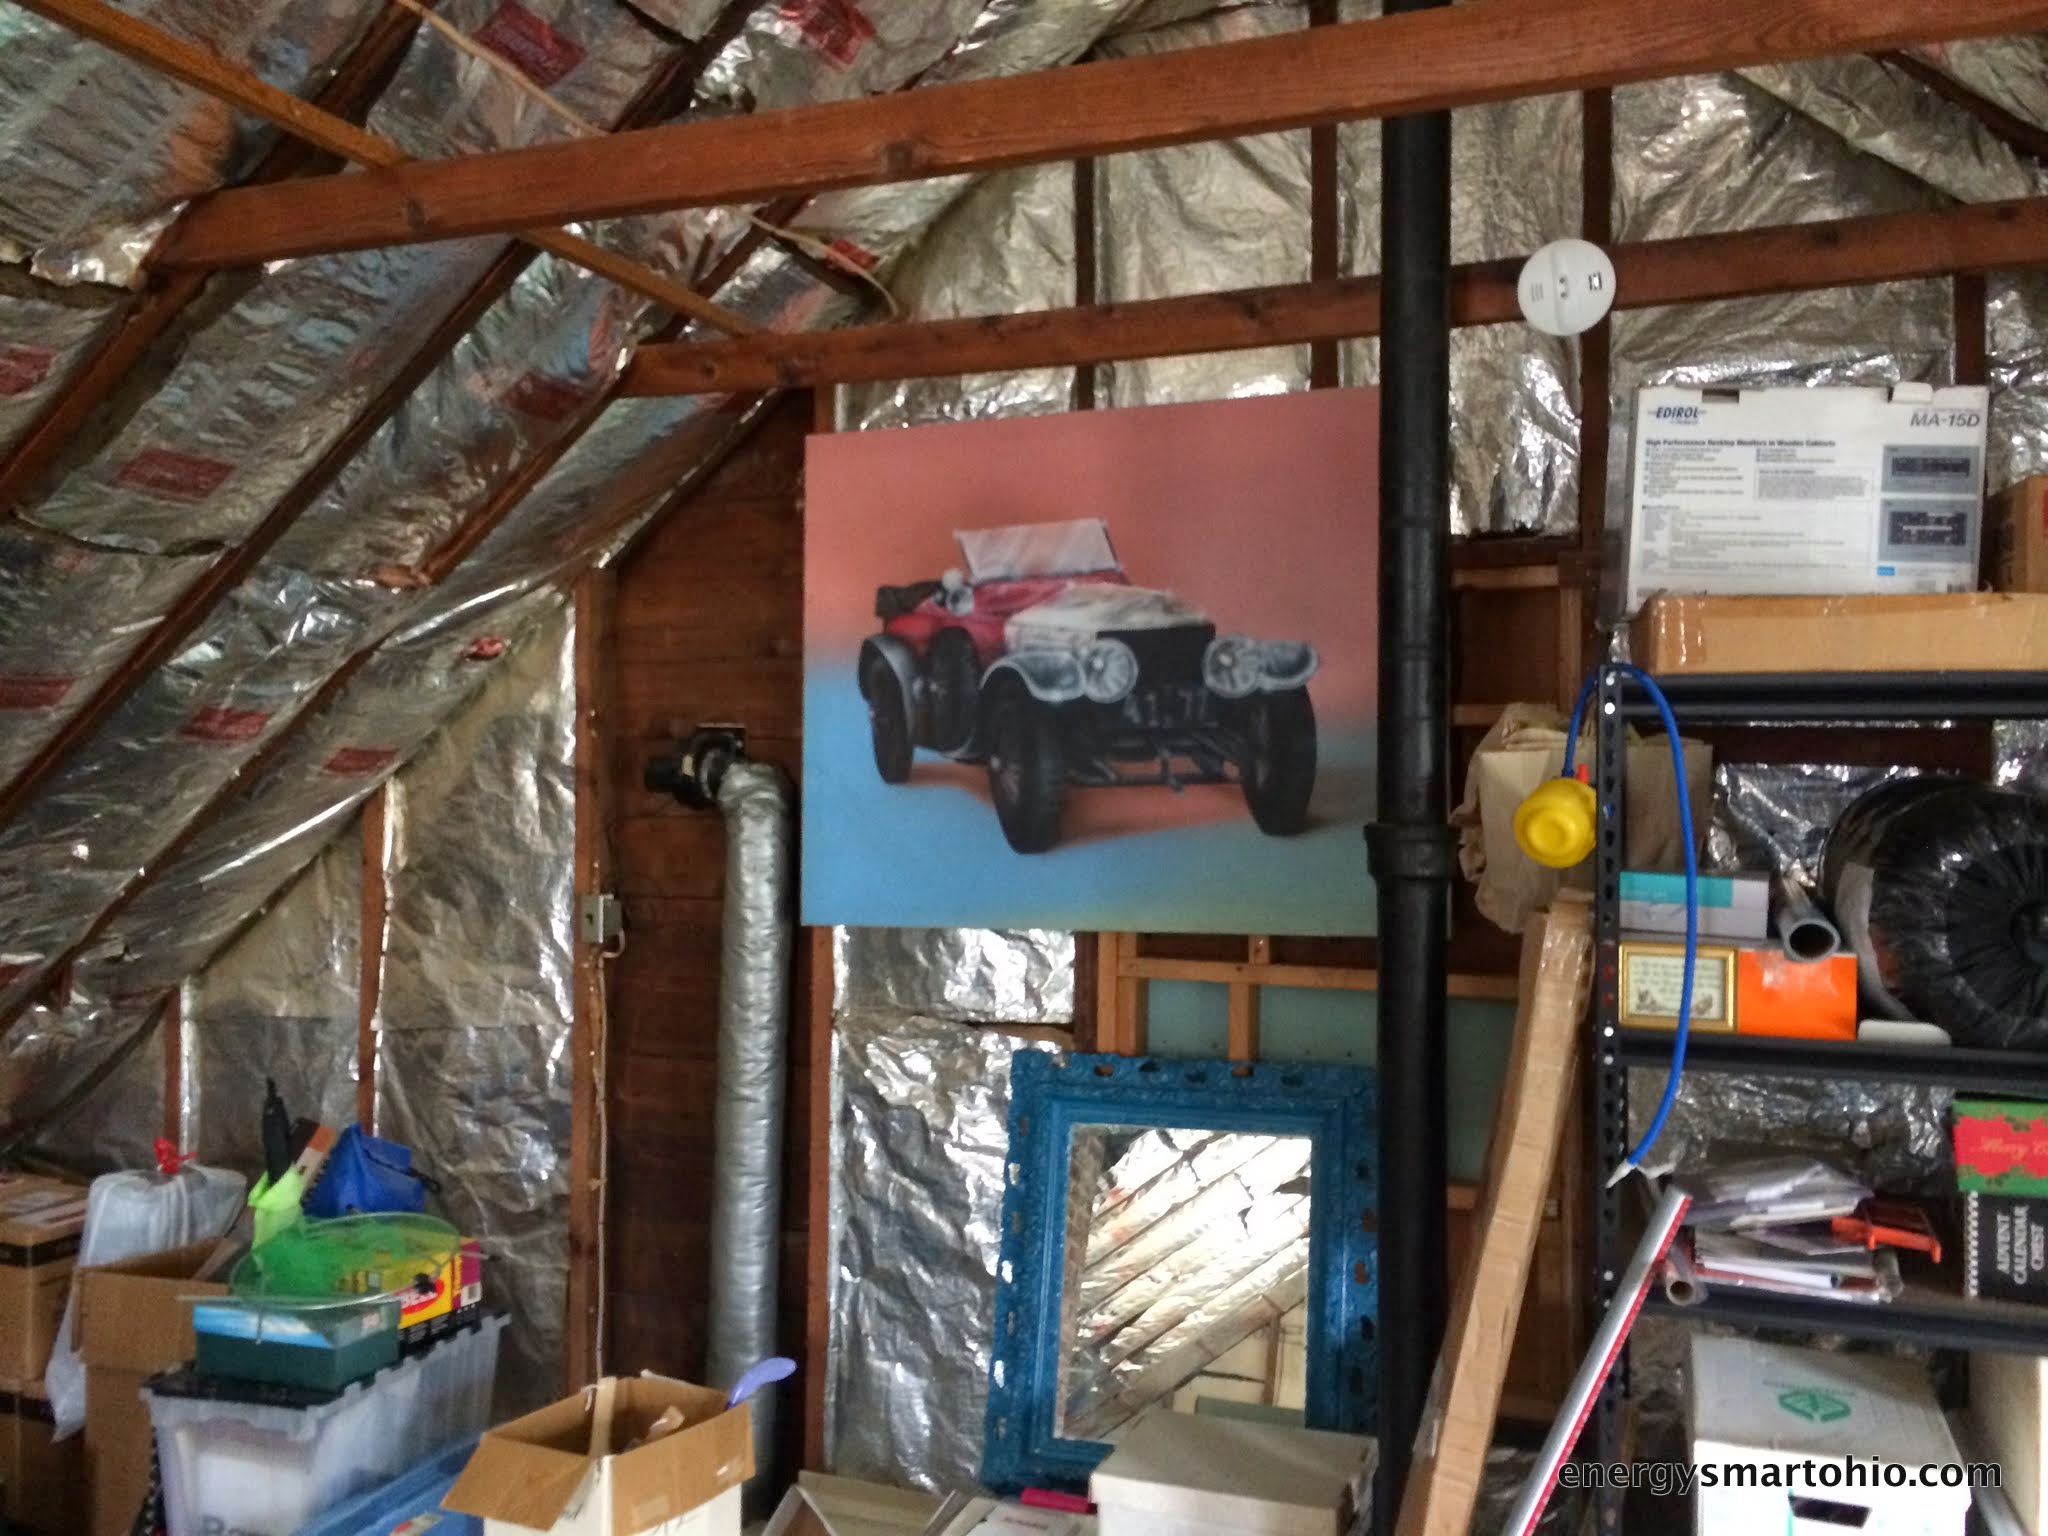
Old school foil faced fiberglass on the roof. It was pretty filthy when it got taken down, completely filled with dirt. This looks like it’s insulated, and it kinda is, but this attic was very leaky. Just like wind across a loose knit sweater, this insulation isn’t worth much.
This is the attic stairway. Note the light colored wood plugs in the stairs. Those were drilled so the stairs could be filled with blown cellulose. While that tactic sounds good, I find that the homes using this method are still pretty leaky.
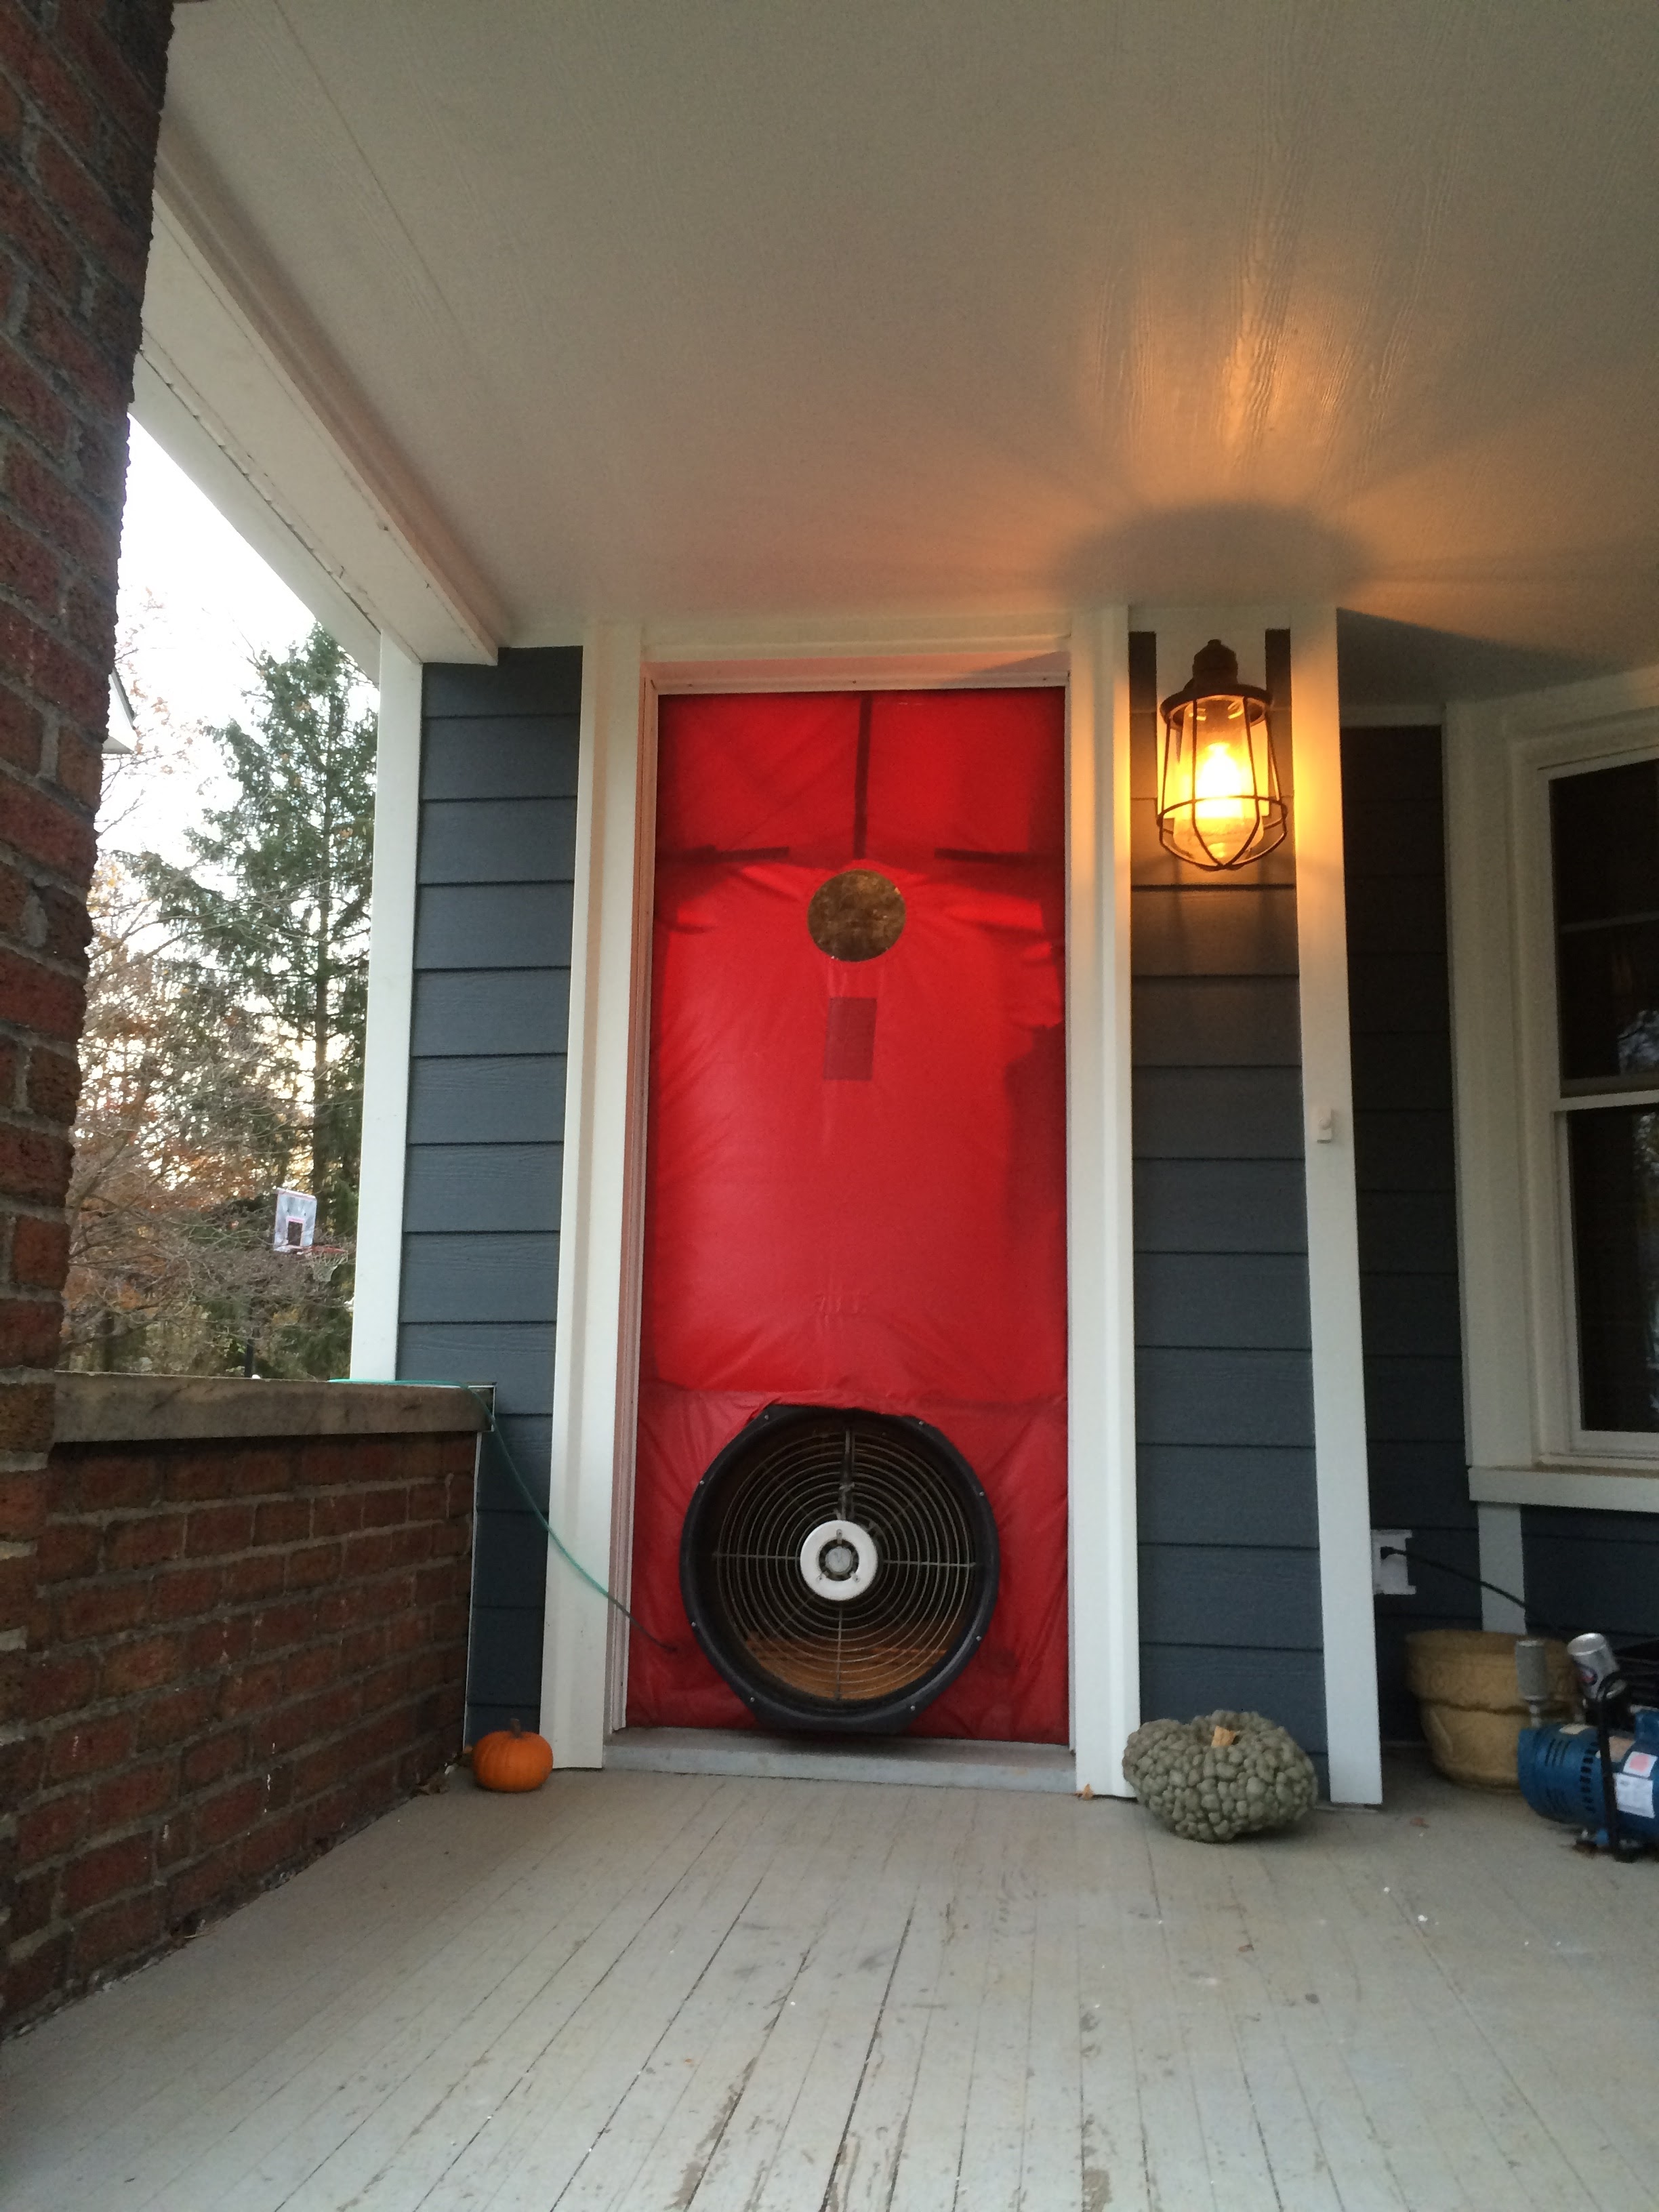
Speaking of which, let’s talk air leakage, which I measure with a blower door. A blower door is a big fan energy auditors like me put in a doorway that can measure how much a house leaks:
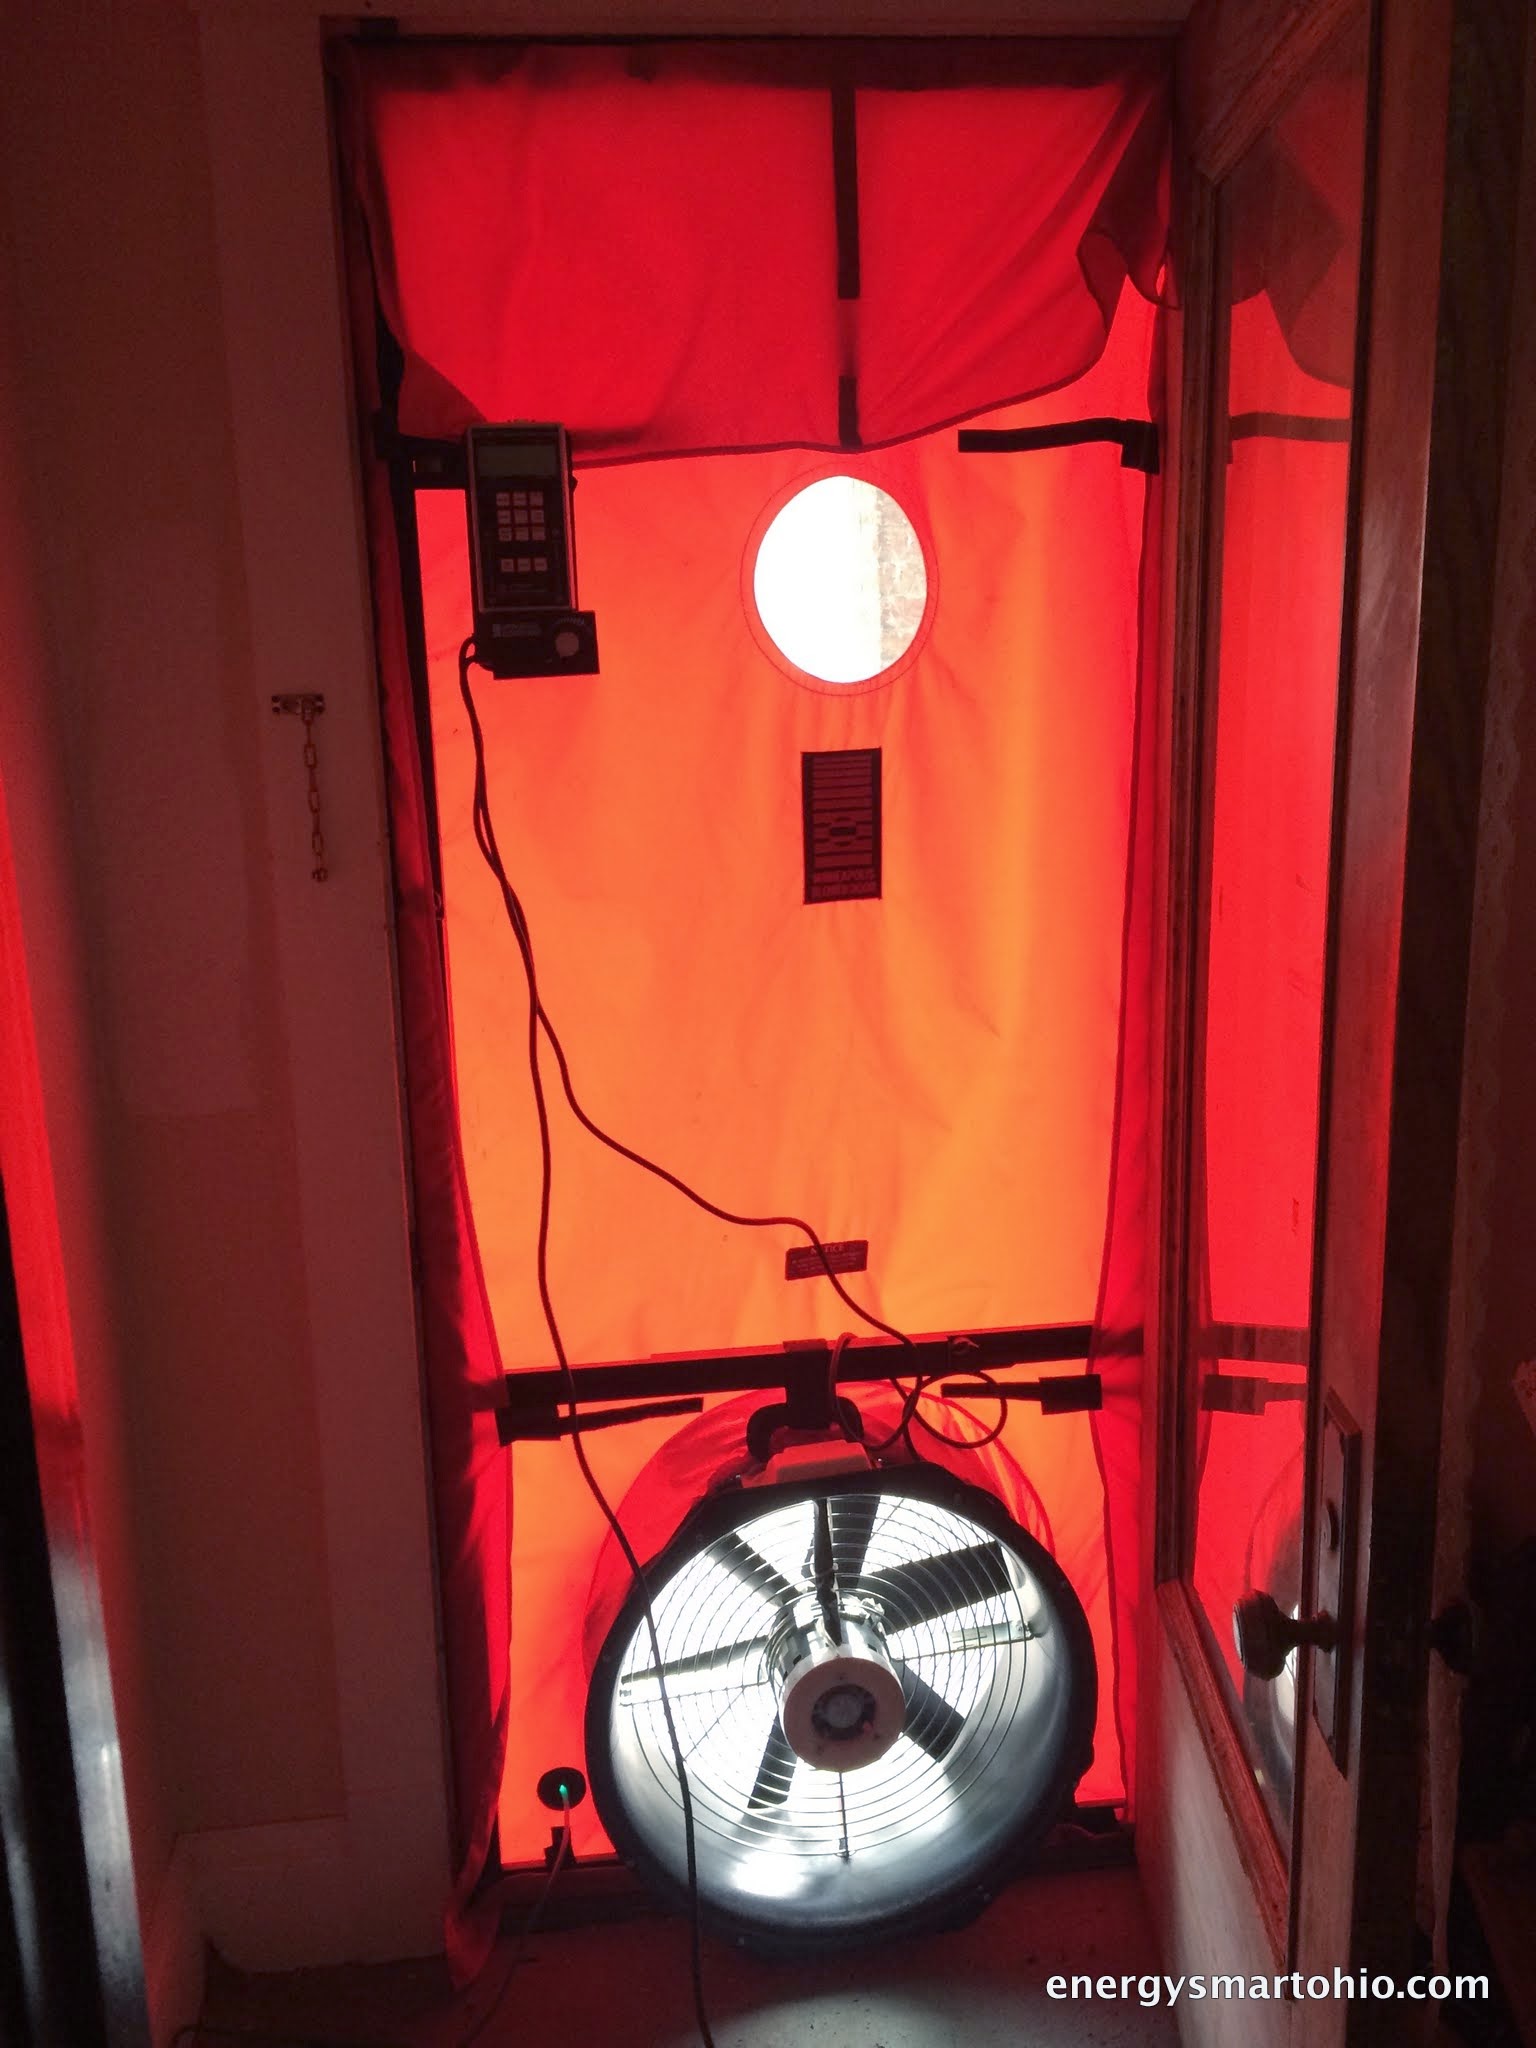
A good rule of thumb is that the leakage number should be the same or less than the square footage of the house. This house is about 1700 square feet, so a 1700 blower door would be pretty good. Here it is with the attic door open:
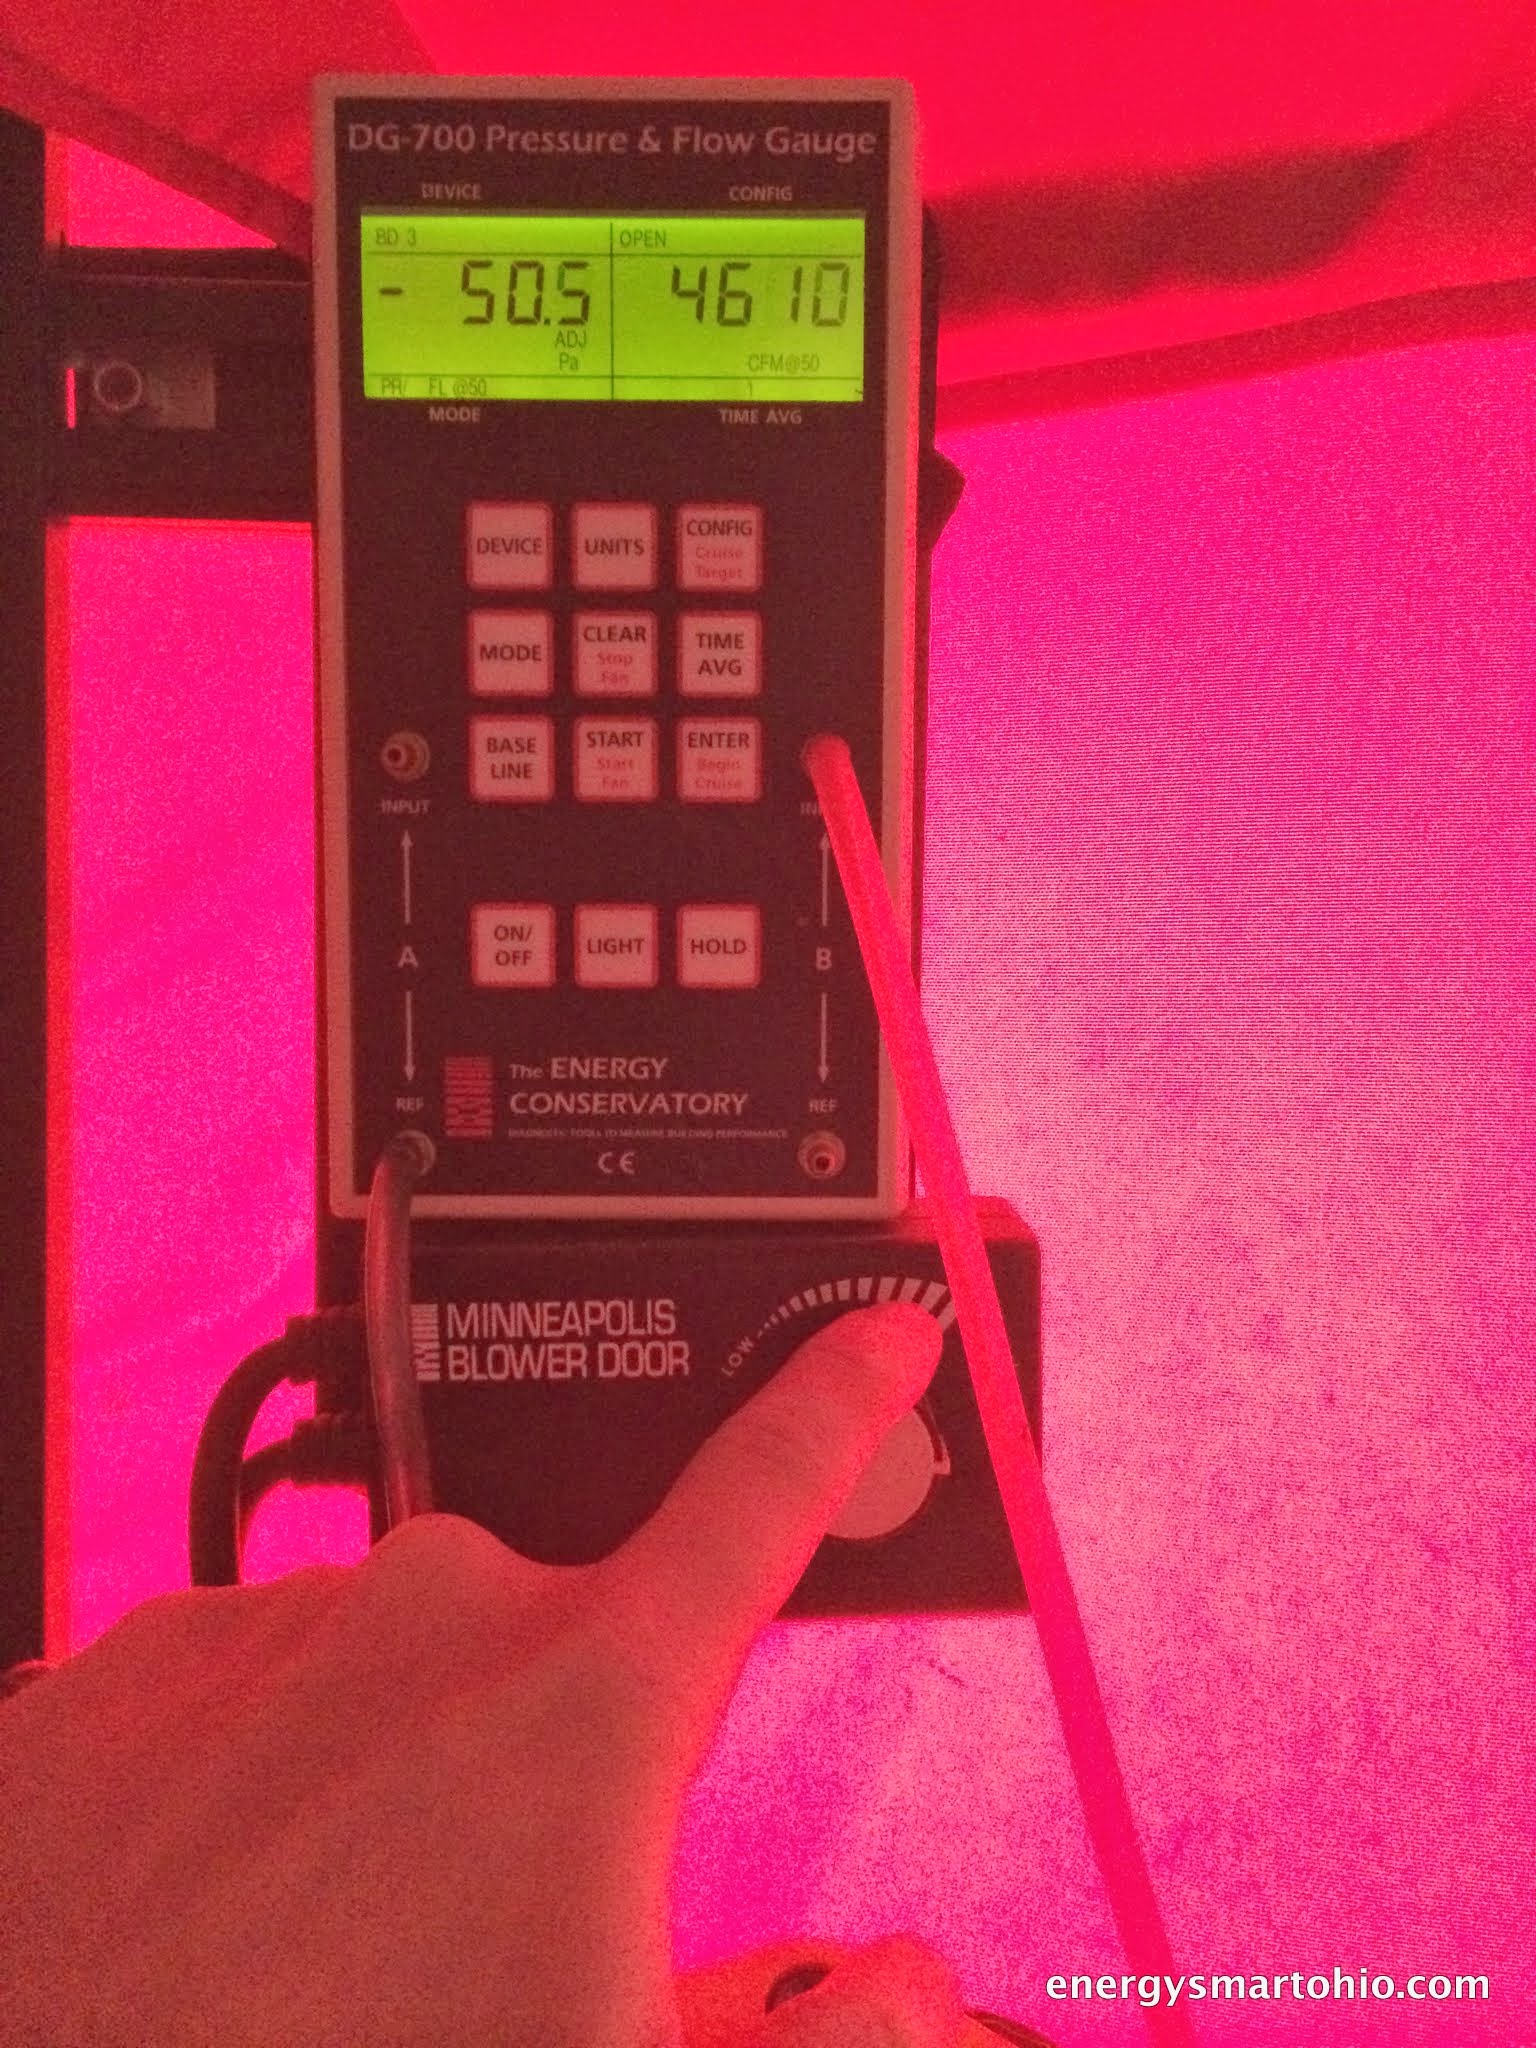
That’s a pretty lousy number. 4610:1700 is pushing 3:1, not the ideal 1:1 or less. Since Jon and Kelly wanted to use the third floor as living space, this reading is unacceptable. The 2600 target is for the entire house, which means this is the key number we care about.
When the attic door is closed, it gets a good bit better:
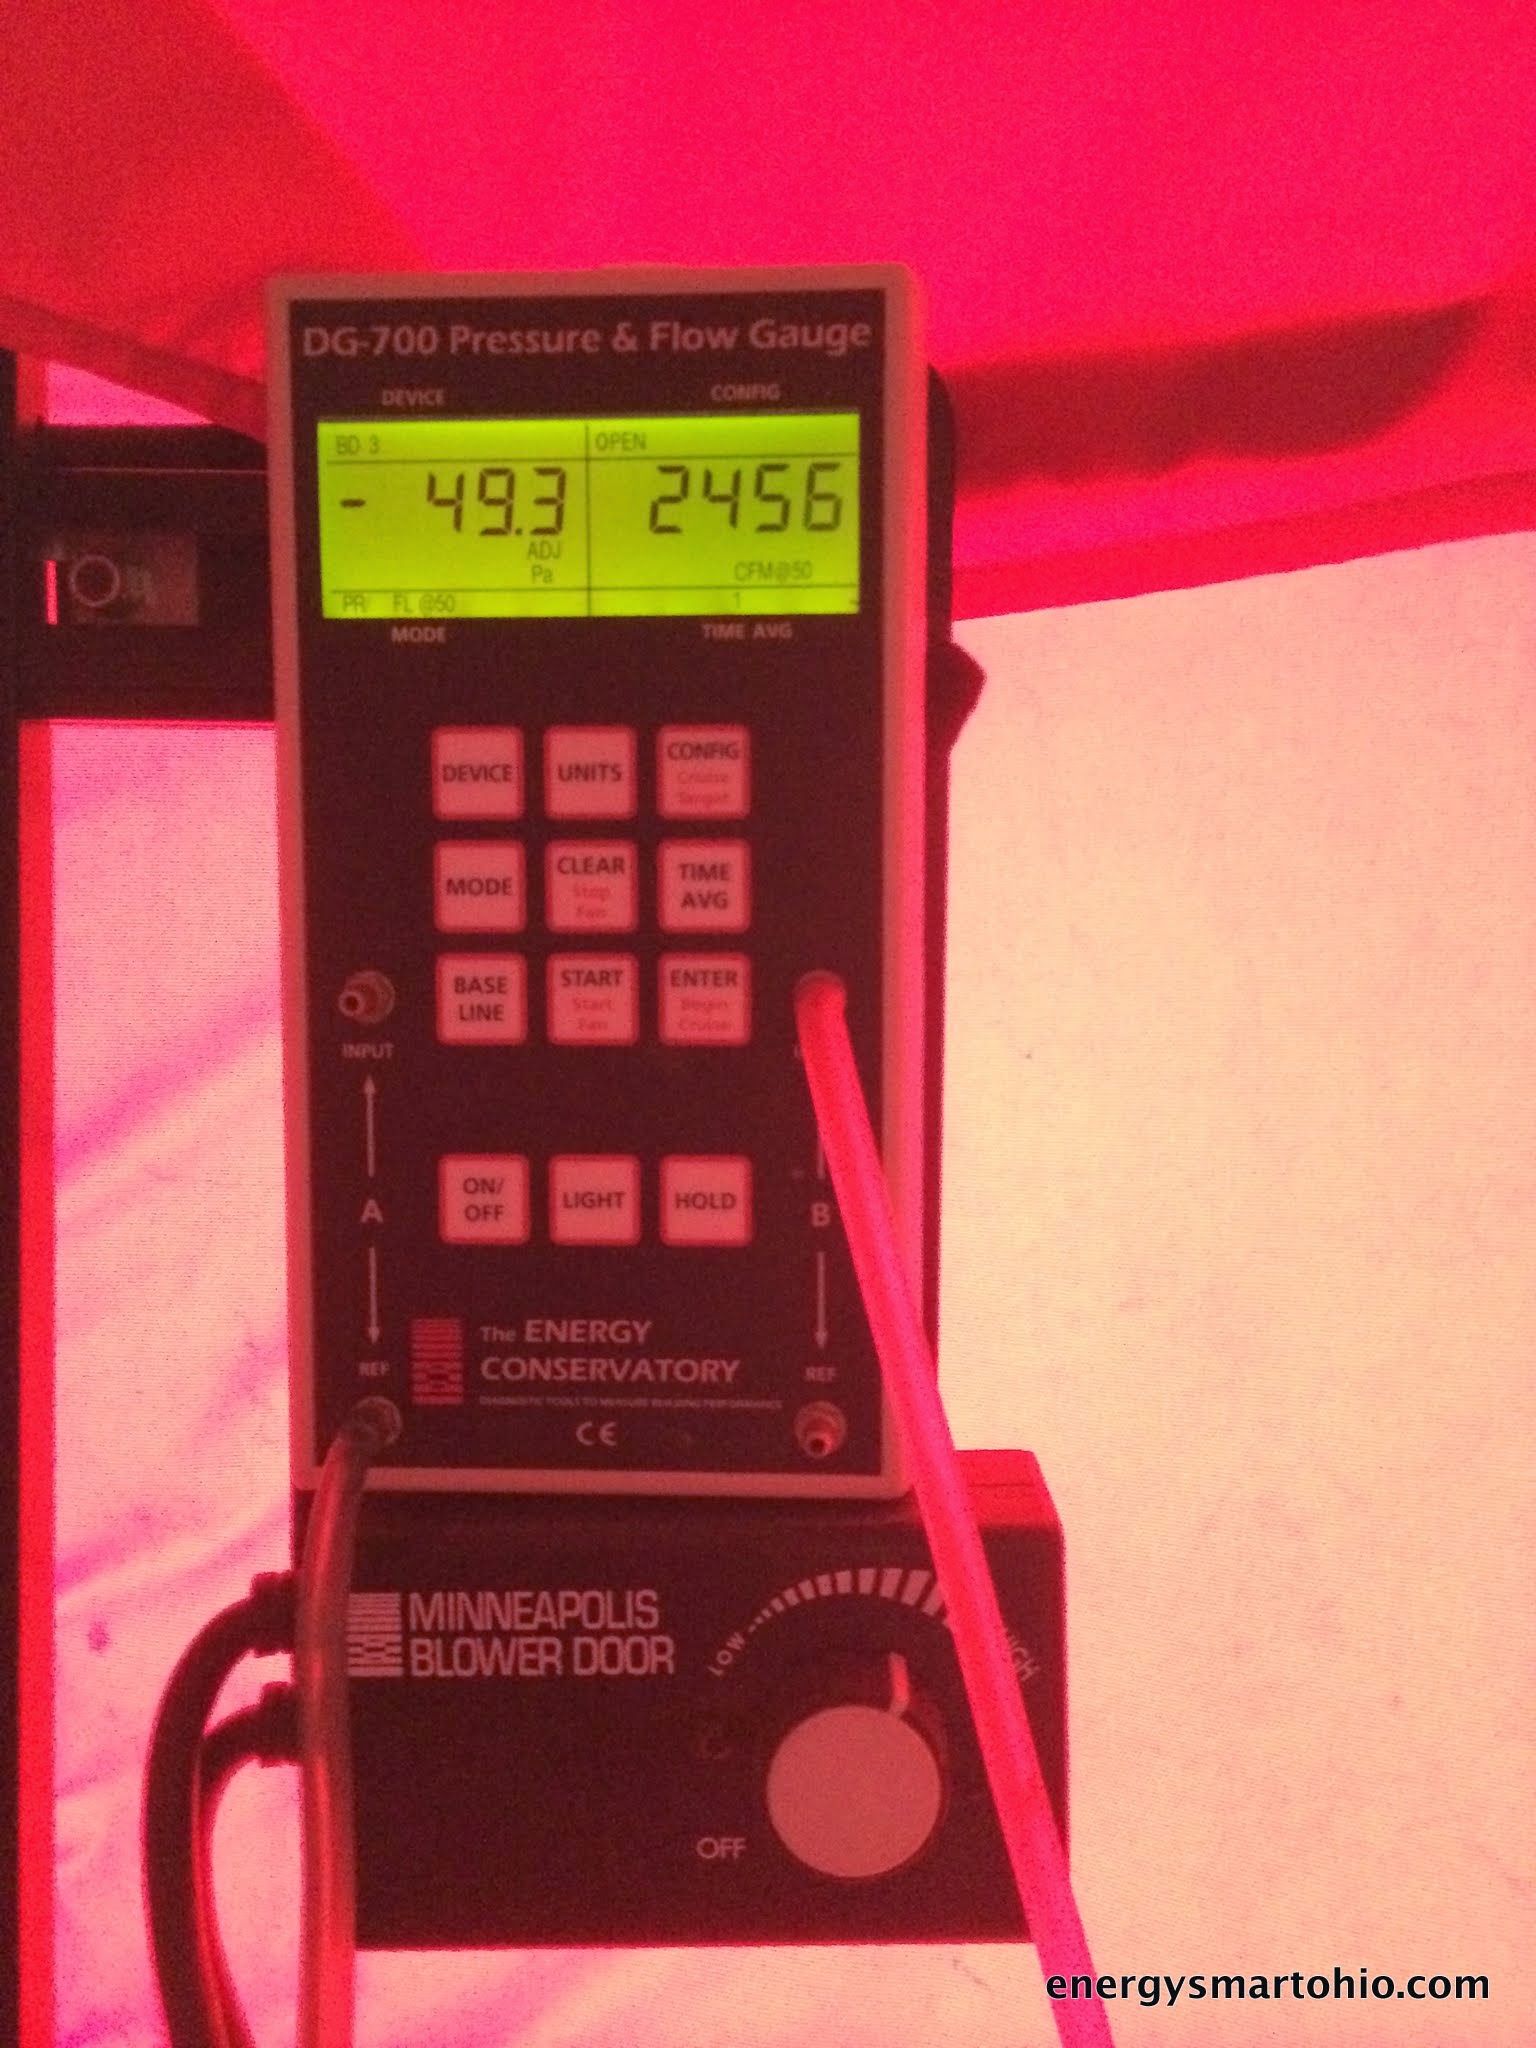
2456:1700 is about 1.4:1. Not bad, but not good enough. If we’re going to use a heat pump, we need to get the leakage down a lot more or else the heat pump will act like your father’s heat pump and be very expensive to operate.
This is in the basement. Note the orange around the stairway, that is single component foam. That’s the professional version of the “Great Stuff” you see at big boxes. The basement air sealing looked pretty good. Or did it?

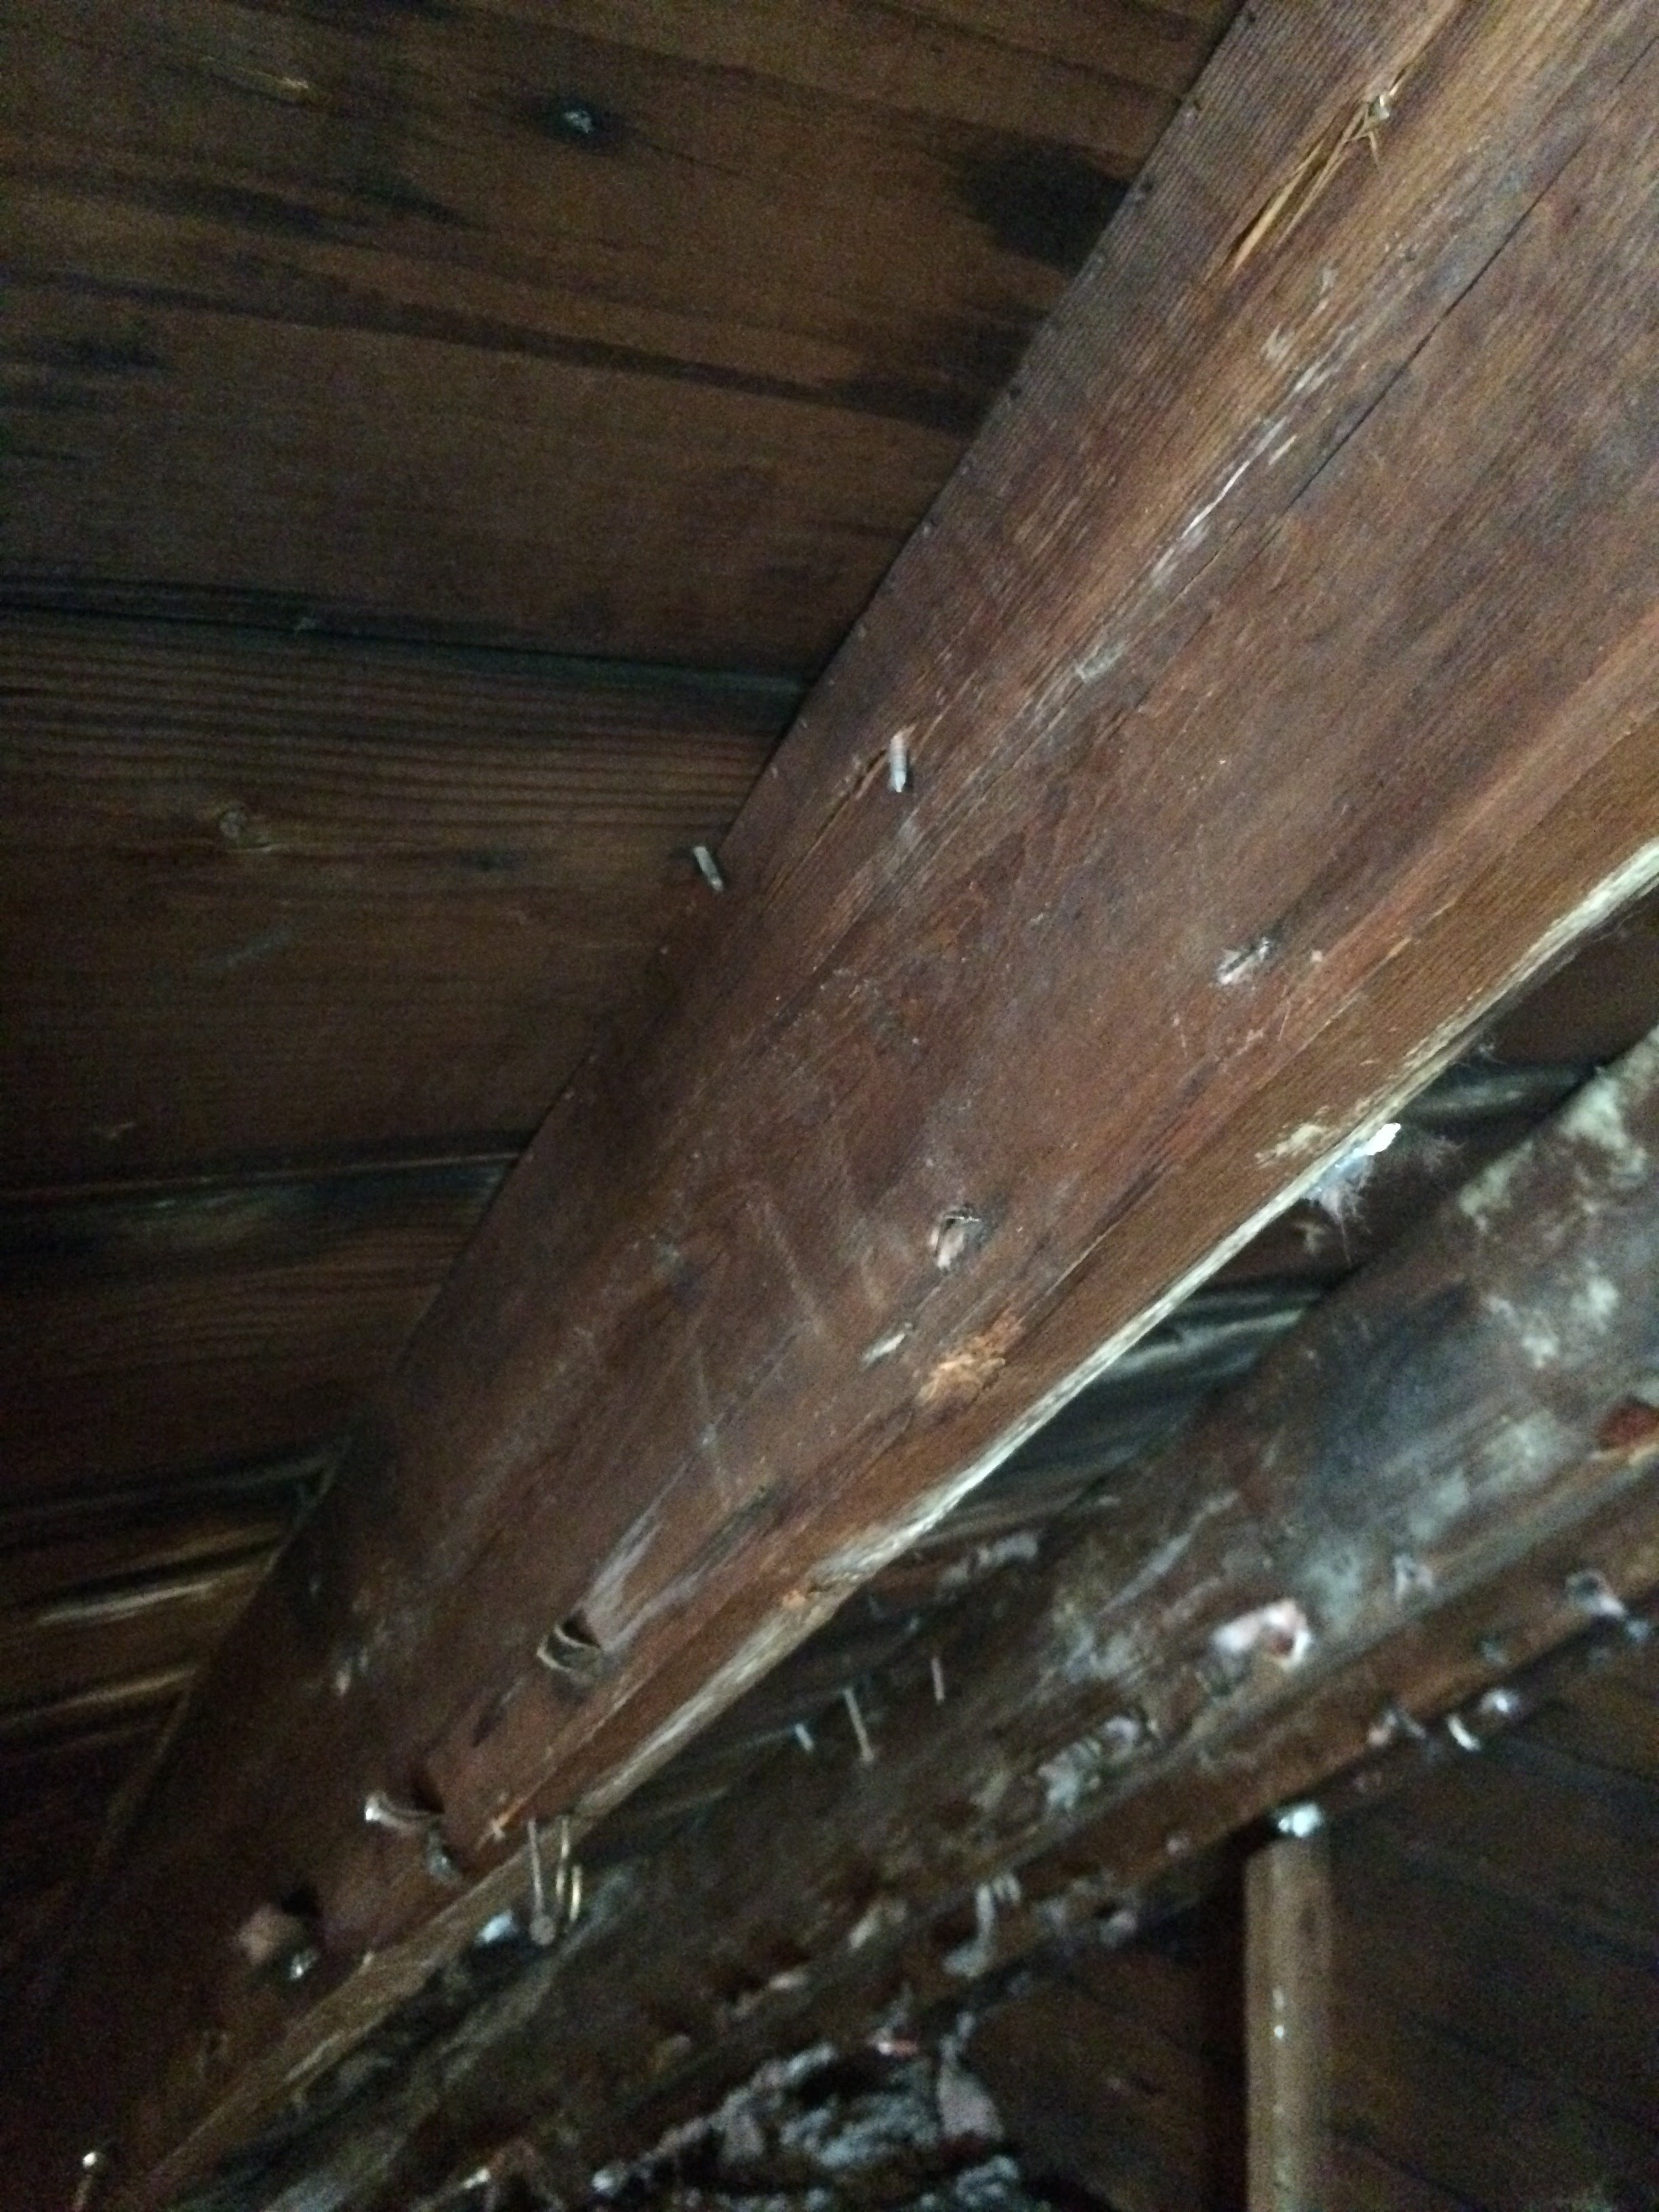
This is a rim joist, or the vertical board that sits on top of the foundation. It is a classically leaky place in all homes with basements, not just old ones. The off white bumpy stuff is two part closed cell spray foam. The orange stuff is more single part foam.
Note the bottom right of the rim joist, where there isn’t any foam. Typically this job is done very quickly, and the bottom edge there is consistently missed. It was a pretty leaky bottom edge, as it turned out. This is something to watch for. If you take the low bid, expect work like this. Without testing, the odds of finding details like this are very low. The details are what make or break you .
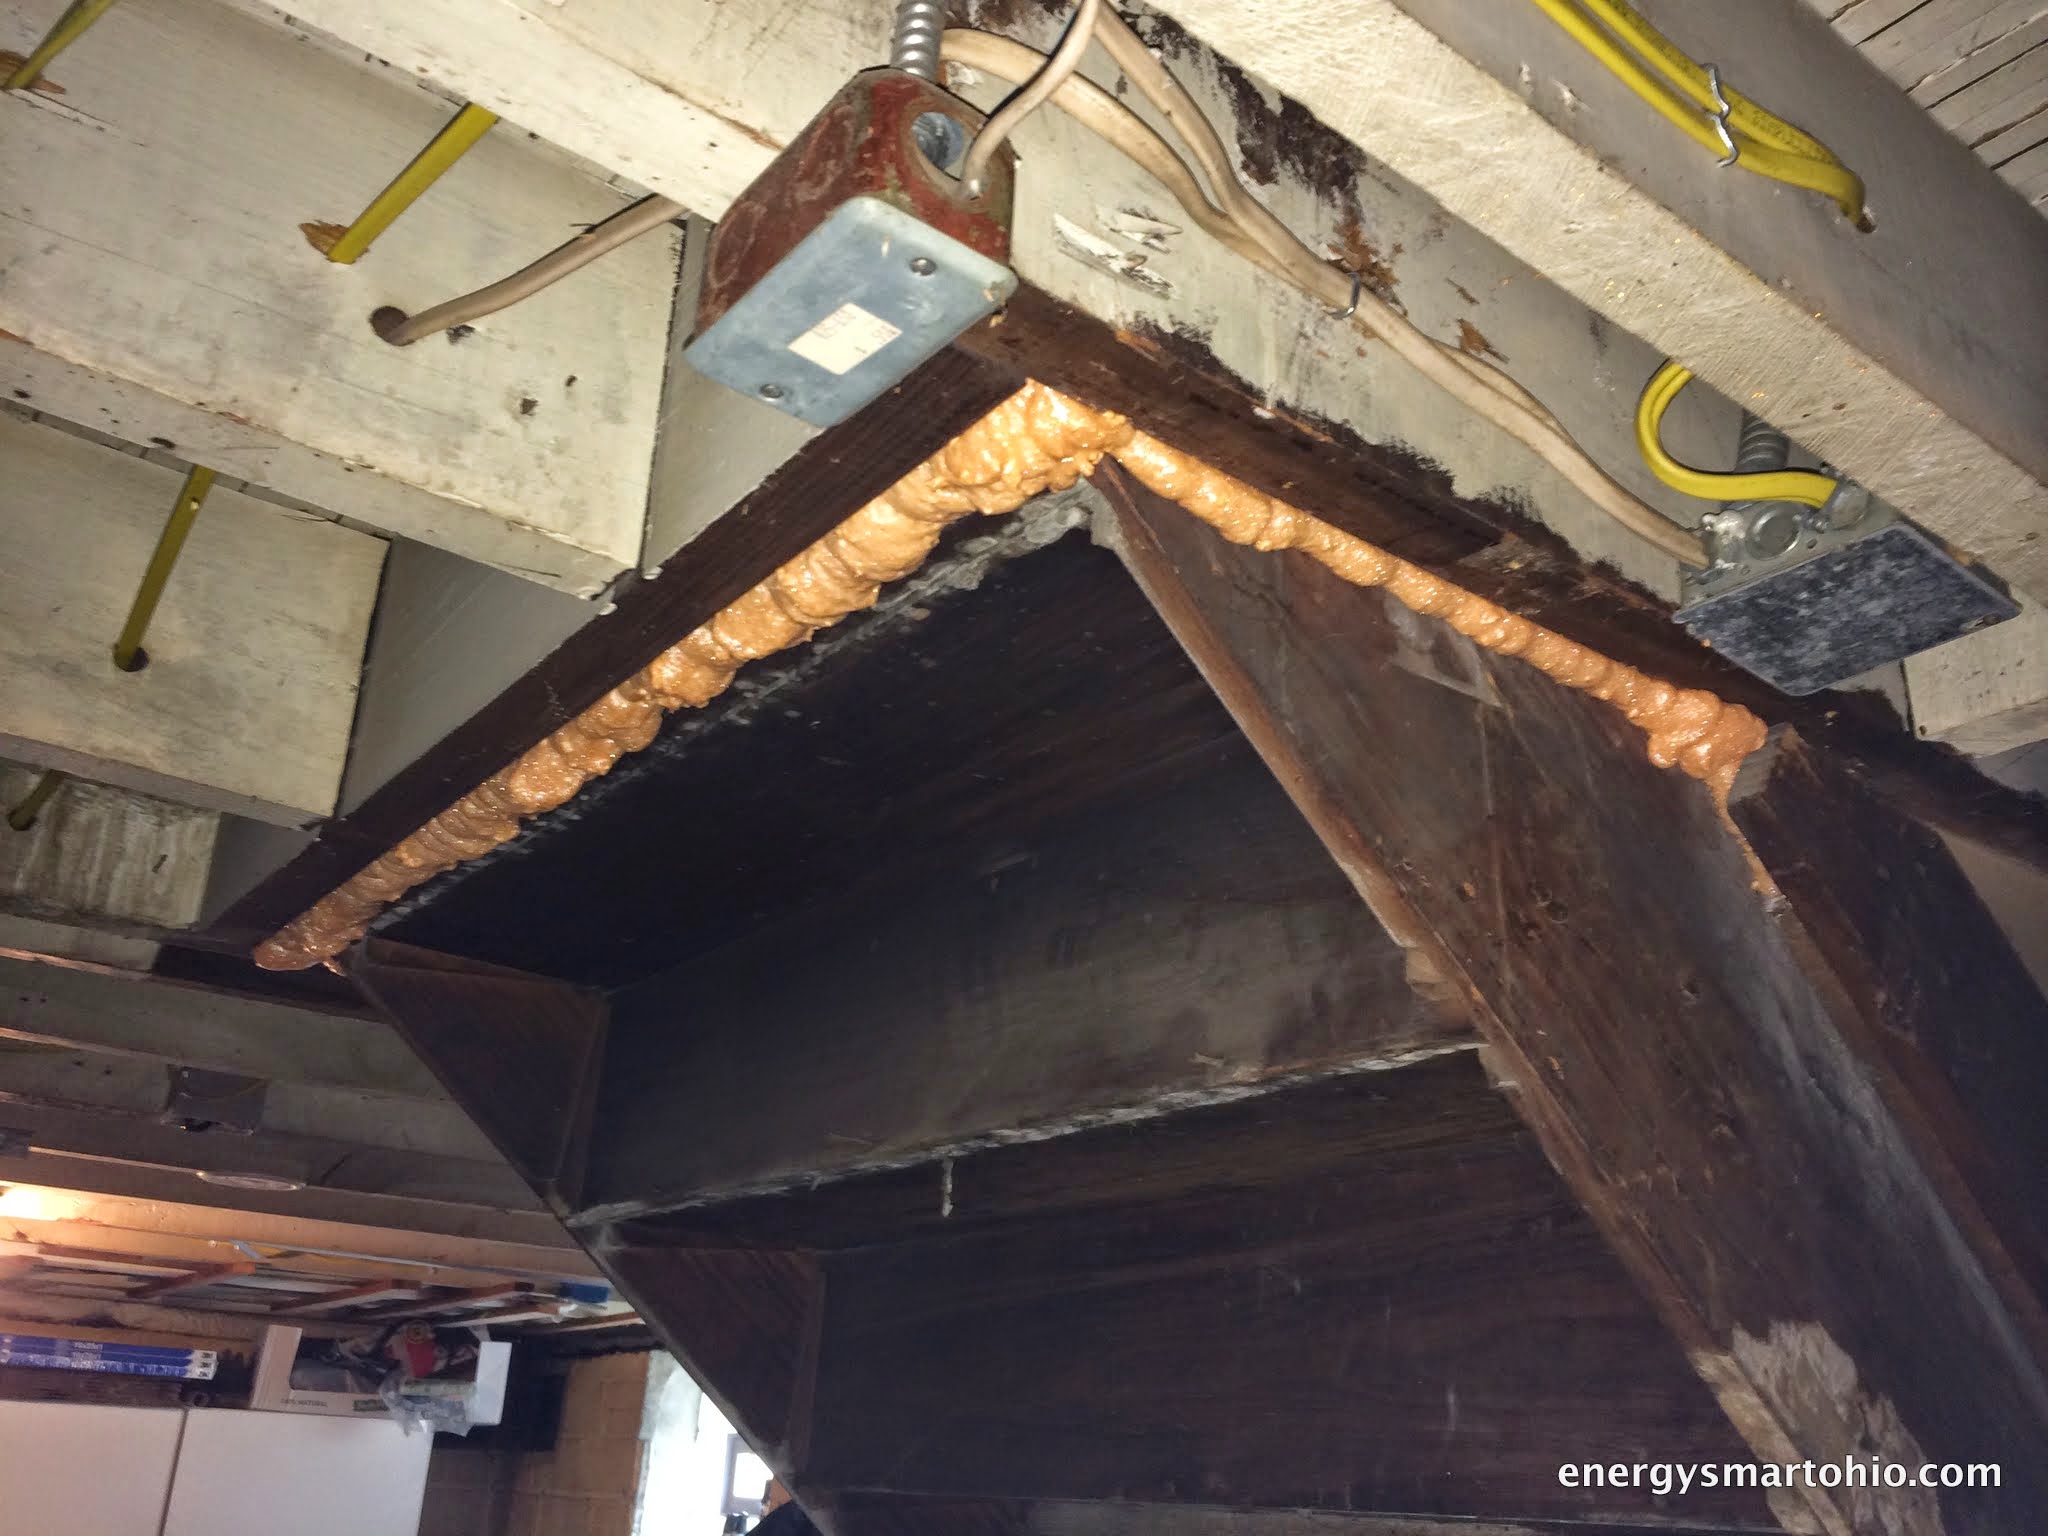
Here is the crawlspace under the front porch:
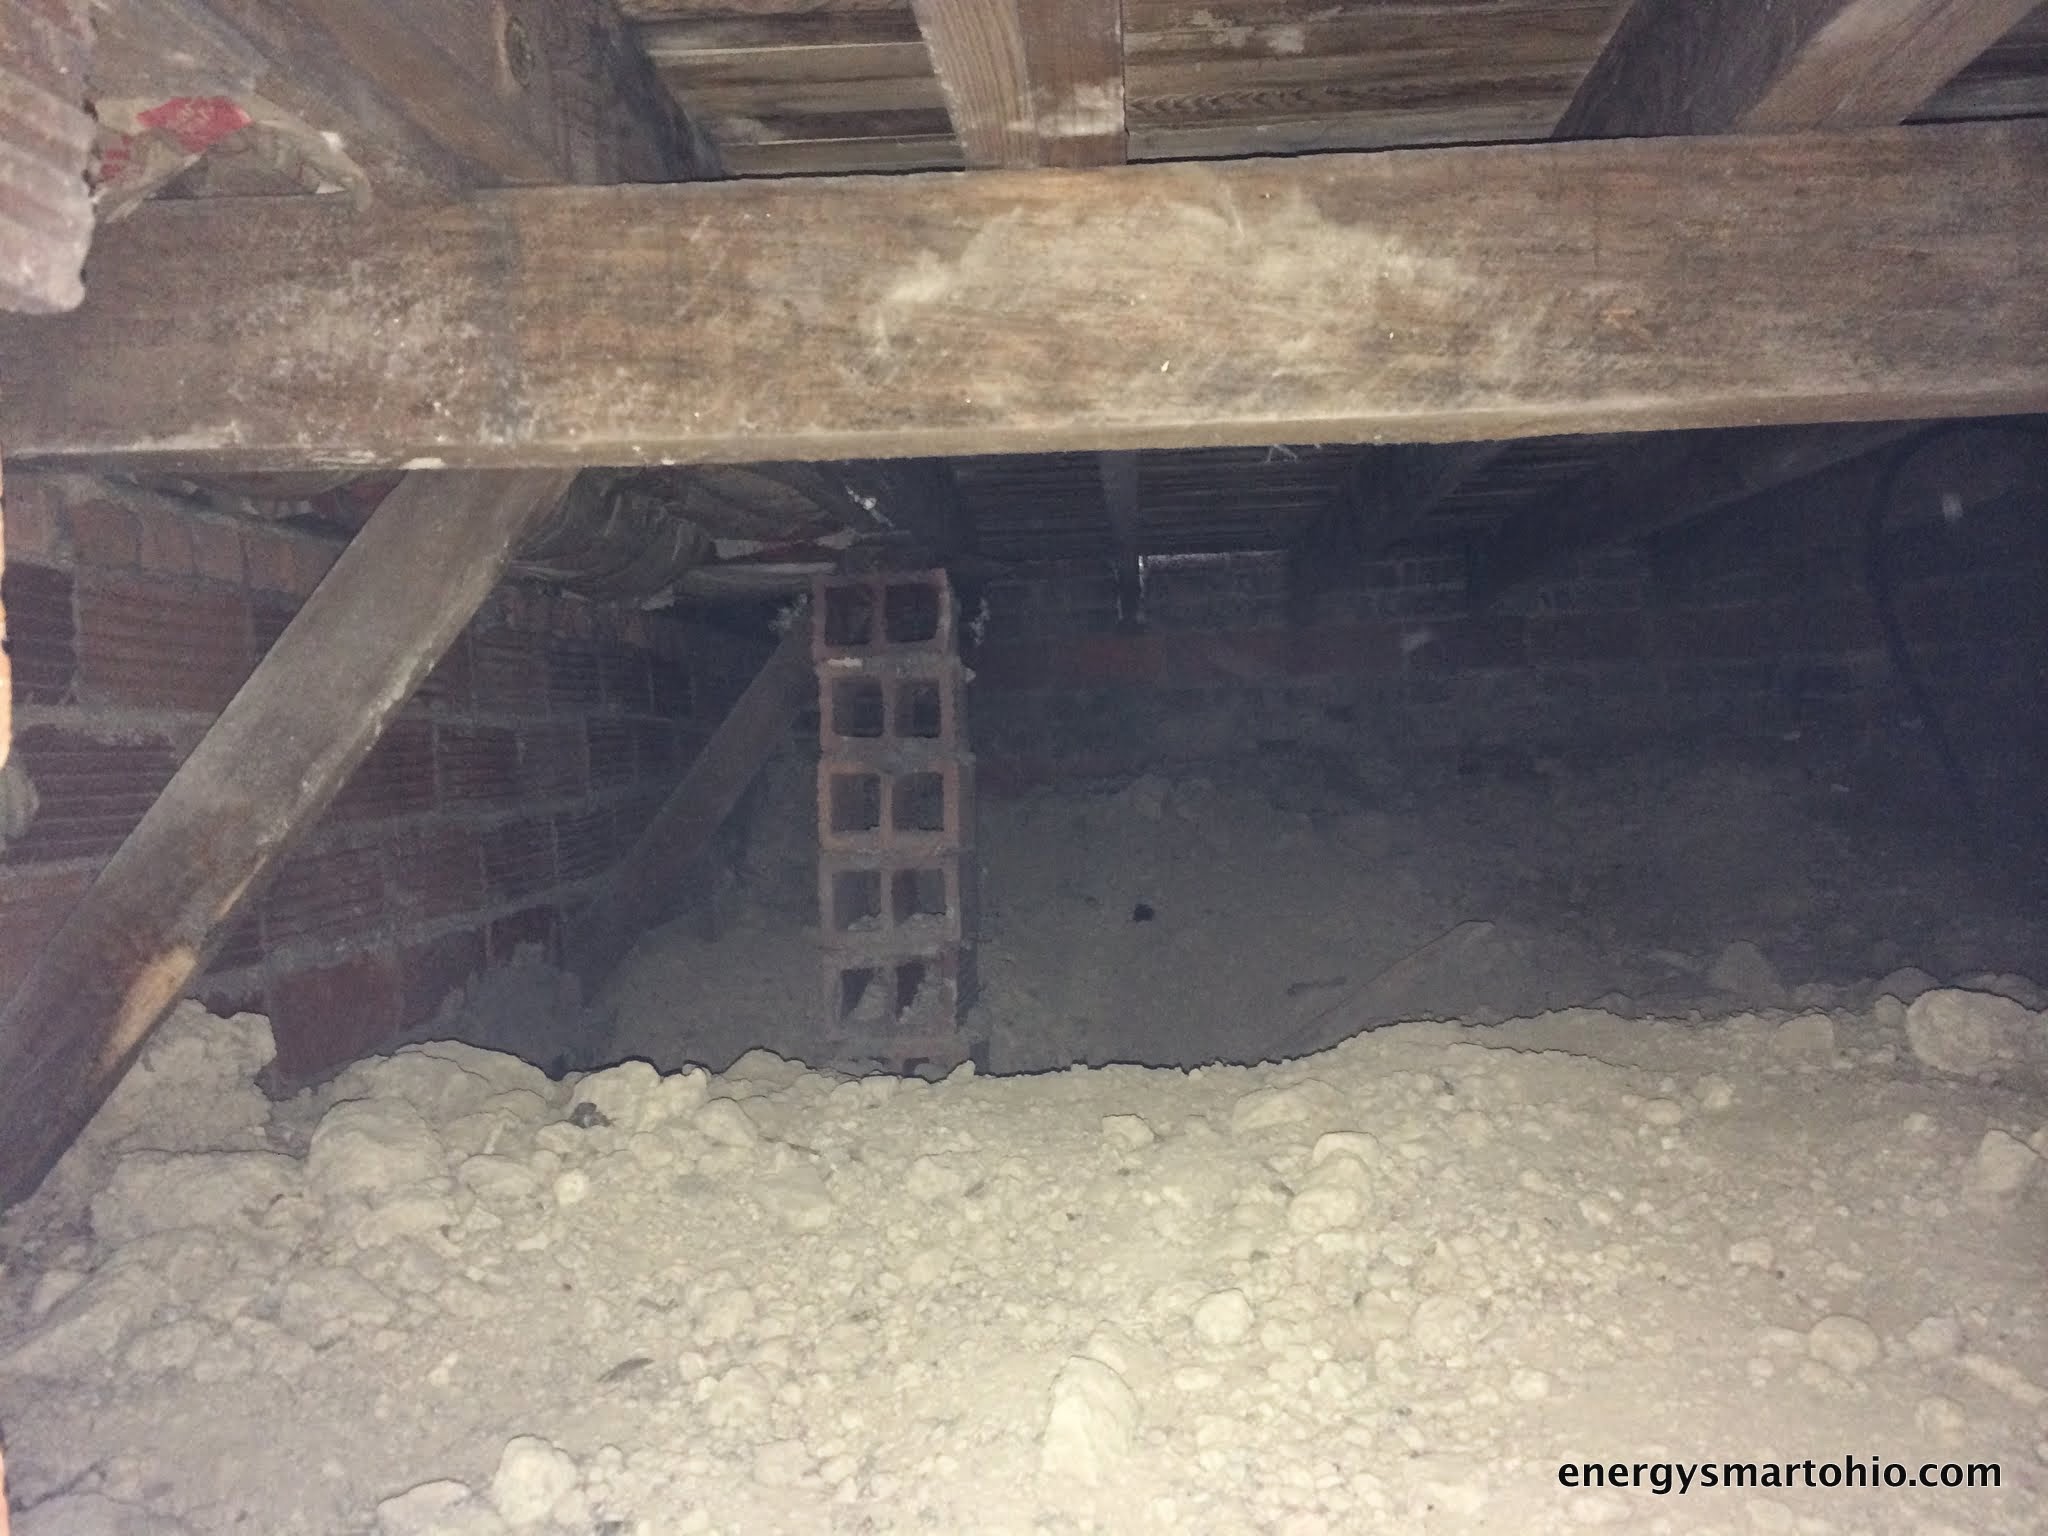
I wish I’d taken a better picture. Note the fiberglass at the top left. It’s stuffed below the bay window in the living room. The spot runs from the beam in the foreground to the block supports partway back. The couch was above that spot, and it was terribly cold. This little space underneath was the problem. Here’s a sneak peek of the work, we spray foamed underneath this spot:
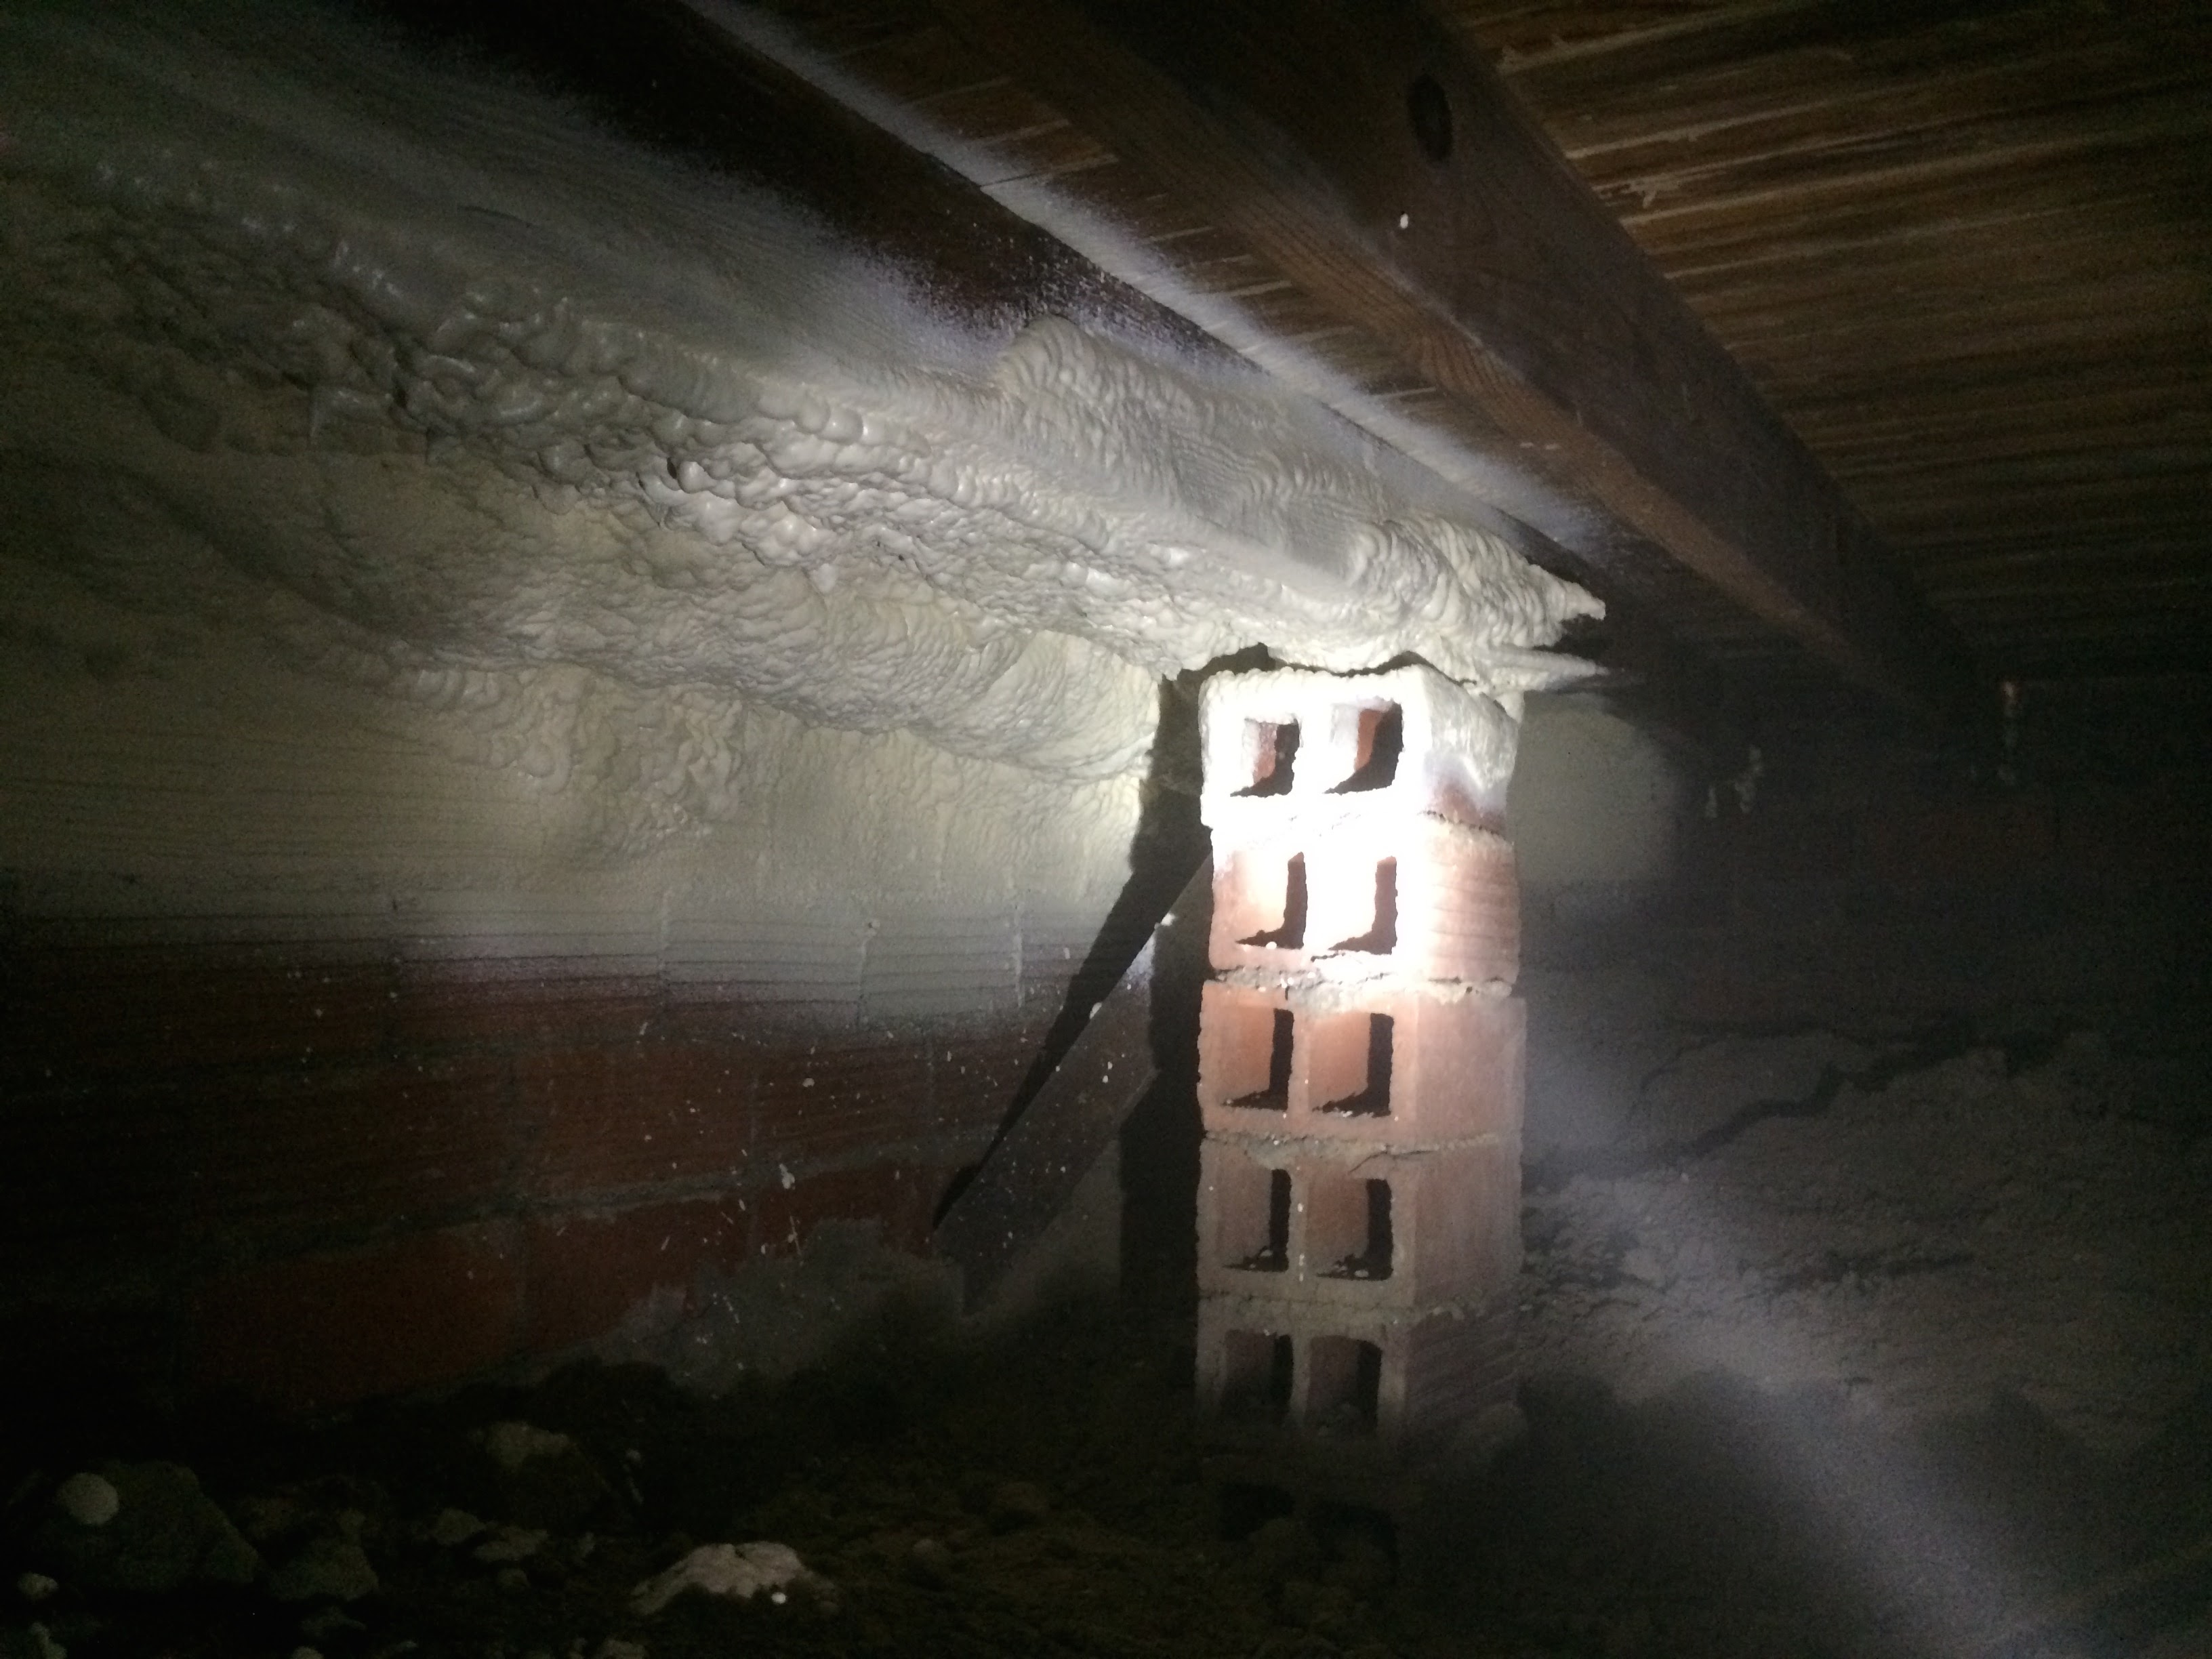
The support you see is the same one above, but now you can see some spray foam on it. Jon reported that area is far more comfortable.
That’s it for the diagnosis pics, basically the attic and the basement needed some help. That combination is pretty common in our world! Let’s talk a bit about switching to a heat pump because it’s a counterintuitive call.
Going All Electric with a Heat Pump
A heat pump is an air conditioner that can heat as well as cool. An air conditioner doesn’t actually cool your house, it takes heat from inside and moves it outside. It pumps heat out. If the air conditioner runs in reverse, it takes heat from outdoors and pumps it into your house. In other words, it pumps heat in. That’s a heat pump. A heat pump goes both ways. It may seem strange to pull heat from cold air, but that’s what your fridge does every day.
Heat pumps lose efficiency as it gets cold, and they have much lower outputs than furnaces, so tightening up a house is critical to making them work. If a furnace was like a typical car with 200 horsepower, a typical heat pump has more like 75.
This makes it very important to do the math and figure out how much heating and cooling it takes to keep a home comfortable. This is done as part of our Comprehensive Planning Process. It’s called running a load calculation.
I’m going to get pretty geeky here, check out the HVAC Sizing chapter for full explanations of this. Here is what a load calculation looks like. Don’t freak out, I’m going to break it down.
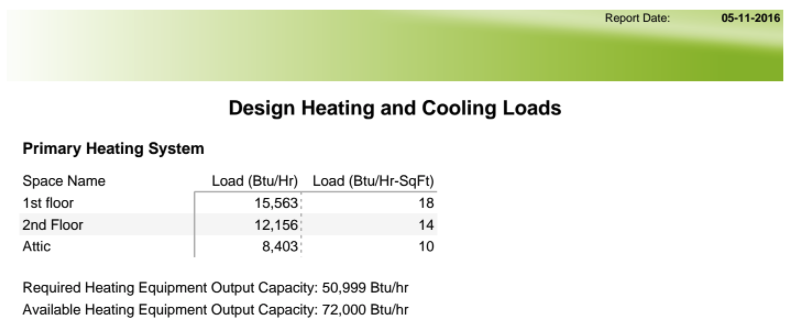
Pay attention to the 50,999 number:
![]()
That is what is known as the “Manual J”. Manual J is the industry standard load calculation. Technically this is only sort of a Manual J because another program (TREAT energy modeling software) is coming up with it, but for our purposes call it a Manual J.
Manual J is known to substantially oversize equipment. It has fudge factors on top of fudge factors. When you are going for comfort and efficiency, though, you want to go as small as you can. (Again, see the HVAC Basics and HVAC Sizing chapters for more.)
Standard furnace sizes come in 20,000 BTU increments (a BTU is how much energy is contained in a match burned from top to bottom.) The smallest standard furnace is 40,000 BTUs. The next sizes are 60,000, 80,000 and 100,000. At 50,000 BTUs, this house would normally get a 60,000 BTU furnace because it is the next size above the Manual J.
That is wrong. Dead wrong. Take a look at this:

These numbers are stripped of most of the fudge factors. They are called “block loads” because they are what individual rooms or floors need to heat and cool them.
Add them up. They total 27,719. That’s what it takes to heat the first and second floors. We have come to trust this number as being pretty close to the truth. It’s about half the 50,999 above.
We found out by watching the heat pump run that this calculation was pretty close to right, it only takes about 25,000 BTUs to heat the first and second floors on a 5 degree day, which is what this calculation is figured at. I’ll show the math later in the case study.
OK, sorry, that was pretty geeky. Here’s why it matters. Heat pumps don’t have a lot of power like I mentioned earlier. The biggest heat pump I could put in this house (for a number of reasons) was 3 tons, or 36,000 BTUs. That’s smaller than the smallest standard furnace.
Until I see a number close to 36,000, I’m nervous. Now we had one under that.
Installing the Heat Pump
My partner is a big fan of Carrier GreenSpeed heat pumps. He put one in at his mom’s house in Rochester NY and it heats her house all year long, the furnace never fires. I’ve been there, it’s an amazingly comfortable house.
Not all Carrier dealers have installed them, and I needed to find someone who had. I called a Carrier distributor and asked who had bought one recently, they gave me a few names.
Meanwhile, Jon went off and got some bids on his own (we discussed it, it was an experiment.) He got the heck confused out of him. Half the contractors told him he was nuts for doing all electric. None of them quoted what he asked for.
Others quoted him a geothermal system (that’s a heat pump that uses the earth to pull heat from, aka ground source heat pumps.) They still added a furnace in the deal. This actually shows that they are not certain of their install, poor installs often run on “backup heat”. If backup is gas, it’s relatively cheap. If it’s electric, you can get a $500-800 electric bill. I’ve heard of those situations, but haven’t gotten a call yet to fix one. The fix would likely be air sealing.
I learned from this experience that it’s best to set a budget and just get one bid. If the bid is below budget (never tell the contractor what it is), pull the trigger. Once I have an idea of what things should cost, this is my recommendation. The reason for multiple bids is to get a better idea of what things cost and to learn who to trust. If you have trust in a Building Scientist who knows pricing like us, that precludes needing multiple bids.
It cost a number of hours undoing the confusion Jon experienced, he was a bit freaked out. (We charge by the hour, so it usually doesn’t save to get multiple bids if we have to spend time ironing out confusion.) When 3 different people tell you 5 different things, it’s hard to make heads or tails of it. Pick your guru and run with them.
Thankfully, Jon picked my partner and I as his gurus. Jon and I chose Cyngier Heating and Cooling because they had apparently bought a number of GreenSpeeds recently and their price was within budget.
I showed up on job day to be happy with their work in the basement:

This is what a heat pump looks like in the basement. Pretty much exactly like a furnace. Some things to note:
- Bottom Return – Probably the best part of this is that it has a bottom return. Note the “box” is sitting on top of ductwork. This typically leads to much better flow than return air coming in only one side. That reduces pressure inside the ductwork, which leads to better distribution and also lower energy usage. It’s good all around.
- Mastic – Also note the seams of the ductwork, they are gray from mastic sealant, a best practice. This sends more heat and cool where you want it: upstairs.
- Media Filter – If you look at the ductwork coming down, there is a filter box in there. It contains a 4” thick filter, aka a media filter. Media filters do a much better job than crappy 1” furnace filters at removing duct from the air. 1” filters are good for keeping rocks and small children out of the furnace, but not small dust that is harmful to our lungs. 1” filters are there to protect the equipment, not you.
- Water Saver Humidifier – See the one duct coming out by itself right below the other ducts? That goes to the humidifier. This water saver humidifier uses about ⅓ the water of traditional humidifiers, but costs exactly the same up front. They are also less prone to mold and mildew issues because they don’t have a tray of standing water.
- Crappy Ductwork – All of the ducts coming out just above the furnace are a less than ideal design, but we left it that way. Changing them didn’t fit the budget. We also find that really good equipment often makes crappy ductwork function just fine. That was the case here.
Trouble
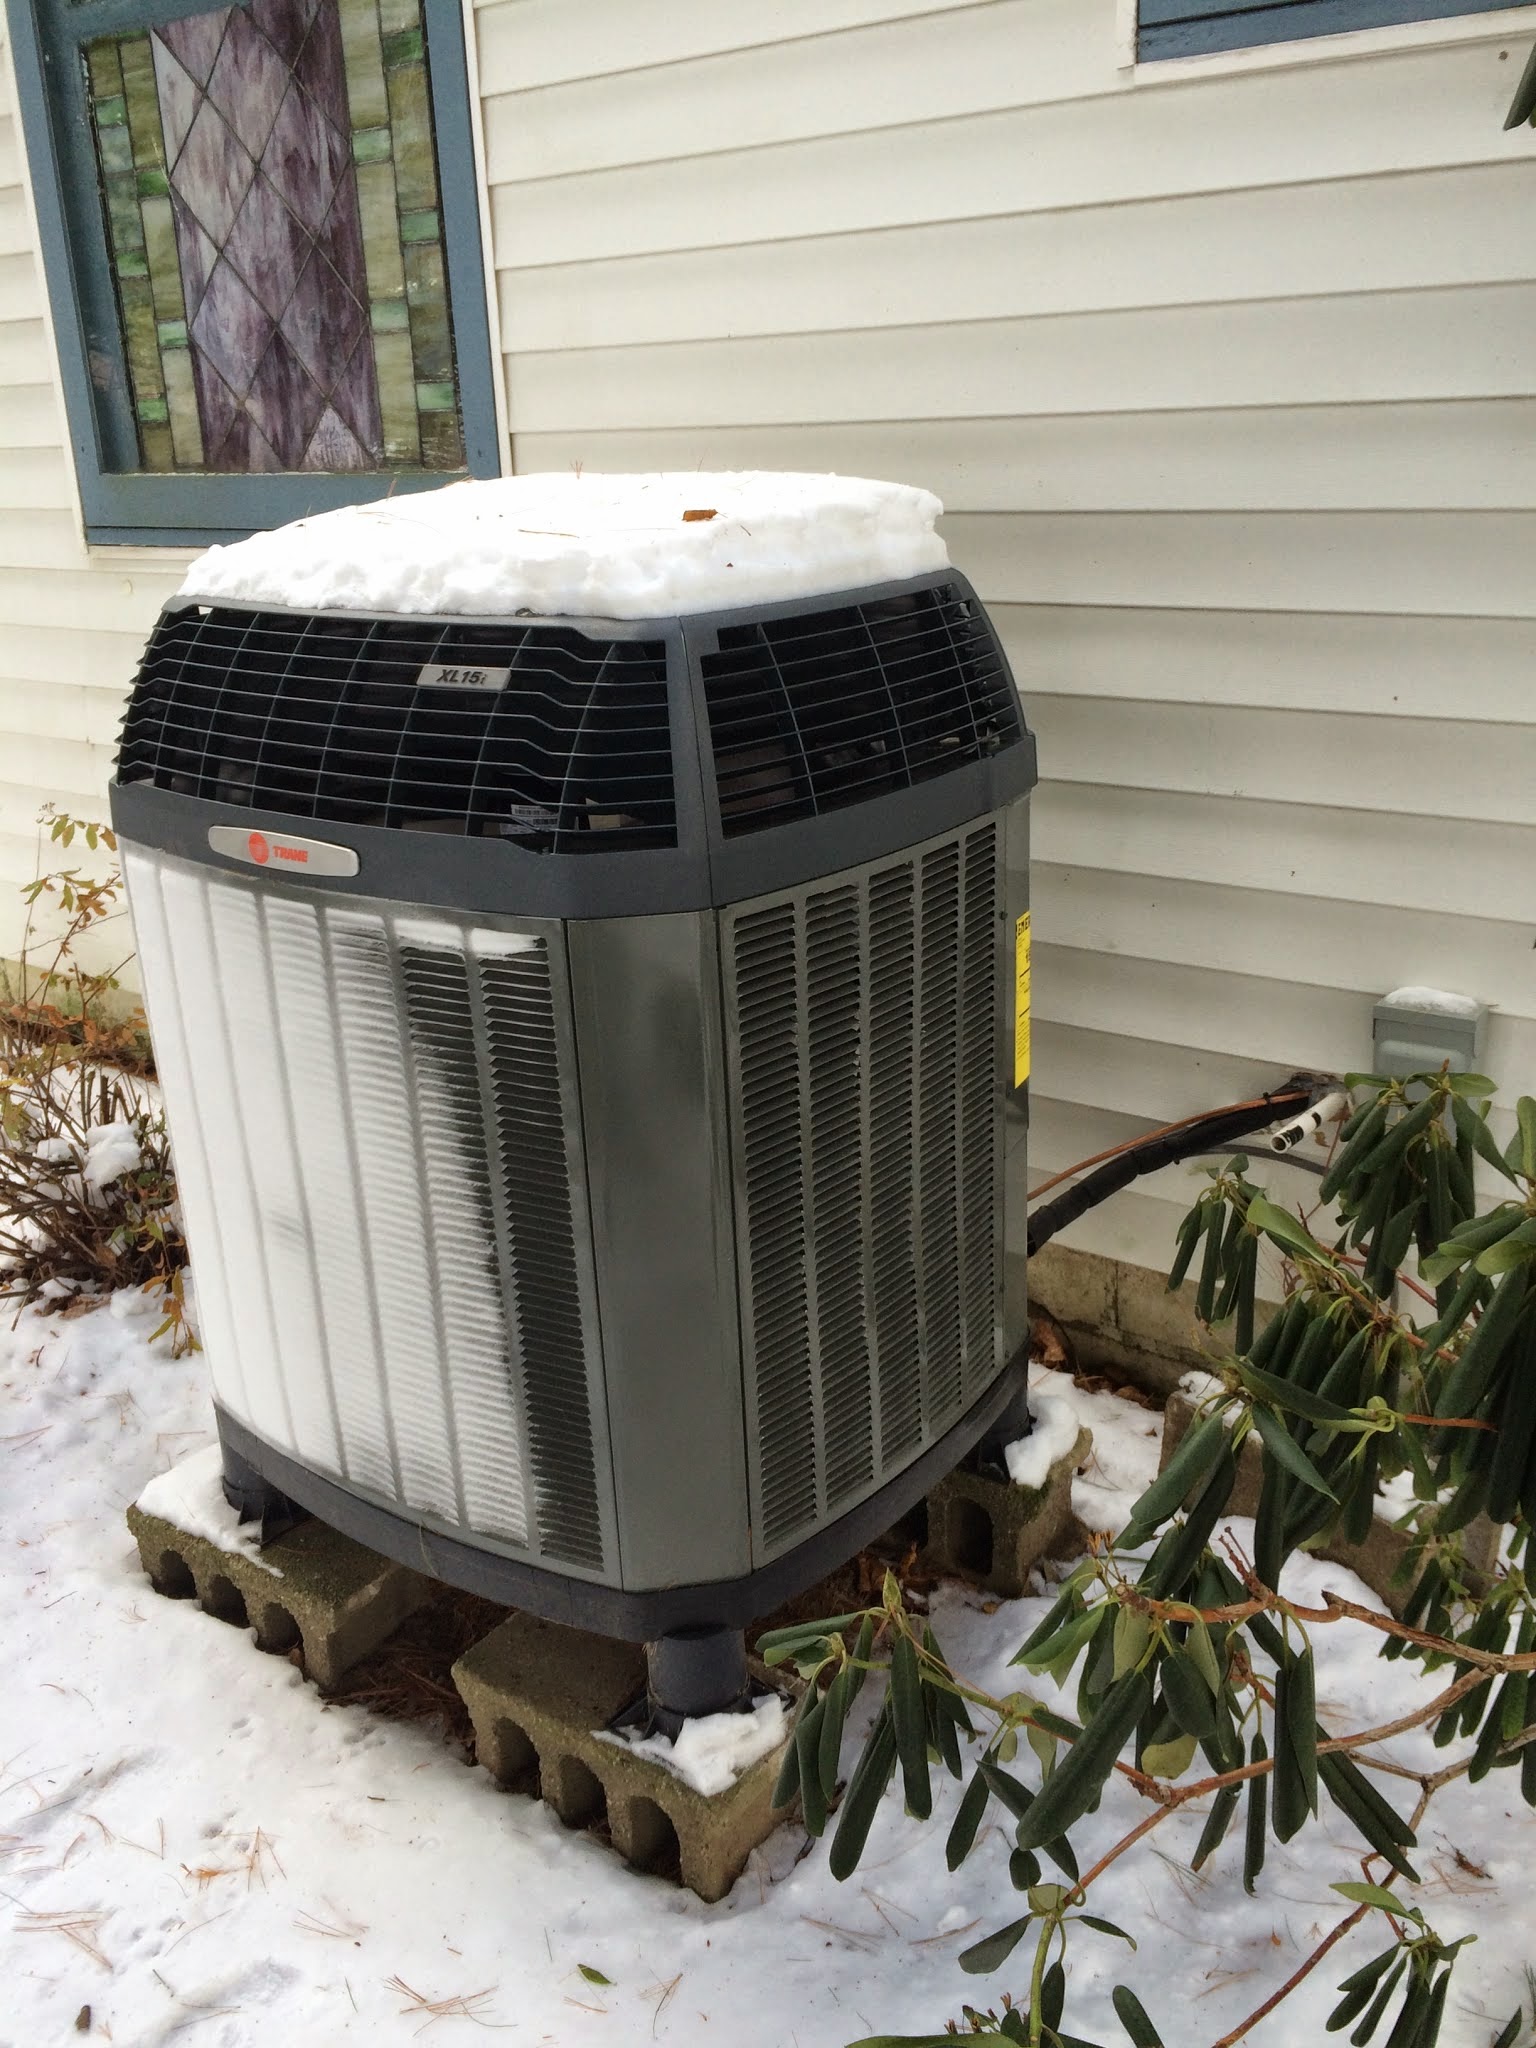
Then I noticed the outdoor unit:
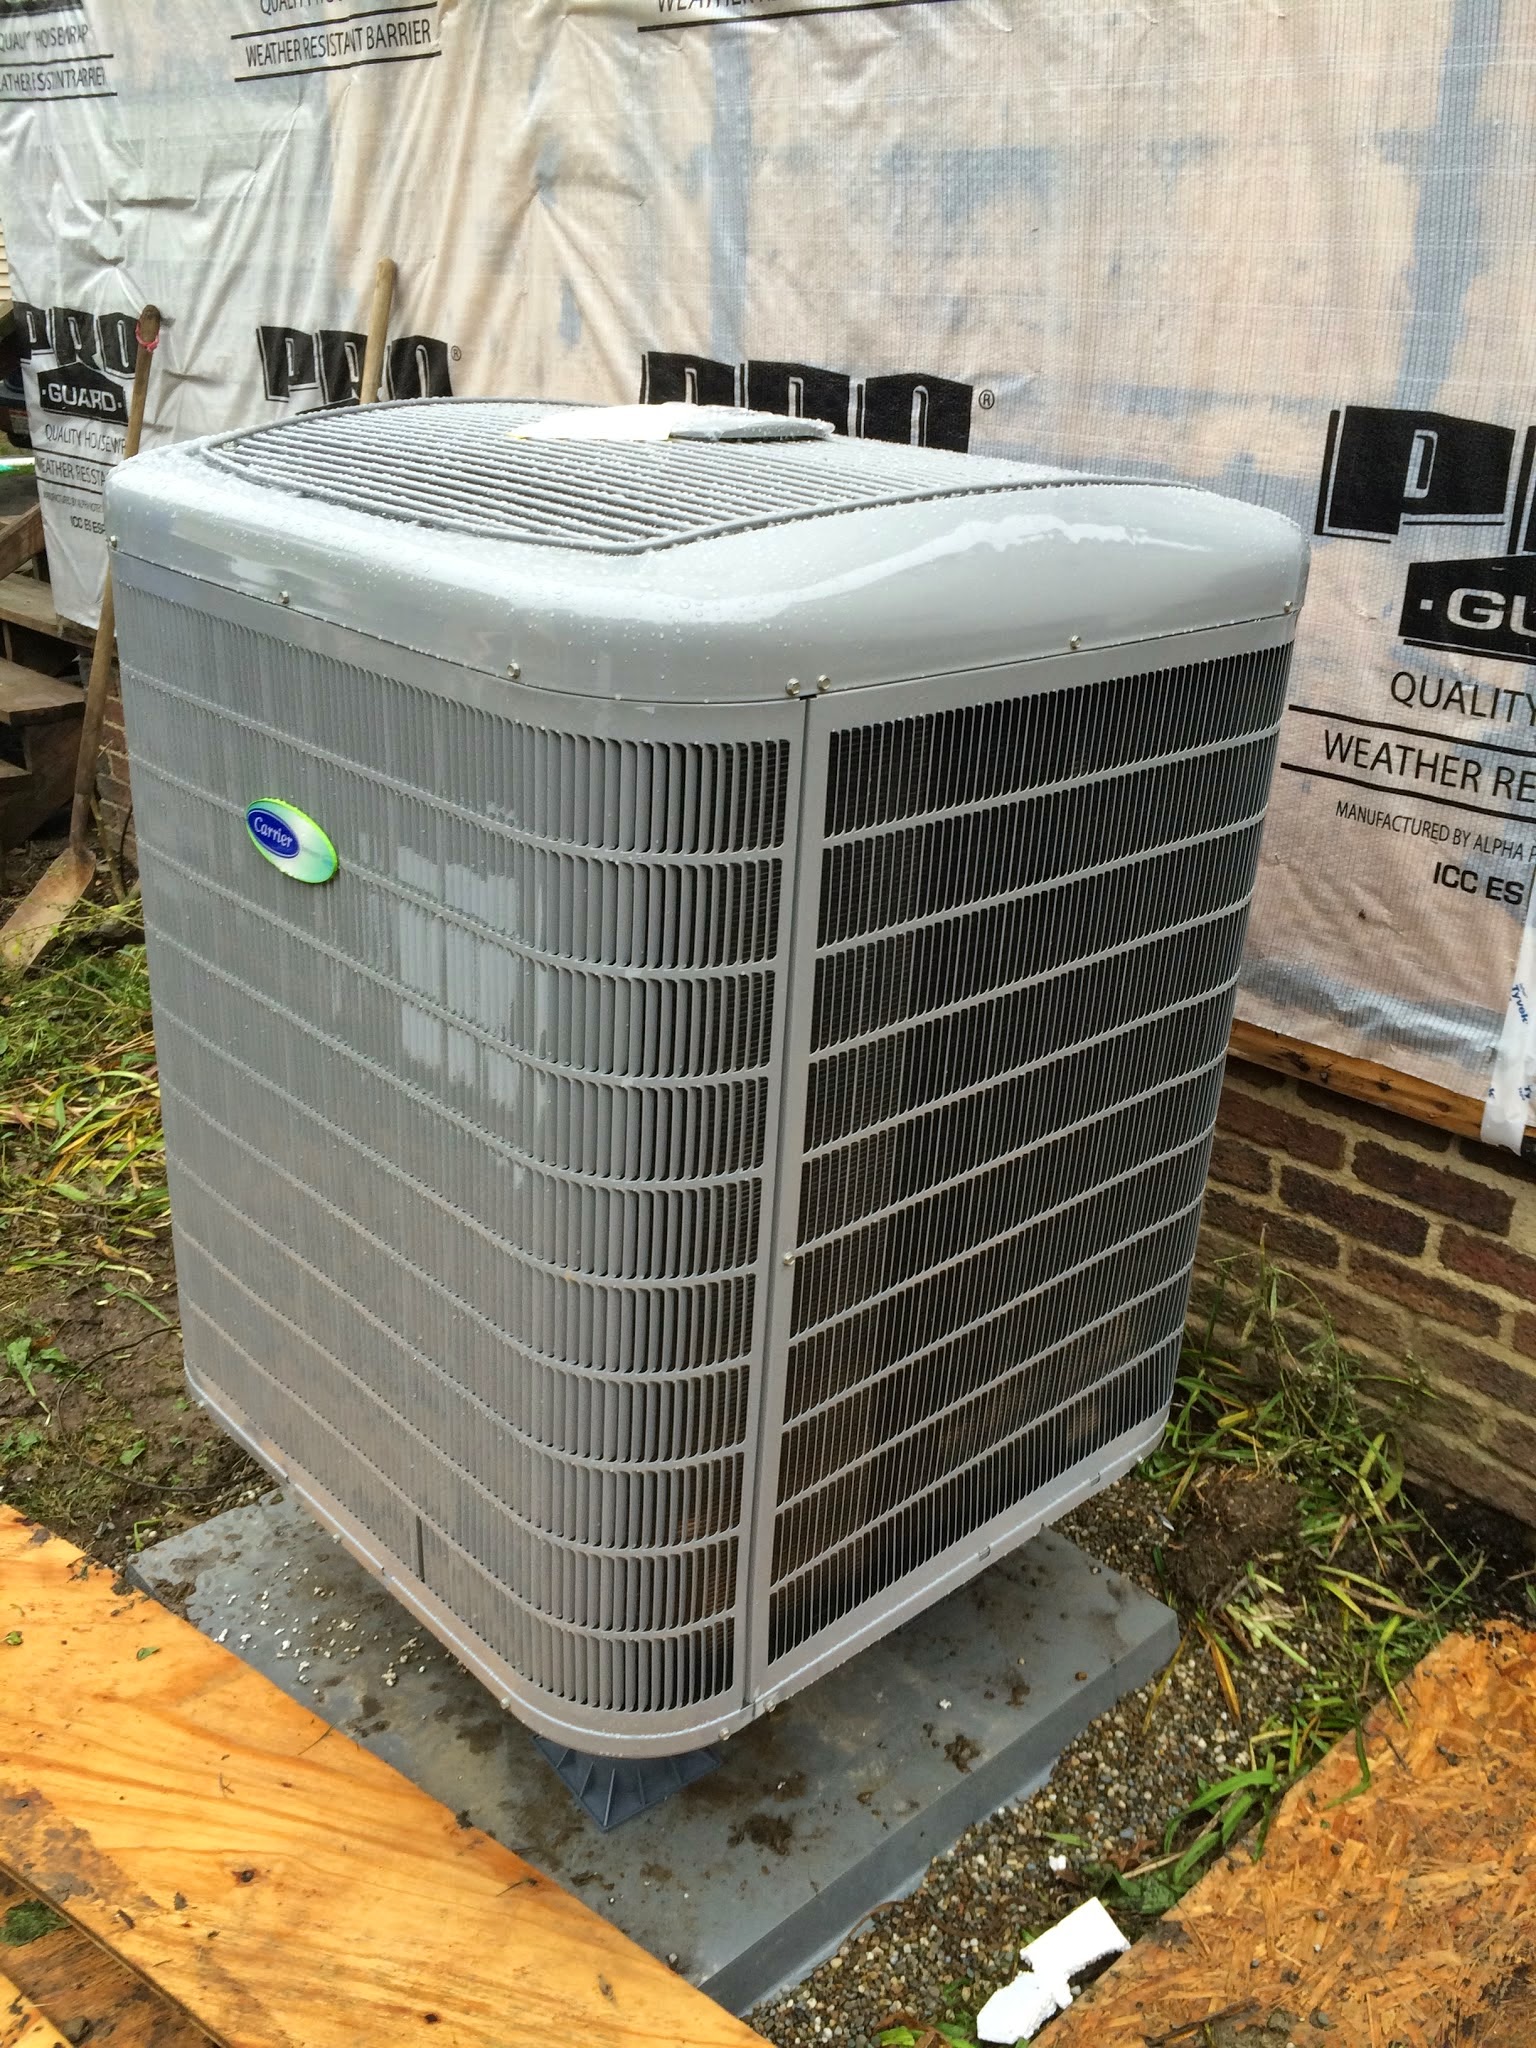
This IS the Droid, you’re looking for. Or so I thought, then I looked at the label:
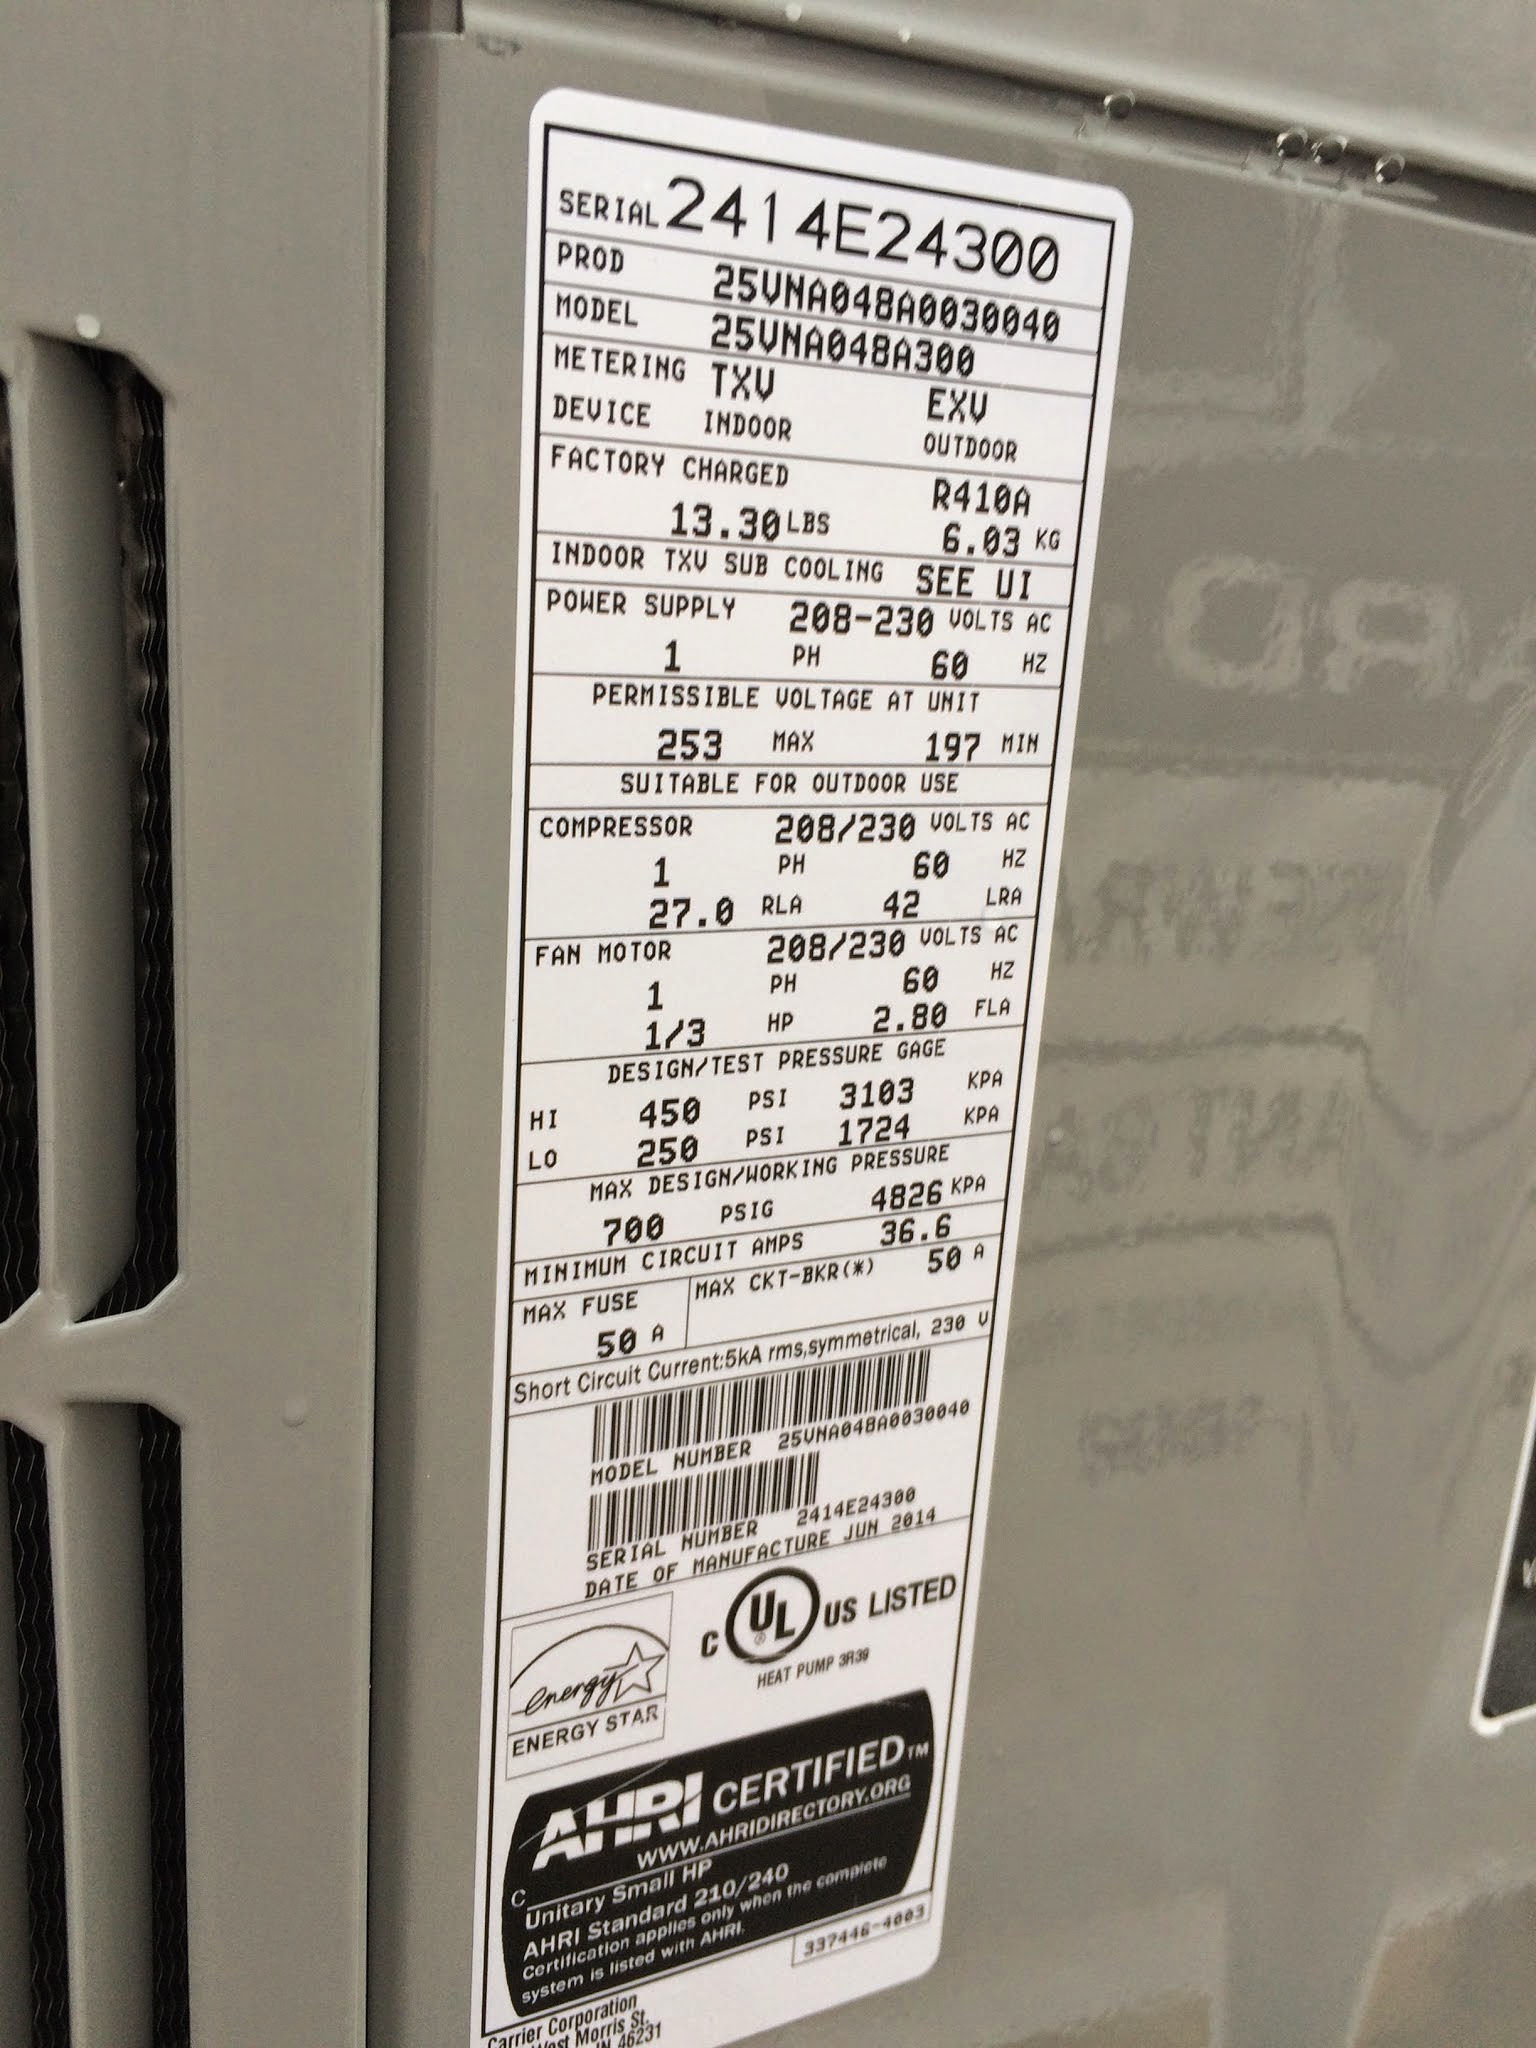
Note the product number, it starts with 25VNA. That’s the product code for a GreenSpeed. Then note the “48” that is part of the number a little bit later. 48 is short for 48,000 BTUs, or a 4 ton unit. I had specified a 3 ton, and a 3 ton was bid. What was this doing here?
A quick-ish note on why smaller is better. About 80 hours a year our climate here in Cleveland is below 5 degrees. This equipment is sized for 5 degrees. The trouble is, all of those other hours need less heat to keep your house warm. Often a LOT less. I want your HVAC to be able to put out just the right amount of heat or cool for as many hours per year as possible. The more it runs, the better.
Amazingly, even the best equipment like this can only match what the house needs about 50% of the year. The rest of the time the house needs even less than that. When you upsize equipment, it’s the wrong size 75-100% of the year. Most furnaces and air conditioners are too big 100% of the time. When HVAC equipment can match what’s needed, you get a really comfortable house. I want it to run almost all the time almost all year. (Yes, it’s counterintuitive, see the HVAC Basics Guide, which is free. Then the HVAC Sizing Guide, which is $5.99) Just remember that smaller is better.
Showing up to find a bigger piece of equipment than I specified was frustrating. I’m glad I was there, because it was a 3 hour discussion (I’m using a euphenism here) to get a 3 ton installed. In the end it worked out, but it left a bad taste in my mouth, it shouldn’t have been that big of a struggle.
All in all, it was a surprising amount of work getting bids and getting a heat pump installed. It was so far off the beaten path that almost everyone thought we were nuts. (Why on earth wouldn’t you use cheap gas?! Because the consequences of continuing to use that fuel are too large. Plus electricity is likely to be the cheapest fuel moving forward.)
First Year Results – The House Is Still Leaky
Kelly found a deal on electricity that was supposed to keep her bill the same as last years. Little did that company know the gas meter got removed. Kelly, Jon and I decided to gamble – we put the spray foam work off until the next year and watched energy usage of the heat pump with the house still leaky.
First off, the home was wildly comfortable, but a comparison is needed. My in-laws have a very tight house, an 1800 square foot ranch with a 995 blower door. While the rooms in their house are very even in temperature, the house often feels cold because they only have single stage heat – it’s either on or it’s off. That means the walls don’t get hit with heat that much, and they get cool. Our bodies notice cool surfaces, and they make us feel cold. So that really tight house is only kinda comfy.
Meanwhile, the heat pump at Jon and Kelly’s almost never shut off. It was constantly washing the walls, floors, and ceilings with slightly warmed air. The effect was astonishing to me: this was the most comfortable home I’ve ever been in by an order of magnitude. And it was built in 1918 vs. my in-laws 2008 house. The crazy part was that it was still leaky! It blew my doors off. (Please understand this is not self promotion, I was genuinely shocked at how good their house felt.) This was the time when Kelly emailed me to say for the first time in many years, she wasn’t wearing a coat inside the house. I was so excited! It worked! This was my first GreenSpeed, so I was definitely nervous about it.
Comfort is Measurable (Sort Of)
I can demonstrate this comfort with data. In a house that has a single stage furnace or heat pump the temperature goes up and down pretty quickly. We can track and watch this by using an Ecobee thermostat which logs various data points over time. Pay attention to the green line in this chart, which is indoor temperature. It’s a bad house:, it’s leaky which makes temps drop fast and it has an oversized furnace which makes temps go up too fast:

See how crazy the green line is? Up! Down! Up! Down! With gusto! That’s not what you want. Have you ever ridden with someone who thinks the gas pedal is an on/off switch? That’s how this feels. It’s not smooth. Note the red spikes on the bottom, that is equipment run time. The furnace barely stays on in this house. Now, let’s juxtapose this to the green line on Jon and Kelly’s house:
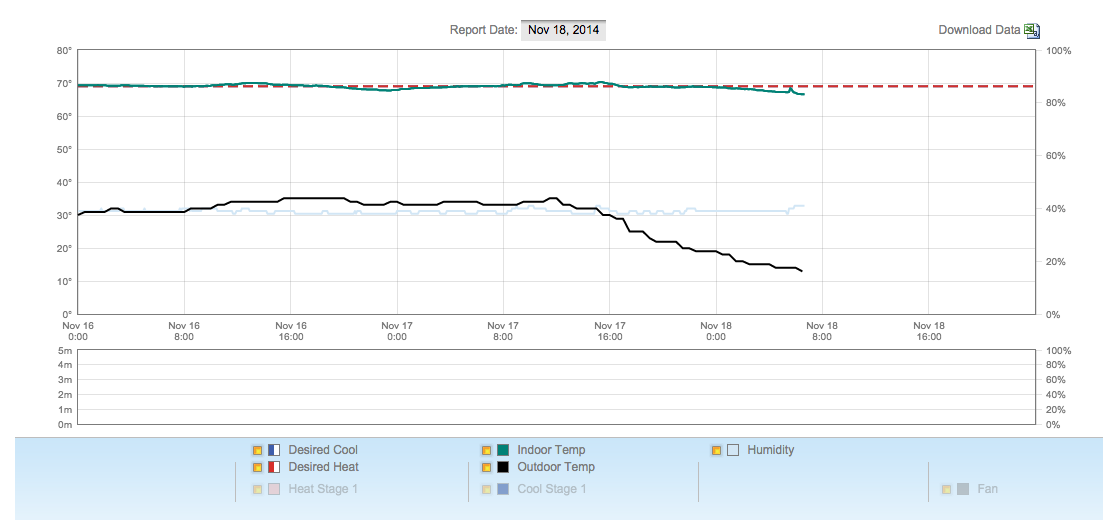
Nice and smooth. Slow moves. This is precisely what we want to see. Note the black line, that is outdoor temperature, it dips towards the end of the chart. There are no red spikes on the bottom (they would actually be large solid bars) because this Ecobee is there only to log temperatures and humidity. It isn’t controlling the heat pump, a Carrier Infinity thermostat is doing that.
This chart also shows the answer to an experiment we ran: with the house leaky, how cold would it be before the heat pump alone couldn’t keep up. Watch where the green line starts to dip. It’s at about 15 degrees outside. (Spoiler Alert! After foam, the heat pump carried the house down to 0, we didn’t get any colder than that last winter to find out where it loses the battle.)
As the green line starts to dip, look for the fast blip upwards. That’s when the backup resistance heat kicked in. If the heat pump loses the battle, there is always a backup to win the war.
The next day when the temperature goes back up, the heat pump will take over heating duties. The heat pump and backup heat actually work together in extreme times, both the heat pump and backup heat are working.
When the heat pump lost the battle at 15, it helped us understand our load calculation. This is the one we ran for the house without spray foam:
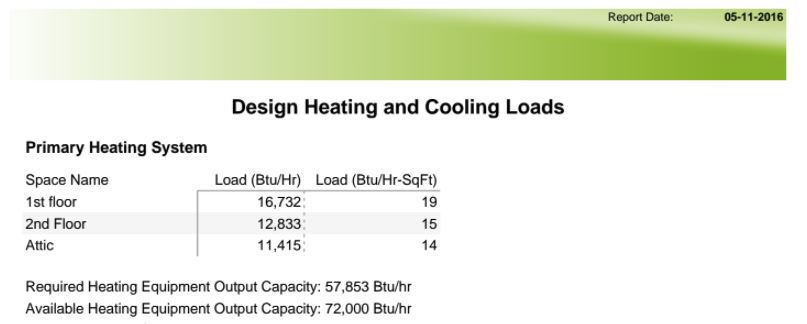
Note the 57,853. After foam that dropped to 50,999. More importantly, the top of the house was still really leaky, which means heat can easily rise right out of the house. And it did. Once we spray foamed it, some heat may have made it to the attic, but it mostly got stuck there because it is now well sealed and insulated.
Energy Use in the First Winter
If you don’t like math, skip to the next section. I want to show the numbers transparently, and it requires a little math. The energy use that first winter was pretty high. Granted it was also one of the coldest on record.
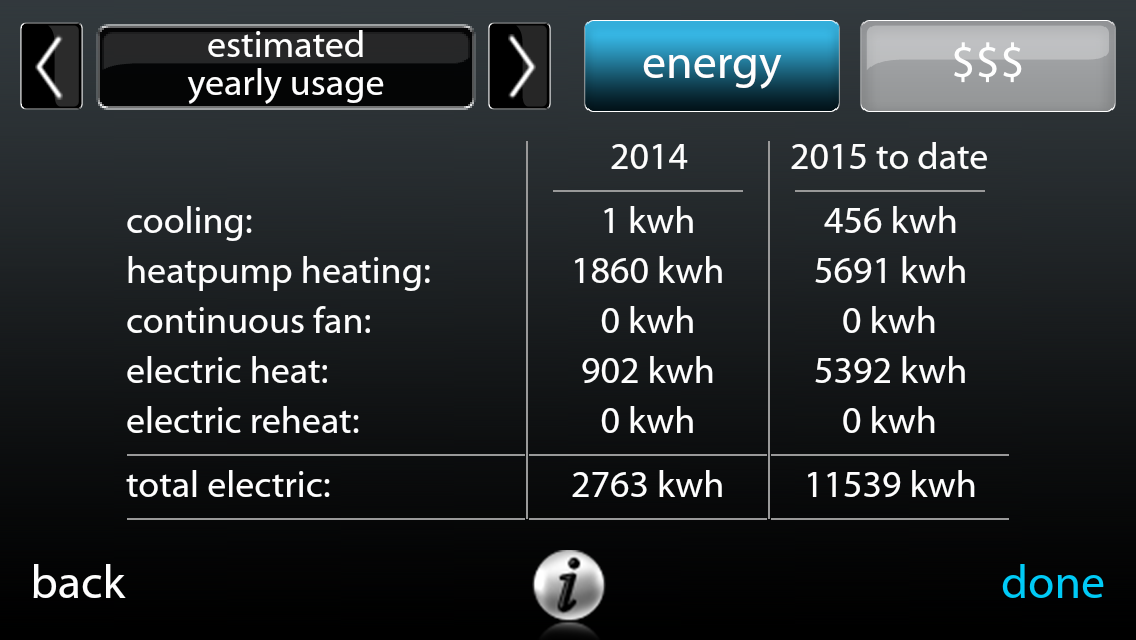
The heat pump was installed 10/22/14, just as winter began. This is a screenshot from Carrier’s thermostat app taken 12/26/15. I was learning the system and forgot to take an earlier screenshot. Note the “electric heat” line. That is backup resistance heat, which gets used when the heat pump can’t keep up or to keep the outdoor unit (the droid) from literally turning into a block of ice.
This is a lot of energy for a winter, but first we have to back out winter 2015-2016 from this 2014-2015 data. For transparency’s sake, here is the usage from the winter of 2015-2016 (which was extraordinarily mild.)
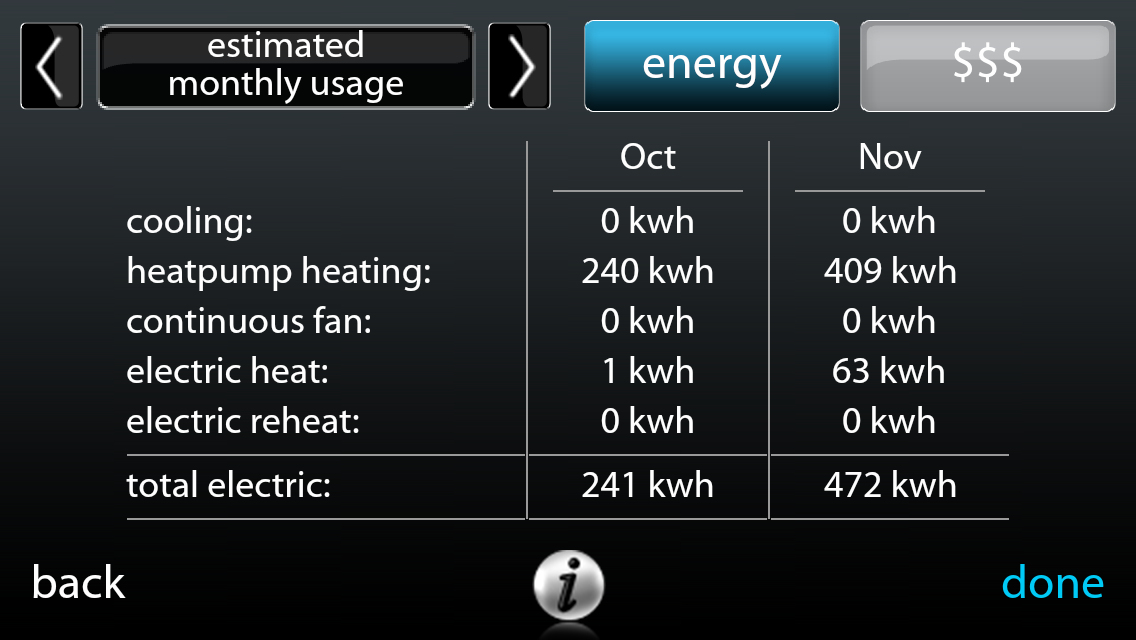
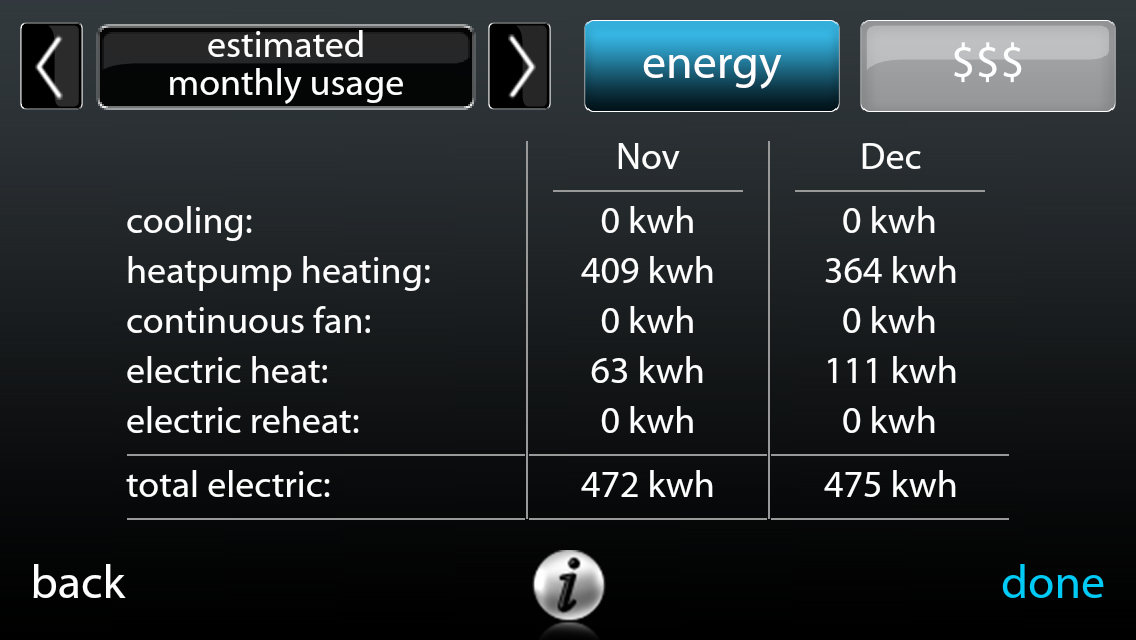
Energy usage for October to December 2015 is 241+472+475 = 1188 kilowatt hours (kWh). Total usage on the top screen is 14,099 kWh. Subtract out the 1188 and the 457 for cooling and you get 12,454 kWh for heating over 2014-2015. That’s about $1300-$1600 depending on pricing. Pretty steep to heat a 1700 square foot house. If you’ve heard bad things about heat pumps costing a lot, this is the sort of thing it’s based on.
But that’s not the end of the story. Far from it. Next up we tightened the home with closed cell spray foam. You can see from the few months of the 2015-2016 winter that things improved. In late January 2016 we figured out how to game the system and save 30-50% more than those first few months, more on that shortly. First, let’s look at the foam job.
Spray Foaming the Basement
This is my blower door, it normally is used to test how much a house leaks, but in this case I turned it around and am blowing it inside. This pushes foam fumes out any window you leave open near the foam work, which is what we did in the attic. We find that VOC levels (chemical pollutants) stay quite low with this method.
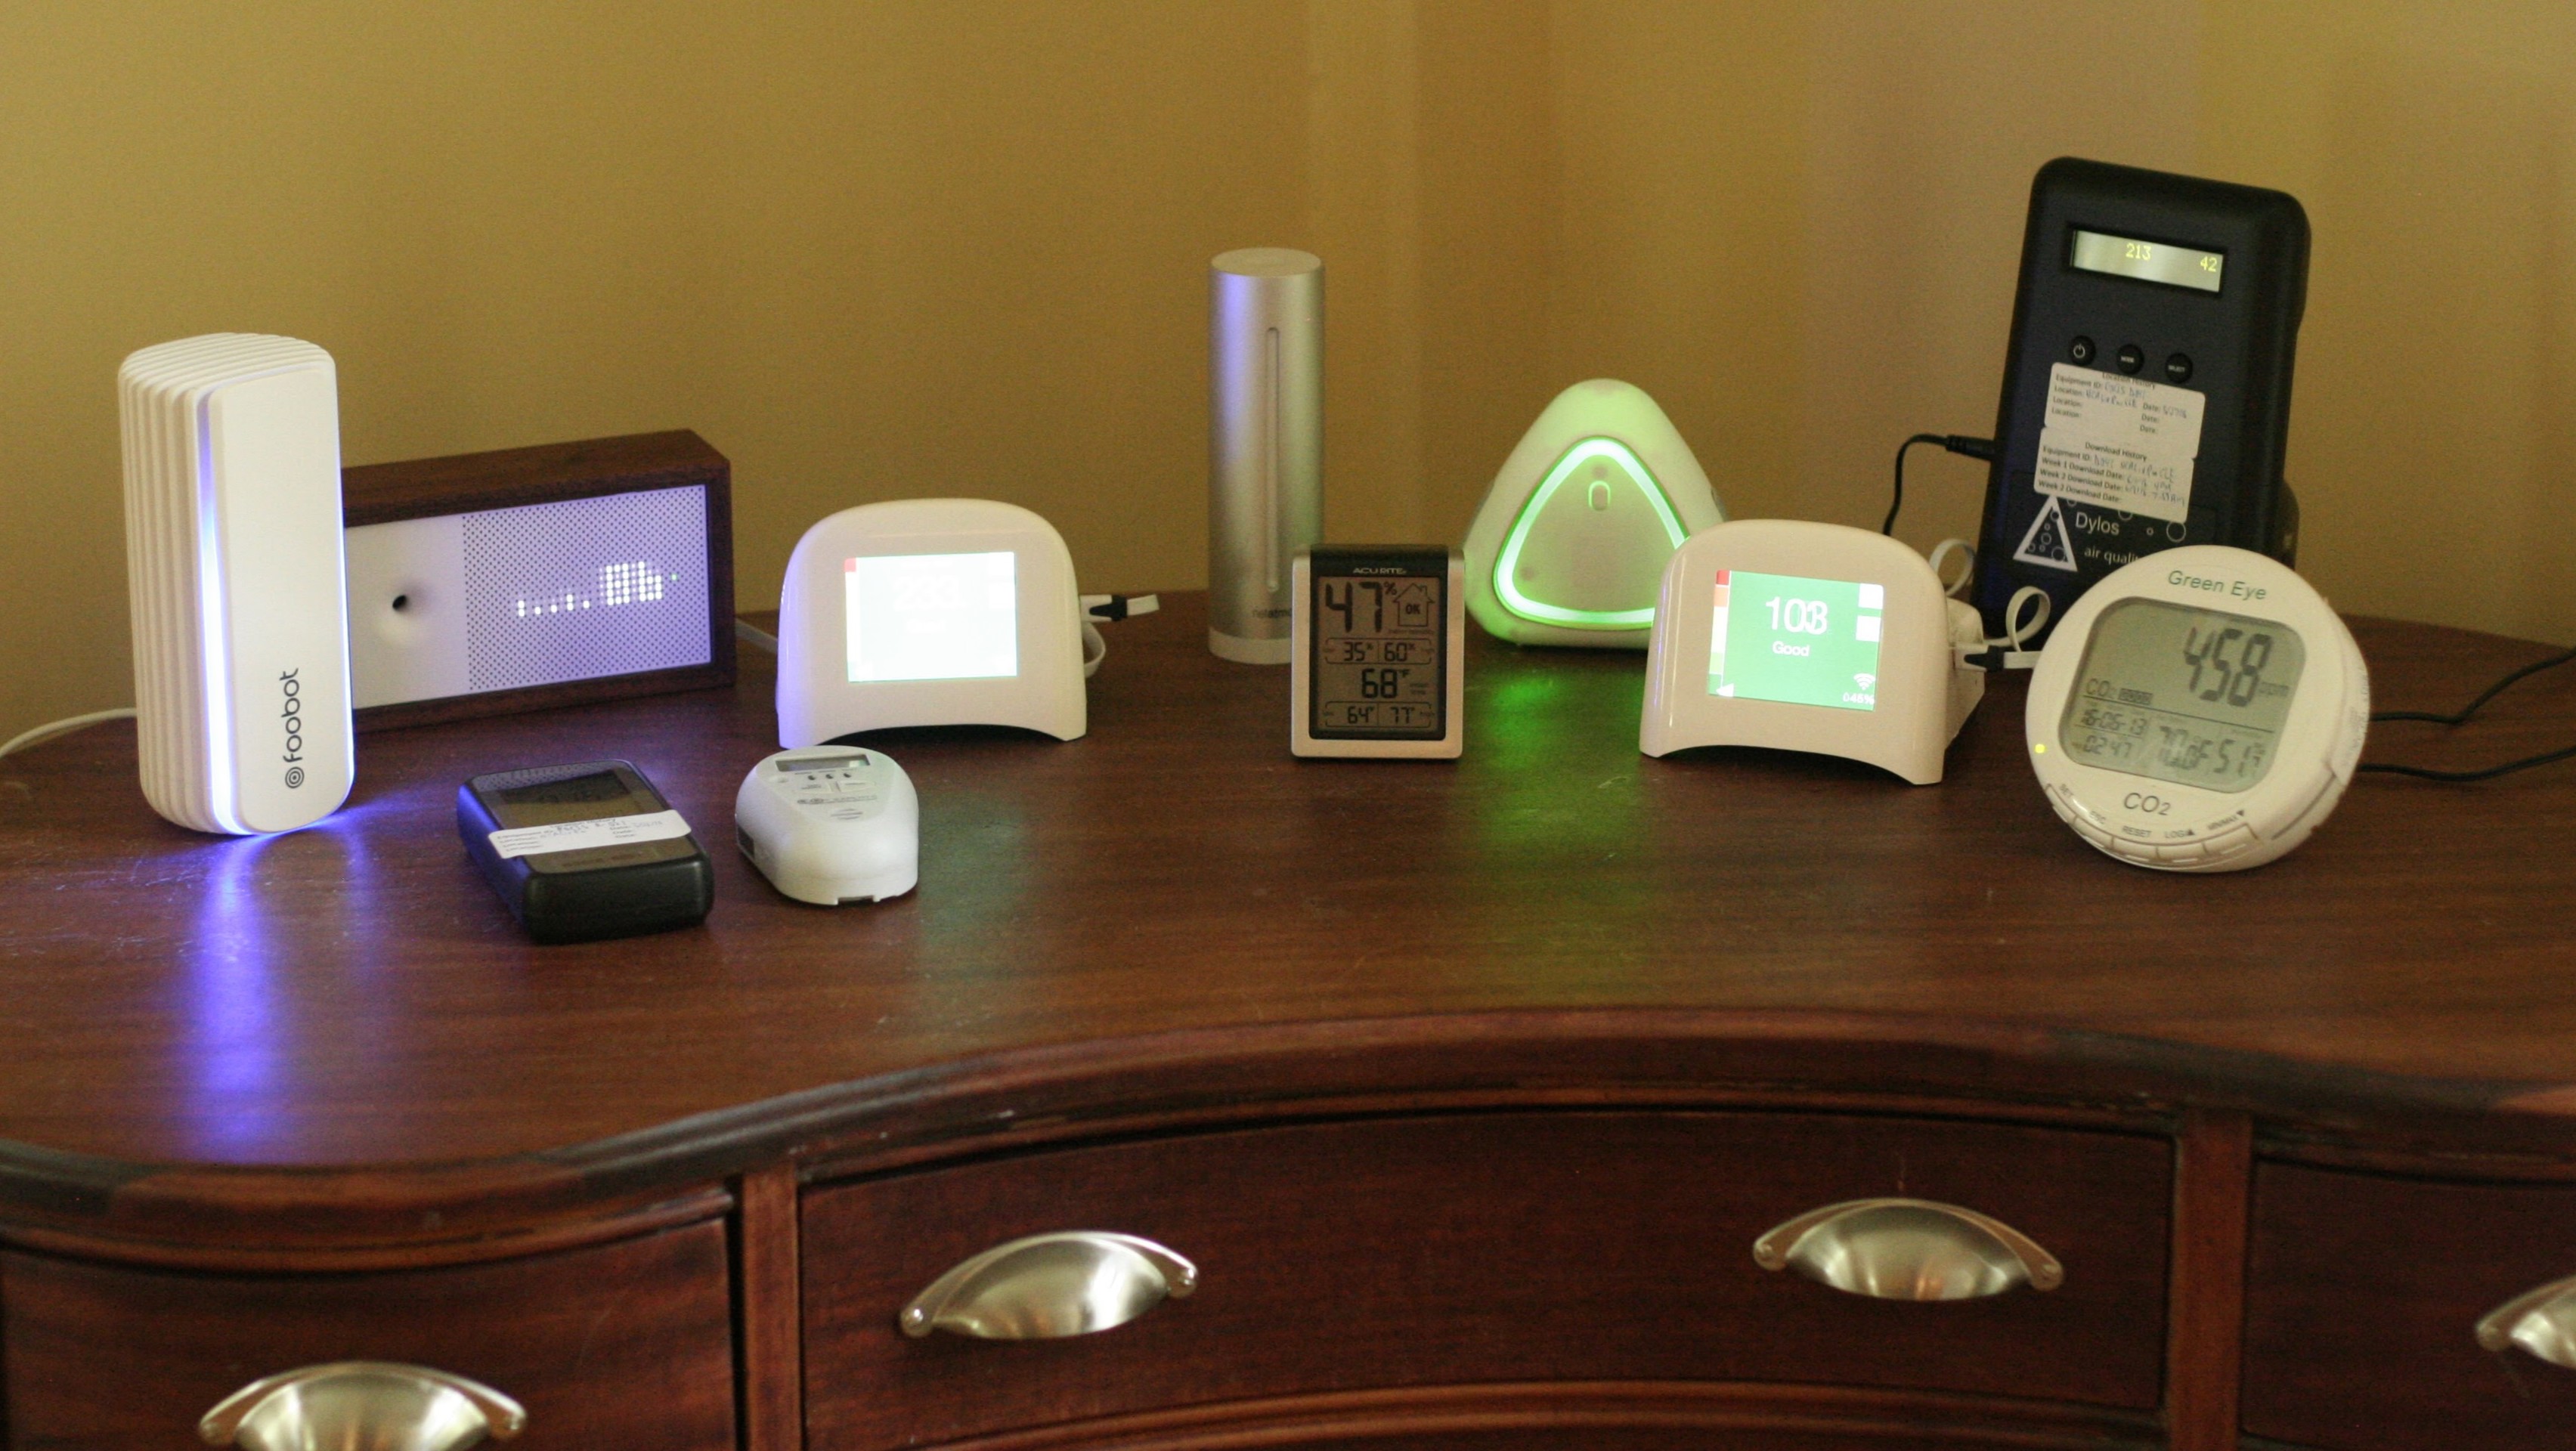
On another job the peaks were no higher than the nighttime peaks from them sleeping in their bedroom with the door closed. A closed door drives up carbon dioxide levels, which the Foobot Indoor Air Quality monitors we like pick up. Some clients note that they can’t smell foam when they stop by to check on progress. (I ask clients to leave during the job and for 24 hours afterwards for health reasons.)
Let’s dig into the actual foam work. We started in the basement.

This is the crawlspace in the back of the house under the kitchen and Jon’s office. (A very tall crawl at 6’.) This spot is quite damp, so we opted to spray the walls which at least keeps the damp walls from pushing water vapor (humidity) into the basement air. It does not stop moisture from getting into the foundation, though. Jon had that adjusted with some exterior waterproofing before this.
Note how smooth the foam is. When a sprayer has a large flat surface like this, the results are much nicer.
Also note the gravel on the ground. This is out of order. There is supposed to be a thick vapor barrier under this. (6 mil+ plastic is a common product to be used here.) This was on Jon’s plate and he ran out of time before the foam crew arrived. It has since been covered. I prefer to do it first, though, because then you can foam the plastic to the wall.
Remember this shot from under the front porch? We tackled it during the basement work.
Once the basement work was done, I ran another blower door test:
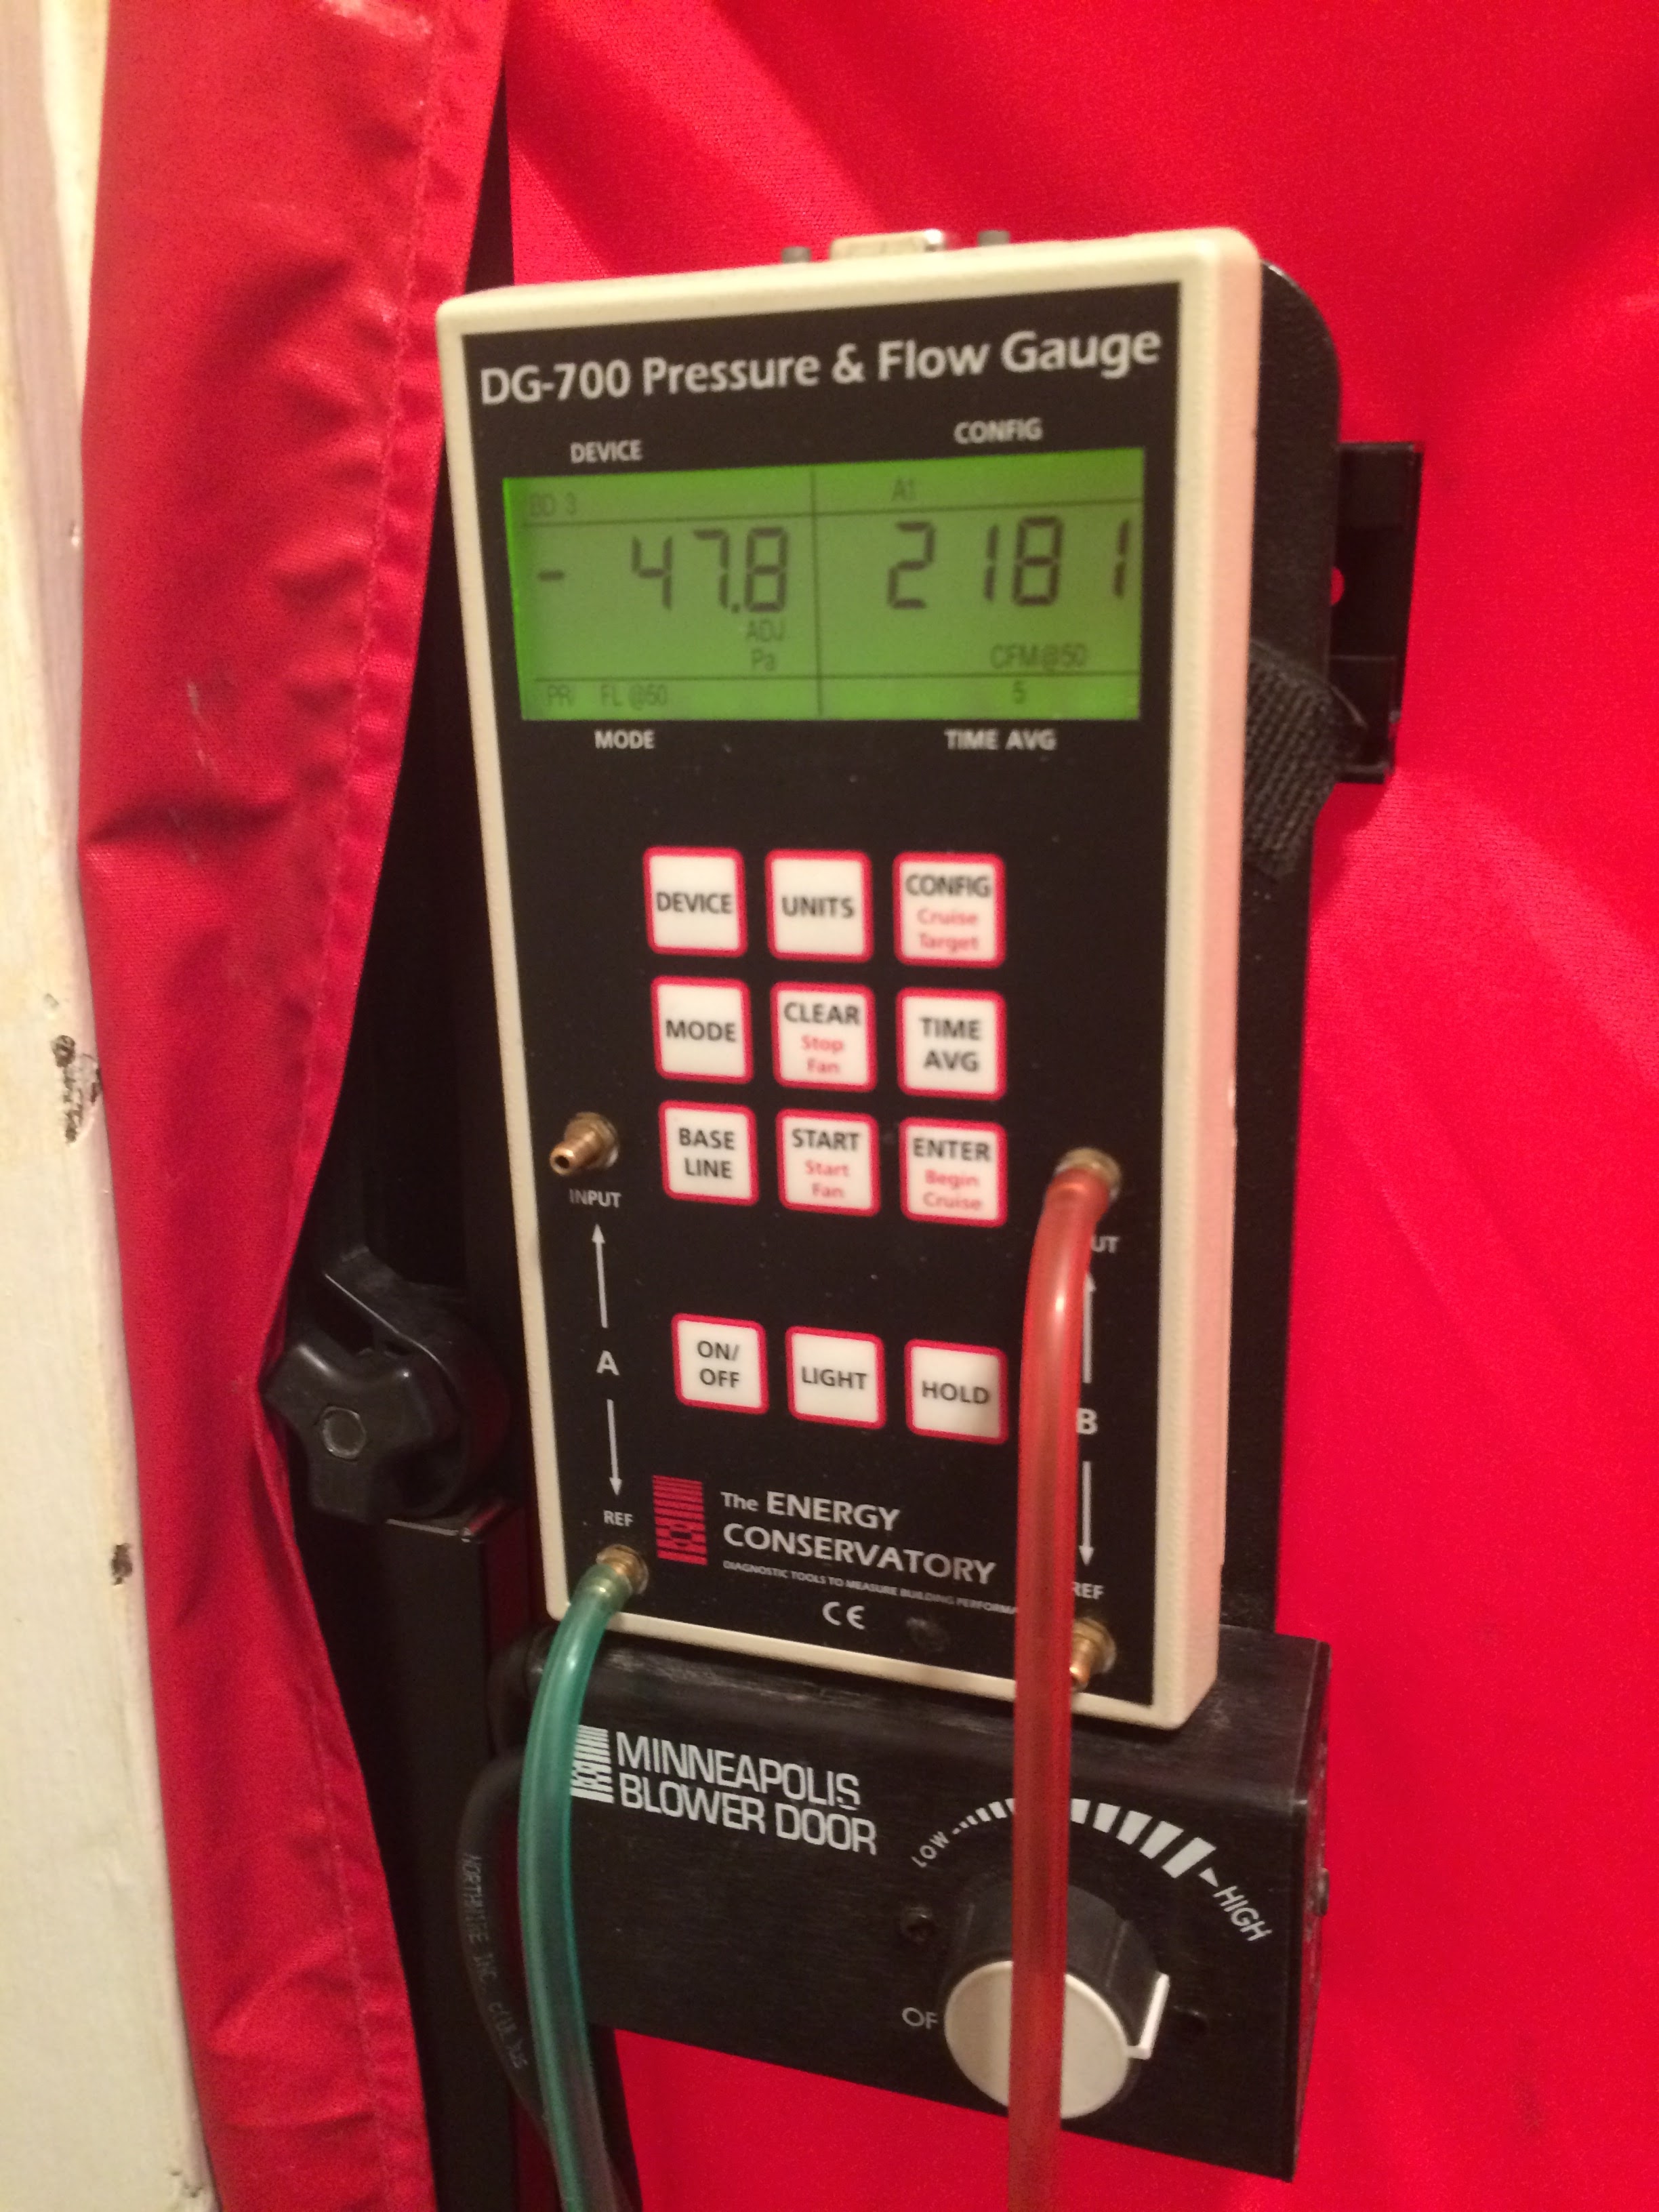
2181 down from 2456, a 275 point or 11% reduction. Air sealing was only a piece of the reason for this part of the job, the rear crawl was mostly a moisture control measure. There were a few misses, as you’ll see in a bit.
Spray Foaming the Attic
As always, the preparation makes or breaks you. Jon pulled down the foil faced fiberglass in the attic, but there were still some little bits and pieces left:

Spray foam is not unlike spray paint. Imagine trying to lay down a nice smooth coat under those tufts of fiberglass. It makes it harder. From experience, I’ve found that small voids in the foam form around small interruptions like these. I’ve heard them called “wormholes.” They show up later in infrared and can cause moisture problems like dripping water.
Wanting to avoid them, my wife Rachel and I went to Jon’s house and cleaned little stuff like this up to get ready for the foam work. Here is that same spot after we did our thing.
Now this cavity is easy to spray. The easier you make the work, the better the job you are likely to get. That is a major thrust of the prep work Energy Smart does.
Here’s another view of the prep work. The right side is ready to go, note how clean it looks. The left side still has some tufts of fiberglass and pieces of foil to remove. Be sure if you are having foam work done to take the time to do this. It may be the difference between a good result and a mediocre one.
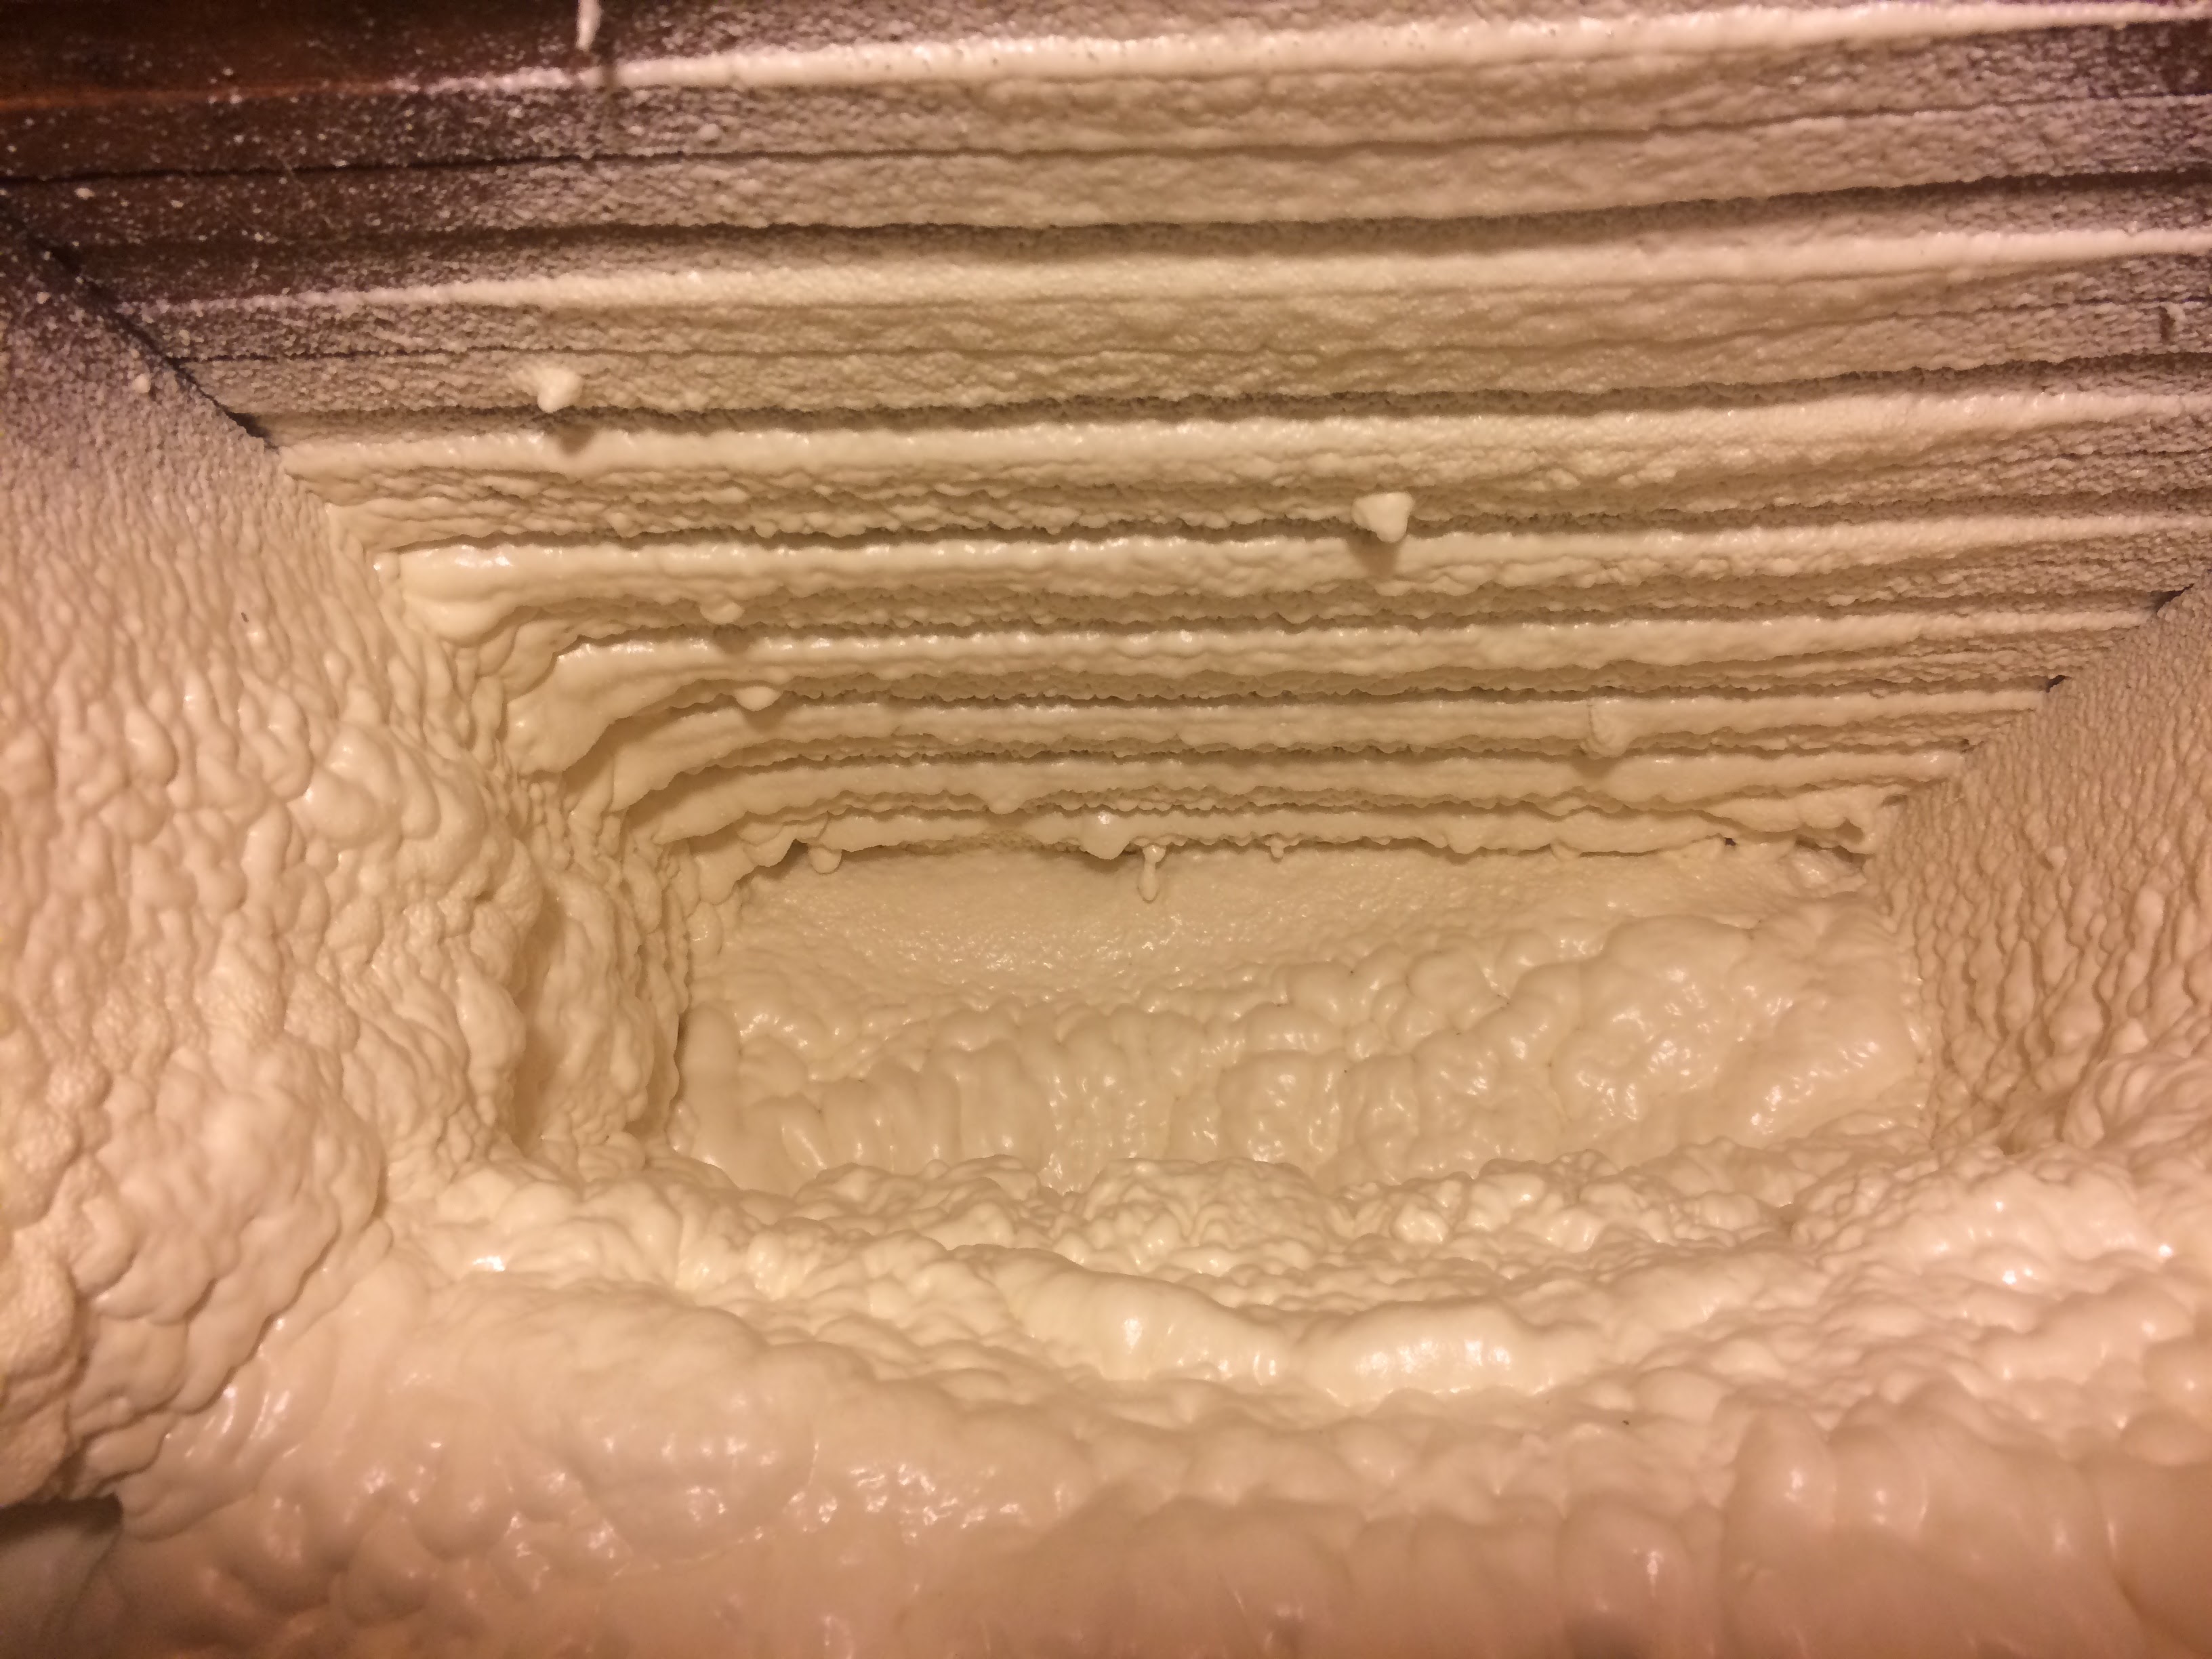
Here is that same wall part way through the foam job:

To help you get your bearings, here is a video from outside with the foam rig. I show a heat leak as well:

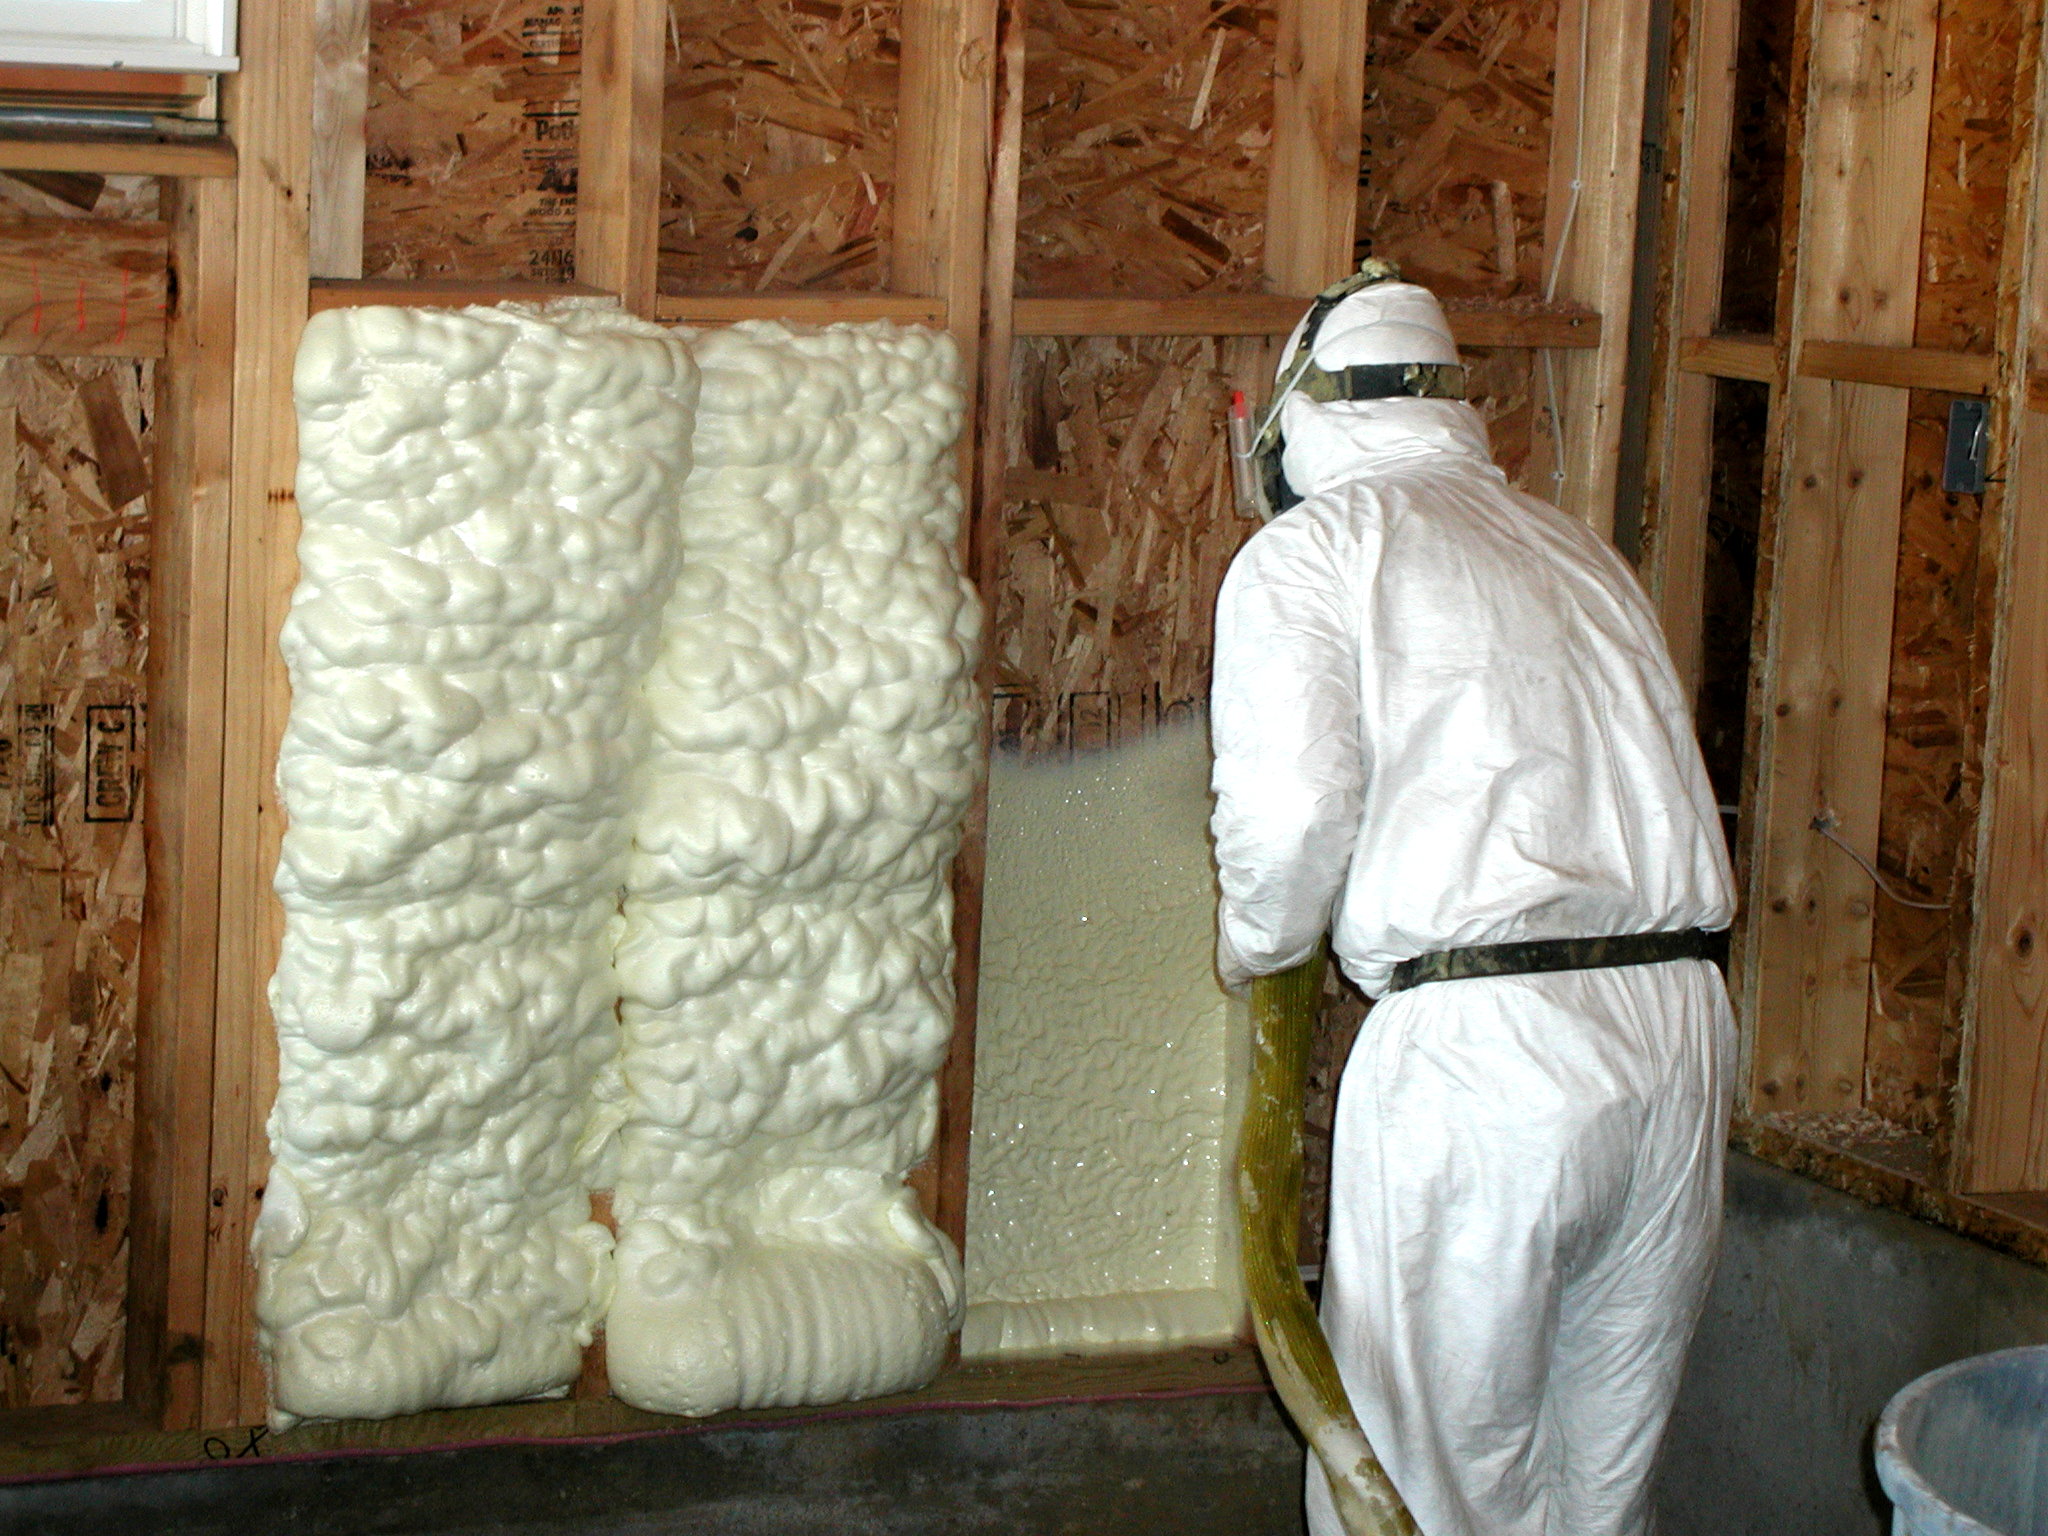
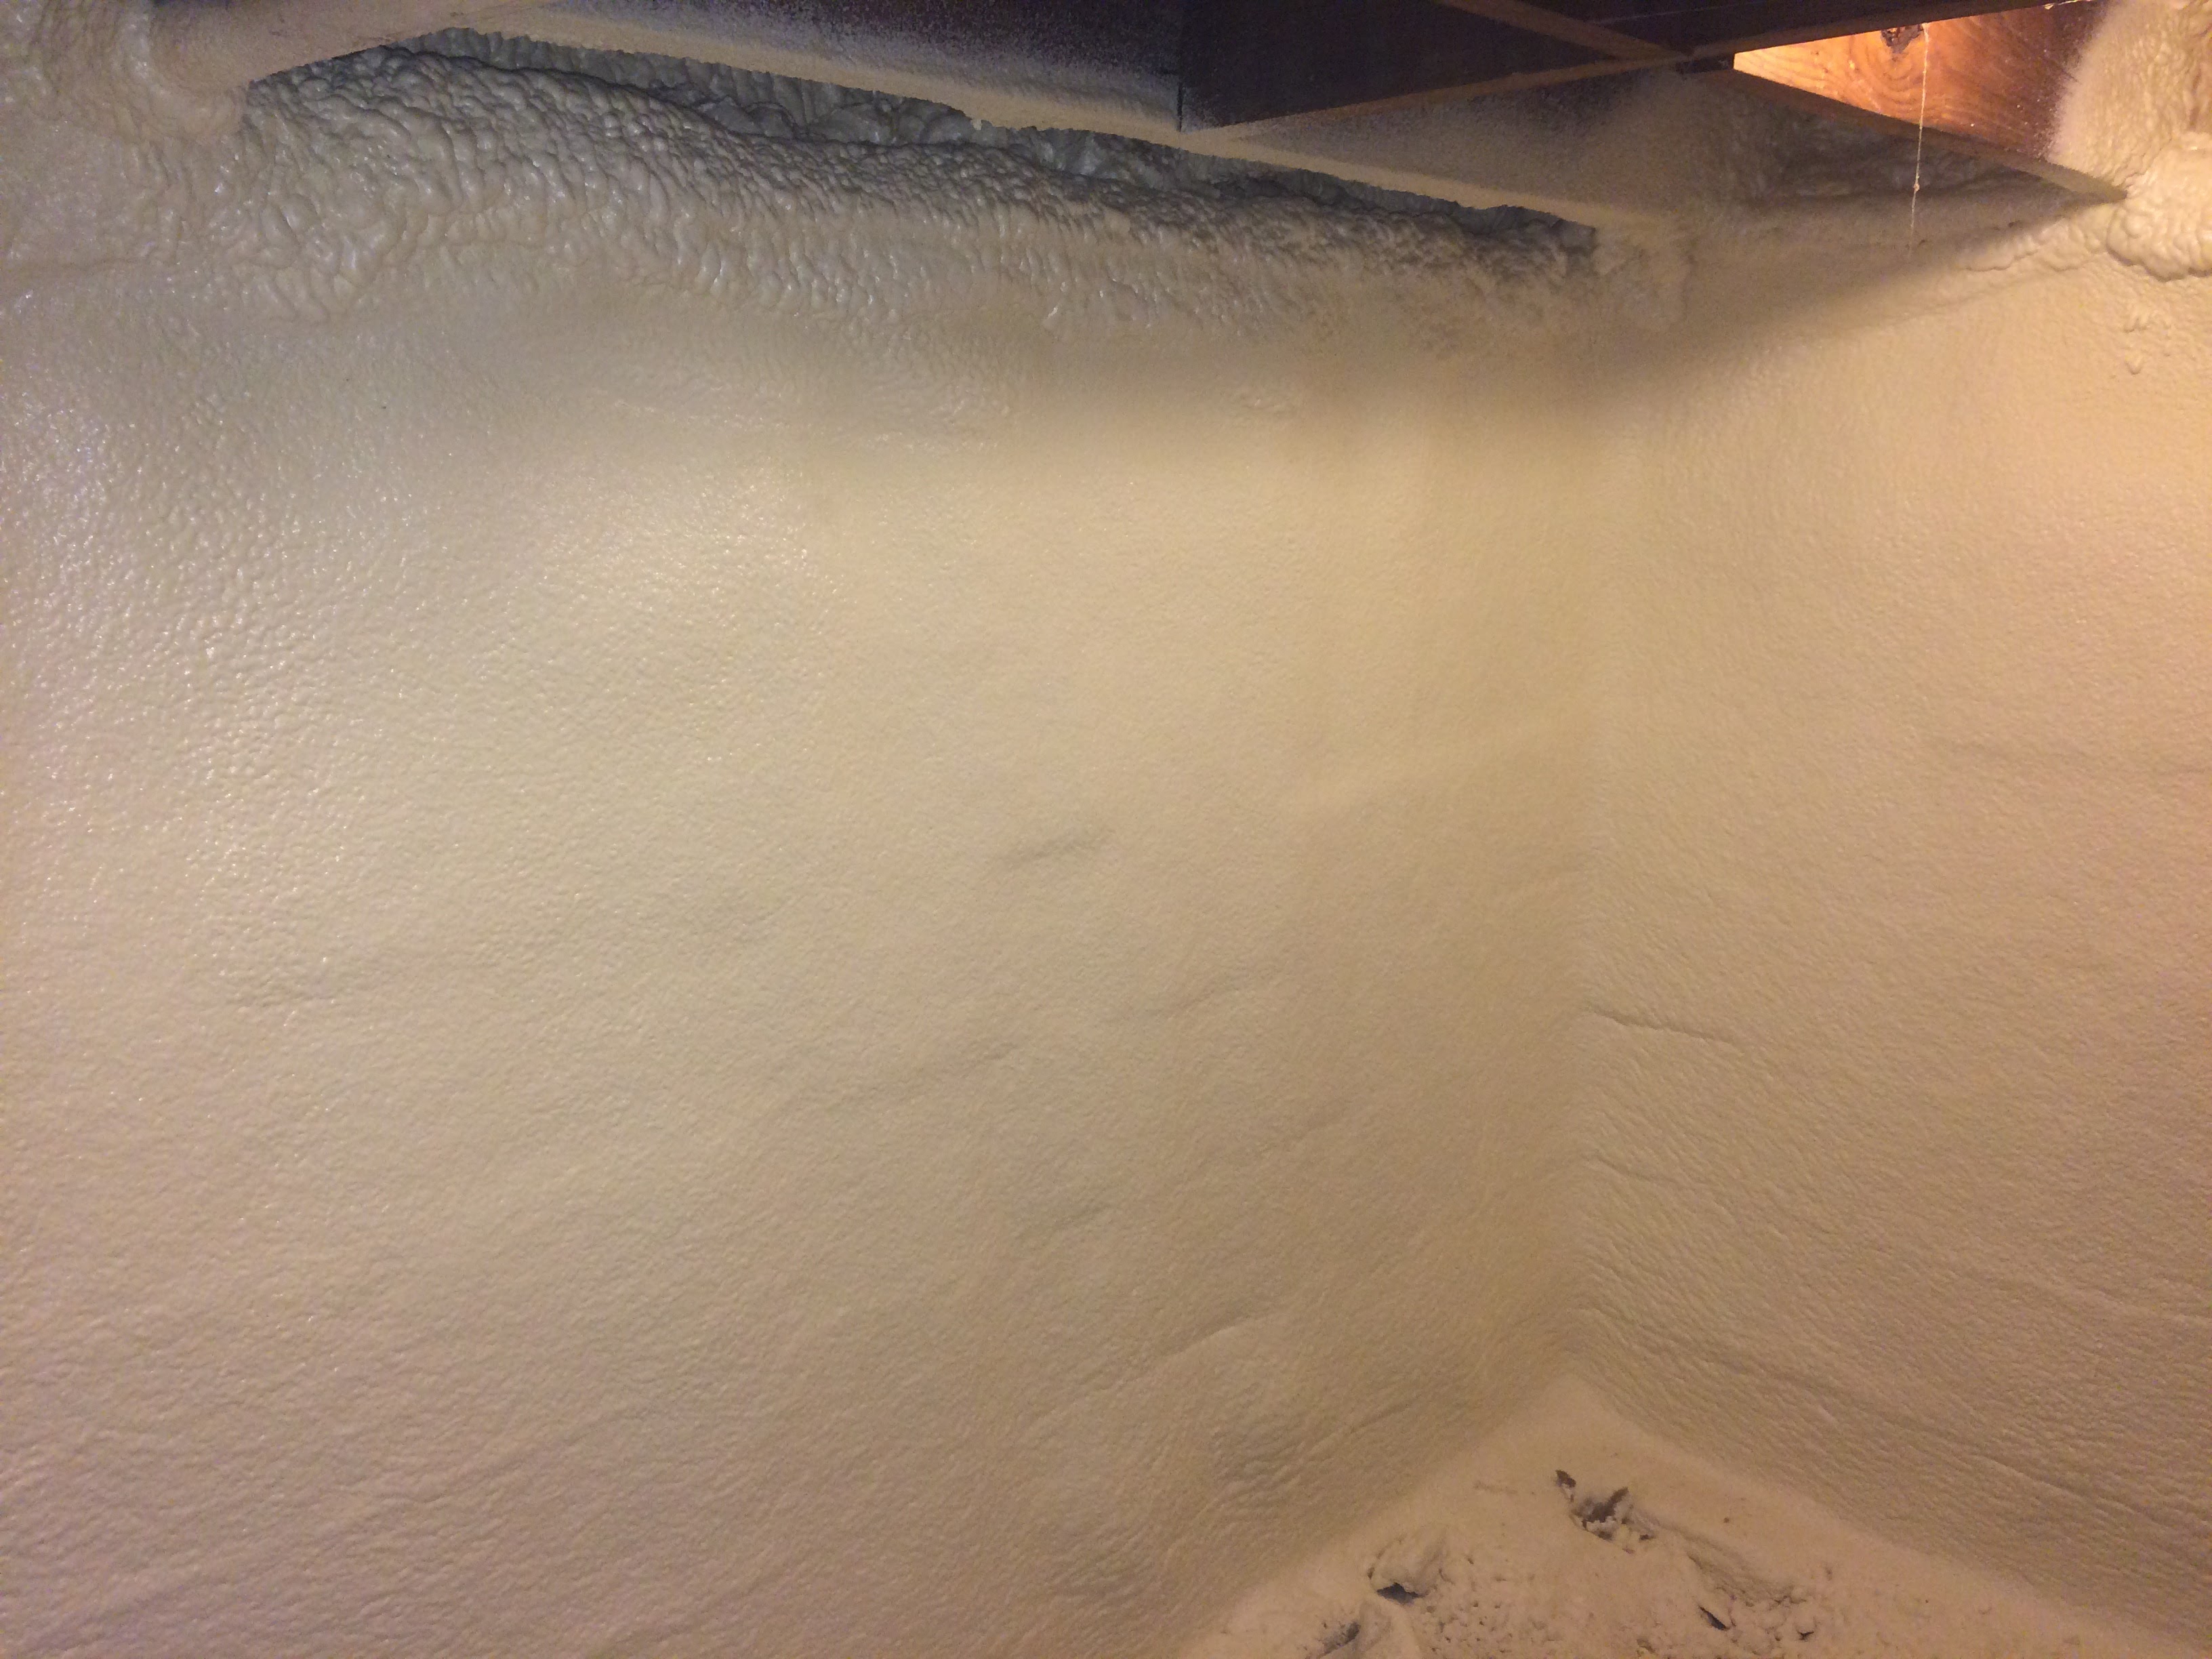
Donny Oney (left) and Gary Smith (right) of Affordable Foam are getting suited up to spray. Note that a part of the ceiling has been sprayed.
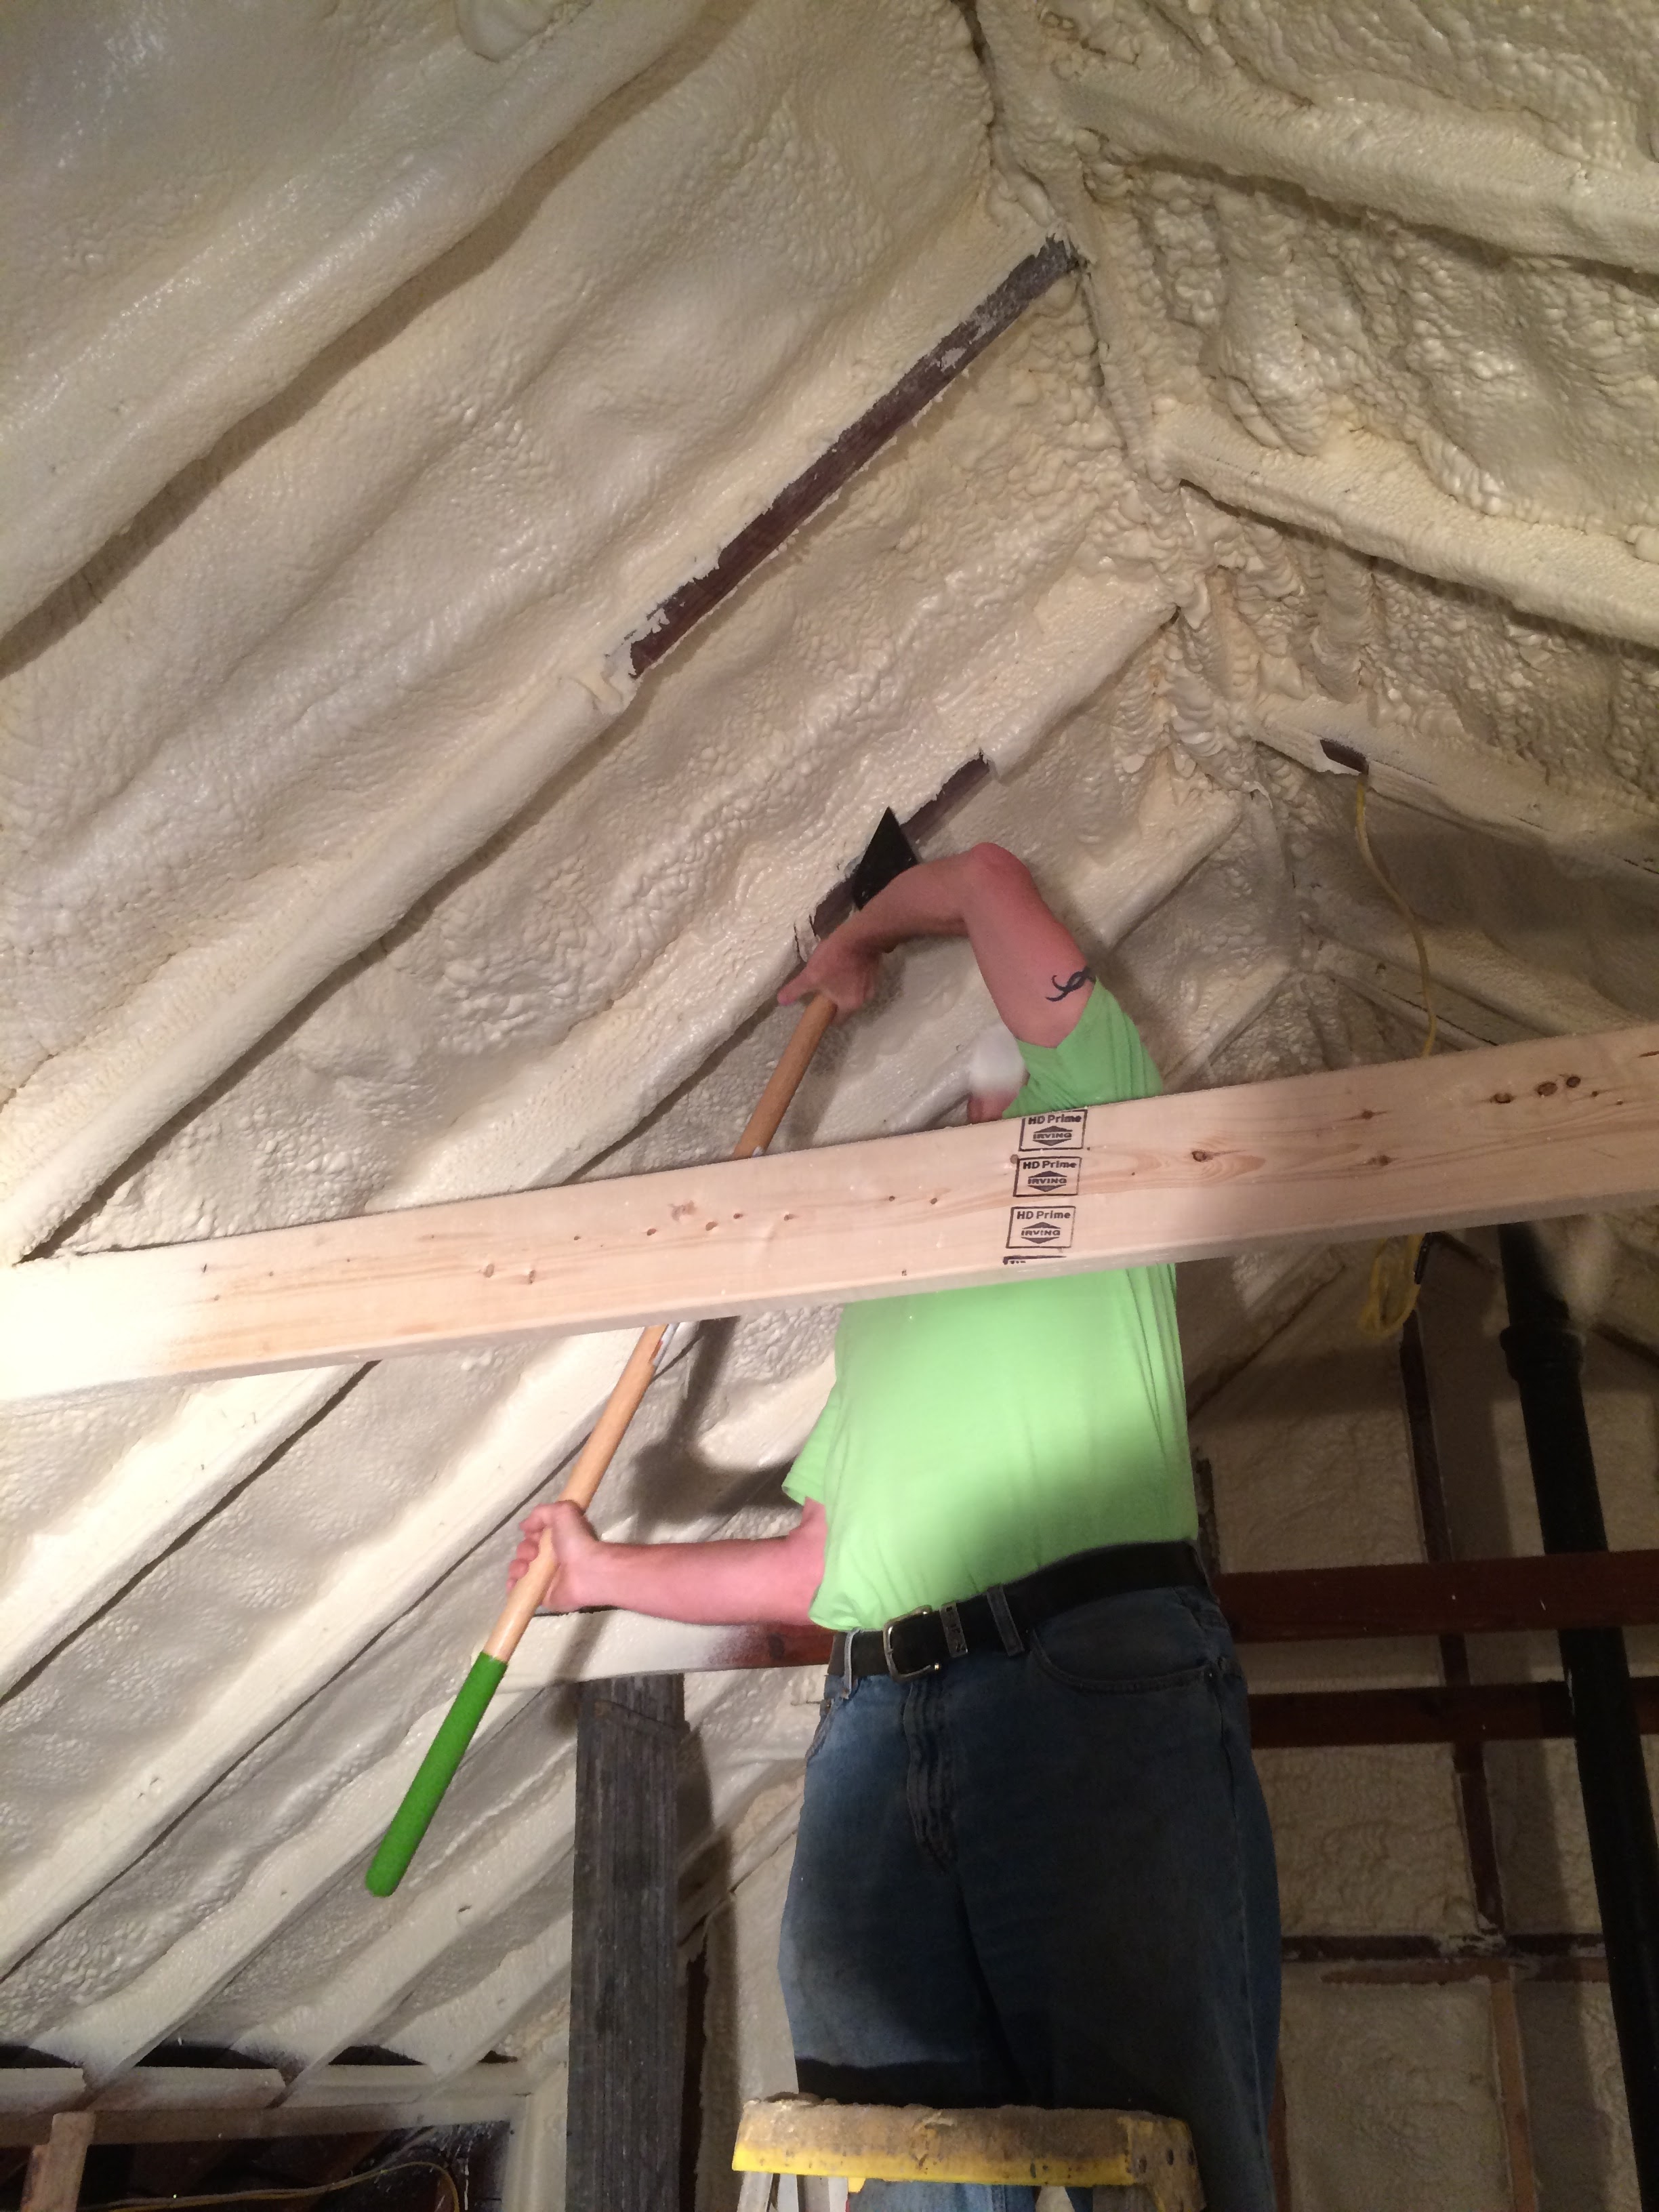
Since the ceiling is going to get drywall, we have to scrape the foam off the face of the roof joist. When possible I’d rather keep that on there for a thermal break. It’s much easier to scrape closed cell shortly after application, it’s “tender” and comes off much more easily.
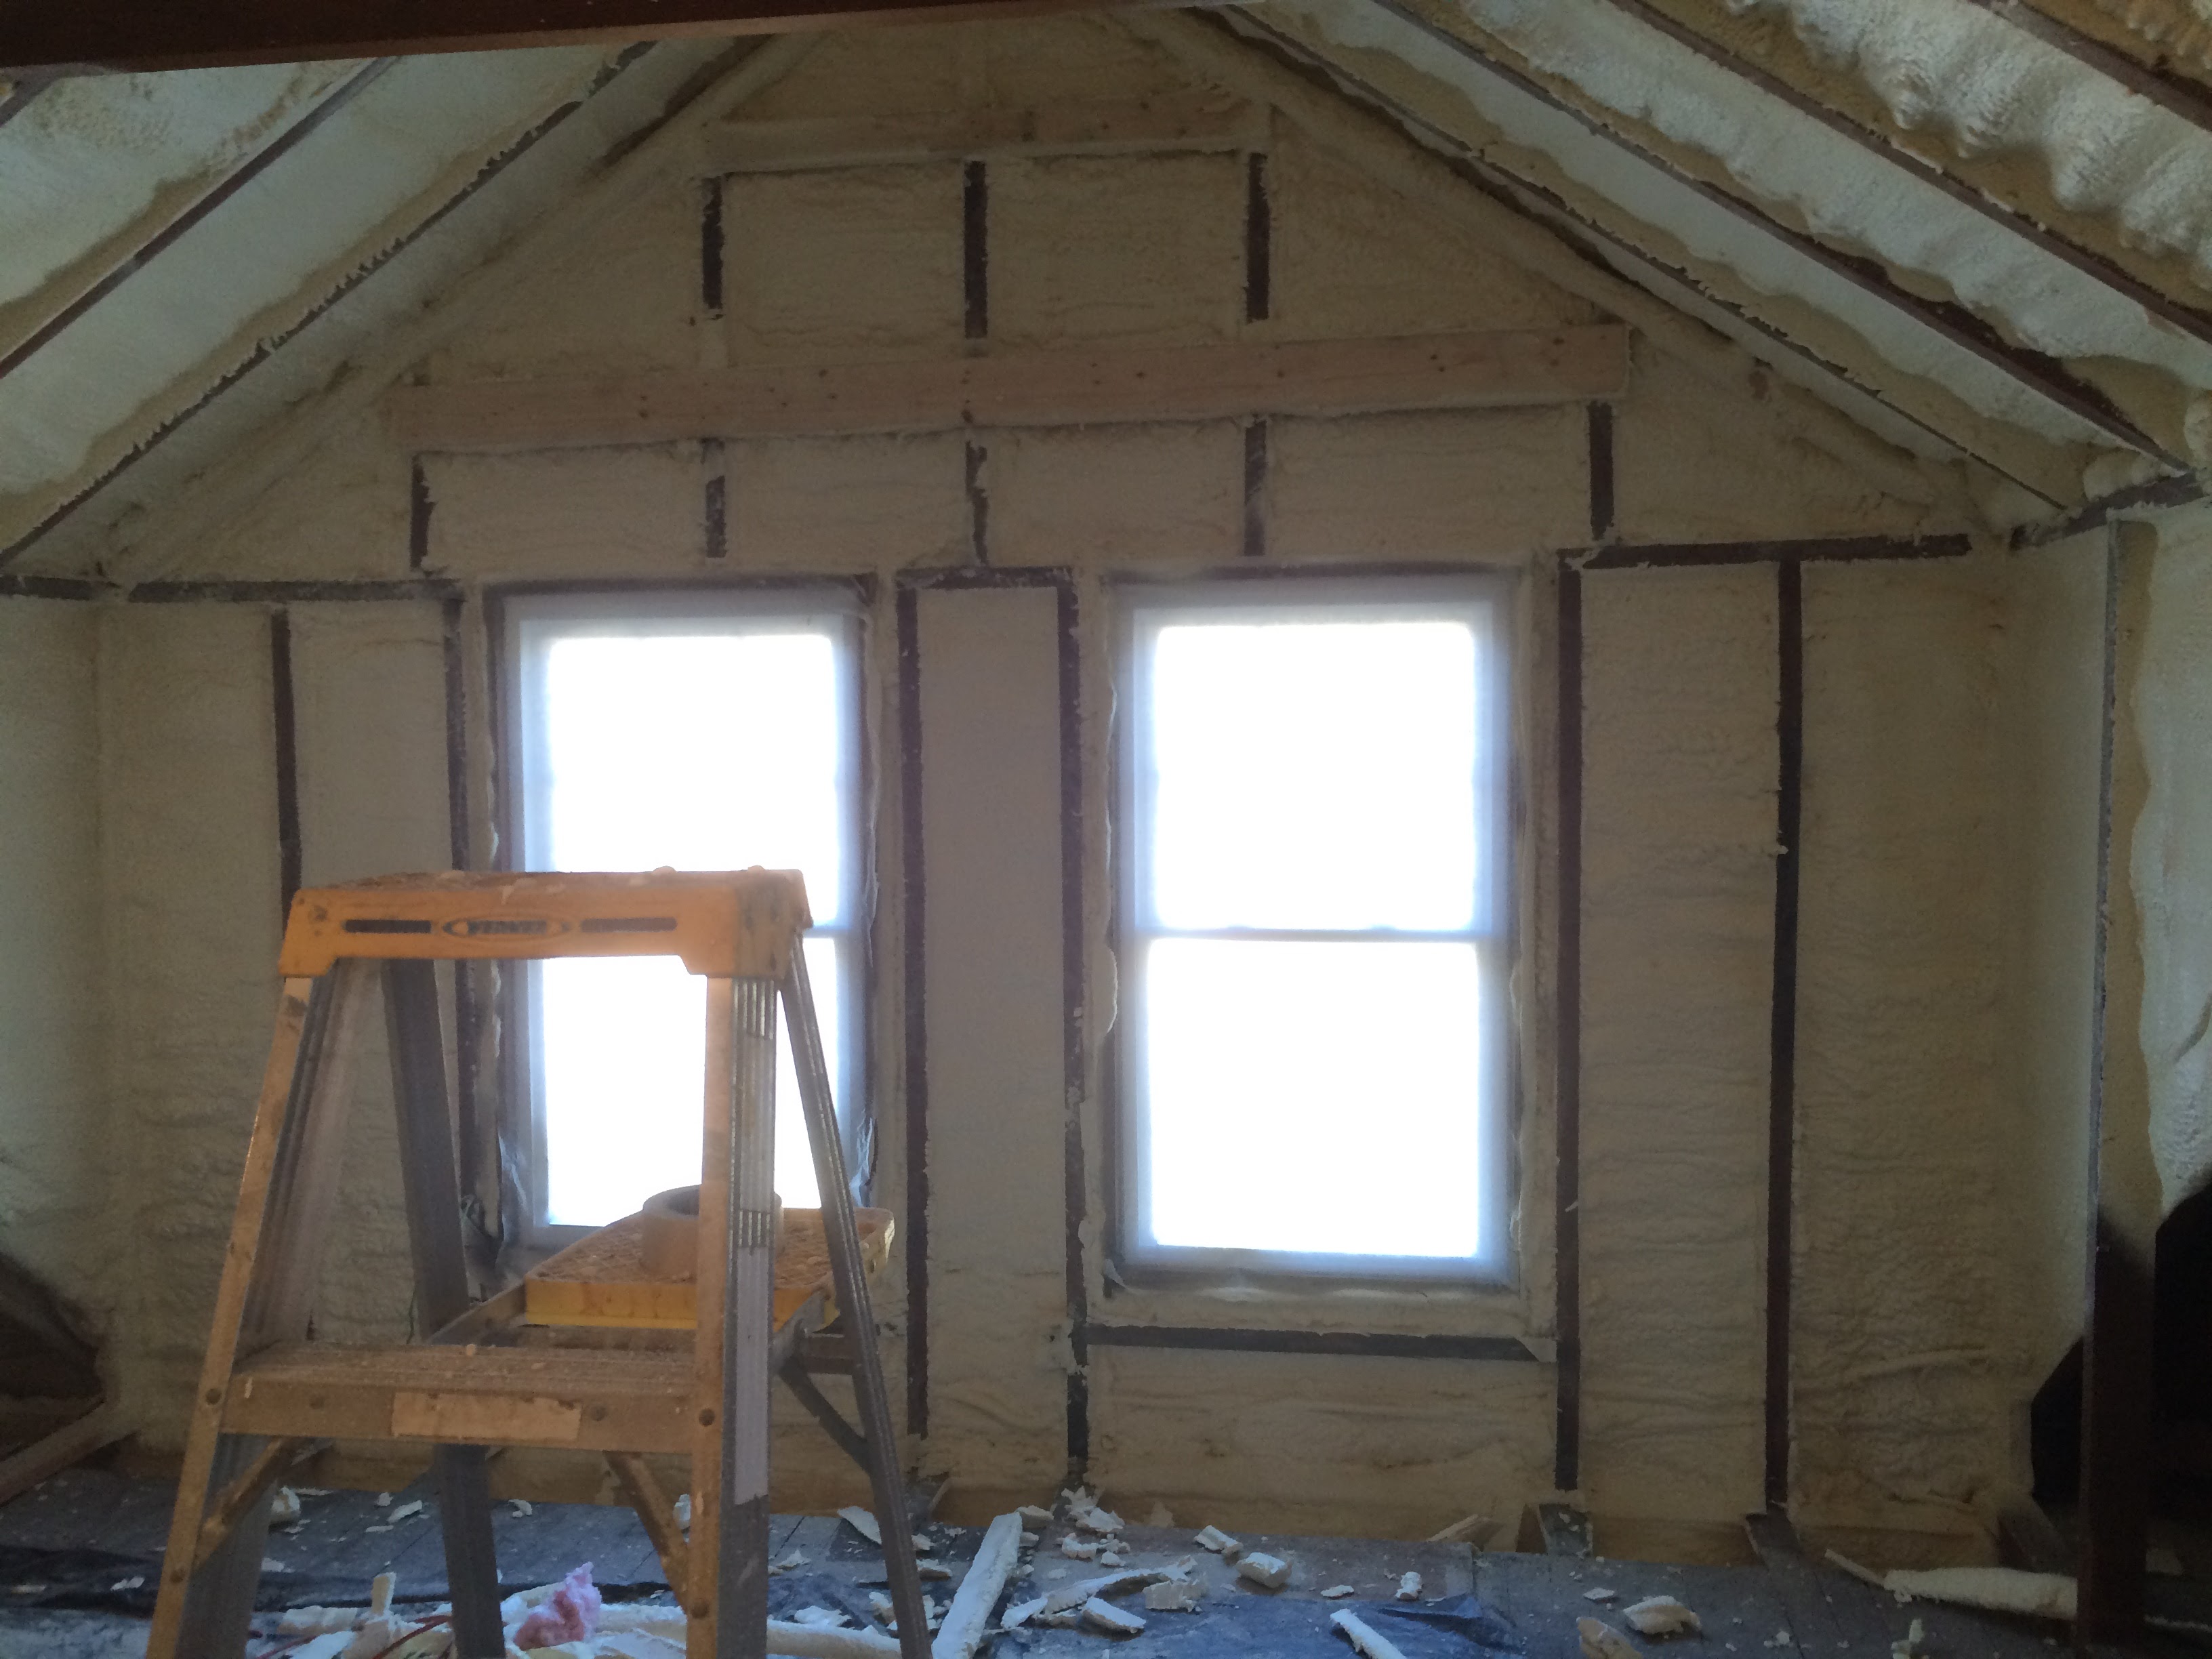
Here is the attic job as it neared completion. Note that you can see the studs, they have been scraped. Foam remnants litter the floor.
When the attic work was complete we’d gone from 2181 blower door to this:
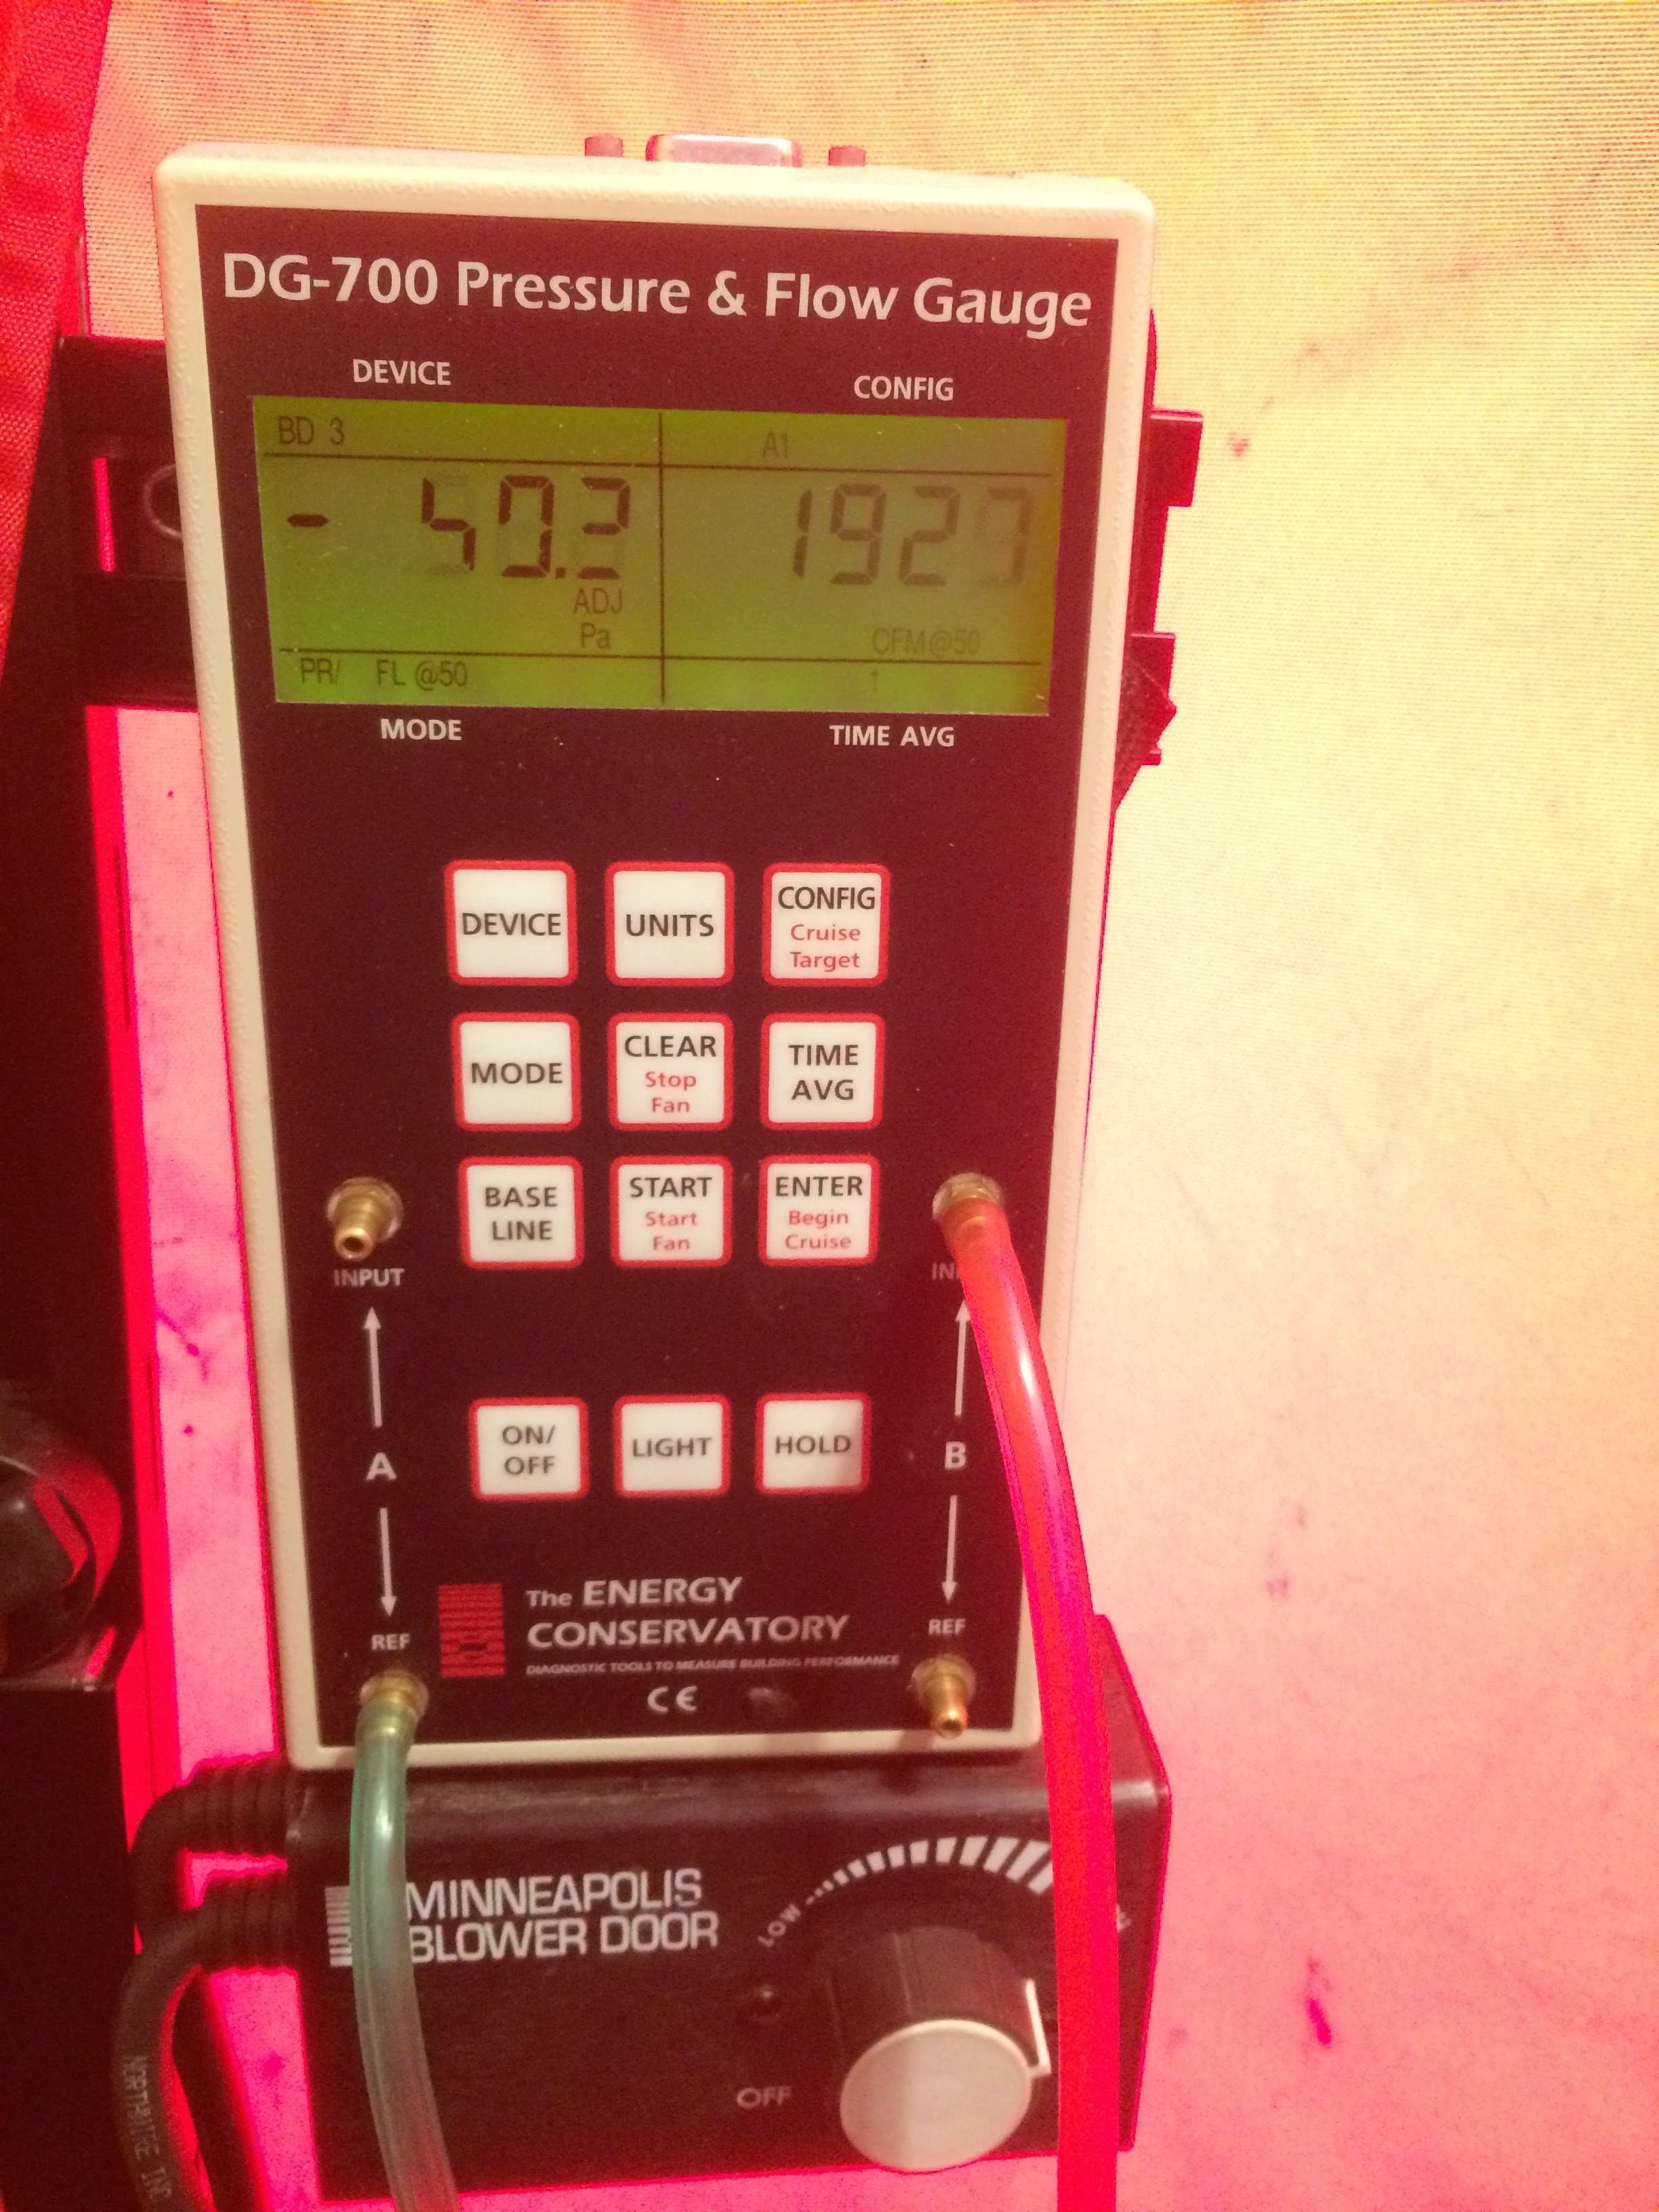
1927 down from 2181 with the attic door closed. Doesn’t sound impressive, does it?
That’s not the critical number here, though. What I really care about is the number with the attic door open. It used to be 4610. It was now:
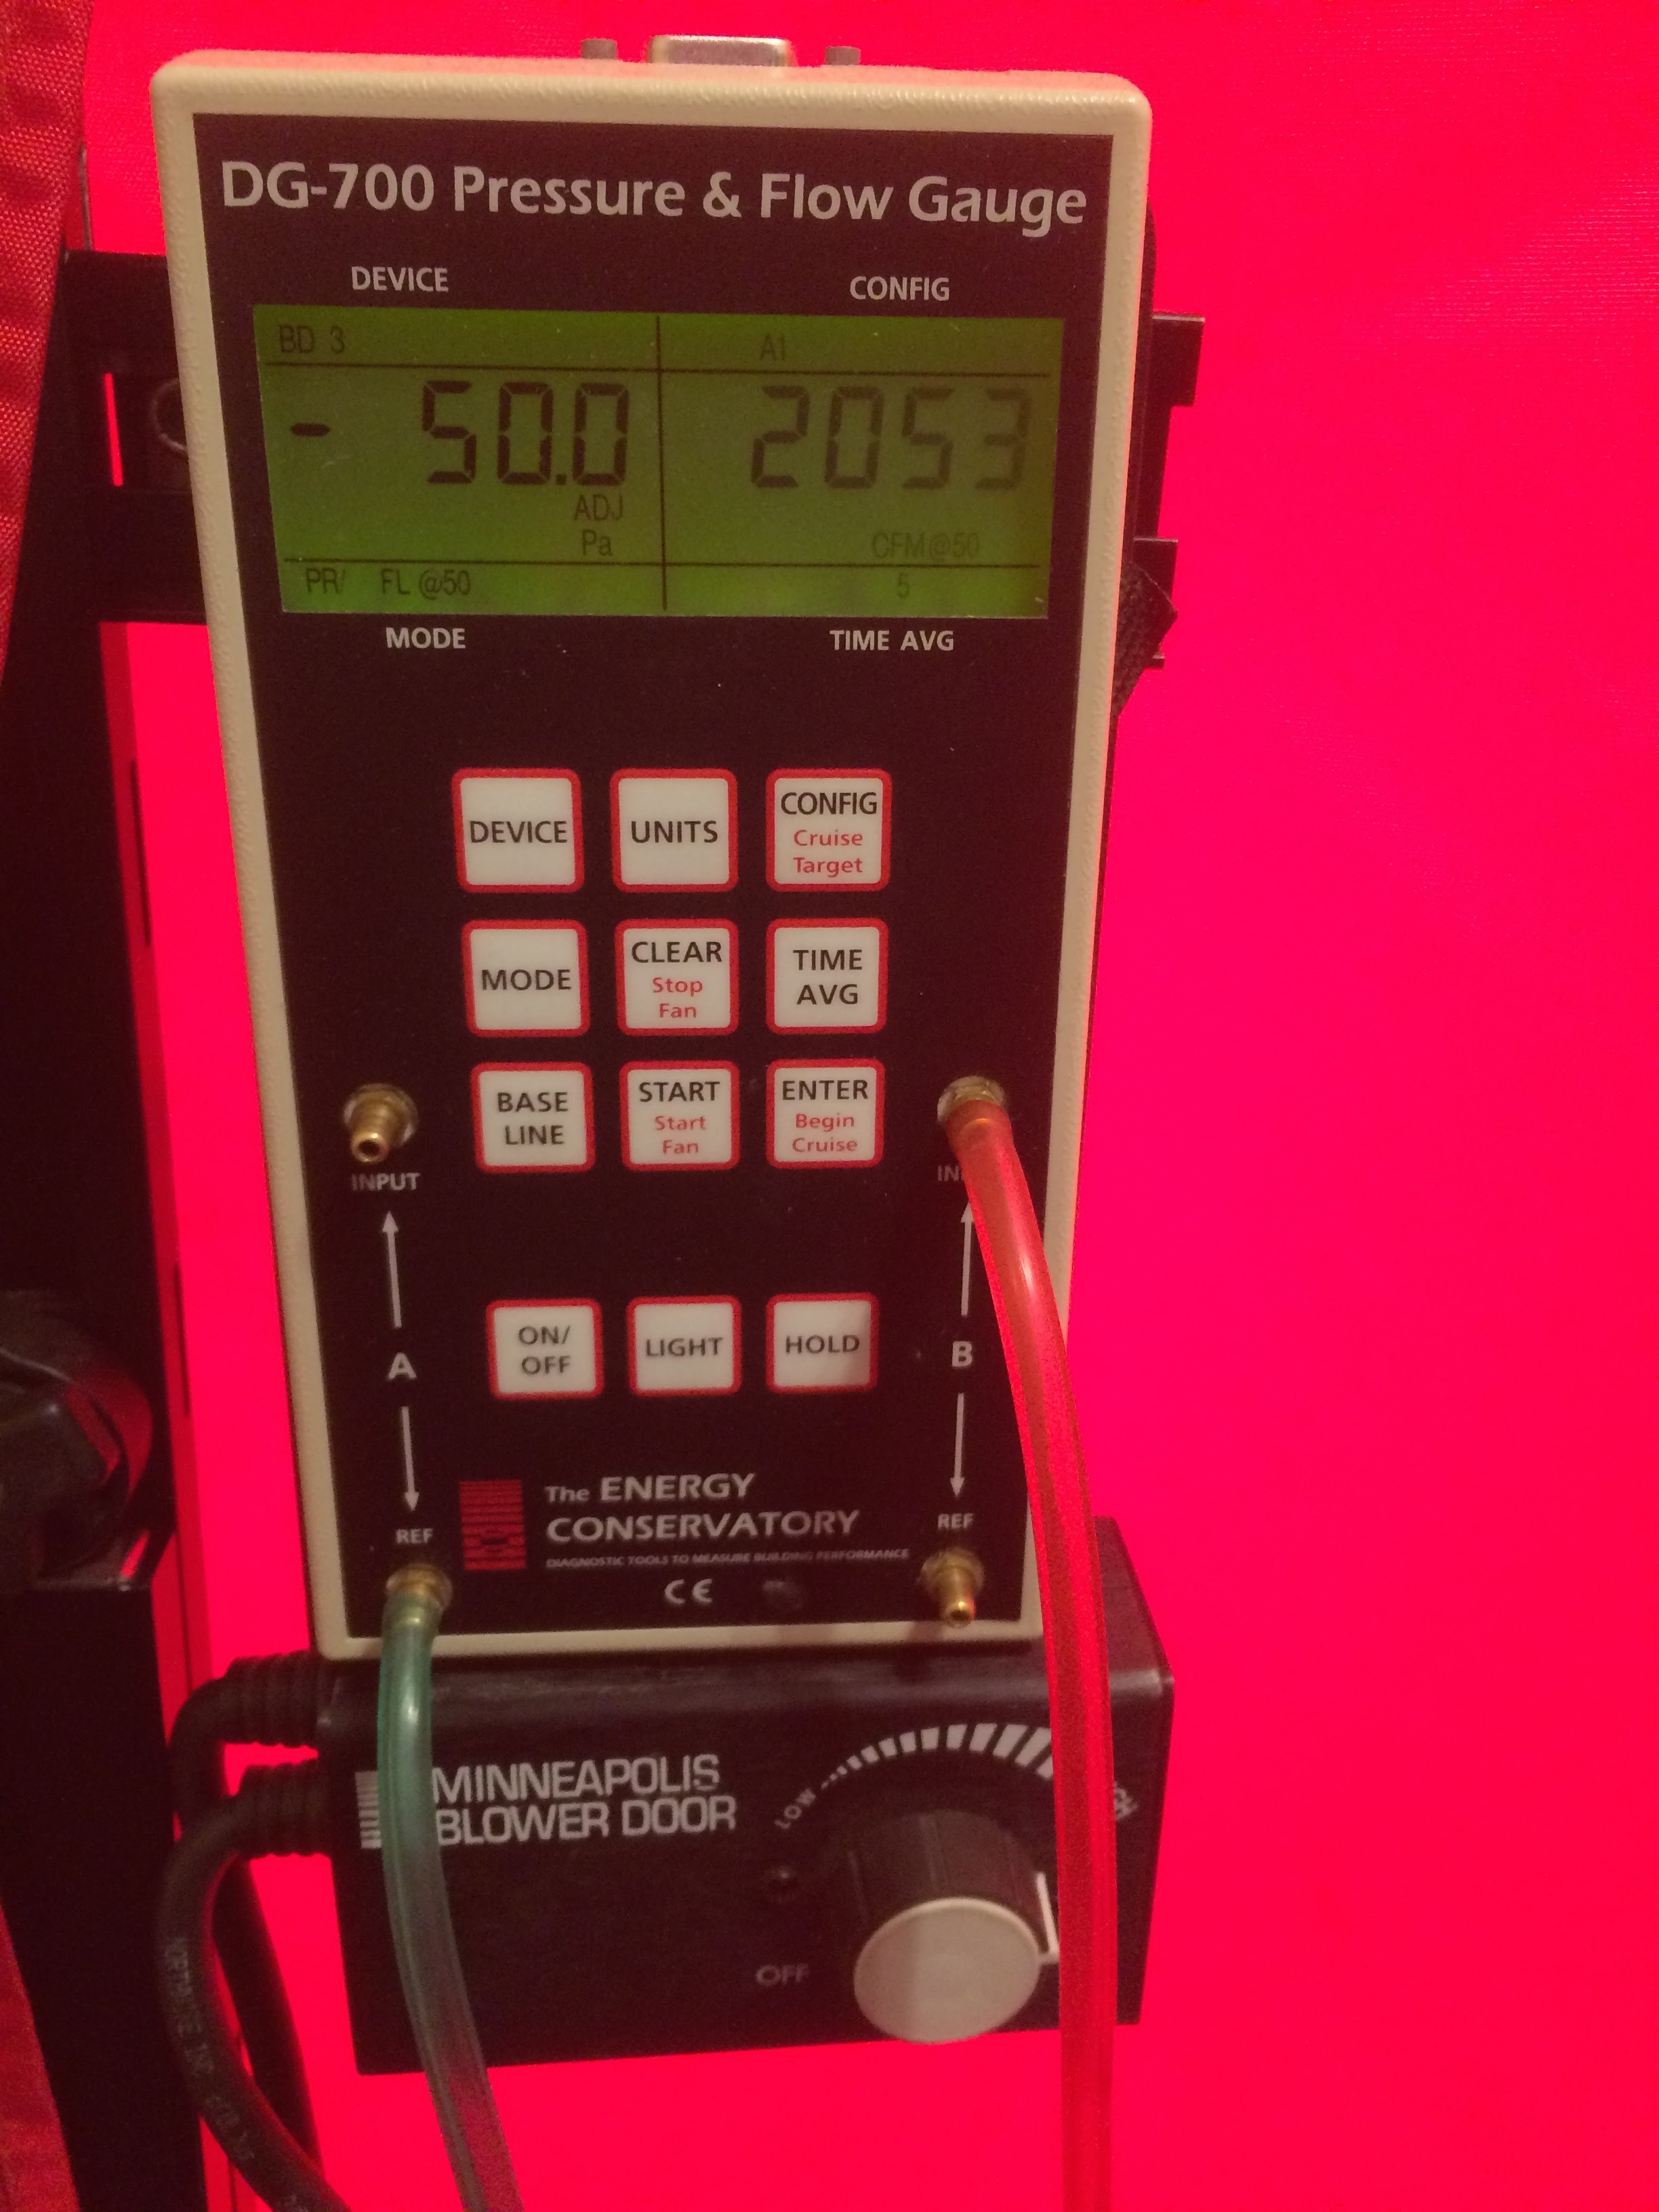
2053 down from 4610, a 2557 point or 55% drop. Quite remarkable. The third floor is now inside the house and ready to be heated and cooled.
Also, we were down from a 2000 point difference between the attic door open and closed to a 126 point difference. Cool!
Quality Control – Testing for Leaks
One very important step that frequently gets skipped is testing the foam work for leaks (or any air sealing work.) Nobody is perfect. There are times I’ve hit a spot 3 times before finally getting it to stop leaking. The only way to do it well is with a blower door. Our hands are pretty good for feeling leaks, but a smoke stick or better yet an infrared camera are better for finding them.
This is a rim joist cavity in the basement. The rim joist is the vertical board that sits on top of the foundation. It looks pretty well sealed, right?
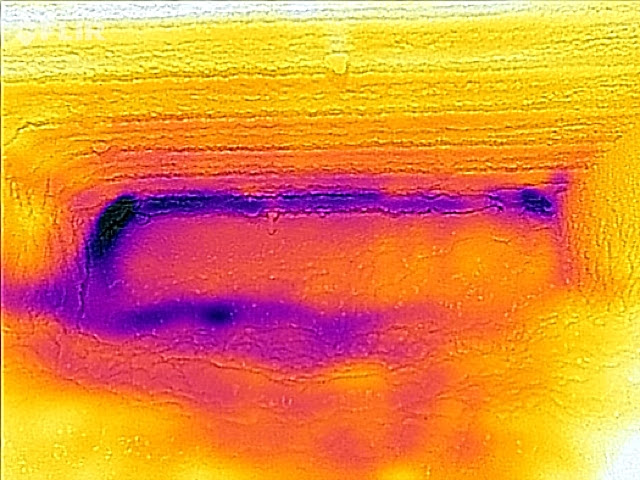
Wrong. This is that same spot in infrared. It’s cold outside, so blue is bad. There are some leaks around the edges. A good infrared picture is boring – everything is the same color. This one isn’t boring. And we never would have found (and fixed) this if we hadn’t tested with a blower door.
Another spot in the basement was leaky, too:
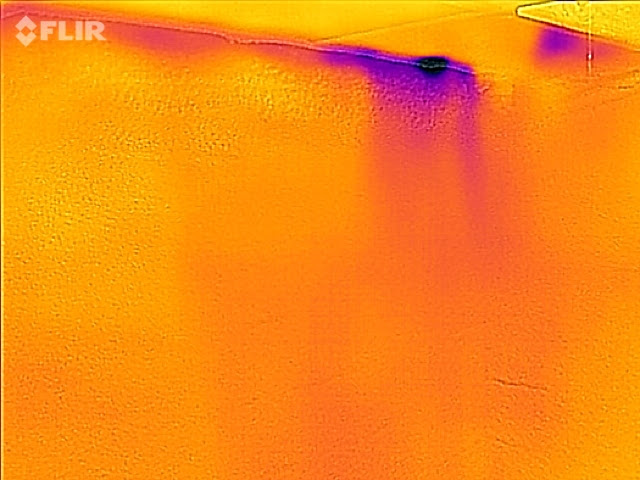
Note the blue spot. This is in the rear crawlspace. Here’s what that spot looks like in real life:
The foam gun is quite large, so it just couldn’t fit in that cavity, we ended up sealing it up with a can of Great Stuff foam like you see at big boxes. There were also some leaks in the attic we addressed.
After sealing up these holes, we dropped from 1927 attic door closed to:
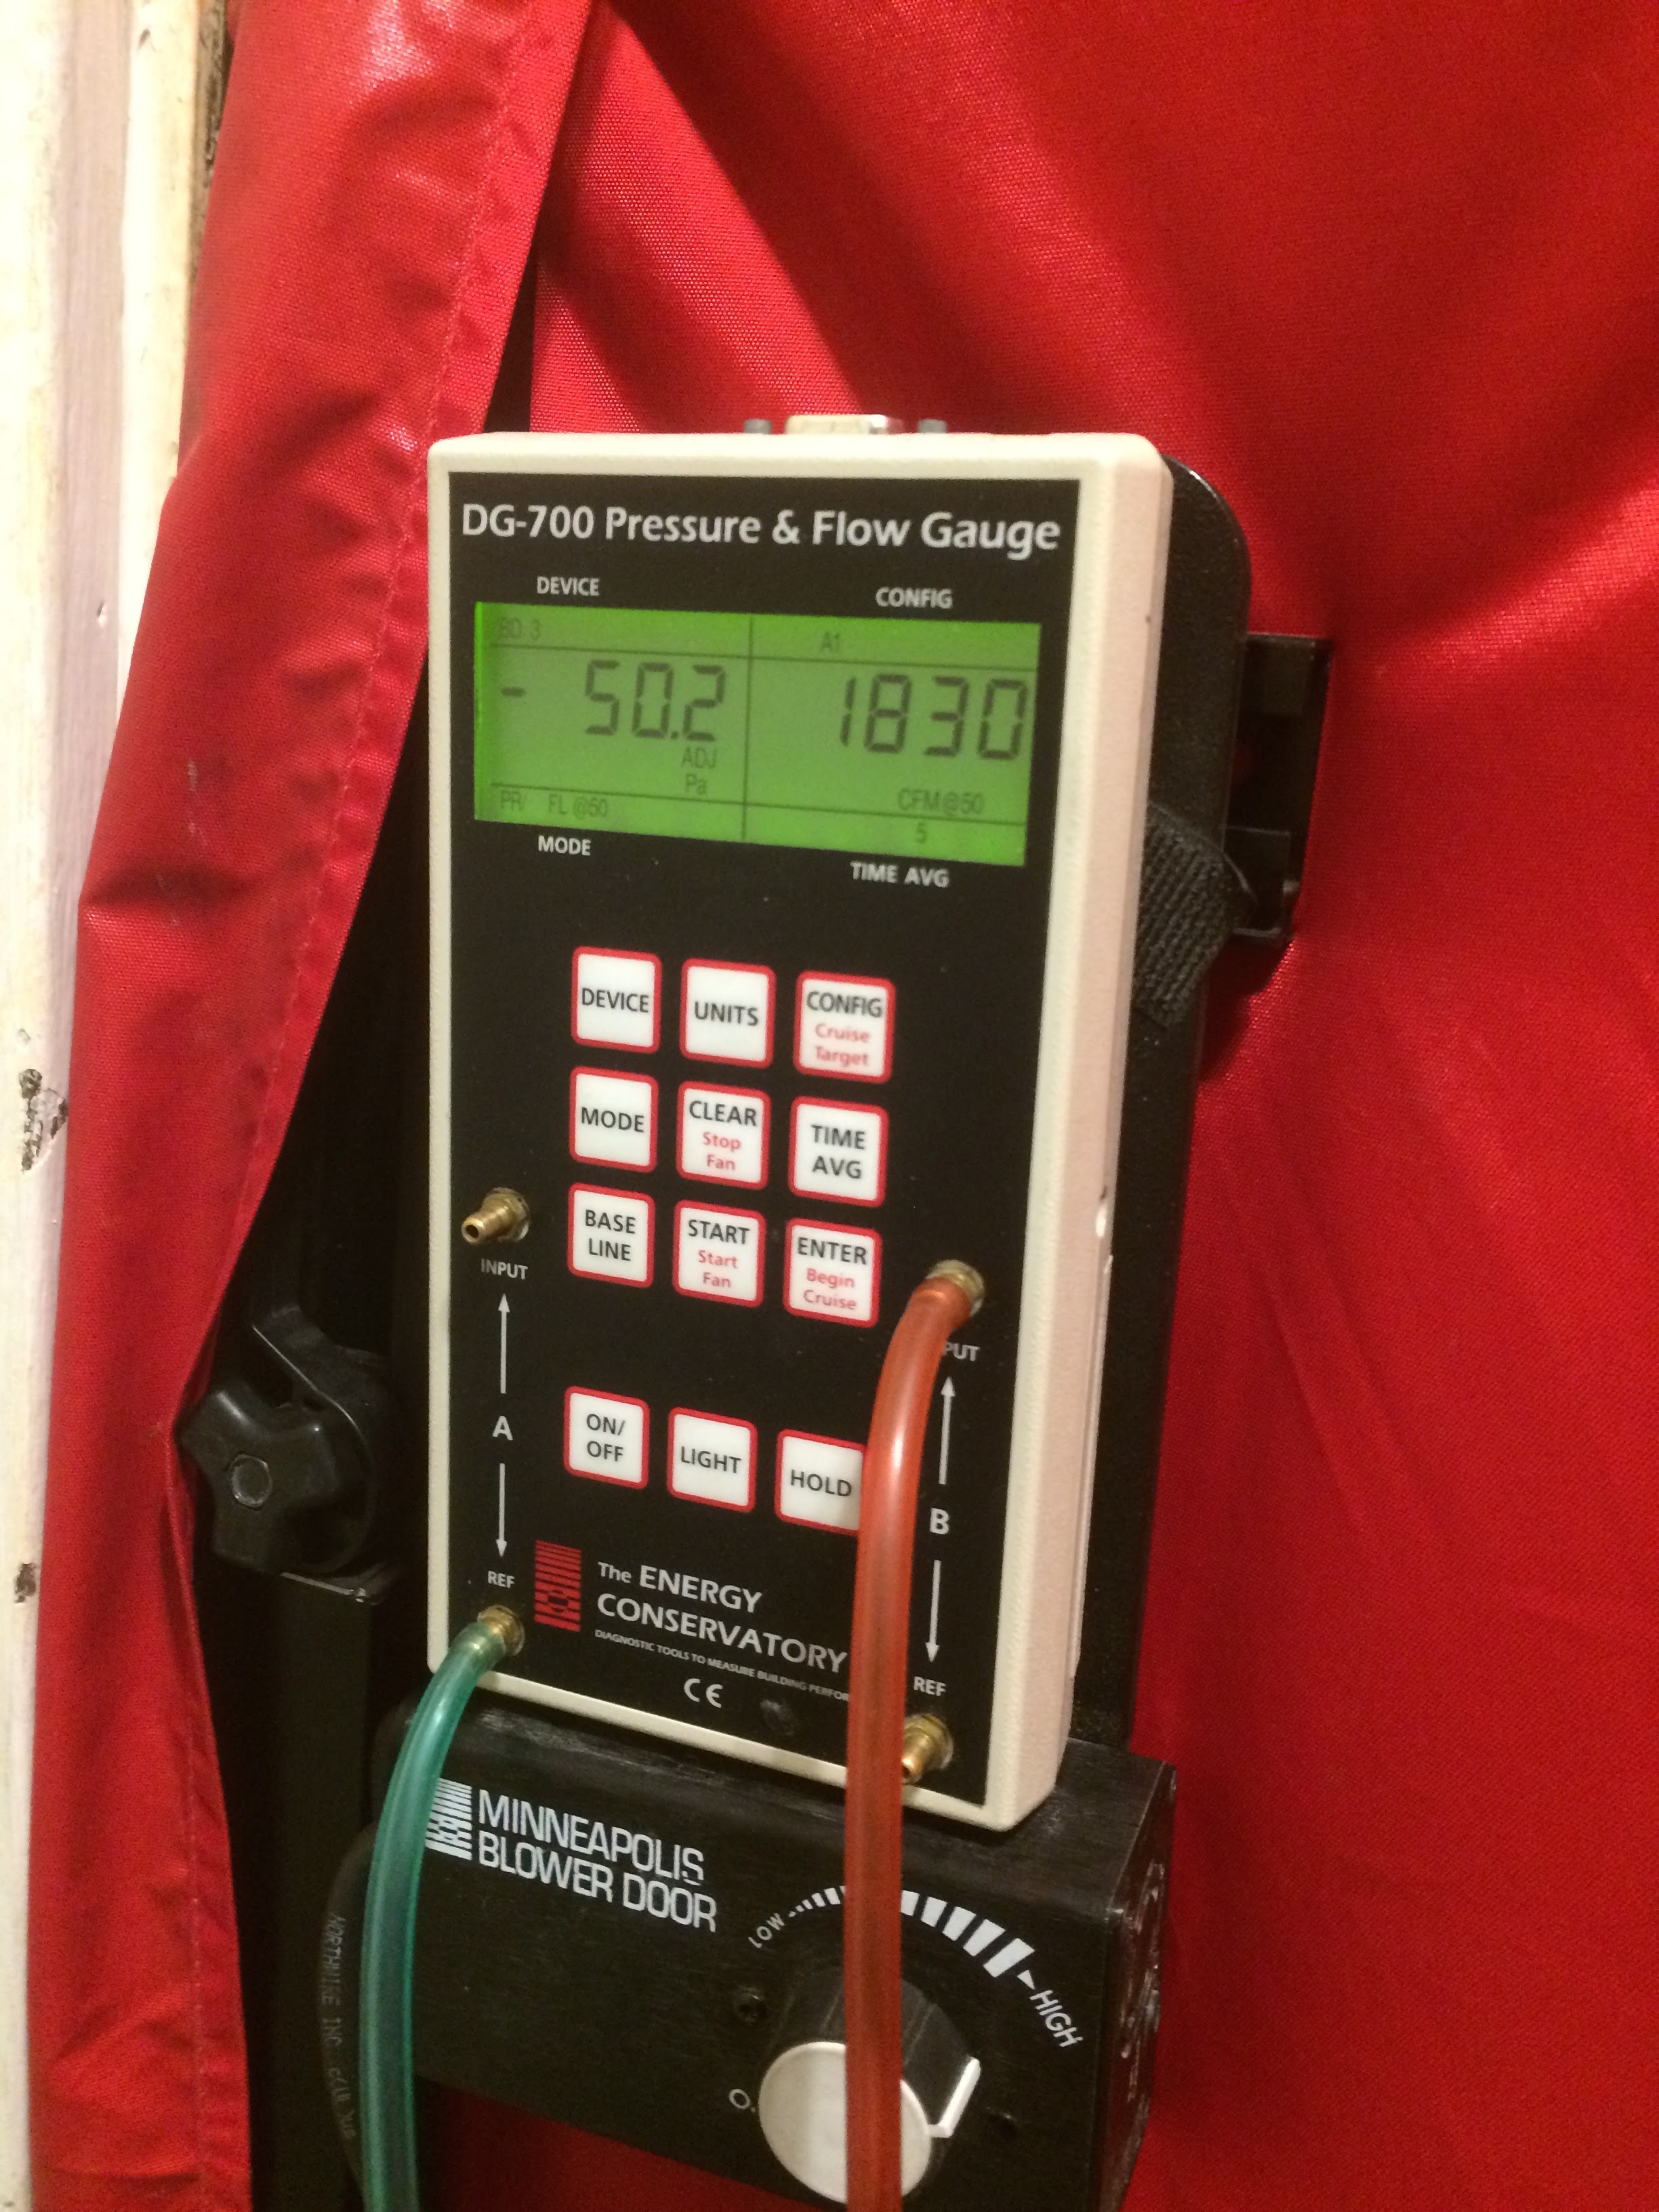
Jon and I had found another 100 points to get us from 1927 to 1830!
Better yet, when we opened the attic door the number only went up to 1860. That likely means the attic doesn’t have a lot of leaks anymore.
4610 to 1860 is a 59% leakage reduction. That is game changing for most homes. It was for this one.
We also blew by our 2600 target and came close to our 1600 stretch goal. Next up, Jon and I wanted to figure out how it changed the performance of the heat pump.
Continuous Optimization
The last step of the Energy Smart process is called “continuous optimization”. Basically, we tweak the new control knobs of the home to get it just right. We made massive changes to this house, now we have to figure out how it changed. It’s similar to making large adjustments to a race car. The only way to figure out what changed and how to make it better is by taking it to the track and finding out.
Technically, optimization never ends, there are always tweaks to be made, so we call it continuous. Practically, we usually spend some time setting the house up for summer, then setting it up again for winter. From then on it’s a 5-10 minute change when going into a new season. We’ll have a chapter on it in The Home Performance Book.
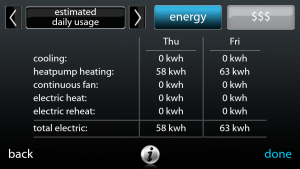
The biggest part of continuous optimization for this house was setting up the heat pump. The extremely powerful Carrier Infinity thermostat let us know that the resistance backup heat was sucking way too much power. Note the “electric heat” line:

Tuesday was 1/19/16 with a high of 19 and a low of 10. Wednesday was a high of 19 and a low of 9. This was as cold as that winter got. Note on Tuesday the electric heat used 57 kWh of electricity, more than the heat pump itself did. It was costing $10-13/day to heat the house. This annoyed Jon. A lot. He called the installer and they came out. Then they shrugged their shoulders, saying that’s just how it works.
Time wore on, and Jon kept seeing things like this:

December 2015 was very mild, but about ¼ of the usage for the month was “electric heat”. For January is was much worse, 37% of usage was for electric heat, or backup resistance heat.
I went up to the house to play with the settings, and found the one I was looking for:

This thermostat lets you tweak when the heat pump and electric heat work. I set it so the heat pump won’t shut down until below -20F. I locked the electric heat out down to 5 degrees, the lowest it will allow.
But that wasn’t the magic. The real magic is the third thing on the screen – defrost with electric heat.
A heat pump is an air conditioner that runs backwards. It takes heat out of the outside air (even when it’s cold) and pumps it indoors. In the process the outdoor unit gets cold, actually turning to a block of ice. Here’s a picture of an incorrectly set up heat pump on another job doing just that:
To combat becoming an ice block, heat pumps reverse themselves and become an air conditioner again: they pump heat from inside the house into the outdoor unit. It’s called a defrost cycle. The problem is, cold air blows out of the vents while this happens. Electric heat can be turned on when that happens to warm up the air coming out of the vents.
As you saw, this can use a fair amount of electricity. Jon didn’t want that. He was also willing to pay a comfort penalty by turning the defrost with electric heat off. (Kelly wasn’t thrilled, though…) We turned defrost with electric heat off.
Here is the result from Thursday 2/11/16 which had a high of 18 and a low of 9. Friday was 23 high/9 low, so pretty similar to the two days in the last example.
Where the other two cold days used 113 and 95 kWh, now we’re in the 60 range. That’s a 30-50% reduction depending on the day. Jon was thrilled! Let’s translate that into dollars:
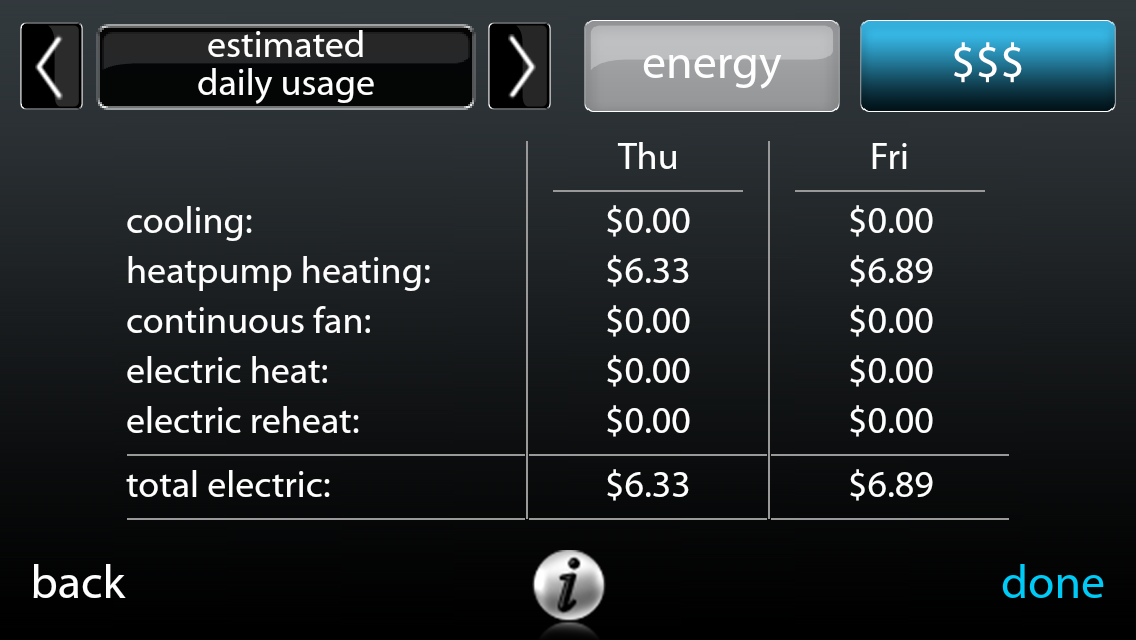
There was, however, a comfort penalty. Here is the house from before when the electric heat was still on:
Note how even the green line is, that’s indoor temperature. Compare that to this:
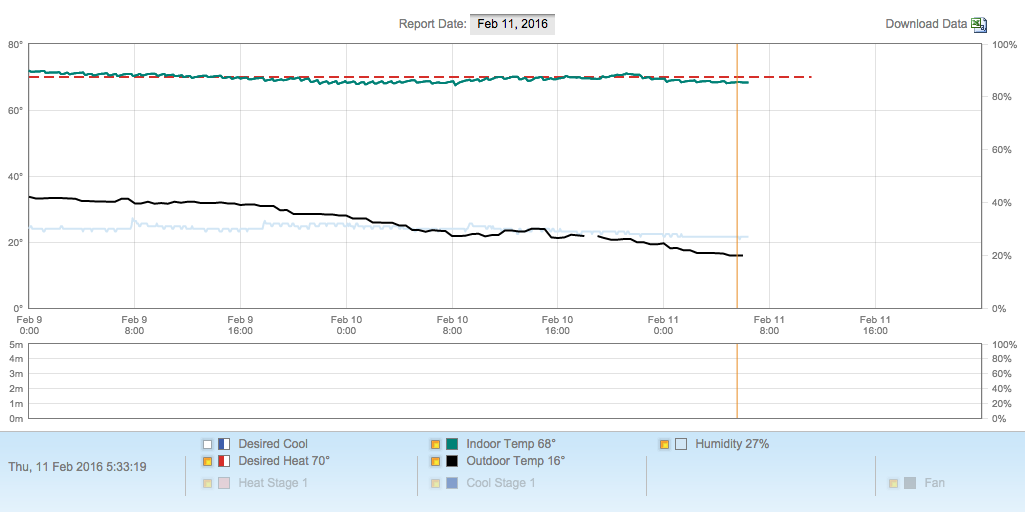
The green line is much bumpier here. Far better than many other homes I’ve seen, including the one I showed you awhile ago, but much bumpier than it was. This is what the “cold blows” look like, they drop the temp about a degree, then the heat pump makes up for it. Note the black outdoor temp line, it’s pretty cold out, about 10 degrees.
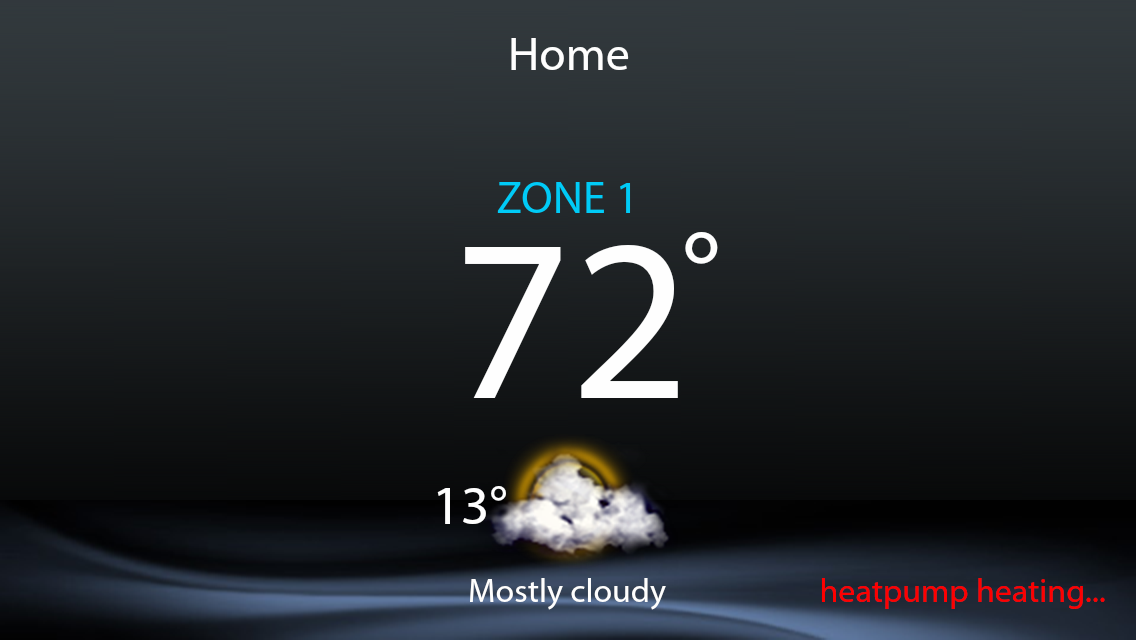
To compensate for turning off the electric heat, I had Jon and Kelly turn the house up to 72 degrees which doesn’t increase the energy costs much but helps with comfort, especially since Kelly runs quite cold. She wasn’t as comfy as she was before, but agreed that saving $5/day was worth it.
Did the Heat Pump Lose the Battle?
One of the big questions I wanted to answer was when the heat pump lost the battle to keep the house warm. Before the spray foam work it lost the battle around 15 degrees.
Another cool feature of the Infinity thermostat is that you can watch to see how hard the equipment is working through its app. I’ll walk you through a few screens:
This is the home screen, it shows you indoor and outdoor temps. It also shows weather conditions and what heating or cooling system is on (the heat pump in this case.)
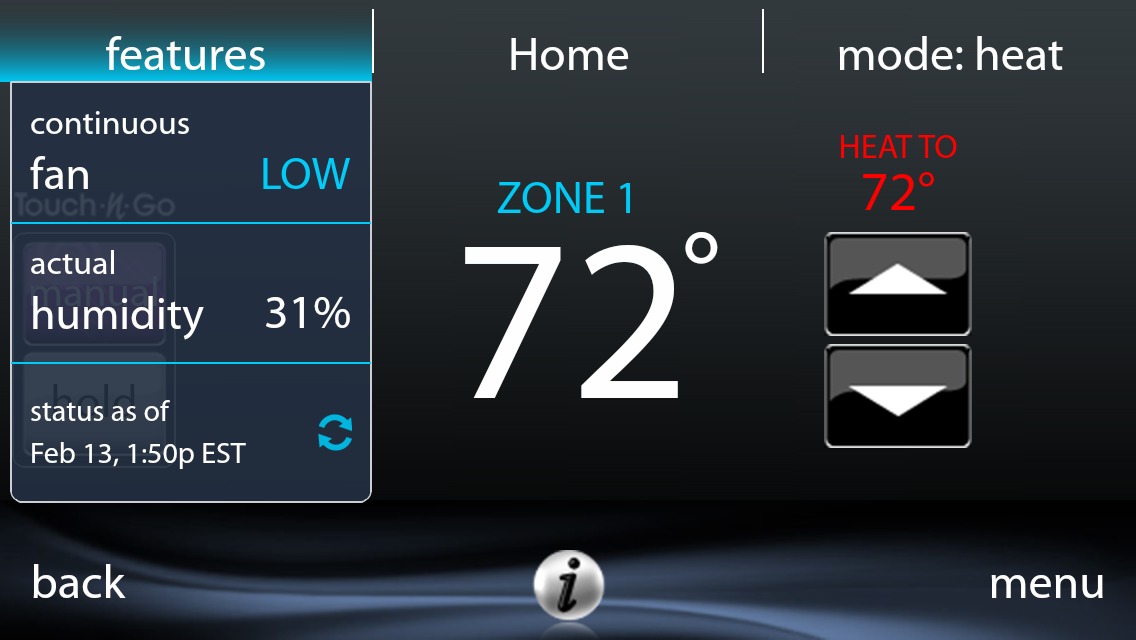
Click on the home screen and this comes up showing set point, indoor temp, indoor humidity and time/date. Plus it shows that the fan is on continuous low. We use that for mixing the air inside the house and for helping provide good filtration for better Indoor Air Quality.
You already saw the screens that show energy use, let’s take a look at the other screen I use all the time:
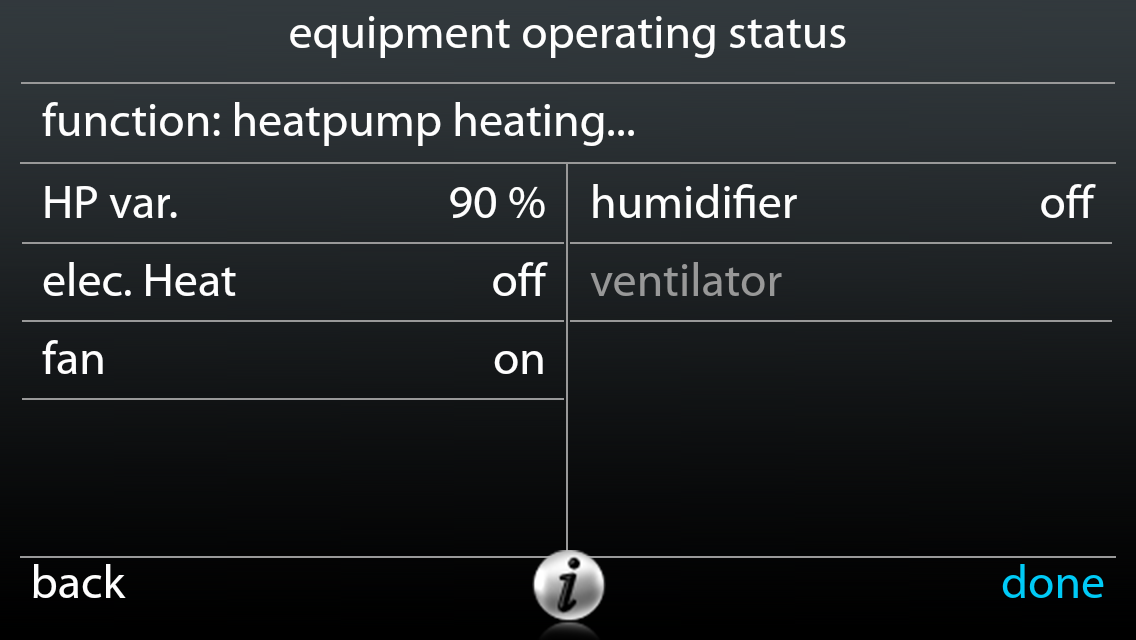
The GreenSpeed heat pump is continuously variable between 40-100%. With this screen I could watch how hard it was working. February 11th-14th were quite cold, so I watched this screen closely and took a bunch of screenshots. (Sadly, Carrier does not log this data, so the only way to track it is to take screenshots like this.)
The heat pump worked hard on those days, but I’m happy to report it kept the house at 72. If a thermostat can be “satisfied” and the HVAC system turns off, the equipment is big enough to do its job. It was big enough!
Remember, this was in a house that the energy model said would take 50,000 BTUs to heat, and we were doing it with 36,000.
In fact, we were doing it with considerably less than 36,000 BTUs. I’m already at a geek level of 8/10, why not push it to 9?
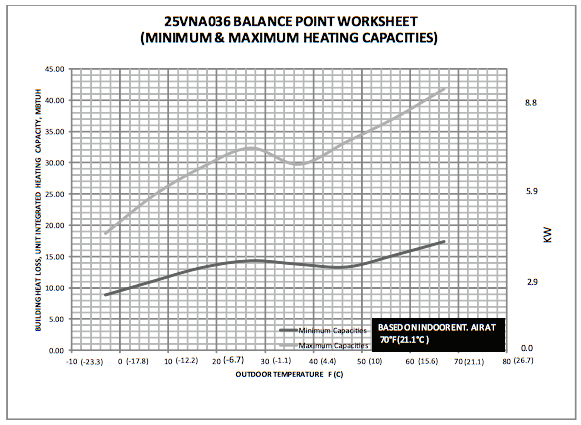
This is called a balance point worksheet. HVAC contractors can use it to help them decide when to heat with the heat pump and when to heat with the furnace, if a house has both. For my purposes, I use it to check our load calculations.
Take a look at the upper line, that is maximum output. At 10 degrees it’s about 26,000 BTUs. That was enough to heat the house. That tells me that the projected 27,000 BTU load of the first and second floors is pretty close. Yay!
I call that a real-time load calculation, and I don’t think many people do it. It can also be done with Ecobee thermostats.
Real-time load calculations tend to give you high levels of confidence in your energy modeling software and projections. We know that for the most part we can be extremely aggressive at downsizing furnaces, air conditioners, and heat pumps – and get away with it. Don’t let an HVAC contractor sell you a bigger unit, the odds are 99% that you don’t need it! (Again, see the HVAC Basics and HVAC Sizing chapters for more.)
The answer to whether the heat pump lost the war is a definitive no!
Difference in Energy Use
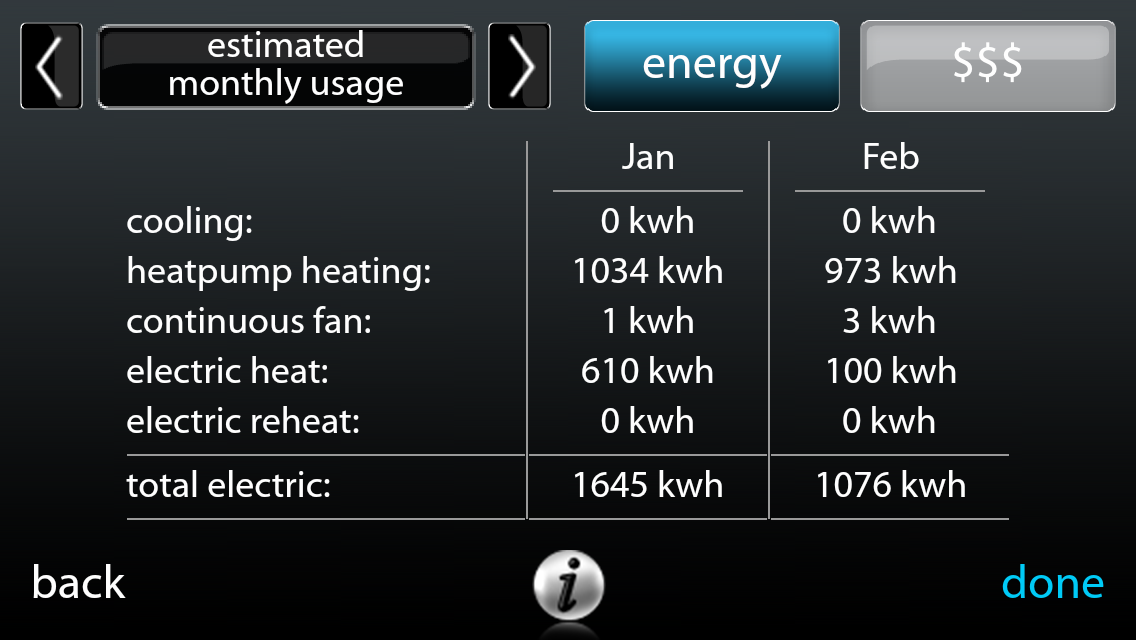
I made the change on the thermostat 1/26/16. As you can see, the usage in February was a lot lower. They were comparable months, too. The 100 kWh of electric heat is from Jon playing with fast temperature changes, in which case the heat pump will use electric heat. Here’s what the costs look like:
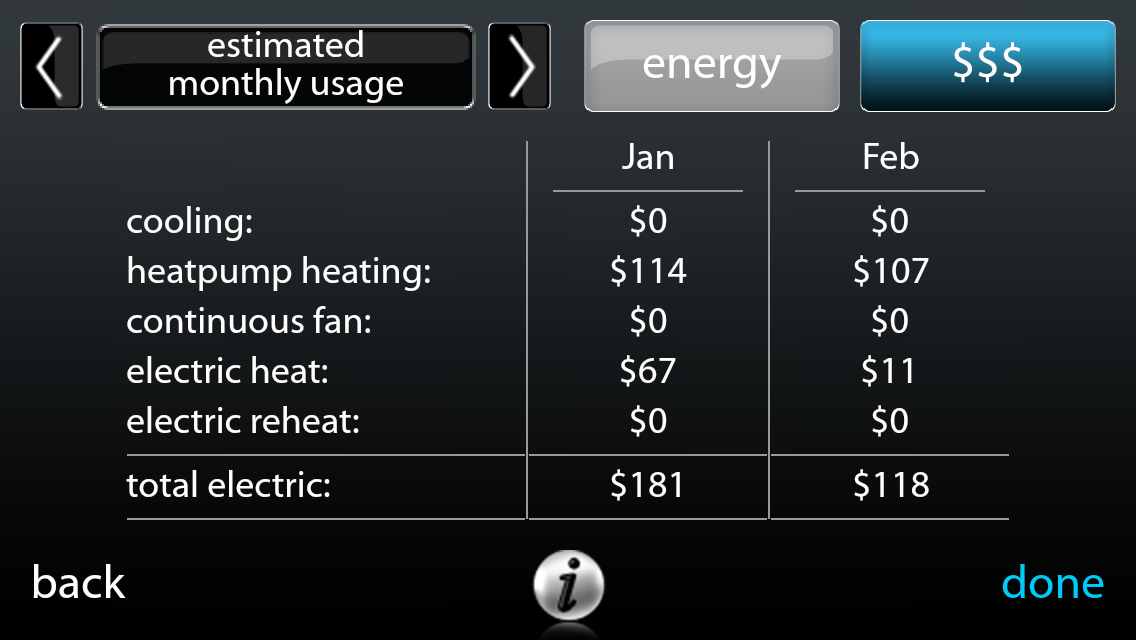
About ⅓ less after the change. Not bad!
Here is a screenshot from 7/8/16:

2016 to date includes the harshest winter months (January – March). Note that there are only 7 more kWh of electric heat than the 2/13 screenshots. Between spray foam and the thermostat setting changes, the energy use of the house has changed markedly. The winter of 2015-2016 was so mild, though, I can’t draw real conclusions yet.
Conclusion
As you can see, this project has been pretty involved and I’ve learned a ton from it. In the end, Jon and Kelly have a comfortable house that is all electric. With the addition of solar, a generator, and maybe a battery they will be able to weather extended power outages as well.
As I write this at the tail end of 2016, here is the energy use of Jon and Kelly’s House of the Future:


It looks like Jon and Kelly will save about 50% on heating and cooling between spray foam and the settings changes vs. the year before. It’s unlikely that the house will use more than 1000 kWh or $110 extra by the end of the year. It looks like heating costs will be very similar to natural gas. Just having a Dominion gas meter here costs $25/mo. If that $543 was for gas, $300 of it would be just for the meter. That’s a bit crazy to me, hence I like to remove gas meters. In the next few years I hope to convert my house to all electric, too.
Here’s to making more Houses of the Future! Thanks to Jon and Kelly for coming with me on this journey!
Next Steps for You
Congratulations for making it to the end of this very long case study! Jon and I will keep tweaking his house, but what about yours? Do you want a House of the Future? Do you have rooms that don’t heat or cool well? Nasty icicles? Kids with asthma? What should you do next?
For starters, learn more. An educated customer is our best customer, hence we spent the time to write this ridiculously long case study. Check out the other case studies, read up on the blog. Or better still download the Home Performance 101 chapter to the right which will teach you the physics of how your house really works.
When you’re ready to spend money to fix the problem(s), you’ll need an initial consultation, just click the Get Started button at the top right of every page. Good luck on your journey!
Detailed Numbers
Gas Use Before 850 therm
Predicted Use After 0 therm
Actual Use After 0 therm
Electric Use Before 4500 kWh
Predicted Use After 11,327 kWh
Actual Use After 12,161 kWh (after heat pump and foam)
Normalized Use (not calculated)
Energy Use
Electric
- 1 year before 4444 kWh
- 2 years before N/A
- 3 years before N/A
- 1 year after 24,289 (heat pump, no foam)
- 2 years after 12,700 (after heat pump and foam, estimated)
- 3 years after N/A, but the real measure
Natural gas
- 1 year before 850 therms (some traveling, likely closer to 950)
- 2 years before N/A
- 3 years before N/A
- 1 year after 0 (no more meter)
- 2 years after 0
Load Calc Heating/Cooling – TREAT Block Loads
- Before Heating w/ Attic 40,980 BTU/hr
- Before Heating w/o Attic 29,565
- Before Cooling Not Calculated
- Predicted Heating w/ Attic 36,122
- Predicted Heating w/o Attic 27,719
- Predicted Cooling w/ Attic N/A
- Predicted Cooling w/o Attic N/A
- Post Heating w/o Attic 25,000
Zonal Testing – Post Project
Attic 12.5 (25% connected to outdoors)
Jons office 7.7 (15.4%)
Kelly’s office 10.5 (21%)
Bathroom 7.5 (15%)
Master 14.5 (29%)
Notes
The master bedroom walls were insulated with fiberglass, but they weren’t air sealed. (That was before my time at the house.) Those leaks are likely connected to the attic, as evidenced by the nearly equal leakage with the attic door open and closed. That’s why the attic still looks leaky, it is likely connections from the second floor walls. There is no basement door, so I couldn’t test the leakage there.
Duct Leakage
- Before N/A
- Predicted N/A
- After N/A
IAQ Measurements
- Before N/A
- Predicted N/A
- After N/A
Year Built 1918
Square Footage 1764
Energy Use Index*
Before 55.2**
Target 42.3
After 23.5
Air Leakage (cfm50)
Start 4610
Target 2600
End 1860
*EUI is a measure of a home’s energy use per square foot. A 0 means it makes all the power it uses, such as with solar. Below 50 is very good. 100 is a bit piggish.
**They traveled a great deal during this measured year, we calculated a more realistic EUI at 91.1. This also includes air conditioning which the home didn’t have pre-project.
*** This measured winter was very mild, and we made a substantial setting change, so this number is also not conclusive. The winter before was very harsh and before attic spray foam, EUI was 48.